Special Hobby 1/32 He-100D
|
KIT #: |
SH32009 |
|
PRICE: |
$78.00 MSRP |
|
DECALS: |
Three Options |
|
REVIEWER: |
Bill Koppos |
|
NOTES: |
Who woulda guessed it?
|
It seems to me the
story of Heinkel aircraft in WW2 is a very up and down one. Some met
fame and success (He-111), some served relatively well (He-51, He-115,
He-219), one was a total disaster (He-177), and one was even ALMOST the
world's first jet fighter (He-280). Two of them were WW2 fighter
"might-have beens". The He-112 was the losing competitor to the Me-109,
only produced in small numbers for export. The other was our object of
attention, the He-100. Basically an attempt by a Heinkel company
unwilling to give up on fighters to get one into Luftwaffe service,
their aim was to make a very improved machine over the He-112, and
superior to the 109.
First on the list-get the performance up. At this
time what was holding performance back on contemporary liquid-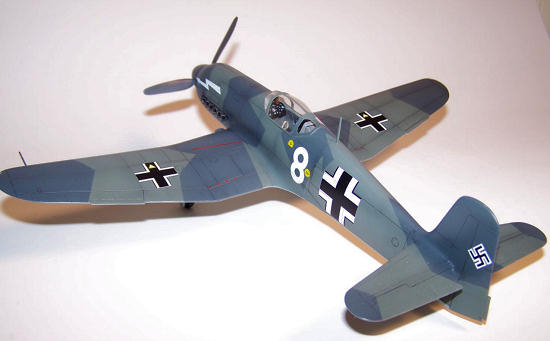 cooled
fighters was all the drag-producing radiators and scoops necessary to
keep coolant and oil temperatures down. Heinkel had been looking for a
better way with their He-119 bomber prototype, which featured a coupled
Daimler-Benz Db601 engine, cooled by Surface Evaporation. Using surface
evaporation there were no radiators jutting into the airstream. Hot
steam from the engine coolant was run into a series of tubes in the
wings just under the skinning where it was condensed, cooled by contact
with the outside air over the wings, and returned to a collection tank
by as many as 22 small pumps. Complicated? Hell yeah! (For those who
need a less simplified description of this system, there is a good one
in Wikepedia.) Prone to battle damage? Oh yes. But the designers were
willing to accept the trade-off. Would the Luftwaffe?
cooled
fighters was all the drag-producing radiators and scoops necessary to
keep coolant and oil temperatures down. Heinkel had been looking for a
better way with their He-119 bomber prototype, which featured a coupled
Daimler-Benz Db601 engine, cooled by Surface Evaporation. Using surface
evaporation there were no radiators jutting into the airstream. Hot
steam from the engine coolant was run into a series of tubes in the
wings just under the skinning where it was condensed, cooled by contact
with the outside air over the wings, and returned to a collection tank
by as many as 22 small pumps. Complicated? Hell yeah! (For those who
need a less simplified description of this system, there is a good one
in Wikepedia.) Prone to battle damage? Oh yes. But the designers were
willing to accept the trade-off. Would the Luftwaffe?
Next order of business was to set the new fighter up
to be easy to produce. The 100 had 969 parts to the 112's 2,885 and
11,500 rivets to the 112's 26,800. Elliptical wings and rounded tail
surfaces were now squared, much in the fashion of North American's later
P-51A. Wide-track landing gear overcame a major Messerschmitt fault. At
rollout appeared was one sleek machine. The various prototypes and
production models proved to be fast birds indeed, sea level speed being
350 MPH, and maxing out at between 390 and 410 MPH. Heinkel's had more
plans for these than just combat, however. This steed was built for
speed, and records made to be broken. None other than Ernst Udet, former
WW1 ace and now Luftwaffe bigwig, flew the first prototype to a closed
course 100km. record of 394 MPH. A well-boosted DB engine and short
wings readied the 8th machine for the world air speed record (after the
3rd crashed on the first try). A blistering 463.92 MPH was reached to
claim the record. However Messerschmitt went and ruined this a month
later with their Me209 at 469 MPH. Heinkel knew he could beat this but
the powers that be told him to desist from trying. The Nazi regime's
preference in manufactures was on full display here.
 Despite having no orders, Heinkel went ahead and built 3 production
prototypes, the refined He-100D-0. 12 production models were also turned
out. As with the He-112, there was overseas interest. This was the
period of "co-operation" between Germany and the Soviet Union, and the
Soviets took all the original Prototypes home for testing. The Japanese,
always fond of Heinkel products, bought the three D-0's and a license to
produce their own under the label AXhei. For unclear reasons the plans
never came off, but the similarity in form between the He-100 and Ki-61
Hien is obvious. It is hard to imagine the Japanese being in possession
of 400 MPH fighters in 1941. Things would have been even worse for the
poor Buffaloes and Hurricanes! I have not found any pictures of the
AXhei in Japanese hands, if ever any were taken. That's a finish I would
have liked to put on this model.
Despite having no orders, Heinkel went ahead and built 3 production
prototypes, the refined He-100D-0. 12 production models were also turned
out. As with the He-112, there was overseas interest. This was the
period of "co-operation" between Germany and the Soviet Union, and the
Soviets took all the original Prototypes home for testing. The Japanese,
always fond of Heinkel products, bought the three D-0's and a license to
produce their own under the label AXhei. For unclear reasons the plans
never came off, but the similarity in form between the He-100 and Ki-61
Hien is obvious. It is hard to imagine the Japanese being in possession
of 400 MPH fighters in 1941. Things would have been even worse for the
poor Buffaloes and Hurricanes! I have not found any pictures of the
AXhei in Japanese hands, if ever any were taken. That's a finish I would
have liked to put on this model.
The 12 production He-100D's were turned into the
mysterious "He-113", a new German fighter in full production, by the
cameras and newspapers of the Nazi propaganda machine. Fanciful unit
markings were made up and applied to the planes, photographed in line-up
on rustic airfields and being maintained. This worked rather well, as
British pilots reported frequent encounters with He-113's, and made
quite a few victory claims to boot. In reality, 12 was it, and these
ended up as the factory protection flight for Heinkel's factory, never
firing a shot in anger.
In the usual large Special Hobby box are 3 grey
Sprues and one clear. The main parts are the usual Special Hobby soft
plastic, with finely engraved panel lines and well done control
surfaces. The small parts are cleanly molded, and no sink marks are in
evidence. The clear sprue has a one piece canopy, rather a thick one.
Don't think I'll be opening this one. There is a small etched brass fret
with seat harness and trim wheels, and a very nice set of hollow resin
exhausts. Decals are provided to do three "He-113" faker-fighters.
This is for sure the first 1/32nd scale kit of this
bird. A highly unlikely subject but I've always liked the looks of it.
Oh well, it is to build.
I started by putting the wings together which
requires assembling the wheel well parts first. Be careful of the
orientation of part C-25, the open area with no rib detail should be
facing the lower wing half. Part locations are a bit vague on the plans,
test fit alot as with any limited run model. Having learned of Special
Hobby's less-than-stellar wing fits the hard way, I taped
 the
fuselage halves together and did a pre exam of the wing to fuselage
situation. If you do this before glueing the wing tops on, sometimes you
can fix a really bad wing gap by sliding one or both uppers inward. It
wasn't necessary in this case, it appeared just some trimming and filing
would suffice. I cleaned the wing half mating surfaces with alcohol,
then glued them with the Tamiya Super Thin, using a lot of solvent and
allowing some to squish out of the joint. This is an attempt to avoid
"Ghost seams", those unglued seams that come back to "haunt" you after
the model is done. This so far has done the trick for me. I added the
clear wingtip lights here, after drilling a tiny hole in each and
adding a drop of red paint into the left and blue in the right. After
setting overnight I blended these into the wing with the trusty sanding
sticks, and repolished them to clarity.
the
fuselage halves together and did a pre exam of the wing to fuselage
situation. If you do this before glueing the wing tops on, sometimes you
can fix a really bad wing gap by sliding one or both uppers inward. It
wasn't necessary in this case, it appeared just some trimming and filing
would suffice. I cleaned the wing half mating surfaces with alcohol,
then glued them with the Tamiya Super Thin, using a lot of solvent and
allowing some to squish out of the joint. This is an attempt to avoid
"Ghost seams", those unglued seams that come back to "haunt" you after
the model is done. This so far has done the trick for me. I added the
clear wingtip lights here, after drilling a tiny hole in each and
adding a drop of red paint into the left and blue in the right. After
setting overnight I blended these into the wing with the trusty sanding
sticks, and repolished them to clarity.
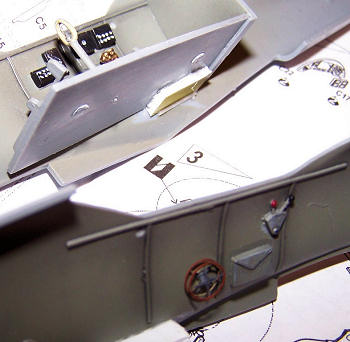
Now to the interior. No detailing stress here as I
have never seen any kind of photo of this thing's innards. You could put
any interior you want in there and no one can call you on it (unless an
ex-Heinkel employee is lurking about). So I just followed the
directions. Some boxes and throttle stuff are provided and a
Hurricane-type control column. The right side boxes have a bunch of
bumps on them which probably represent the thirty or so Evap cooling
system warning lights. A seat harness is on the etched fret, but I made
tape belts and used the brass buckles only. The instrument panel is OK,
enough detail to take drybrushing. In the end it won't matter, as the
one piece canopy is too thick to cut apart and will be glued on closed
up, and not a hell of a lot of interior will be visible. The cockpit
floor and bulkhead only attach at the bulkhead, and the seat only by two
pi ns
on the seat bracket. I put two styrene tabs on the fuselage sides to
hold the floor, and notched out the floor stringers to take the seat
bracket, to provide some mounting strength. A lotta work for a barely
visible interior. Anyway I painted it up in RLM 02, washed with black
for depth, and drybrushed with aluminum, with some chips. After putting
in the tailwheel well the fuselage could be mated up, the two halves
fitting rather nicely, the same anti-seam procedure as above being
employed.
ns
on the seat bracket. I put two styrene tabs on the fuselage sides to
hold the floor, and notched out the floor stringers to take the seat
bracket, to provide some mounting strength. A lotta work for a barely
visible interior. Anyway I painted it up in RLM 02, washed with black
for depth, and drybrushed with aluminum, with some chips. After putting
in the tailwheel well the fuselage could be mated up, the two halves
fitting rather nicely, the same anti-seam procedure as above being
employed.
The fun starts here-wing to fuselage time.
Offering up the wing to the uppers shows some trimming is needed at the
rear portion to close gaps. Also apparent is there will be a gap at the
rear portion. I had a problem on this one similar to the Azur Bloch 152
I did recently. I had to glue the left side first and let it dry
completely before glueing the right side, to get the dihedrals to
match. This still left a small gap on the right which I filled with a
styrene shim. At this time the rear gap was shimmed also, allow all to
set overnight, then start the sanding sticks to buzzing. When the dust
settled it was not so bad, but the darned dihedral is just a bit off
from side to side. It is so hard to get perfection on these limited run
kits. The stabilizers were a bit weird, one being slightly smaller than
the other. These were cemented on and tweaked a bit to try and disguise
the wing issue, adjusted using the Mark 1 eyeball. Rescribing was done
to fix panel lines lost to sanding, checking done for flaws and the
canopy hole and wingtip lights masked. Out to the state-of -the- art
Koppos paint shop.
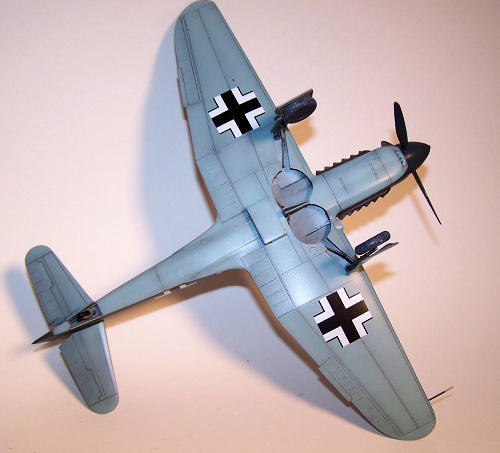
The camo ensemble is a simple RLM70/71 splinter
with 65 lowers. First the 71 Dunkelgrun was laid down. Then the splinter
pattern can be masked using Tamiya tape. The markings and paint section
of the plans is small and hard to work with so I improvised in spots,
but after shooting the Schwartzgrun the finished product looked alright
to me. Now the tops can be masked and the lichtblau applied underneath,
then I postshaded all the panel lines with a very thin mix of black,
trying not to overdo it.
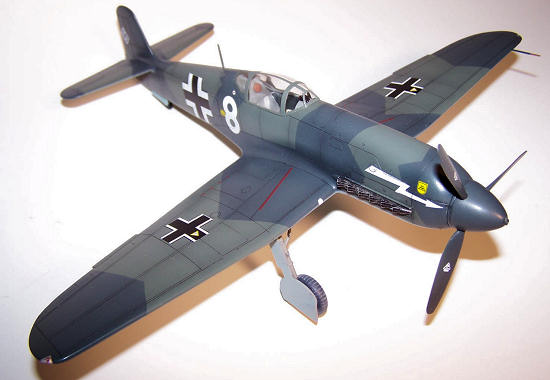
 After
the paint cured, I put the landing gear on so the model could have a leg
to to stand on during glosscoating. First I painted the main gear
covers and installed them onto the struts. The attachment points for the
gear legs are shallow holes, so to add stregnth to the long stalky legs
holes were drilled and wire pins installed. These can't be very long
though as the holes in the wing can't be very deep. Cyanoacrylate was
used here and the struts set at an angle from reference pictures, but
before the glue sets completely one should put on the actuating arms,
one fit well but I had to slightly move one leg to line it up. The legs
are still kind of wobbly, so this model should not be subjected to any
rough landings.
After
the paint cured, I put the landing gear on so the model could have a leg
to to stand on during glosscoating. First I painted the main gear
covers and installed them onto the struts. The attachment points for the
gear legs are shallow holes, so to add stregnth to the long stalky legs
holes were drilled and wire pins installed. These can't be very long
though as the holes in the wing can't be very deep. Cyanoacrylate was
used here and the struts set at an angle from reference pictures, but
before the glue sets completely one should put on the actuating arms,
one fit well but I had to slightly move one leg to line it up. The legs
are still kind of wobbly, so this model should not be subjected to any
rough landings.
Stop the presses! Koppos is actually trying
something new. My kid has been using Tamiya spray can TS-13 Clear as a
glosscoat and loved it, so I tried it and was glad I did. This is a
lacquer paint, it lays down well with the spray can, and dries nice and
even. The best part is the fast drying, done in about half an hour. I
believe we have a winner here. The decals turned out to be rather good,
the sheet says they are done by Aviprint. They are the kind I have been
encountering more these days, where they need no setting solution for
application. They are quite thin and need a lot of water if you want
them to move around to position them right. Solvaset did not have much
effect on them, but as there is not that much surface detail on this
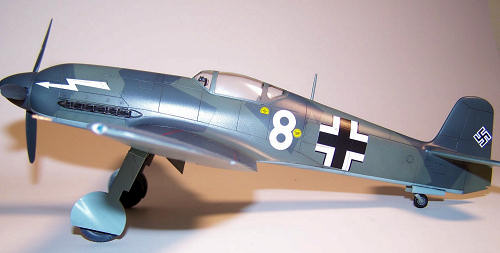
model it's not a factor. The decal guide matched photos of the real
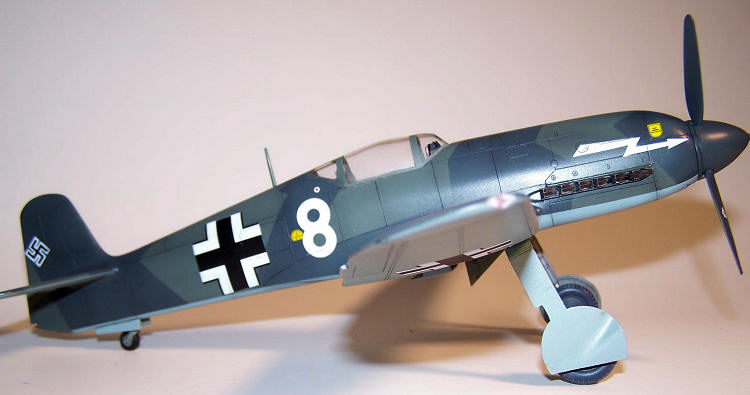
thing nicely, and I chose the option with the snazzy arrow on the nose,
like the old Lindberg kit had. Swastikas are provided in halves so as
not to offend any sensibilities. Here I tried to use the Tamiya spray to
overcoat the decals and the results were some spotting of the larger
crosses due to the coarseness of the spray can's pattern. I reverted to
Metallizer Sealer for this job, but will probably stick to the Tamiya
spray for pre-decal coats in future.
 Time to have a look at the spinner/propeller. Look at photos and one
immediately sees that the spinner is far too bulbous. I opened up the
hole in the backing plate and glued in a piece of sprue to chuck in the
Dremel, tacked the backer plate to the spinner, and using my Dremel with
the speed control low, lathed the spinner down with a no. 11 blade till
the profile looked more streamlined. Sometimes looking at pictures is a
bad thing, as I looked more at them I realized the whole nose profile
wasn't really right, the contours around the nose area being off in
places, the top line curving toward the spinner too sharply and the
bottom parts not bulged enough. So I tapered in the spinner to kind of
blend all the lines together till it looked as close as possible to the
pics and acceptable to my eyeballs.
Time to have a look at the spinner/propeller. Look at photos and one
immediately sees that the spinner is far too bulbous. I opened up the
hole in the backing plate and glued in a piece of sprue to chuck in the
Dremel, tacked the backer plate to the spinner, and using my Dremel with
the speed control low, lathed the spinner down with a no. 11 blade till
the profile looked more streamlined. Sometimes looking at pictures is a
bad thing, as I looked more at them I realized the whole nose profile
wasn't really right, the contours around the nose area being off in
places, the top line curving toward the spinner too sharply and the
bottom parts not bulged enough. So I tapered in the spinner to kind of
blend all the lines together till it looked as close as possible to the
pics and acceptable to my eyeballs.
The exhausts are nicely done hollow resin
pieces, these were cut off the blocks,
trimmed down and painted Testor's " Exhaust", and attached. The tailwheel
is in 3 parts and a bit of a pain, this was assembled and brush painted.
The small main gear and tailwheel doors were sprayed on both sides
during previous sessions, these are now put on with their support
struts. The resin gunsight was outfitted with two small reflector
"glass" plates cut from clear sheet, the slot in the cockpit coaming
enlarged, and positioned making sure it was in proper relation to the
canopy. The canopy was masked and sprayed to match the camo job one
fridgid morning before a blizzard (It's been BAD here in the great
Northeast). Test fitting revealed an imperfect fit, and several fiddling
sessions were required to gain a respectable result, good 'ol Elmer's
glue being used to attach and fair it in. According to photos, Special
Hobby missed a large trim tab on the rudder, so I made one up from sheet
and glued and painted it. The He-100 had one 7.92 mm machine gun in each
wing root, no holes were given for these but rather than drill at this
point, I added some taped covers in the proper places as seen in pics.
After all these things just flew about and looked pretty anyway.
Now it's time for my own propoganda machine
to go into action. Pictures were taken from all angles of the "New
Luftwaffe fighter" He-100/He-113. If nothing else, I think it is a very
good looking airplane, with it's Kawasaki Hien nose, Vultee Vengeance
wings, Focke-Wulf landing legs and P-51A Mustang rudder, strangely
enough it all combines to look right for me. Truthfully I never expected
this one in 1/32nd scale, but am quite happy with the results. Modellers
with limited-run experience will have fun with it, with the noted
exceptions. Lack of references and a good 3 part canopy will probably
stifle those who want to take it further though.
 Rod's
Warbirds website...http://www.warbirdpix.com/armynavy.htm
Rod's
Warbirds website...http://www.warbirdpix.com/armynavy.htm
"Warplanes of the Third Reich" William Green Doubleday and Co. 1970
Wikepedia
Editor's Note: An outstanding reference on the aircraft is
Midland's Heinkel He-100: Record
Breaker. There is also a Schiffer book
on the subject, but it is not as good.
Bill Koppos
January
2010
Kit courtesy of www.hlj.com
If you would like your product reviewed fairly and quickly, please
contact
me or see other details in the
Note to
Contributors.
Back to the Main Page
Back to the Review Index Page