|
KIT: |
Monogram 1/48 Me-262A |
|
KIT # |
5410 / 5453 |
|
PRICE: |
$ |
|
DECALS: |
Several, depending on boxing |
|
REVIEWER: |
|
|
NOTES: |
An oldie but still goodie |
|
HISTORY |
 The Me-262 was one of the most
amazing aircraft to change the look of modern air warfare but is agreed upon
by many to have had almost no impact on the outcome of World War Two. The
aesthetic purity of design and its beauty from almost any angle has made the
Schwalbe or Turbo one of the most popular subjects for researchers and model
builders. To say the Me-262 was a leap in technology is an understatement.
Right off the bat it was over 120 miles per hour faster than the Allies
fastest aircraft. It did have some banes that kept it from perfection. Many
accidents were caused due to the new technology being rushed into combat. The
engines were very sensitive to throttle changes and the high landing speeds
were hard for the pilots to adjust to. It is estimated that there were never
more than 200 Me-262s in active service at once even though more than 1400
were built in an incredibility short period of time.
The Me-262 was one of the most
amazing aircraft to change the look of modern air warfare but is agreed upon
by many to have had almost no impact on the outcome of World War Two. The
aesthetic purity of design and its beauty from almost any angle has made the
Schwalbe or Turbo one of the most popular subjects for researchers and model
builders. To say the Me-262 was a leap in technology is an understatement.
Right off the bat it was over 120 miles per hour faster than the Allies
fastest aircraft. It did have some banes that kept it from perfection. Many
accidents were caused due to the new technology being rushed into combat. The
engines were very sensitive to throttle changes and the high landing speeds
were hard for the pilots to adjust to. It is estimated that there were never
more than 200 Me-262s in active service at once even though more than 1400
were built in an incredibility short period of time.
|
THE KIT |
I found this kit at a garage sell for a whopping $1.00. It didn’t have a box, directions or decals but that is not a problem. The ease of construction made the directions a moot point. I had no problems at all.
|
CONSTRUCTION |
I started with the cockpit tub (#39). It got
a coat of RLM 66 by Aeromaster Warbird Color. Then I lightened the tint just a
bit and painted the control stick (#41) just for contrast. The boot of the
control stick got a coat of brown. The instrument panel (#40) is very well
detailed right out of the box. It got a coat of the same RLM 66 and then each
instrument was painted black with white highlights and a drop of Microscale
Kristal Klear for each lens. I painted a few of the instrument bezels yellow,
brown or red depending on what instrument they were. The throttles (#42) were
glued into place and throttle knobs painted yellow. There are very good
reference photos in the Monogram Publications German Aircraft Interiors
1935-1945 Vol 1. I made a small seat pad out of Miliput to cover the seat
which has the seatbelts molded in. Next improvement was a set
 of old Waldron
German Foot pedals and a set of Edward Luftwaffe seat belts to spruce up the
stock cockpit a bit. The whole tub got put into the fuselage cockpit support
(#37) to make a great little package that will drop into the assembled
fuselage perfectly. Now I glued the two fuselage halves (#1/2) together and
put the nose wheel well (#17) into place.
of old Waldron
German Foot pedals and a set of Edward Luftwaffe seat belts to spruce up the
stock cockpit a bit. The whole tub got put into the fuselage cockpit support
(#37) to make a great little package that will drop into the assembled
fuselage perfectly. Now I glued the two fuselage halves (#1/2) together and
put the nose wheel well (#17) into place.
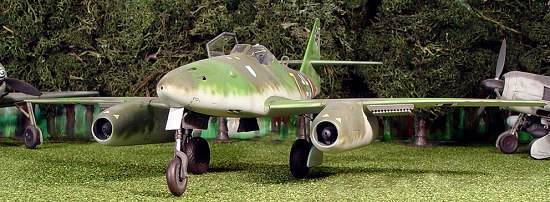
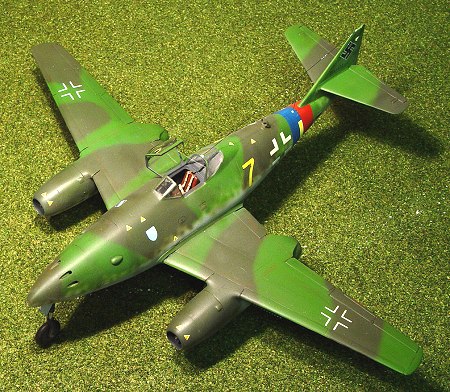
I decided to display the plane with the
weapons bay closed to show off the shark like appearance of the plane. I had
to make a guess at how much nose weight would be needed to be glued into the
small area. I used lead fishing weights epoxy in place and hoped I had enough.
I glued the gun deck (#46) into place since it also acts as the roof of the
nose gear well and added to make the nose area more ridged. Dry fitting of the
gun port panel (#29) and the gun access panel (#38) shows many fit problems. I
superglued these panels into place with super thick superglue to help fill in
the gaps. I then used 400 grit sandpaper to reshape the nose. In the process I
sanded off the small bulges on the gun access panels. I then went over this
area a few times with Tamiya Putty and Mr. Surfacer to help hide the seams. I
then dove into my spare parts and found some small blisters that were left
over from a Hobbycraft F8F Bearcat (Tree “G” part #3
 and #4). The blisters
were used on the Bearcat wing to replicate different versions. They looked
perfect when glued in place of the missing blisters I had sanded off earlier.
and #4). The blisters
were used on the Bearcat wing to replicate different versions. They looked
perfect when glued in place of the missing blisters I had sanded off earlier.
Now I turned my attention to the wings
(#3/4/5). The wings should be displayed with the leading edge slats extended
but the amount of work I would have to do was just more than I was willing to
put out on this kit. It might be a different story if I was building the
Tamiya Me-262. The wings glue up with no problems but are susceptible to wing
droop and warping so take your time in gluing them together. I broke off the
pitot tube right away and lost it somewhere on the floor. So that is going
have to be replicated at a later time. The next thing to tackle was the engine
nacelles. The left nacelle consist of the two halves (#9/84), the engine cowl
(#10) and the two exhaust cone halves (#15/90). The fit of these components is
not the best. After placing the nacelle to the wing you can attach the engine
exhaust cowl (#50). The fit was really rough and the area needed heavy
sanding. You have the ability to show off the engine which is detailed enough
to make a nice display. But I decided to keep the nacelle closed. There is no
other way to support the exhaust cone (#14/91) without the engine core so I
glued the engine halves (#12/13) together and placed the engine into the
nacelle halves (#8/83). Then I glued the front engine cowl (#10) to the
nacelle. This got affixed the wing and the exhaust engine cowl (#51) to the
end of the nacelle as I had done on the other wing. This area
 needed lots of
filling and sanding. The fit is probably the worse part of this kit. For ease
of work, I did not glue on the wings until I was finished sanding it down
completely. Then using labeling tape and scribe plates I re-scribed the wings
and fuselage. This was the most time consuming activity on this kit but the
payoff was worth it.
needed lots of
filling and sanding. The fit is probably the worse part of this kit. For ease
of work, I did not glue on the wings until I was finished sanding it down
completely. Then using labeling tape and scribe plates I re-scribed the wings
and fuselage. This was the most time consuming activity on this kit but the
payoff was worth it.
I glued the wing onto the fuselage then filled and sanded the joints. I was pleased with the fit in this area. Next came the tail plane (#6) and the rudder (#7) turning the rudder slightly just to give the model a bit of life. I filled the joint of the tail plane to the rudder section with Mr. Surfacer and hit it with some 400 grit sandpaper. I also glued the front windscreen and aft windscreen (#68) onto the fuselage and sanded with 600 grit sandpaper. I polished out the glass with a soft cotton cloth. I used Tamiya masking tape to protect the glass for the remainder of the build.
|
CAMOUFLAGE & MARKINGS |
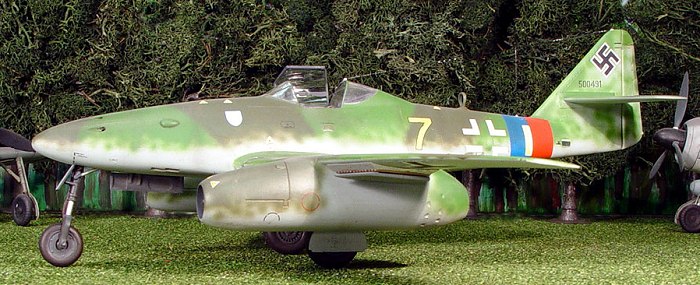
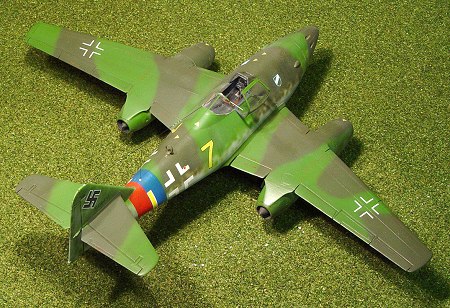
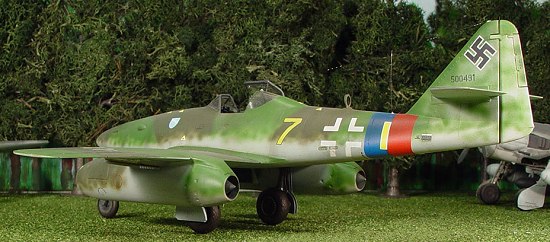
The hardest part of this
project is deciding on which one to model. There are so many great schemes to
choose from. I decided on Yellow 7 flown by Ofw. Heinz Arnold of 11./JG 7
Parhim, Germany April, 1945. The actual aircraft can be found in the
Smithsonian Air and Space Museum. I have many reference photos of this plane
and like the contrast in 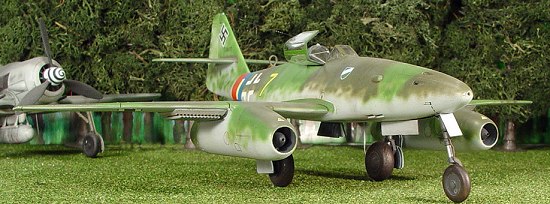 RLM 82/83 and the non standard upper wing camouflage.
I used Model Master colors RLM 76, 82 and 83. For some reason I really like
painting Luftwaffe planes. There is great satisfaction when you pull it off
right. I used my own photos and books to get the mottling just right. A quick
gloss coat of future and it was ready for decals.
RLM 82/83 and the non standard upper wing camouflage.
I used Model Master colors RLM 76, 82 and 83. For some reason I really like
painting Luftwaffe planes. There is great satisfaction when you pull it off
right. I used my own photos and books to get the mottling just right. A quick
gloss coat of future and it was ready for decals.
I used SuperScale Decal Sheet 48-781 which worked out very well. But I believe there are a few mistakes I think the yellow 7 should be more straight instead of the curved down stroke of the 7. The badge should not be such a light shade of blue. But the dark blue and red bands around the tail are about perfect. They acted very well to Solva-set. Another coat of future then I used Model Master Flat to knock off the gloss sheen.
|
FINAL CONSTRUCTION |
 Next thing to hit was the
landing gear. It is not bad in detail but is weak in supporting the plane with
all the nose weight in it. You might want to drill out the landing gear legs
and place pins or small wire in them to help support them when they are glued
in. I painted the wheel well area and landing gear (#20/21) and support struts
(#22) the same RLM 66 as I did in the cockpit. The gear got the usual
detailing with rubber for the brake lines and silver for the struts. Take your
time and align up the gear at this point. It will pay off when you go to set
it up on its wheels later. The stock wheels are just fine for this project so
they got painted up and highlighted prior to being put on the landing gear
struts. No trick to the landing gear doors either. They look just fine with
just a little highlighting with some thinned black.
Next thing to hit was the
landing gear. It is not bad in detail but is weak in supporting the plane with
all the nose weight in it. You might want to drill out the landing gear legs
and place pins or small wire in them to help support them when they are glued
in. I painted the wheel well area and landing gear (#20/21) and support struts
(#22) the same RLM 66 as I did in the cockpit. The gear got the usual
detailing with rubber for the brake lines and silver for the struts. Take your
time and align up the gear at this point. It will pay off when you go to set
it up on its wheels later. The stock wheels are just fine for this project so
they got painted up and highlighted prior to being put on the landing gear
struts. No trick to the landing gear doors either. They look just fine with
just a little highlighting with some thinned black.
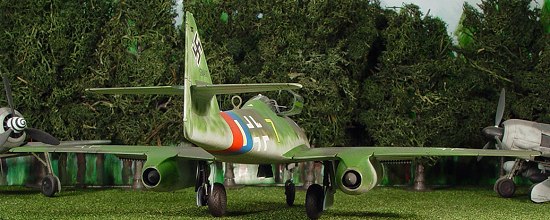
The last things to be put on were the rocket launchers that I painted silver with wood rails and medium grey rockets. The loop antenna which I made from scrap brass looks better than the kit one I thought was way too thick for this scale. I made the antenna wire from 2lb test fishing line and the open canopy was detailed with a few brass pieces to help it out. This version of the 262 did not have the armor plating shown on the box so it was thrown into the spares box.
|
CONCLUSIONS |
Overall I really had fun with this model. It made me remember my earlier days of building models and enjoying the hobby without being too critical of every aspect of the construction and finish. It took a lot of sanding and filling of the nose and engine nacelles. The raised panel lines that come with the kit might put some people off but this is a good kit to try out those re-scribing skills. This kit can still be found for a quarter of the price of the Tamiya kit. I have rediscovered the old Monogram kits from my youth and am enjoying the hobby more now than ever. I say get it and build it. You will not be disappointed.
April 2003
20 hours to build
1. SuperScale decal sheet
48-781
2. Model
Master RLM 76/82/83
3.
AeroMasters Warbird Color RLM 66
4. Edward
Model Accessories #49 002 Seatbelts
5. Waldron
Luftwaffe Foot Pedals Accessories
|
REFERENCES |
1.
Messerschmitt Me 262 Arrow to the Future by Walter J Boyne
2.
WarbirdTECH Series Messerschmitt Me 262 Sturmvogel by D. Jenkins
3.
Messerschmitt Me 262 by Willy Radinger & Walter Schick
4.
Me 262 Stormbird Rising by Hugh Morgan
5.
German Aircraft Interiors 1935-1945 Vol 1 by Kenneth A. Merrick
If you would like your product reviewed fairly and quickly by a
site that has nearly 200,000 visitors a month, please contact
me or see other details in the Note to
Contributors.