|
KIT: |
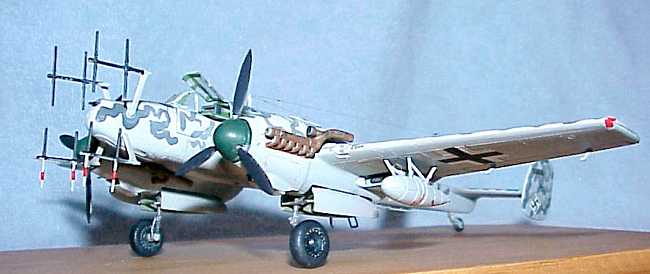
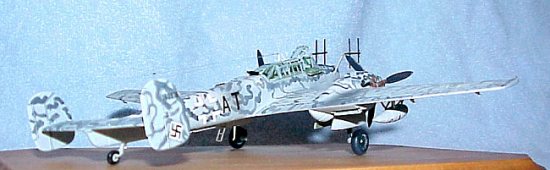
Italeri 1/72 Bf-110G-4 |
|
KIT # |
039 |
|
PRICE: |
$14.00 |
|
DECALS: |
Three aircraft |
|
REVIEW & |
|
|
NOTES: |
|
|
HISTORY |
|
THE KIT |
 The modeler is
greeted with three sprues of injection molded plastic, two in light grey, and
one in clear. Detail is crisp and light with recessed panel lines, and good
detail in the landing gear wheel wells. Instructions consist of blow-up
illustrations, but they are well drawn, and there are drawings of the three
sprues with parts references, so you want get lost trying to select the right
parts for assembly. The sprue trees were in one bag, with the decal sheet kept
separate. Right away, though, I lost the landing light lens, so I had to
construct another one from the clear sprue tree. Consequently, trying to fit
this makeshift part was poor on my part.
The modeler is
greeted with three sprues of injection molded plastic, two in light grey, and
one in clear. Detail is crisp and light with recessed panel lines, and good
detail in the landing gear wheel wells. Instructions consist of blow-up
illustrations, but they are well drawn, and there are drawings of the three
sprues with parts references, so you want get lost trying to select the right
parts for assembly. The sprue trees were in one bag, with the decal sheet kept
separate. Right away, though, I lost the landing light lens, so I had to
construct another one from the clear sprue tree. Consequently, trying to fit
this makeshift part was poor on my part.
|
CONSTRUCTION |
 I generally followed the instructions step by step, as I was going to enter
this model in an OOB contest sponsored by my modeling club (no, I didn’t win
anything). Thus, I began with the interior, which I painted entirely the wrong
color. It should have been RLM dark grey, but for some reason, I chose a
green-grey. The cockpit tub fit snugly between the two fuselage halves, and the
little details on the side instrument panels came to life with drybrushing and
picking out the individual knobs and switches in white and red. Crystal Clear
would have been great for the radar screen, but I didn’t have any, so I
painted it silver instead. Overall fit was very good, but care has to be taken
to align the horizontal stabilizer so that it is parallel with the front wings.
I neglected to do this, so when the model sits on its wheels, the stabilizer
looks cockeyed. Oh well, live and learn.
I generally followed the instructions step by step, as I was going to enter
this model in an OOB contest sponsored by my modeling club (no, I didn’t win
anything). Thus, I began with the interior, which I painted entirely the wrong
color. It should have been RLM dark grey, but for some reason, I chose a
green-grey. The cockpit tub fit snugly between the two fuselage halves, and the
little details on the side instrument panels came to life with drybrushing and
picking out the individual knobs and switches in white and red. Crystal Clear
would have been great for the radar screen, but I didn’t have any, so I
painted it silver instead. Overall fit was very good, but care has to be taken
to align the horizontal stabilizer so that it is parallel with the front wings.
I neglected to do this, so when the model sits on its wheels, the stabilizer
looks cockeyed. Oh well, live and learn.
After major assembly, it was a coat of primer, then to the paint shop.
|
PAINT & DECALS |
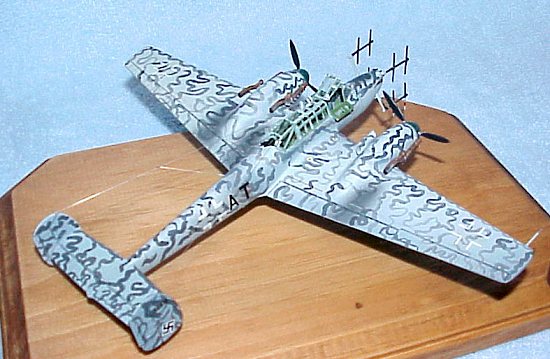 I decided to challenge myself and go after the paint scheme of NJG1 of 1944,
with the squiggly dark grey camouflage over light ghost grey. For some reason, I
couldn’t get the hang of getting my airbrush regulated down enough so that I
could spray on this pattern, so I elected to do it by hand. After I did it
thought, Scott van Aken and others came to my assistance and told me how to do
it, so now I can do it to future Luftwaffe models I decide to build. After the
pattern had dried for a day, I sprayed two coats of Testor’s Gloss Coat prior
to decaling.
I decided to challenge myself and go after the paint scheme of NJG1 of 1944,
with the squiggly dark grey camouflage over light ghost grey. For some reason, I
couldn’t get the hang of getting my airbrush regulated down enough so that I
could spray on this pattern, so I elected to do it by hand. After I did it
thought, Scott van Aken and others came to my assistance and told me how to do
it, so now I can do it to future Luftwaffe models I decide to build. After the
pattern had dried for a day, I sprayed two coats of Testor’s Gloss Coat prior
to decaling.
Decals went on like a dream. I was really impressed by them. Right thickness, registration, and opaqueness to rival anything from Aeromaster or SuperScale. I didn’t need any Solvaset at all, as they hugged every line. After the decals had dried, I wiped down the model to remove residue.
|
FINAL STEPS |
Two shots of Testor’s Dullcote sealed the decals nicely, then I lightly weathered the plane with thinned flat black, primer grey, and rust for the exhaust stains, and aluminum along the leading edges of the props and leading edges of the wings.
|
CONCLUSIONS |
Even though I didn’t win anything with this plane in the contest, I was very pleased at how it turned out. (Editor's note: And that is why most of us build models!) I really need lessons in masking canopies, especially with this one, and that is pretty obvious from the pictures. What impressed me the most was that this Italeri kit stands up pretty well to just about anything that Tamiya and Hasegawa is producing today. If you have the bucks, and are a Luftwaffe fan, I highly recommend this kit.
If you would like your product reviewed fairly and quickly by a site that has over 1,700 visits a day, please contact me or see other details in the Note to Contributors.