Hasegawa/DML 1/48 Me-163 Komet
|
KIT # |
HD 5 |
|
PRICE: |
$45.00 (Australian) |
|
DECALS: |
See review |
|
REVIEW & |
|
|
NOTES: |
Decals specifically for the Cockpit series and therefore not all used. On the whole I would the rate the set
as 7/10. Kit very accurate. |
|
HISTORY |
See the previous review for a history of this aircraft.
|
THE KIT |
This kit is a re-boxed Dragon kit and it shows. The detail is crisp and panel lines are recessed with a nice array of different bits within the cockpit to build a passable Komet straight out of the box.
There are 4 plastic sprues moulded in light grey plastic, one clear sprue
and two photo-etch frames. As this kit has a number of variations there are
quite a few spares on the parts sprues, this enabled some to be substituted (or
put in where they did not exist) into the Testors kit. It also
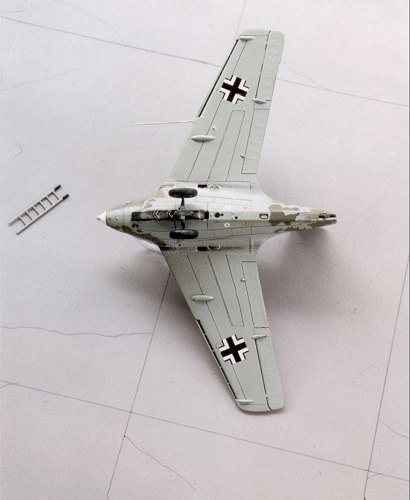
comes with a boarding ladder and a pilot figure (No, this one is not laughable!)
that can be made up in the climbing position.
As is the case with quite a few Dragon kits there are some
fit problems but judicious use of putty sees most of the problems sorted.
The kit has three versions that can be made, however as this kit is from Hasegawa’s
Cockpit Series only decals for this version are supplied. The other two versions
are both from JG400 Squadron. One is White ‘14’ from 2. /JG400 Squadron and
the other is ‘26’ from 1. /JG400 Squadron.
|
CONSTRUCTION |
The Cockpit
Like chalk and cheese this kit’s canopy was full of detail and I simply added Eduard photo etch and thin copper wire to round out round out the “office”.
The cockpit was painted in RLM 66 Schwarz Grau with various knobs and levers being painted red. The seat belts were painted olive green and the instruments dials were represented by film painted white on the back and then overlain by the photo etch painted Schwarz Grau. The dial bezels were painted different colours, depending on their functions.
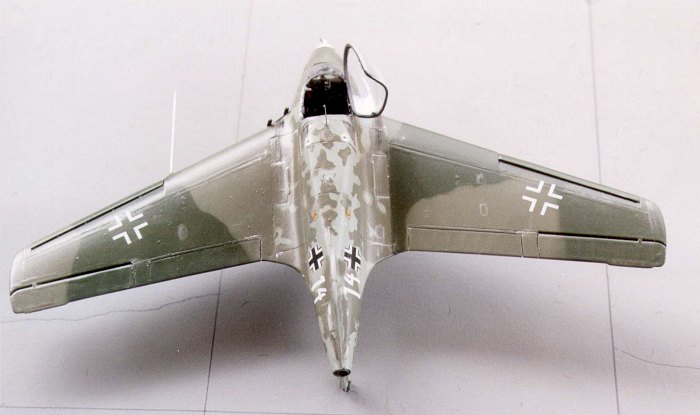
 The Fuselage and WingsThis kit has the fuselage as two halves that include a substantial part
of the wing root, making the wing attachment a simple affair, although there
were a few gaps in the join that required some putty. The cannon openings are
present and similar to the Testors kit, I elected to use brass
pipe to simulate the MG-151/200 cannon barrels. However, on this kit I elected
to make them flush with the leading edge of the wing root. This kit would be
built as a Me 163B-1 of JG400.
The Fuselage and WingsThis kit has the fuselage as two halves that include a substantial part
of the wing root, making the wing attachment a simple affair, although there
were a few gaps in the join that required some putty. The cannon openings are
present and similar to the Testors kit, I elected to use brass
pipe to simulate the MG-151/200 cannon barrels. However, on this kit I elected
to make them flush with the leading edge of the wing root. This kit would be
built as a Me 163B-1 of JG400.
Once the two fuselage halves were connected the completed wing assemblies
were attached and the whole thing put to one side to set.
The lower portion of the fuselage directly underneath the cockpit is metal etch using the kit offerings and this is painted in Model Master RLM 02 Grun. It is into this cavity that the skid assembly retracts after take off. The dolly, complete with wheels is jettisoned also at take off.
|
PAINT & DECALS |
 Once all the colours had cured I gave the panel lines a very diluted wash
of black and, like PK+QL sprayed the whole airframe with Humbrol Satin
Clear after giving the aircraft a somewhat weathered look using silver on panels
to show extreme wear and tear.
Once all the colours had cured I gave the panel lines a very diluted wash
of black and, like PK+QL sprayed the whole airframe with Humbrol Satin
Clear after giving the aircraft a somewhat weathered look using silver on panels
to show extreme wear and tear.. The decals for the most part came from the Testors kit. This was more due to the fact that the decals supplied with the Hasegawa kit were for a single model as part of the Cockpit series. The only useful decals from this kit were the various aircraft insignia such as the T-stoff, C-stoff decals, put trestle here (albeit in German!), etc.
The Testors decals are very well printed and quite thin
without much register loss. I encountered a small problem with the colour for
the T-stoff symbols. There are four such symbols and they are positioned next to
the relevant fuel cells. They are supposed to be white circles with a black
“T” in the middle. I ended up cutting circles out of white decal sheet and
then slicing up some black cross decals to form the “T” – problem solved!
I used the decals supplied from the Testors kit to finish
both models, although the numbers for the II. /JG400 machine were pilfered from
my yet to be built Dragon Me 163S-1 ‘Habicht’. This kit has
supplied a decal sheet with a range of numbers that far outstrips those needed
to build the model.
I also purchased a set of crosses and swastikas from Aeromaster Decals in 1:48 scale and used some of the decals where I did not have sufficient in the kits in my possession.
|
CONCLUSIONS |
I enjoyed building this fantastic little aircraft and it is a great contribution to my expanding WWII collection of aircraft. I still have the ‘Habicht” to build and, as a resin kit is now available for the HWK 109-509A Walter rocket in 1:48 scale I will definitely end up building another Komet.
I would like to thank my local
Hobby shop, Southside Hobby Centre, Buranda (south of the Brisbane CBD), run by
Warrick and Bernie. Specifically Bernie Quigley, the “Komet Nutcase”, for
his critique of Wolfgang Spate’s machine and the loan of a tremendous amount
of reference material on this, the first rocket powered fighter aircraft the
world has seen. Bernie has scratch built the Me 163A as flown by Heini Dittmar
on the first 1000+kph flight and presented it as a diorama.
|
REFERENCES |
Me 163 Komet, Aircraft Monograph No. 7, B. Belcraz & R. Peczkowski. A.J. Press Publishers ISBN: 83-86208-62-7
Messerschmitt Me 163 Komet, Mano Ziegler, Schiffer Military History, 1990. ISBN: 0-88740-232-1
Messerschmitt Me 163 “Komet” Vol. II, M. Emmerling & J.Dressel, Schiffer Military History, 1992. ISBN: 0-88740-403-0
If you would like your product reviewed fairly and quickly, please contact me or see other details in the Note to Contributors.