Hasegawa 1/48 Junkers Ju 87D-8 ‘Night
Attacker’
| KIT #: | 09279 |
| PRICE: | $30.00 back at the turn of the century |
| DECALS: | Two options |
| REVIEWER: | Andrew Garcia |
| NOTES: | White Metal parts – Antenna, DF Loop, 20mm gun barrel with flash suppressor |
| HISTORY |
In the early 1930s,
Germany developed the platform for its dive bomber, called a "Stuka", short for
"SturzKampfFlugzeug" (translated literally as "diving combat aircraft"). After
the dive bomber competition or trials at the Luftwaffe test center at Rechlin,
the Ju 87 was selected as the winner of the competition.
Designed by Hermann
Pohlmann, the Stuka first flew in 1935 and made its combat debut in 1936 as part
of the Luftwaffe's Condor Legion during the Spanish Civil War. The Ju 87 Stuka
was tested in combat during 1937 with the German Condor Legion during Spanish
Civil War. Initially flying the Ju 87A, the Legion soon switched to the newer by
Ju 87B. The Stuka was at the forefront of the German invasion of Poland on
September 1, 1939, as a key element of the German blitzkrieg.
The aircraft was easily recognizable by its inverted gull
wings, fixed non-retractable (i.e. spatted)
undercarriage and known by the sound of its
Jericho-Trompete ("Jericho Trumpet") wailing siren. It is seen in most WWII
historical film as the personification and propaganda symbol of German air power
and the blitzkrieg victories of 1939–1942.
 The Ju 87
Stuka continued to have success during the invasion of Norway, Holland and
France. The Ju 87's success stopped during the Battle of Britain. Due to heavy
losses the Ju 87 Stuka was withdrawn from the battle. No longer effective on the
Western Front, the Stuka was once again used in the Mediterranean where it
continued to be effective against shipping.
Stukas
were also used in the Balkans, Greece and Crete campaigns. Stuka units also
supported the armor thrusts of the Afrika Korps in North Africa. Its last great
theatre of action was in the Soviet Union. By the end of the war the Stuka was
replaced in the final months by ground attack variants of the Focke-Wulf
Fw-190A. Over 6,500 Ju 87s were built during its production run.
The Ju 87
Stuka continued to have success during the invasion of Norway, Holland and
France. The Ju 87's success stopped during the Battle of Britain. Due to heavy
losses the Ju 87 Stuka was withdrawn from the battle. No longer effective on the
Western Front, the Stuka was once again used in the Mediterranean where it
continued to be effective against shipping.
Stukas
were also used in the Balkans, Greece and Crete campaigns. Stuka units also
supported the armor thrusts of the Afrika Korps in North Africa. Its last great
theatre of action was in the Soviet Union. By the end of the war the Stuka was
replaced in the final months by ground attack variants of the Focke-Wulf
Fw-190A. Over 6,500 Ju 87s were built during its production run.
There were many
variants from the initial prototypes and A-series to the B-series through
R-series Stukas. The second generation of Ju87’s were represented by the
D-series through F-series Stukas and the final Ju-87G-1/G-2 versions.
Since this build is concerned with a “D” variant I’ll
cover that series in more detail.
The
Ju-87D-1 was the initial
production D-series machine, with a Jumo 211J-1 engine and new propeller.
Compared to the “B/R ” version it had a redesigned airframe and canopy, received
more armor, new Revi C/12C gunsight,
and
a change in defensive armament having the rear MG-15 gun replaced by twin MG-81
guns. Full production started in September of 1941 with combat use occurring at
Leningrad in January 1942. The Ju-87D-2 was similar to D-1 but had a glider tow
attachment. The next version was the Ju-87D-3 which was similar to the D-1 but
with more armor for the close-support role. There was a unique version called
the Ju-87D-4 which was a land-based torpedo-bomber conversion of Ju-87D-3. It
was not used operationally and all the production was converted back to the
original Ju-87D-3 specification.
In
the Spring of 1943 a change in the “D” series was initiated to replace the D-3
with the Ju-87D-5. It’s longer wings, explosive-cartridge jettisonable landing
gear, lack of dive brakes (in some units) and new wing armament consisting of
MG-151/20 cannon replacing the MG-17 guns was an improvement. The Ju-87D-6 was a
retooled design but never exited the proposal phase.
Finally, the versions adapted for night operations and the
focus of this build appeared. The Ju-87D-7 (which was a re-manufactured or
modified D-3) was the first “D” night attack variant with flame damper exhausts
and other night operations components such as the FuG 16Z radio set, augmenting
the older FuG 25. The subject of Hasegawa’s kit # 9279, the Ju-87D-8 was
essentially a conversion of Ju-87D-5’s to Ju-87D-8 night-attack configuration.
The
Ju 87D-8 used the long span wing and was a conversion of the Ju-87D-3. The armor
rustatz was not used. A prototype conversion was ordered in September 1943 along
with a feasibility study.
The focus became centered on developing a night
attack aircraft.
The radio and directional finding equipment was
enhanced. How many of these D-8’s were built? According to one source
“Unfortunately, it has not been possible to confirm definitely how many Ju-87D-7
or Ju-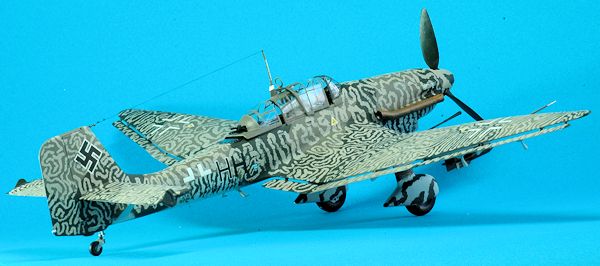 87D-8
conversions were completed.” See
Junkers
Ju87 From Dive Bomber to Tank Buster 1935-1945 Classic Publications 2012, pages
312 to 320 for more details on the Ju-87D-7 and Ju-87D-8 conversions along with
information on their units deployments.
The
Junkers Ju 87 Stuka, Yellow Series # 6125, Stratus Books reference states 1,178
D-5’s were built. This book also has starting with page 57 a section devoted to
Ju 87 night versions with excellent details on the component changes a modeler
needs to know including explanations as to why the total number of D-8’s used
for night operations is a complicated subject.
87D-8
conversions were completed.” See
Junkers
Ju87 From Dive Bomber to Tank Buster 1935-1945 Classic Publications 2012, pages
312 to 320 for more details on the Ju-87D-7 and Ju-87D-8 conversions along with
information on their units deployments.
The
Junkers Ju 87 Stuka, Yellow Series # 6125, Stratus Books reference states 1,178
D-5’s were built. This book also has starting with page 57 a section devoted to
Ju 87 night versions with excellent details on the component changes a modeler
needs to know including explanations as to why the total number of D-8’s used
for night operations is a complicated subject.
There is very little information that I could find on the
Ju-87D-7 or Ju-87D-8 conversions night operations in most of my references. I
read and scanned all my Ju-87 Stuka books and did some web searches but found
very little except for one book.
About
ten years ago I purchased Ghost Bombers – The Moonlight War of NSG 9 published
by Classic Publications in 2001, hoping it would the best source on the subject,
and it was. Its main theme was communicated mostly by text detailing operational
events for NSG 9. As a modeling reference, although it was helpful with photos I
had not seen in other Stuka references, the photos were not the clear propaganda
large-format film camera pictures that make for superior modeling references.
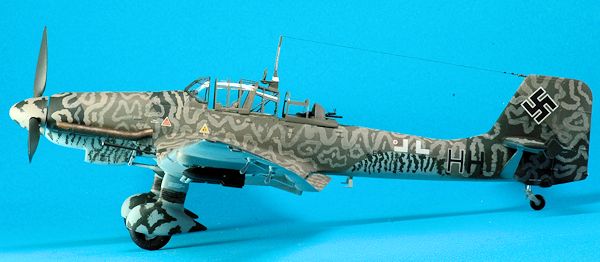
I
did find one grainy photograph of the kit markings I used in this build,
“E8+HH”,
on page 59. The book is excellent and helpful in understanding the unit trials
and activities. Another reference, Osprey Combat Aircraft # 6 Junkers Ju 87
Stukageschwader of North Africa and the
Mediterranean has a good summary of NSG 9 on pages 86 to 87.
One reference, Ju 87 Stuka Classic Aircraft No. 5 from PSL
Books, has a drawing profile on page 37 with its descriptive text stating
“Ju87D-7 of 1/I//NSGr 9, Italy, April 1945. Black-green (RLM 70) upper surfaces,
with light grey
(RLM 76) wavy overspray. Light grey lower surfaces
sprayed over the original light blue (RLM 65). Parts of the insignia had also
been over sprayed and the under wing crosses had not been reinstated. This was
not uncommon on the Ju 87D-7s and D-8s in the night ground attack role. Black
codes, letter “H” outlined in light grey, repeated in white on spats. NSGr 9 was
coded E8, (incorporating 3/NSGr2 coded D3) but used the cipher E8 but it was not
evident on this aircraft. Generally it has a clean appearance due to fresh areas
of light grey but some exhaust stains over wings.”
 Aero Detail
#11, Ju87D/G Stuka 1994 on pg. 69 commented in a photo caption: “Photo 15: A
Ju87D-8 of 1./NSGr. 9 at a base in northern Italy during the summer of 1944.
Though the picture is not very clear, the flame concealing exhaust pipe covers –
the distinctive feature of the D-7 and D-8 – can be seen on the cowl. Though the
aircraft is painted in the standard RLM76 “squiggle” pattern, the wheel spats
alone are painted in a unique white mottling scheme. The national insignia on
the rear of the fuselage has been half obscured by the paint from the planes
underside. For some reason, of the second two characters (“HH”) in the plane’s
code letters, only the left “H” has a white border.” Photo # 13 on pg. 69
provided a great look at the wings and fuselage paint scheme from the rear
quarter perspective providing me with the best paint guide for this build.
Aero Detail
#11, Ju87D/G Stuka 1994 on pg. 69 commented in a photo caption: “Photo 15: A
Ju87D-8 of 1./NSGr. 9 at a base in northern Italy during the summer of 1944.
Though the picture is not very clear, the flame concealing exhaust pipe covers –
the distinctive feature of the D-7 and D-8 – can be seen on the cowl. Though the
aircraft is painted in the standard RLM76 “squiggle” pattern, the wheel spats
alone are painted in a unique white mottling scheme. The national insignia on
the rear of the fuselage has been half obscured by the paint from the planes
underside. For some reason, of the second two characters (“HH”) in the plane’s
code letters, only the left “H” has a white border.” Photo # 13 on pg. 69
provided a great look at the wings and fuselage paint scheme from the rear
quarter perspective providing me with the best paint guide for this build.
| THE KIT |
There are some areas that could be improved with some new
resin bits such as the wing landing light, and a replacement for the white metal
FuG16ZY DF loop antenna mast and 20mm gun barrels with flash suppressors. This
would be an ideal new product from Quickboost since it would complement their
existing set of three variations of night intruder exhausts. All you need are
the antennas and you can adapt other “D” kits using the spare decals. This does
not mean the Hasegawa provided white metal parts were not good. They were fine
to use except for the white metal used in thin castings for the
 antenna and
long 20mm gun barrels which were easy to bend and difficult to keep straight.
antenna and
long 20mm gun barrels which were easy to bend and difficult to keep straight.
One area I considered improving was replacing the
injection moulded plastic actuating rods of the ailerons and landing flaps which
appear under the wings as simple solid triangles. They fail to capture the look
of the actual airframe part. The alternative is removing them and making new
rods from wire. Despite this being the most visible fault of the model I chose
not to change it since I use the wings to handle the model during construction.
Going this route, although the appearance is greatly improved,
gave me concerns regarding long term durability so
I decided not to make any changes in this area.
Hasegawa Kit # 9279
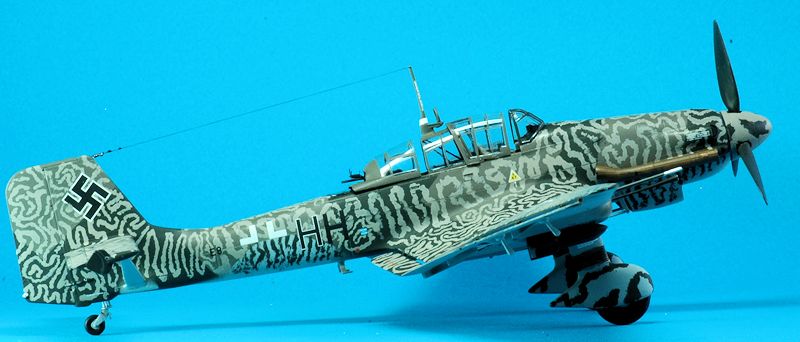
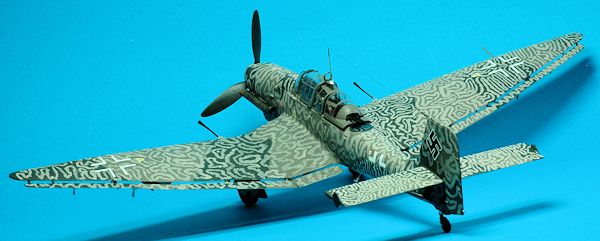
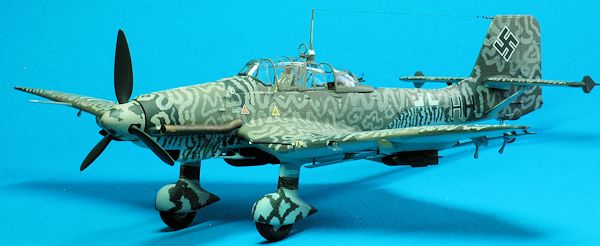
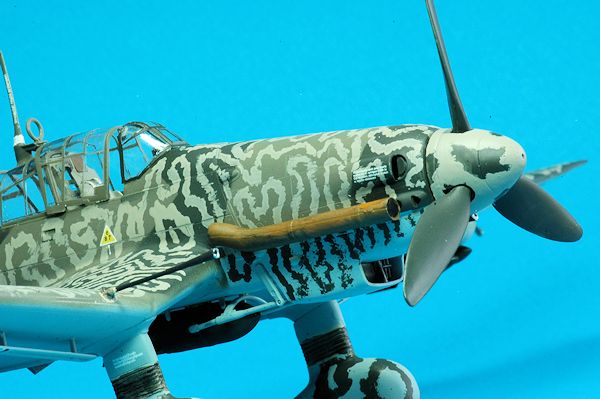
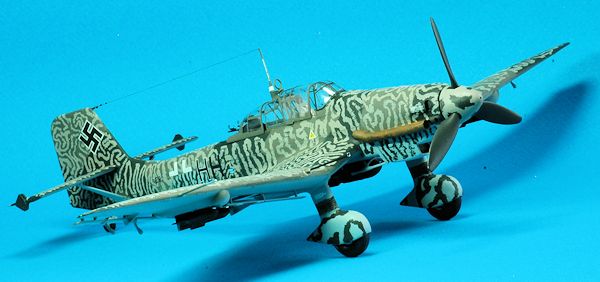
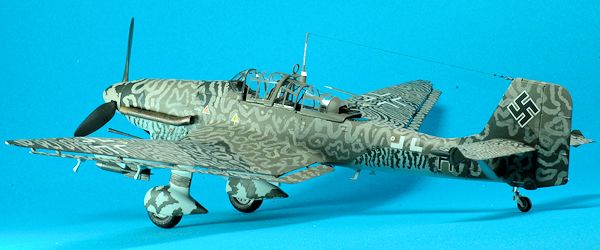
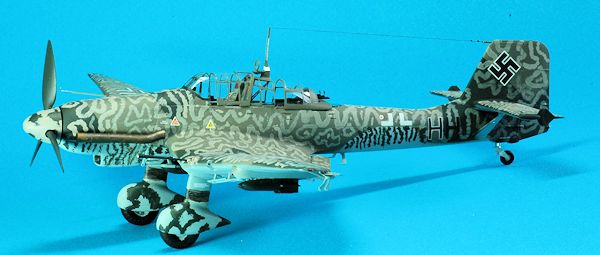
Junkers Ju87D-8 has two choices of markings.
#1
Ju87D-8 from 1.N.S. Gr. 9 representing a complex
squiggle (or meander or scribble) camo pattern of RLM 02/70/71 with some RLM 65
undersurfaces containing RLM 71 on the lower fuselage sides. FAOW Ju87 Stuka pg.
56 has photo of this aircraft, 09279 Hasegawa Junkers Ju 87D-8 Night Stuka kit,
marking # 1. A
source ( Ju 87 Stuka Classic Aircraft No. 5 PSL Books (pg. 37 drawing)
indicated
the “squiggle” and all other undersurfaces were an RLM 76 light grey with white
splotches on the lower wheel spats/covers.
The
color box art represents one of the decal choices and is a good supplement to
the painting information.
| CONSTRUCTION |
 area on
transparent canopy part # “T2” to correct this moulding limitation of the
missing retraction groove. Hasegawa failed to provide the notch at the top of
the canopy that fits around the antenna when the canopy is retracted.
A razor saw or Dremel cutter is needed to finish
this part to a correct condition.
Even if you do this the canopy is too small to
completely slide rearwards.
area on
transparent canopy part # “T2” to correct this moulding limitation of the
missing retraction groove. Hasegawa failed to provide the notch at the top of
the canopy that fits around the antenna when the canopy is retracted.
A razor saw or Dremel cutter is needed to finish
this part to a correct condition.
Even if you do this the canopy is too small to
completely slide rearwards.
After washing the
resin parts in dishwater soap and letting them dry, I then pre-painted all the
parts as indicated in the instructions. Starting with the interior the kit was
assembled per the instructions. The Aires resin interior builds up very nicely
with no significant problems. Although the kit interior is reasonable the
plastic cockpit parts detail is a little on the sparse side. However, I would
say the detail in the cockpit is more than acceptable, especially if you finish
and display the canopy closed. The Aires resin cockpit was beautiful with many
small knobs and details definitely enhancing the look of the cockpit and rear
gunner positions. I decided to use the kit supplied plastic with decal for the
main instruments. Aires does provide an etched panel with transparent instrument
solution but after painting it the instruments were not as visible as I wanted.
I would substitute an Eduard Color Zoom instrument panel for this area if I were
building another version. I also added a few Eduard etched metal parts from the
now OOP #48-258 Ju 87D etched set such as the rearview mirror, front canopy grab
handles, center canopy roll-over support frame, radiator screens and rear post &
bead gun sights.
The Hasegawa “D” kit
has an improved approach for attaching the propeller and spinner to the fuselage
compared to Hasegawa’s Ju 87B/R kits. I found the propellers on the Ju 87B/R
moulds from Hasegawa to be awkward to complete. The problem is with how the kit
was engineered to attach the spinner assembly to the front cowl. I have built
several Hasegawa “B/R” versions and never find it a pleasant task since I am
waiting for the day the prop falls off and I have to glue it into a fixed
non-rotating status. The “D” version represented by this kit uses the now
standard captured shaft vinyl “P1” part to permit removal and placement of the
prop and spinner section – that’s an improvement!
Step 15, Canopy Installation has a cumbersome step when it
comes to correctly gluing parts U2 and U7 which are the rear mg bracket and
sight poles labeled “gunsight” on the instructions. Gluing these two parts
together and later integrating it with the T4 canopy part and U1 twin 7.92mm
guns takes some
 deliberate
tasks so take your time with this step. I would encourage you to first glue U11
and U1 (step 1)
together, once dry add U2 and U7 ensuring U2 is
just touching the fuselage behind the cockpit end. This is not clear in the
instructions which would have you glue U2 and U7 together and slide them through
the extended mg barrels. It would be recommended you glue U2 and U7 into place
on the mg rather than sliding them on.
I added the Eduard ring and bead gunsights, etched
parts # 61 a very nice detailed representation of the ring and bead sights to
the U7 bracket as a final step.
If you add this etched part you should also glue
the rear gunners canopy in a forward position to avoid having it slide back or
off and damage the etched parts.
deliberate
tasks so take your time with this step. I would encourage you to first glue U11
and U1 (step 1)
together, once dry add U2 and U7 ensuring U2 is
just touching the fuselage behind the cockpit end. This is not clear in the
instructions which would have you glue U2 and U7 together and slide them through
the extended mg barrels. It would be recommended you glue U2 and U7 into place
on the mg rather than sliding them on.
I added the Eduard ring and bead gunsights, etched
parts # 61 a very nice detailed representation of the ring and bead sights to
the U7 bracket as a final step.
If you add this etched part you should also glue
the rear gunners canopy in a forward position to avoid having it slide back or
off and damage the etched parts.
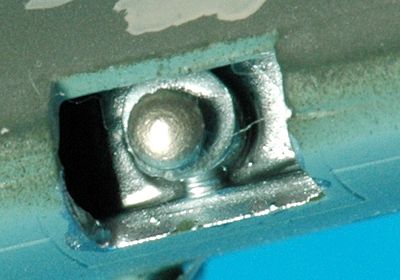
The only major overall construction concern was the fitting of the forward fuselage insert that permits Hasegawa to offer the many variants of the Stuka with the same basic moulds. The insert approach in this case did not fit all that well but it was remedied with some Tamiya putty and Mr. Surfacer 500. This was the only less than excellent kit comment that I can give Hasegawa’s kit. Main wing assembly and installation was an easy step, but I did have a small typical Hasegawa underside wing root gap. After a quick sanding down of all the fuselage and wing seams with a Flex-i-file followed by a Squadron #30505 Tri-grit polishing stick, I painted, decaled, and weathered the kit leaving a number of small parts like the rear guns, transparencies and white metal parts, off for final assembly. In a departure from my preferred approach of adding the antenna at this stage I decided to glue the white metal antenna to the canopy part T3 early in the build before painting. Once it was on and dry I masked the canopy and painted it at the same time as the fuselage visited the paint shop. I did it this way because the antenna is a two part component and attaching it to the canopy required a “third hand” alligator clip holding device done early in the build cycle.
| COLORS & MARKINGS |
 I tried a
new technique to paint the white metal exhaust. I was pleased it worked out as
planned. I brushed on Testors # 1424 Burnt Iron metalizer (dark iron
non-buffing) as the base coat and randomly dabbled some Pactra IP96 rust onto
the still wet metalizer. The “hot” metalizer carrier solution, which should be
thinly sprayed onto plastic or it will melt, craze or deform the plastic, could
be hand brush painted onto the white metal exhaust. I put it on thickly and
while it was evaporating applied touches of the Pactra enamel rust which quickly
thinned out and left a light spotted rust appearance which is what I was looking
for with this build.
I tried a
new technique to paint the white metal exhaust. I was pleased it worked out as
planned. I brushed on Testors # 1424 Burnt Iron metalizer (dark iron
non-buffing) as the base coat and randomly dabbled some Pactra IP96 rust onto
the still wet metalizer. The “hot” metalizer carrier solution, which should be
thinly sprayed onto plastic or it will melt, craze or deform the plastic, could
be hand brush painted onto the white metal exhaust. I put it on thickly and
while it was evaporating applied touches of the Pactra enamel rust which quickly
thinned out and left a light spotted rust appearance which is what I was looking
for with this build.
Weathering and Final
Coat – I sprayed on a Future coat before the initial decal application. After
decaling was completed I used Testors Dull Cote during the final step to seal
all of the decals and give the correct flat finish.
Whether you call the scheme “scribble” camouflage, “wave mirror” or some other term the application could differ across different sections of the airplane since it was being applied by more than one person.
| FINAL CONSTRUCTION |
The kit looked nice at this point and there were many
small detail steps due to the variety of tiny plastic or white metal parts.
After the Testors Dull Cote dried I added the canopies, metal 20mm guns, and
cockpit rear defensive guns with their Eduard etched metal post and bead sights.
A Copic multiliner SP 0.05 black pen was used to paint the thin antenna wires on
the inside of the transparent part “T5” a circular access panel that goes onto
part N6 which appears on the top of the fuselage spine after the rear gunners
position (see step 9). This area has a moulded into the fuselage opening showing
the tubular Peil GIV RDF (radio direction finding) navigation system under a
transparent window
(part T5). Applying a Copic multiliner SP 0.05
black pen to the raised clear antenna lines gives a better look than using a
paint brush to paint the very thin raised lines.
The very last step was attaching a cut flat pin head to
the scratch built wing landing light. After looking at some photos in my
references I added a piece of round kit plastic sprue as the base for a wing
light. I
used a Dremel grinder to hollow out a concave surface (the part I used was one
of the small punch posts used to eject the plastic mold). This part was painted
with Testors #1790 chrome silver enamel. I drilled a hole to receive the flat
top portion of a metal pin (not one of the pearl top types). By inserting it but
leaving the top separated from the larger plastic post it created the illusion I
was trying to achieve. The Stuka wing light has a prominent shiny center bulb.
There is one aftermarket wing landing light resin part for sale on eBay (seller
= vwrocket) which looks like a nice alternative to my scratch build. Hasegawa
should have done a better job in this area and include the light in a boxed in
component.
The greenhouse clear
parts, after removing the Cutting Edge BlackMagic CEBM48277 canopy masks were
added using Testors 8876C white glue. I use this because of its long, tapered
black plastic applicator that allows small amounts of glue to be carefully
placed. I painted the clear canopy parts early in the build with Future before
masking and painting them.
The antenna wire was made from #F1 E Z Line elastic polymer which I attached to the mast and rear vertical stabilizer. It is mounted onto a piece of guitar wire wrapped with a copper spring which was inserted into a hole in the vertical stabilizer. To get the antenna connection right I used a clear close up photo found on page 85 in Junkers Ju 87 Stuka, Yellow Series # 6125, Stratus Books. The Eduard gun sights, etched parts # 61 were glued onto the U7 bracket poles as the final step after the canopy glue set.
| CONCLUSIONS |
The Hasegawa Ju 87D-8 Night Attacker is an enjoyable build
and provides another link in their comprehensive Ju 87 Stuka series.
The night camouflage scheme while a challenge to
get it right is an interesting colorful change to the normal Stuka look. It
provides for a different look from other Stuka models shown in the factory
standard splinter finish.
Hasegawa’s 1/48 Stuka kits look superb straight out
of the box, and if you choose to add some resin or etched aftermarket they look
even better.
Small
items such as the rear gunner VE42 ring & bead gunsight with the extra added
detail of the other parts I used from Eduard photo-etch adds a great deal to
this kit. The Aires resin cockpit parts detail was superb. This is an easy kit
to build that presents no difficulties in its construction except for some seam
cleanup using putty on the forward fuselage, rear fuselage seams and
 underside
wing to fuselage joins. You will be rewarded with superlative results and a
good-looking model with minimal time and effort.
It is a highly recommended kit.
underside
wing to fuselage joins. You will be rewarded with superlative results and a
good-looking model with minimal time and effort.
It is a highly recommended kit.
There
is a recent Hasegawa release of a similar night attacker, kit # 7323 “Junkers Ju
87D-3N Stuka NSGR 2” which represent the short-span “D” wing version, with white
metal exhausts but without the DF canopy loop antenna. There are a terrific set
of Quickboost aftermarket resin exhausts, # QB48-280, 284 and 292, providing all
three varieties of night suppressed exhaust versions that can be used for a
variety of other configurations. Whatever Stuka version you choose to build B/R,
C, D or G, Hasegawa’s Night Stuka releases are highly recommended. You will be
rewarded with your decision to model this interesting and enjoyable building kit
if you are looking for a fun experience.
The kit I used for this build, # 9279, is a December 1998 release for Hasegawa that I started building around 2000! Life events caused a thirteen year delay in completing this build hence I have components like the Cutting Edge masks included. They worked well in case you were wondering.
| REFERENCES |
Aero Detail #11,
Ju87D/G Stuka 1994 (pg. 52 flame concealing exhaust types, pg. 69 photo)
Ju 87 Warplane
Classic International Air Power Review Vol. 21 June 2007 Pg. 132 - 163
Squadron Signal
#1073, Ju87 Stuka in Action 1986 (pg. 52 & rear cover)
AirDOC ADC 009
Junkers Ju 87 "Stuka" Teil 2 Late Variants
Junkers Ju 87 Stuka,
Yellow Series # 6125, Stratus Books, Mushroom Model Publications 2008
Ghost Bombers – The Moonlight War of NSG 9
Classic Publications 2001 pg. 59 photo.
Stukas Over Spain –
Schiffer Books 2013
Junkers Ju87 From
Dive Bomber to Tank Buster 1935-1945 Classic Publications 2012
Junkers Ju 87 Black Cross series Volume 5, original in
German 1999, 2004 version Midland Pub.
The Junkers Ju.87
Stuka, a Complete History, Peter C. Smith Crecy Books 1998
Famous Airplanes of
the World Junkers Ju87 Stuka No.11 1988-7
Waffen-Arsenal Band
133 Deutsche Sturzkampfflugzeuge Ju87 – Ju88 Dressel & Griehl 1992
Junkers Ju 87 Stuka
Vol. 2 Zobel & Mathmann Schiffer Books
Junkers Ju 87 Stuka
MBI Books 1992 (pg. 22 color profile, pg. 41 inside rear cover photo of “Yellow
3” Werk Nr. 1084)
Junkers Ju 87 Stuka Warpaint Series No. 3
Hall Park Books
Junkers Ju87 B-G Stuka
FAOW 136 # 3 March 1983 pg.44
Ju 87 Stuka Classic
Aircraft No. 5 PSL Books (pg. 37 drawing)
Stuka - A Pictorial
Chronicle of German Close-Combat Aircraft to 1945, Aders/Held Schiffer Books
1989
Junkers Ju 87 Stuka
Peter Smith Crowood Publications 1998 (pg. 212-217)
Ju87 Stuka
Baginskis/Watanabe Crown Books 1982
Ju-87 Stuka
Aero Series
Vol. 8 - Aero Books
Flying Colors - Squadron/Signal 6031
pg.78-79
Kagero KG3030 Junkers Ju 87 Vol. III
2006
November 2013
If you would like your product reviewed fairly and fairly quickly, please contact the editor or see other details in the Note to Contributors.