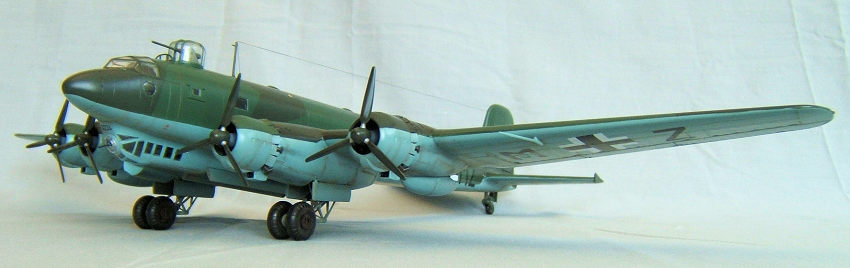
Revell 1/72 FW-200C Condor
| KIT #: | |
| PRICE: | |
| DECALS: | One option |
| REVIEWER: | Mike Rohde |
| NOTES: | Short run with photo etch and resin parts. |
| HISTORY |
On 16 th July 1936 Kurt Tank submitted his idea of a new transport aircraft to the Directors of the Deutsche Lufthansa with the promise that this new aircraft would fly within a year. In autumn 1936 work commenced on this project and the first of three prototypes , the FW 200 V 1 ,flew on 27 th July 1937.
An all metal low wing monoplane, the FW 200 was initially equipped with four 875 hp Pratt & Whitney Hornet radials and was designed to provide accomodation for up to 26 passengers in two compartments.The other two prototypes were powered by four 720 hp BMW 132 G -1 radials.
The second prototype became Adolf Hitler's personal transport and the third prototype and four examples of the initial production FW 200 A Condor were delivered to Lufthansa, two FW 200 A's to DDL ( Danish Airlines) and two to Lufthansa's Brazilian associate Syndicado Condor.
 One
prototype --redesignated FW 200 S-1 ( named Brandenburg) --made a number of
record flights in the second half of 1938, beginning on 10th August when
Lufthansa's Chief Pilot Alfred Henke flew nonstop from Berlin to New York in 24
hours 56 minutes and returning on 28th August in 19 hours 55 minutes.
One
prototype --redesignated FW 200 S-1 ( named Brandenburg) --made a number of
record flights in the second half of 1938, beginning on 10th August when
Lufthansa's Chief Pilot Alfred Henke flew nonstop from Berlin to New York in 24
hours 56 minutes and returning on 28th August in 19 hours 55 minutes.
On 28 th November the FW 200 S-1 set a 46 hours 18 minute record for the trip from Berlin ( via Basra, Karachi and Hanoi) to Tokyo.
Just before the outbreak of WW 2 the Luftwaffe decided to establish a long range anti shipping unit. The FW 200 V 10 was evaluated and batch of 10 pre production FW 200 C- 0 aircraft with structural strengthening was delivered in September 1939. The first four C-0's were unarmed and these , together with Lufthansa's four FW 200 B's were used to equip KgrzbV 105 at Kiel/ Holtenau in April 1940. The other six C-0's were armed with one MG 15 in fore and aft dorsal turrets with a third MG 15 firing through a ventral hatch. Operated initially by Oberstleutnant Edgar Petersen's Fernaufklaerungsstaffel ( later 1./ KG 40), the unit's first operation sortie was flown on 8th April 1940.
The first production reconnaissance version was the FW 200 C-1.Armed with on 20 mm MG FF cannon in the nose, one MG 15 in a ventral gondola and similar single weapons in fore and aft dorsal positions. Four 250 kg bombs were carried on underwing racks.
The FW 200 C-2 was generally similar, the difference was that the outer engine nacelles were modified to accommodate slightly recessed and streamlined bomb racks. There were still structural weaknesses apparent in the early versions and this led to further improvements made with the C-3 in 1941.The C-3 version were also equipped with more powerful Bramo 323 R-2 engines as well as further upgrades in defensive armament. The FW 200 C 3 /U1 had a 15 mm cannon in a power operated forward turret and
the nose mounted MG FF cannon was replaced by an MG 151/ 20. The final C3 /U 4 variant accommodated an extra gunner operating two additional beam mounted 13 mm MG 131 .All MG 15's were already replaced by MG 131's. Despite all the structural improvements weaknesses of the airframe were never entirely resolved and throughout the FW 200's operational career many of them became major casualties when they broke their backs on landing.
With the C-4 variant the installation of the FuG 'Rostock' search radar( later FuG 200 'Hohentwiel”) took place and a Lotfe 7D bombsight was installed where required. To provide greater offensive capability , a number of FW 200's under the designation C-6a ( conversions of the C3/U1 and C3/U2 variant) were modified to carry two Henschel HS 293A rocket propelled guided bombs in combination with FuG 203B 'Kehl' missile control equipment. This variant entered service with 3/KG 40 in November 1943. The final version was the C-8 which added 'Hohentwiel ' search radar to their onboard equipment. It is believed that approximately 280 Condors of all variants were built.
| THE KIT |
In the box we find 6 frames containing 113 parts molded in light blue/grey plastic and one frame with 23 clear parts. Quality in detail and fit is very good. A few shallow sinkmarks were detected but nothing worthwhile to write home about.
The kit gives us one version , this being the FW 200 C8 with 2 Henschel Hs 293 guided bombs and the FuG 'Hohentwiehl' search radar antenna array. The decal sheet gives us 5 different unit markings. The quality of the decals is also very nice. The 7 page instruction sheet is well laid out and easy to follow.
| CONSTRUCTION |
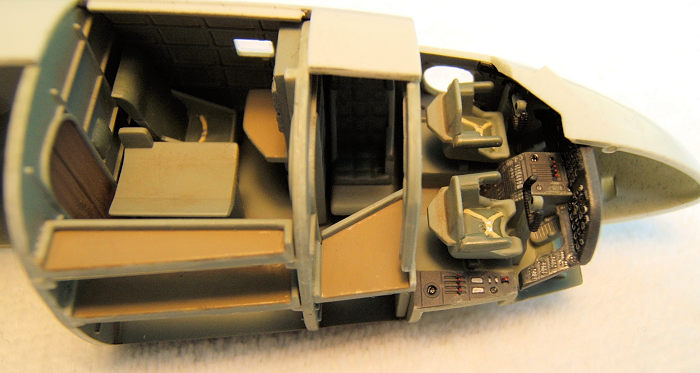 I always
start with taking all parts off their respective sprues , inspect and clean them
in case there is a bit of flash. All components were prepainted before assembly
and the instrument panel received a well fitting and nicely detailed decal. The
other consoles I hand painted under (10 fold ) magnification. The interior was
painted in RLM 2 (see photos) and I applied mild weathering using Pastel colours.
I always
start with taking all parts off their respective sprues , inspect and clean them
in case there is a bit of flash. All components were prepainted before assembly
and the instrument panel received a well fitting and nicely detailed decal. The
other consoles I hand painted under (10 fold ) magnification. The interior was
painted in RLM 2 (see photos) and I applied mild weathering using Pastel colours.
Next I prepared the upper decking carrying the aft dorsal gunner position and made sure that the turret fitted easily into place. The fit was a bit tight initially and a bit of careful sanding did the trick. The same applied to the forward dorsal decking and turret.
I taped the fuselage halfes together and made sure that the fore and aft decking fitted neatly into their respective positions. That done I prepainted all the parts and after the paint had dried I assembled the complete forward turret and the turret ring in the aft position.
Then followed the tailwheel assembly and with that item I was ready to place all the components into the left fuselage shell ( making sure that all the windows were glued into place first.) That done I joined both fuselage halfes and let things sit for a while until the glue and small amounts of putty at the seams have set. Finally I carefully sanded and polished the seams and re engraved panel lines where necessary.
The gondola comes in 3 clear clear plastic pieces . First I glued the front end to the main body and dry fitted these parts onto the bottom fuselage to make sure that there are no gaps. Having done that I masked off all the small window panels on the outside. The inside of the gondola I painted by hand with RLM 02.The masking tape gave me a good guide to where the correct out lines of the windows were. Next I glued the MG 131into the aft turret and then the complete assembly to the gondola.
Last I installed the second MG 131 into the front turret and masked off the gun barrel and gun sights.
 The
Condor's landing gear is rather complex and the kit gives us 7 parts for the
supporting frame plus 2 hubs and 2 wheels for each landing gear assembly. The
landing gear doors come as one piece each and need to be separated for
displaying the plane with landing gear down.
The
Condor's landing gear is rather complex and the kit gives us 7 parts for the
supporting frame plus 2 hubs and 2 wheels for each landing gear assembly. The
landing gear doors come as one piece each and need to be separated for
displaying the plane with landing gear down.
After carefully cleaning up all the bits I first assembled the main support structure and painted everything. After the paint had dried I fitted the wheels and moved on to getting the wings and tail plane ready to go.
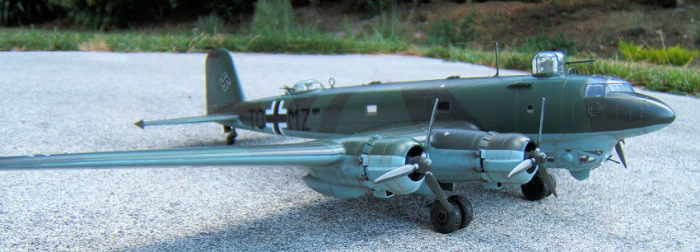
The engines can either be displayed with engine panels open or closed. I have chosen the latter option.The insides of the nacelles and cowlings were painted in RLM 02 . The radial engines received matt black cylinders and blue grey crank cases. The cylindes were carefully dry brushed using Tamiya matt aluminium to highlight push rods and cylinder fins. The exhaust system was painted iron and weathered with dark rust red pastel.
Propellers and hubs were painted dark green. The shafts have slight interference fit into the crank cases , so I decided not to go per plan and use the parts to secure the propellers. I also thought it being easier to paint the completed nacelles (and the exhaust rings) separately and install these when the plane has received it's paint job. I decided at this point to dry fit the cockpit canopy to make sure optimal fit before painting and after finishing I glued the canopy into place and masked off the canopy.
Wings and tailplane are straight forward. The fit is good and cleaning up the seams required ( as always )a bit of putty and careful sanding and finishing around the leading and trailing edges. Joining the tail plane and wings to the fuselage was also straight forward and needed only small corrections. After the wings were glued into place and the seams had been cleaned up the complete gondola was attached to the fuselage.
| COLORS & MARKINGS |
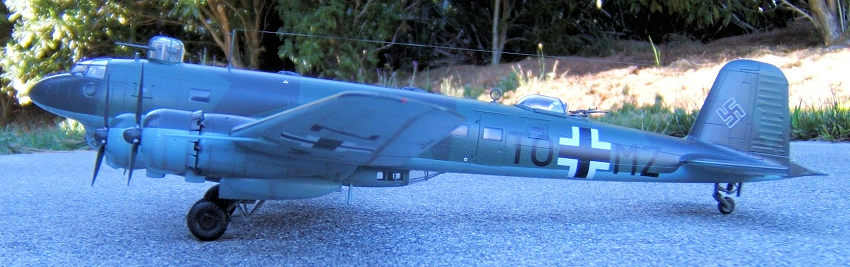
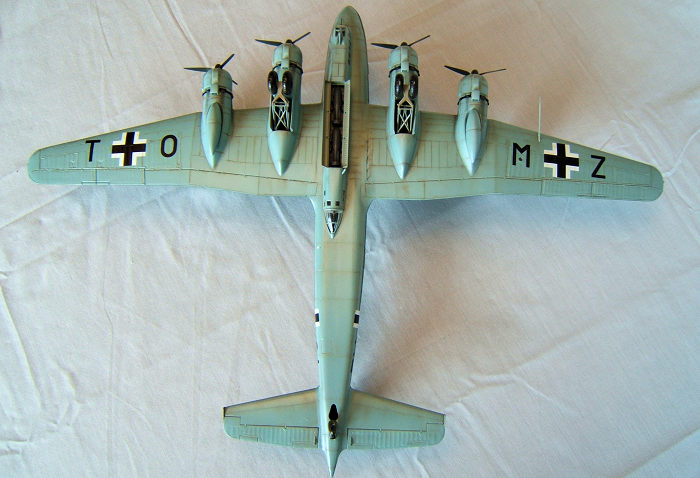
As usual, painting things is preceeded by masking off all clear parts , engines, wheel wells , tailwheel, ( the main landing gear I will install later) and the bomb bay. I started with the undersides ( plus landing gear doors, bomb bay doors,and 2 x3oo ltr drop tanks for my C3 /U 8 recon version) using Tamiya XF 23 light blue and let the paint dry overnight.
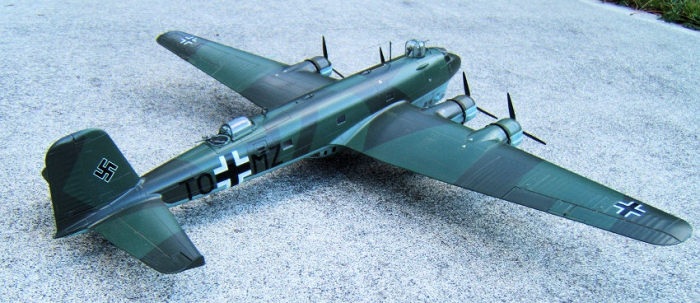
 The next
step was to mask off the entire underside of the model . This done , I gave the
model a overall coat of RLM 73 ( which I mixed using different Tamiya greens and
flat white) and let the paint dry overnight. More masking !! This was done to
lay out the splinter camo for the dark green areas using Tamiya XF 61 with a bit
of Tamiya flat white mixed in and let the paint dry overnight. Now it was time
to carefully remove the masking tape ( and there was a lot of that !) except for
the tape covering canopy windows and gondola glazing.
The next
step was to mask off the entire underside of the model . This done , I gave the
model a overall coat of RLM 73 ( which I mixed using different Tamiya greens and
flat white) and let the paint dry overnight. More masking !! This was done to
lay out the splinter camo for the dark green areas using Tamiya XF 61 with a bit
of Tamiya flat white mixed in and let the paint dry overnight. Now it was time
to carefully remove the masking tape ( and there was a lot of that !) except for
the tape covering canopy windows and gondola glazing.
I needed to touch up small areas of the light blue section meeting the splinter camo caused by the masking tape lifting a little bit. Having done that a overall coat of Tamiya clear X 22 was applied to give all surfaces a slight gloss. This was done to give the decals a smooth surface to adhere to. The model was left to dry overnight.
Now it was time to fit the main landing gear assembly. This is a rather fiddly job but with patience I managed to get that done without breaking anything. The four landing gear covers followed. CA glue was used to do that. I glued the two bombs into place in the central bomb bay and attached the bomb bay doors. All four engine nacelles and exhaust sytems were glued into place. Last but not least I fitted the pitot tube .
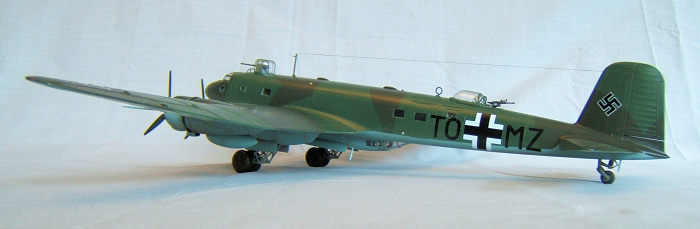 The decals
went on nicely with the help of Micro Sol decal solution. No silvering anywhere.
After the decals had set I gave these a thin sealing coat of Tamiya clear X 22
and left the model to dry .Before I moved on to the last step of the build
process-- the weathering-- I removed the rest of the masking tape covering
canopy ,gondola glazing , and forward turret and glued the machine gun and
canopy for the aft gun position into place
The decals
went on nicely with the help of Micro Sol decal solution. No silvering anywhere.
After the decals had set I gave these a thin sealing coat of Tamiya clear X 22
and left the model to dry .Before I moved on to the last step of the build
process-- the weathering-- I removed the rest of the masking tape covering
canopy ,gondola glazing , and forward turret and glued the machine gun and
canopy for the aft gun position into place
After the weathering was done I installed the antenna wires using EZ line.
16 January 2018
Copyright ModelingMadness.com.
If you would like your product reviewed fairly and fairly
quickly, please
contact
the editor
or see other details in the
Note to
Contributors.
Back to the Main Page
Back to the Review Index Page
Back to the Previews Index Page