Merlin 1/72 He-280
|
KIT # |
? |
|
PRICE: |
(If it is over $.01 it is too much! Ed.) |
|
DECALS: |
One version the 280v3 |
|
REVIEWER: |
Mark Fordham |
|
NOTES: |
Get LOTS of sandpaper |
|
HISTORY |
 The first powered
version of the Heinkel He 280 made it’s maiden flight on the 2 nd April
1941 and was unique in the fact that is was the first flight of a
turbojet powered aircraft that had been specifically designed as a
fighter.
The first powered
version of the Heinkel He 280 made it’s maiden flight on the 2 nd April
1941 and was unique in the fact that is was the first flight of a
turbojet powered aircraft that had been specifically designed as a
fighter.
The He280 had in fact been test flown as a glider at the end of the previous year and was one of the first aircraft to be fitted with ejector seats, powered by compressed air, during the test program while being towed by two Me 110’s the controls of the he280 iced up and the pilot was forced to successfully use the ejection seat.
At one point the He 280 was flown in direct competition with the new Me 262 and although it well it was decided to put the Me 262 into production and cease development of the Heinkel. The main reason put forward was that the Me 262 had superior range, although there is reason to believe that Hitler wanted Heinkel to concentrate on bombers and leave the fighters to Messerschmitt.
|
THE KIT |
One
word, MERLIN, sums up the kit, for those of you that have never had the
pleasure of Merlin kits they were a manufacturer of crude (in some cases
very crude) short run injection moulded kits with poor quality white
metal wheels, seats and undercarriage. In most cases the subjects that
Merlin covered have now been released by other manufacturers
 such as MPM, A-Model
and Special Hobby. So unless you are wanting a Wapiti for your
collection or you are a slightly crazy Kiwi there really is no need to
punish yourself these days by doing a Merlin kit. I was fortunate enough
to be given 7 Merlin kit by a very generous English chap (thanks Tel) who
passed then on to me because he wanted to see them built.
such as MPM, A-Model
and Special Hobby. So unless you are wanting a Wapiti for your
collection or you are a slightly crazy Kiwi there really is no need to
punish yourself these days by doing a Merlin kit. I was fortunate enough
to be given 7 Merlin kit by a very generous English chap (thanks Tel) who
passed then on to me because he wanted to see them built.
One opening up the box I was confronted with ten “blobs” of soft plastic a very thick canopy that makes the average Airfix one look like vacuformed replacements and a couple of white metal blobs that were either buttons, moulding slag or wheels, Still haven’t decided which yet. An A4 sheet of instructions with 1/72nd scale plans and a very nice little decal sheet rounded of this gem.
The overall quality of the kit parts is very poor with one fuselage half being about 2 mm longer than the other side, the wings are cast in one solid piece that is very thick and suffer from sink marks, the engine pods range from being oval to banana shaped J oh dear! What have I got myself into, and this was one of the better Merlin kits, streets ahead of the Wapiti that I had just finished.
|
CONSTRUCTION |
Construction? This section should have been renamed Carving, cause that’s
what you have to do first, carve the fuselage to shape al-la Gillows
balsa models. With the fuselage glued together I could then get it sanded
round and clean up the mismatched lengths as best as I could. By lining
up the fuselage halves at the cockpit and allowing the extra length hang
over the tail and nose meant that at least the canopy would fit. And it
was easier to reshape the tail and nose due to the very thick plastic.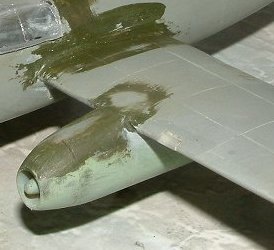
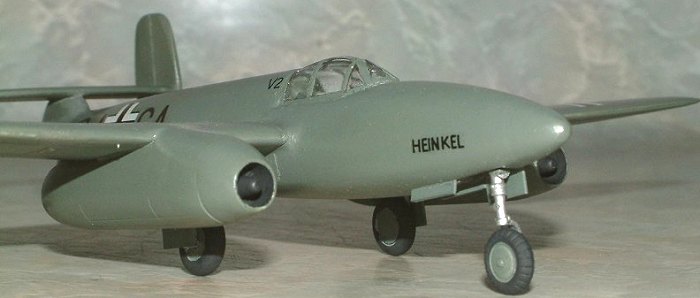
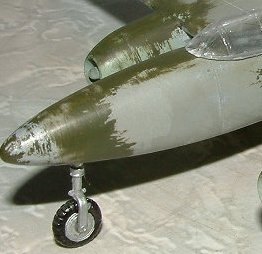
With the fuselage done the wings where then carved out of the two pieces of supplied plastic, The fact that they were so thick was a bonus as it enabled me to sand out most of the sink marks and thin down the trailing edge to a scale thickness of two feet instead of six. At this point the engine pods looked like complete write offs as they were just so badly formed. Doing a bit of research on the net and in books I discovered that the V2 version of the Heinkel was fitted with the same Jumo 004 engines that were fitted to the Me 262, I happened to have a couple of Matchbox 262 spare from the Me 262 V1 (the prop driven one) conversion I did a while ago, with a bit of cutting and hacking the Matchbox engines could be flared into the He 280 wings. The Matchbox Me 262 also donated it’s Nose wheel and strut to the cause as well.
When mating the wings up to the fuselage it becomes obvious that the moulded wing root on the fuselage doesn’t bear any resemblance to the shape of the supplied wings, you have the completely reshape the wing roots and remove about 5 mm off the rear to eliminate the step between wing and root. To make matter even more frustrating the root is about 1 mm too deep and requires major sanding to get it to flair in.
 Moving on before RSI
set in I took each blob of plastic and sanded it to shape, referencing
the supplied plans all the time thinning in some cases down to half the
originals thickness for the tailplanes. Once the major airframe
components were sanded to shape and glued on it was time to stand back
and look at the progress so far, something didn’t look right, the He 280
looked good compared to the plans but looked wrong when comparing it to
photos. Two brews and much screwing up of eyes later it hit me, the nose
was too long and pointy, in fact it bore a remarkable resemblance to a
Delta Dart nose. Time for drastic surgery, I made a cut about 15 mm back
from the nose and then proceeded to wop 5 mm off behind that. I then
glued the nose back on and sanded and puttied the nose until smooth, now
compared to the plans the He280 is 5 mm too short but it looks a lot
better when comparing it to photos.
Moving on before RSI
set in I took each blob of plastic and sanded it to shape, referencing
the supplied plans all the time thinning in some cases down to half the
originals thickness for the tailplanes. Once the major airframe
components were sanded to shape and glued on it was time to stand back
and look at the progress so far, something didn’t look right, the He 280
looked good compared to the plans but looked wrong when comparing it to
photos. Two brews and much screwing up of eyes later it hit me, the nose
was too long and pointy, in fact it bore a remarkable resemblance to a
Delta Dart nose. Time for drastic surgery, I made a cut about 15 mm back
from the nose and then proceeded to wop 5 mm off behind that. I then
glued the nose back on and sanded and puttied the nose until smooth, now
compared to the plans the He280 is 5 mm too short but it looks a lot
better when comparing it to photos.
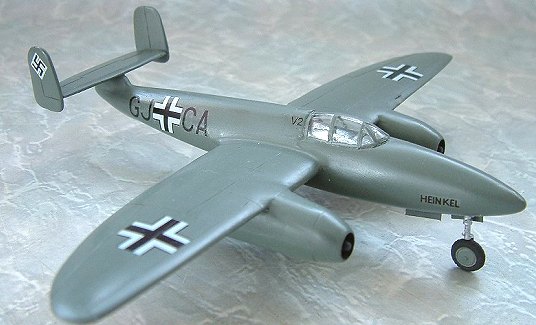
With the Airframe now finally complete I scribed a few panel lines here and there and set about scratch building a cockpit interior, I had left it out until now because of the amount of heavy handling the fuselage would get. With a canopy that had the clearness of a pea soup fog, I didn’t go overboard with the detailing with a seat and harness and one of my laser printed instrument panels to finish off the deal. The seat and visible cockpit area was given a swish of RLM Gray and the Futured canopy was then glued on and masked up in preparation for painting.
The Main undercarriage struts were scratch built from stretched sprue and masking tape with the main wheels coming from n Airfix Whirlwind with new wheel covers added from small disks of 5 tho plastic card. The nose wheel assembly came straight from the Matchbox Me 262 and was shorted by about 4 mm to get the right height.
|
CAMOUFLAGE & MARKINGS |
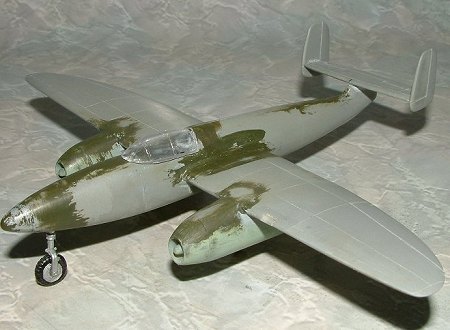
What’s the old saying “Any colour as long as it’s Black?” well in this case Gray , Tamiya RLM Gray. After a couple of thick coats of matt white to act as primer the airframe was treated to three of four reasonably heavy coats of RLM Gray to hide most of the sanding marks, ripples, cat hair, etc. Once Dry the paint was rubbed down with a nylon pot scrubber to remove said sanding marks ripples and cat hair. Rubbing the paint with a soft pot scrubber is a really good way of getting orange peel out of your paint because you haven’t thinned it quite enough and for removing fine hair or “free floating objects” out of dried paint. Handy if you are like me and live in a place that has a lot of floating pine pollen at this time of the year.
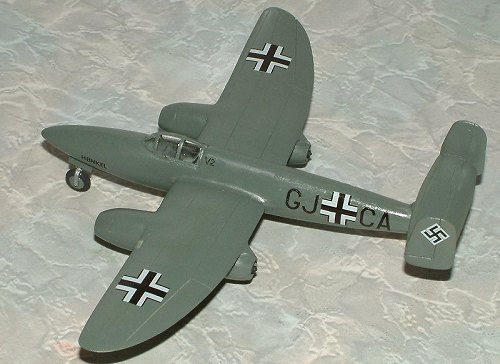
 With the paint work
reasonably smooth a couple of coats of Future was brushed over the plane
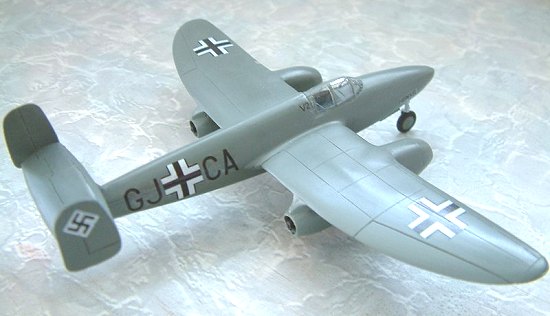
in preparation for the decals. Merlin supply decal for the V3 prototype
with the codes GJ*CB , this particular aircraft was fitted with the
original Heinkel HE-S series turbojets. As I had fitted the Jumbo 04
turbojets I needed to do the V2 prototype with the codes GJ*CA, What I
did was use a RAF (sic) Font on my computer and generated the right size
lettering in MS Word and printed them out onto clear decal sheet using a
HP 1200 Laser printer, The only difference is the “J” as it is supposed
to have a top “bar” but I was unable to find a simular match in the 3000
odd fonts I have on CD. As soon as the decals where printed they were
given coat of liquid decal from microset to protect the decals from
water. They were then cut out and applied as per normal decals, be warned
that it pays not to use decal setting solutions of these types of decal
as the setting solution can sometime eat through the protective liquid
decal layer and destroy the printed codes, putting the decal onto a bed
of wet future is the best way to apply these types of home made decal.
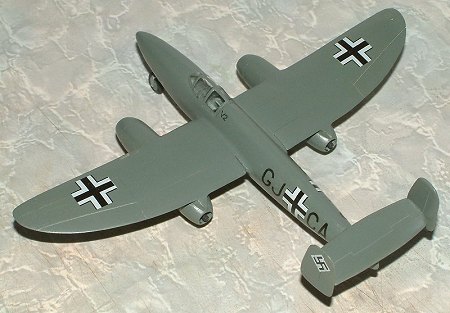
The Supplied national marking from Merlin went down with out any problems
and reacted well to my homemade decal solution. The V2 marking were added
and are slightly too large but the smallest font size was 8 point, I
could have done it in Paintshop Pro as an image and scaled it down
smaller but I find it gets a little too blurry to be usable.
With the paint work
reasonably smooth a couple of coats of Future was brushed over the plane
in preparation for the decals. Merlin supply decal for the V3 prototype
with the codes GJ*CB , this particular aircraft was fitted with the
original Heinkel HE-S series turbojets. As I had fitted the Jumbo 04
turbojets I needed to do the V2 prototype with the codes GJ*CA, What I
did was use a RAF (sic) Font on my computer and generated the right size
lettering in MS Word and printed them out onto clear decal sheet using a
HP 1200 Laser printer, The only difference is the “J” as it is supposed
to have a top “bar” but I was unable to find a simular match in the 3000
odd fonts I have on CD. As soon as the decals where printed they were
given coat of liquid decal from microset to protect the decals from
water. They were then cut out and applied as per normal decals, be warned
that it pays not to use decal setting solutions of these types of decal
as the setting solution can sometime eat through the protective liquid
decal layer and destroy the printed codes, putting the decal onto a bed
of wet future is the best way to apply these types of home made decal.
The Supplied national marking from Merlin went down with out any problems
and reacted well to my homemade decal solution. The V2 marking were added
and are slightly too large but the smallest font size was 8 point, I
could have done it in Paintshop Pro as an image and scaled it down
smaller but I find it gets a little too blurry to be usable.
|
CONCLUSIONS |
 Not the hardest
Merlin I have done, that falls with the Merlin Wapiti but by no means an
easy kit. Once competed the satisfaction of turning blobs of plastic into
something that resembles an out-of-the-box Airfix kit is rewarding. I
doubt whether many people are crazy enough to bother building these types
of old kits now as most of them are now available in 1/72 nd Scale by
better manufacturers.
Not the hardest
Merlin I have done, that falls with the Merlin Wapiti but by no means an
easy kit. Once competed the satisfaction of turning blobs of plastic into
something that resembles an out-of-the-box Airfix kit is rewarding. I
doubt whether many people are crazy enough to bother building these types
of old kits now as most of them are now available in 1/72 nd Scale by
better manufacturers.
Still if you want to hone your scratch building skills for that ultra rare vacuform that you have been sitting on the last thirty years dig out these old Merlin kits and while away a few evenings. My thanks to Tel McGrady for passing on his collection of Merlin kits for me to experience. (Obviously Tel is some sort of sadist...:o) Ed)
|
REFERENCES |
Various internet Sites, just “Google” He 280 and follow the links.
Fighting Aircraft of WWII Bill Gunston
Copyright ModelingMadness.com. All rights reserved. No reproduction in part or in whole without express permission.
If you would like your product reviewed fairly and fairly quickly, please contact the editor or see other details in the Note to Contributors.