|
KIT: |
Tamiya 1/48 Bf-109E-4/7 trop |
|
KIT # |
61063 |
|
PRICE: |
31.65 € |
|
DECALS: |
Three options |
|
REVIEWER: |
Javier Elejalde |
|
NOTES: |
|
HISTORY |
No other fighter has been built in greater quantity than the Messerschmitt Bf109 and it was only second to Russian Il-2 Stormovik in history, having been built over 30000 units. The Bf109 was one of the most advanced fighters in the world when WWII started, but as the war went on its supremacy over Allied fighters was reduced despite the continuous improvements made on it.
The Bf109E version, called "Emil" was the spearhead of the Blitzkrieg in the opening phases of the war. It annihilated opposing fighters over Poland, Norway, Netherlands and France, where it met RAF's Spitfires, a real threat for its superiority over European skies in those days. During the Battle of Britain, in the summer of 1940 it was the only German fighter capable of defeating the British Spitfires and Hurricanes, for the twin-engined Bf110 rapidly showed its limitations in dogfihting.
 Powered
by the Daimler Benz DB601A (1100 hp) the Emil enjoyed great acceleration
and its diving ability saved more than one's pilot's life, for the German
engine featured a fuel injection system that ensured continuous fuel
supply, even in negative g maneuvers like a direct dive, not like
Spitfires' Rolls Royce Merlin engines. Its greatest handicap during the
Battle of Britain was the lack of sufficient fuel load to remain over the
British sky for more than about 15 minutes before having to turn back to
its bases in France and Belgium. In spite of that shortcoming, some
German pilots managed to score impressive victory records over the
British fighters.
Powered
by the Daimler Benz DB601A (1100 hp) the Emil enjoyed great acceleration
and its diving ability saved more than one's pilot's life, for the German
engine featured a fuel injection system that ensured continuous fuel
supply, even in negative g maneuvers like a direct dive, not like
Spitfires' Rolls Royce Merlin engines. Its greatest handicap during the
Battle of Britain was the lack of sufficient fuel load to remain over the
British sky for more than about 15 minutes before having to turn back to
its bases in France and Belgium. In spite of that shortcoming, some
German pilots managed to score impressive victory records over the
British fighters.
An example of these German fighter pilots was Helmut Wick, who scored 42 kills over England between August and November of 1940. He registered his first victory on 22 November 1939, when he shot down a French Hawk 75 fighter flown by the French ace Camille Plubeau (who scored 14 victories). Wick continued increasing the number of aerial victories over France, including 4 fighters shot down on a single day (5 June 1940). By late September of 1940 he had already exceeded 30 kills and on 6 November he shot down five RAF fighters! On 28 November 1940, after shooting down his 56th kill (becoming the leading fighter ace in the world) his Bf109 was hit by British ace John Dundas (13.3333 confirmed victories) and crushed on the English Channel. In a year Wick had scored 56 confirmed victories, being 24 of them against RAF's Spitfires.
|
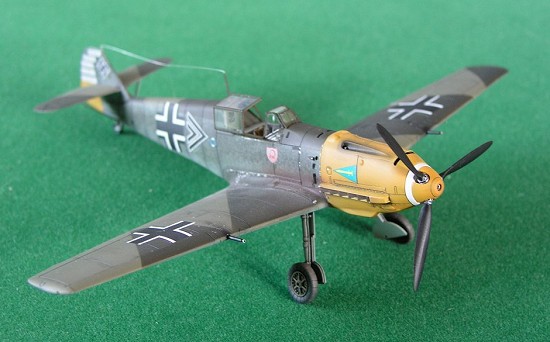
THE KIT |
What does Tamiya offer in this box? A very well detailed Emil; a superb engineered kit, with everything common to Tamiya kits: engraved panel lines, detailed rivets, complete cockpit, buidling facilities such as the separated tires and the ability to glue the exhaust pipes after painting the fuselage. I found, though, the propeller a little bit sharp pointed.
 Construction options include open or closed cockpit and undercarriage,
and a drop tank. Three different versions can be built: an E-4, an E-4
Trop and an E-7. Decals are provided for completing three different
aircraft, flown by three aces:
Construction options include open or closed cockpit and undercarriage,
and a drop tank. Three different versions can be built: an E-4, an E-4
Trop and an E-7. Decals are provided for completing three different
aircraft, flown by three aces:
Bf109-E7 flown by Joachim Münchenberg (7./JG26 1941, Sicily)
Bf109-E4 Trop flown by Werner Schroer (2./JG27 September 1941, North Africa)
Bf109-E4 flown by Helmut Wick (I./JG2 October 1940, Belgium)
The instructions sheet is very well done, with a brief historical reference, beautifully ilustrated steps, and very well done profiles for the three schemes. A sheet in 1/48 scale showing the camouflage pattern for the E-4 Trop version is also included. The colour references are given in Tamiya codes. The fact that not even the RLM numbers are indicated is the only shortcoming I found in the instructions, but as the colors used on these Emils are so well known and easy to find out there, it doesn't matter at all.
|
CONSTRUCTION |
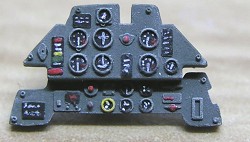
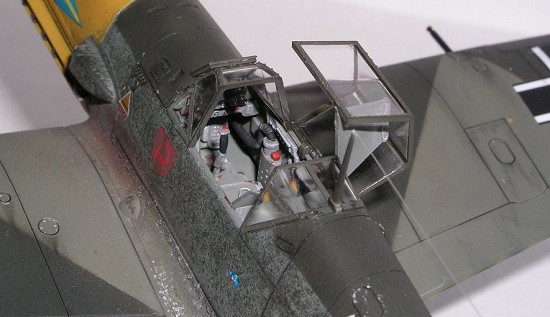
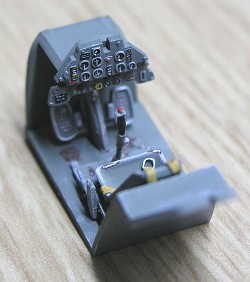 Construction started with the cockpit, as always, concretely with the
pilot's seat. I built the harnesses using a copper sheet and wire. Then I
attached the hydraulic pipes for the breaks to the undercarriage legs. I
spraying all interior parts, the wheel bays and the undercarriage RLM02
and after drybrushing them with light grey I painted the details with
acrylics. I added a conduction hose made of copper wire rolled around a
thicker wire. The instruments panel is very accurate, with perfect raised
details. All gauges were painted black and detailed in white.
Construction started with the cockpit, as always, concretely with the
pilot's seat. I built the harnesses using a copper sheet and wire. Then I
attached the hydraulic pipes for the breaks to the undercarriage legs. I
spraying all interior parts, the wheel bays and the undercarriage RLM02
and after drybrushing them with light grey I painted the details with
acrylics. I added a conduction hose made of copper wire rolled around a
thicker wire. The instruments panel is very accurate, with perfect raised
details. All gauges were painted black and detailed in white.
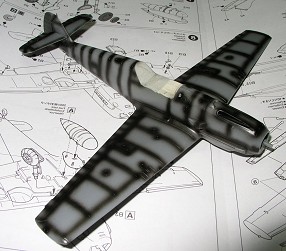
I glued together all parts and joined the fuselage with absolutely no problem. When the wings were attached I checked the almost perfect fitting betweend them and the fuselage. Very little filler was needed; you know, that's Tamiya's quality. I didn't glue the tailplane braces at this moment in order to make the painting easier. The main construction phase was completed quicker than I thought.
|
COLORS & MARKINGS |
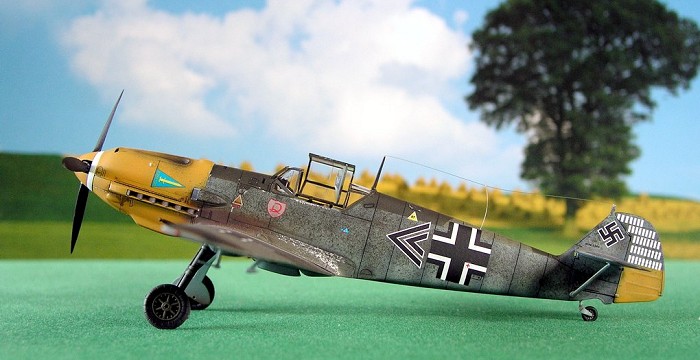
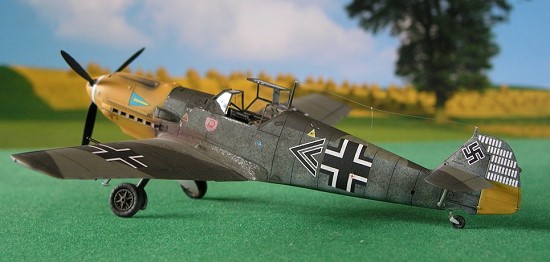
 I chose
Wick's plane because I've always wanted to build a Battle of Britain
Emil. The color scheme, although given in Tamiya colors is the well known
RLM65 on sides and lower surfaces of the fuselage, and RLM02 and RLM71 on
upper surfaces. This plane had the nose and lower surface of the tail
rudder painted yellow. It was a typical painting scheme during 1940, but
this aircraft showed a particular stippling on fuselage sides which was
common on planes of JG2 during the Battle of Britain. This stippling was
applied in the front bases in order to improve the camouflage the
fighters carried when arriving from factories.
I chose
Wick's plane because I've always wanted to build a Battle of Britain
Emil. The color scheme, although given in Tamiya colors is the well known
RLM65 on sides and lower surfaces of the fuselage, and RLM02 and RLM71 on
upper surfaces. This plane had the nose and lower surface of the tail
rudder painted yellow. It was a typical painting scheme during 1940, but
this aircraft showed a particular stippling on fuselage sides which was
common on planes of JG2 during the Battle of Britain. This stippling was
applied in the front bases in order to improve the camouflage the
fighters carried when arriving from factories.
Before
start painting I masked the wheel wells and the cockpit with masking
tape. The canopy was masked using adhesive tape and a sharp model knife
to cut it over the window frames. I preshaded the panel lines using
black. Next I sprayed RLM65 on sides and underside the fuselage. Next
step was the RLM02, just airbrushed on the surfaces where it was not
covered with the RLM70 in order to preserve the preshaded panel lines. At
the end I realized the panel lines were almost totally covered on the
upper wing surfaces. I must improve this
 technique... The last camouglage
color was RLM71, painted after putting the adequate masks to conform the
hard edge camouflage pattern used on this plane.
technique... The last camouglage
color was RLM71, painted after putting the adequate masks to conform the
hard edge camouflage pattern used on this plane.
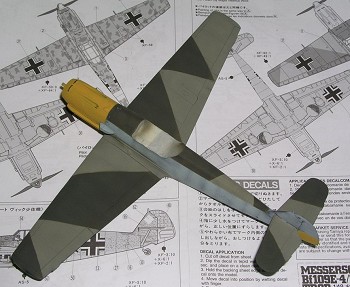
I altered the base mixes with some more khaki and sprayed it on the panels to simulate color fading due to weather exposure, but I realized I made this effect too lightly after aplying the varnish. I will try making the postshading effect heavier next time.
The next color to be painted was the nose and tail yellow. The nose masking was easier than I thought, because the air intake on the port side seemed to make it a little bit tricky, but there was no problem with it. The tail masking work was easier so the yellow color was applied with no problem at all. I poured a couple of red paint drops on the yellow in order to fade its flat-yellow appearance. The result was fine.
So the three main camouflage and the nose and tail colors were applied and ready for the final step of the painting work: the RLM71 stippling. The stippling showed on JG2 machines was applied by hand, using a brush (From my reading, they used a sponge! Ed), it was not sprayed with a compressed air tool, so I let the airbrush take a rest for a while. To replicate the efect in 1/48 scale I decided to apply the stippling with a hard bristled brush. I slightly soaked it into the paint and applied it just touching the model with the point of the bristels. It was very easy and quick to apply. I had never tried this kind of stippling before, but the result was very appealing.
The painting of the tyres was a pleasure: the two parts were painted separately, drybrushed and finally glued together easily.
 At this
point the model was taking the appearance of a 1940 Emil. A Tamiya gloss
varnish layer was applied to prepare the surface for the decaling phase.
The decal sheet provided by Tamiya is very attractive, and the decals
seemed to be quite good on the sheet. A good point is that swastikas are
included, something that unfortunately is not common in other
manufacturers like Academy, Italeri or Revell. On previous models I used
to paint the national markings, including Balkan Kreunz and swastikas,
but as these decals seemed pretty good ones I decided to use them for all
the markings (for the first time).
At this
point the model was taking the appearance of a 1940 Emil. A Tamiya gloss
varnish layer was applied to prepare the surface for the decaling phase.
The decal sheet provided by Tamiya is very attractive, and the decals
seemed to be quite good on the sheet. A good point is that swastikas are
included, something that unfortunately is not common in other
manufacturers like Academy, Italeri or Revell. On previous models I used
to paint the national markings, including Balkan Kreunz and swastikas,
but as these decals seemed pretty good ones I decided to use them for all
the markings (for the first time).
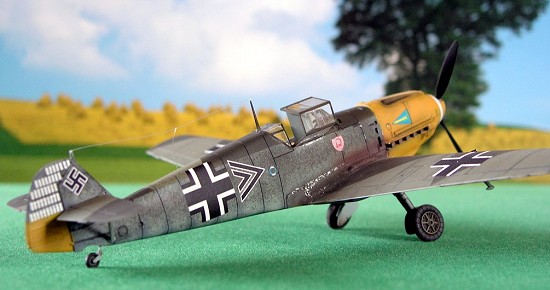
I used Micro Sol and Micro Set solutions to apply them, but first I cut the surrounding clear borders because they always tend to be seen after being attached, specially on dark surfaces. The decals applying work took me a morning and the final result was fine and disappointing at a time. The model looked impressive with the black and white crosses, the kills markings on the tail and the double chevron insignia, but they didn't fit the panel lines very well. In fact they hide the beautifully recessed panel lines under them, although I used Micro Sol on them. I've noticed when the decals are applied over raised panel lines they tend to fit it after using the solution, but on recessed panel lines they simply don't "enter" into them, so the panel stops being seen when it reaches the decal, it just disappears under it! I don't know if the problem is that my decaling technique is very poor or the decals I use are too thick.
Anyway,
I sealed the decals with another gloss varnish layer and started
weathering. It consisted mainly in washing the panel lines using artist's
oils. I bought an odorless spirit to dissolve the oils and found it very
good for using at home, because the smell is really non-existent. I
highly recommend it to everyon e
who uses turpentine because although it's a bit expensive, I use very
little each time, so the bottle can last for very long.
e
who uses turpentine because although it's a bit expensive, I use very
little each time, so the bottle can last for very long.
This process was completed very quickly and then it was the time to simulate the paint chipping. I used Tamiya's silver chrome and after doing little chipping on the engine cowling with a fine brush I focused on the wing roots, specially on the port wing, where the pilot stepped to reach the cockpit.
Finally the smoke stains behind the exhaust pipes were airbrushed using a black and brown mix. The stains caused by the machineguns and cannons firing and the cartridge releasing were painted just black.
With the whole painting job finished it was time to apply a Marabu matt varnish to protect the job. The final construction step was the attachment of the undercarriage, the spinner and the canopy.
|
CONCLUSIONS |
 A very
nice model, and having built a 1/48 Hasegawa Bf109-E, I couldn't say
which one lookes nicer when finished. What I could say is that Tamiya's
one is a little bit easier to build, with some little details that make
the building and painting process a pleasure.
A very
nice model, and having built a 1/48 Hasegawa Bf109-E, I couldn't say
which one lookes nicer when finished. What I could say is that Tamiya's
one is a little bit easier to build, with some little details that make
the building and painting process a pleasure.
Being the final result almost the same, I found the biggest difference in the price: I paid about 18€ (2 years ago, and it even included some etched parts) for the Hasegawa Emil, and 31€ for the Tamiya's one. OK, the Tamiya kit is new and Hasegawa's one was older, but the differences between them are almost irrelevant when compared to the price. In case I build another 109, I think I’ll choose the cheaper Hasegawa kit.
June 2004
If you would like your product reviewed fairly and quickly by a site that has over 250,000 visitors a month, please contact me or see other details in the Note to Contributors.