|
KIT: |
Hasegawa 1/32 Bf-109G-10 |
|
KIT # |
08072 |
|
PRICE: |
¥4200 (about $41) from HLJ |
|
DECALS: |
Three options |
|
REVIEWER: |
Tom Cleaver |
|
NOTES: |
|
HISTORY |
By the Spring of 1944, the Bf-109G-6, which had been the primary production version of Messerschmitt’s fighter since the previous fall, was falling behind in the relentless race for performance. Beginning in the late spring, many airframes were re-engined with the DB605D, on which an increased-diameter supercharger had been fitted and compression raised to from 7.3/7.5 to 8.3/8.5, using standard B4 (87 octane) fuel with methanol-water (MW50) injection, to provide 1,800 h.p. for take-off and 1,600 h.p. at 6,000 meters. That summer, production “standardized” on the Bf-109G-14, which could use this engine or the DB605CD, which utilized C3 (96 octane) fuel and MW50 to provide 2,000 h.p. for take-off and 1,800 h.p. at 6,000 meters. That fall, the redesigned Bf-109K-4 came into production and reached the Jagdwaffe beginning in mid-November 1944.
 The Bf-109G-10
began life as a way of modernizing the Bf-109G-6 airframe to make it as
much like a Bf-109K as possible. This version, all of which were
re-manufactured G-6 airframes, did not enter service until January 1945,
after the introduction of the Bf-109K-4, which has spread no small amount
of confusion among Bf-109 “experten”. Coupled with the fact that the
G-10 could appear with either engine, with or without an extended-leg
tail wheel like the K-4 had, with or without the taller wooden rudder of
the K-4, G-14, and late production G-6, and with or without the larger
wheels and associated upper wing fairing of the K-4 variant, it is close
to impossible unless one can discern a Werkenummer in a
photograph, and has access to a list of sub-types by serial number (and
even then it is not a 100% lock since the records are not totally
complete), to determine if one is looking at a Bf-109G-6AS, a
Bf-109G-14AS, or a Bf-109G-10. There are few photos available of any of
these late war types to top it off. (Editor's Note. If one can see the
cockpit, then the G-10 has a small protrusion in the back wall behind the
pilot to provide clearance for the MW-50 tank.)
The Bf-109G-10
began life as a way of modernizing the Bf-109G-6 airframe to make it as
much like a Bf-109K as possible. This version, all of which were
re-manufactured G-6 airframes, did not enter service until January 1945,
after the introduction of the Bf-109K-4, which has spread no small amount
of confusion among Bf-109 “experten”. Coupled with the fact that the
G-10 could appear with either engine, with or without an extended-leg
tail wheel like the K-4 had, with or without the taller wooden rudder of
the K-4, G-14, and late production G-6, and with or without the larger
wheels and associated upper wing fairing of the K-4 variant, it is close
to impossible unless one can discern a Werkenummer in a
photograph, and has access to a list of sub-types by serial number (and
even then it is not a 100% lock since the records are not totally
complete), to determine if one is looking at a Bf-109G-6AS, a
Bf-109G-14AS, or a Bf-109G-10. There are few photos available of any of
these late war types to top it off. (Editor's Note. If one can see the
cockpit, then the G-10 has a small protrusion in the back wall behind the
pilot to provide clearance for the MW-50 tank.)
What is known definitely about the Bf-109G-10 is that it was the final type to equip Squadrigli of the Aviazione della R.S.I., as well as the last type to equip the Croatian Jagdstaffel that flew with the Italians in the last months of the war, and that it was found interchangeably with the Bf-109K-4 in Luftwaffe Geschwadern in the last months of the war. It was acknowledge the fastest of the series, with a top speed at altitude of 452 m.p.h., slightly faster than the Bf-109K4. As far as having any effect on the war, the airplane may as well not have existed; by the time it arrived, the Luftwaffe had shot its final bolt in Operation Bodenplatte, and was a spent force with few leaders left alive, fewer pilots of any ability left on operations, and an uncertain supply of aviation gasoline which meant most of these airplanes were supplied to a unit that never flew them before they were lost to Allied strafing in the few months after the Battle of the Bulge that spelled the end of the Nazis and their “Thousand-Year Reich.”
|
THE KIT |
 Following
Hasegawa’s philosophy of doing every version of an aircraft type that can
be done while leaving a minimum of 70 of the sprues from the “main
version” kit in each box, the Bf-109G-10 arrives looking very similar to
the previous Bf-109K-4 kit, with the addition of propeller blades, wheels
and wheel fairings from the Bf-109G-6 kit, and the Bf-109G-6 cockpit,
without the open tail wheel well and outer main gear doors of the K. The
fuselage is again sectioned just aft of the cockpit, and the forward
parts are properly asymmetric in shape when seen from above. With the
fairing bulges on the lower forward cowling, this is a version of the
G-10 powered by the DB505CD with C3 fuel.
Following
Hasegawa’s philosophy of doing every version of an aircraft type that can
be done while leaving a minimum of 70 of the sprues from the “main
version” kit in each box, the Bf-109G-10 arrives looking very similar to
the previous Bf-109K-4 kit, with the addition of propeller blades, wheels
and wheel fairings from the Bf-109G-6 kit, and the Bf-109G-6 cockpit,
without the open tail wheel well and outer main gear doors of the K. The
fuselage is again sectioned just aft of the cockpit, and the forward
parts are properly asymmetric in shape when seen from above. With the
fairing bulges on the lower forward cowling, this is a version of the
G-10 powered by the DB505CD with C3 fuel.
Unfortunately, this last item in the kit means that none of the aircraft for which decals are provided are accurate for the airframe provided, since photographs reveal all of these are the version without the lower cowling bulges. There have already been howls from the 109nutz about this, and assurances from aftermarket decal makers of proper decals to appear in short order. Given the paucity of photographic evidence of the Bf-109G-10, this is unlikely to result in a lot of sheets, though it would be nice to see some Italian aircraft, given the interesting look of the combination of German and Italian markings found on these aircraft.
The kit
cockpit is quite acceptable for those who are not building for a
competition and who are likely to view their models from a distance of 12
inches or more most of the time. The one thing that will certainly
improve the look of the final product is the use of the Cutting Edge
posable resin seat belts,
 which I have come to
swear by for large scale Luftwaffe models. Jerry Crandall reported
that the first two kits he received were missing the rear cannon cover
for the cockpit; the part was there in my kit.
which I have come to
swear by for large scale Luftwaffe models. Jerry Crandall reported
that the first two kits he received were missing the rear cannon cover
for the cockpit; the part was there in my kit.
The decals provided are for a Bf-109G-10 of 2.JG300, one from 3.JG51 (or possibly 7.JG302, depending on interpretation of unit stripe colors), and one of an unknown unit - and as stated above, all are inaccurate for this particular airframe subtype. Of the three, one has the small wheel bulge and smaller tires and (most likely) the Bf-109G-6 prop, while the other two have the large wheel fairings on he upper wing, the larger wheels, and would use the Bf-109K paddle prop (most likely). For anyone doing this kit, it is essential to have a photo of the airplane you are doing, to determine these differences, which do have a major effect on the final look of the model.
|
CONSTRUCTION |
Construction is - with minor changes for the various small parts - much like the construction of all the other Hasegawa 1/32 Bf-109 kits released to date. The only real problem I found was that the fit of the forward and aft fuselage parts left something to be desired along the joint line, requiring that I sand down the area to get final smooth fit of the parts. Other than that, a modeler would have to make big plans and take definite steps to screw up the assembly of the kit.
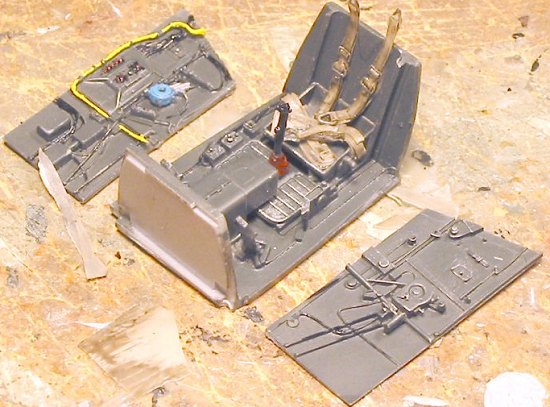 Having a
Cutting Edge Bf-109G-6 resin cockpit at hand, I used this as a
replacement for the kit parts, which meant I had to dremel off the
molded-in side panel detail inside the cockpit walls. I used the kit
instrument panel with the instrument decals, and also the kit control
stick since I had managed to lose the resin control stick in the
replacement set. The cockpit parts were taken off their pour plugs,
cleaned up, then painted RLM66 Schwarzgrau, with details hand
painted in the appropriate colors when this was dry, and some
dry-brushing with ModelMaster aluminum paint to simulate wear and
chipping and to “pop out” some of the smaller detail. I used the Cutting
Edge posable resin seat belts; I paint these beforehand with a wash of
Tamiya “Smoke,” to pop out detail, then paint the various buckles and all
with Steel. The result looks just like the seat belts in the Bf-109G-6
in display at the National Air and Space Museum according to photographs.
Having a
Cutting Edge Bf-109G-6 resin cockpit at hand, I used this as a
replacement for the kit parts, which meant I had to dremel off the
molded-in side panel detail inside the cockpit walls. I used the kit
instrument panel with the instrument decals, and also the kit control
stick since I had managed to lose the resin control stick in the
replacement set. The cockpit parts were taken off their pour plugs,
cleaned up, then painted RLM66 Schwarzgrau, with details hand
painted in the appropriate colors when this was dry, and some
dry-brushing with ModelMaster aluminum paint to simulate wear and
chipping and to “pop out” some of the smaller detail. I used the Cutting
Edge posable resin seat belts; I paint these beforehand with a wash of
Tamiya “Smoke,” to pop out detail, then paint the various buckles and all
with Steel. The result looks just like the seat belts in the Bf-109G-6
in display at the National Air and Space Museum according to photographs.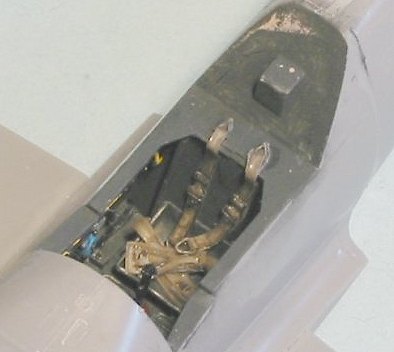
Other than the time spent painting the cockpit and the wheel wells, landing gear, and radiator flaps, the kit went together in only a couple hours, and spent the night setting up. I used Mr. Surfacer 500 on all the seams I found, then rescribed the rear fuselage centerline seams above and below.
I also cut off the rear tip of the drop tank, to make a tank like I saw in photos of several late-war Bf-109s.
Since the photos of the airplane I was doing clearly showed the Bf-109G-6 prop and small wheel fairings on the upper wing, I used those parts from the kit to construct this model.
|
COLORS & MARKINGS |
Painting:
What colors to paint a Bf-109G-10 are problematic. There are few color pictures, and making color callouts from black and white photos is always a matter of “best educated guess.” The possibilities are many: the wings could have come from an earlier airplane and be still in 74/75/76, or they could have been repainted when they were repaired. The fuselage might have been repainted in the alleged “RLM84" Sky color, with 75/83, 81/82, 81/83 or 82/83 upper colors. The kit calls for one airplane in 74/75/76, while the other two are to be painted in RLN83 and “Olive Drab” uppers with 76 lower surfaces. I think the callout of “Olive Drab” is supposed to be a close approximation to the original shade of RLM81 Braunviolett, which can fade to a reddish brown shade, and which might have started life as a browner color called “Messerschmitt Brown” that was specific to the Messerschmitt factory at Augsburg.
The result of all this is, a modeler has several possibilities - and not one single member of the Kolourpolizei can prove any choice is incorrect.
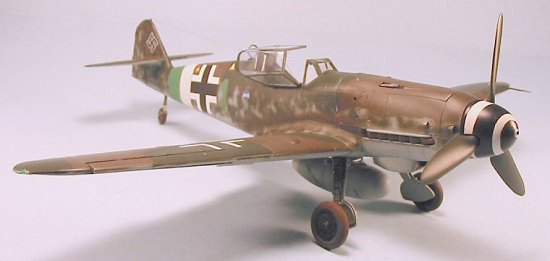 My choices
here were made by a “best guess” of two photographs in Merrick’s
“Luftwaffe Colors, Vol. 3" from 27 years ago, coupled with a desire to
have a completed model that would look different from the other 1/32 109s
in the collection so far as colors were concerned. What I came up with
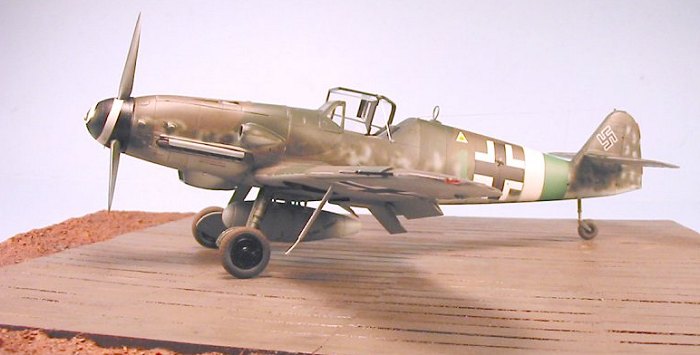
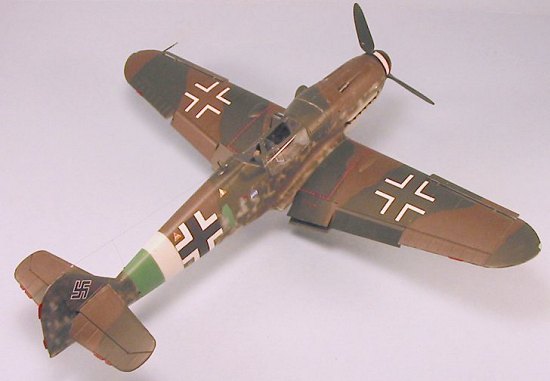
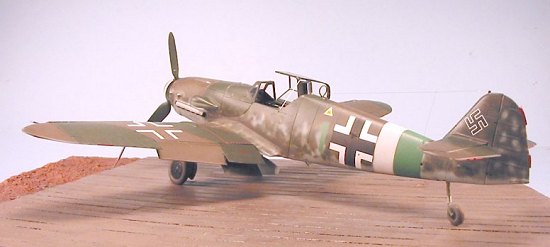
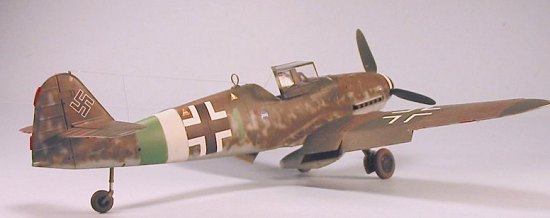
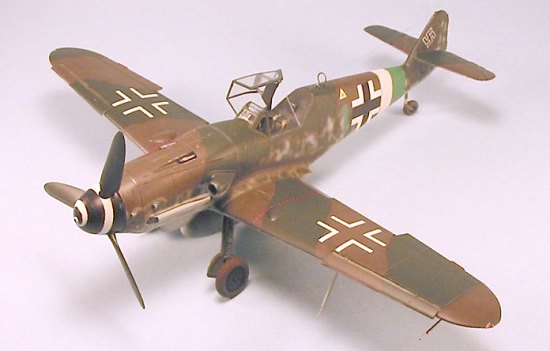
was an airplane with overall RLM76 Graublaue lower surfaces, with
upper camouflage colors of (my version of) “Messerschmitt Brown” and
RLM81, with a heavily-mottled fuselage and vertical fin and rudder, as
shown in the photos. As to whether this airplane - which the book says
is “Grun Ein” of JG77 and which a recent profile I saw in another
book said is “Rot Ein” of JG77 - is the version kitted as far as engine
bumps are concerned is unverifiable, since both pictures show the
airplane with its cowlings completely off. I decided to make mine
“Grun Ein” for two reasons: the tonal quality of the number in the
black and white photos seemed similar to the green part of the JG77
Reichverteidigung band (though red would likely look the same), and I
did not have a Bf-109 in the collection with a green number while I did
have one with a red number. The Reichverteidigung stripe and the
number 1 were airbrushed and then masked after I had pre-shaded the
model.
My choices
here were made by a “best guess” of two photographs in Merrick’s
“Luftwaffe Colors, Vol. 3" from 27 years ago, coupled with a desire to
have a completed model that would look different from the other 1/32 109s
in the collection so far as colors were concerned. What I came up with
was an airplane with overall RLM76 Graublaue lower surfaces, with
upper camouflage colors of (my version of) “Messerschmitt Brown” and
RLM81, with a heavily-mottled fuselage and vertical fin and rudder, as
shown in the photos. As to whether this airplane - which the book says
is “Grun Ein” of JG77 and which a recent profile I saw in another
book said is “Rot Ein” of JG77 - is the version kitted as far as engine
bumps are concerned is unverifiable, since both pictures show the
airplane with its cowlings completely off. I decided to make mine
“Grun Ein” for two reasons: the tonal quality of the number in the
black and white photos seemed similar to the green part of the JG77
Reichverteidigung band (though red would likely look the same), and I
did not have a Bf-109 in the collection with a green number while I did
have one with a red number. The Reichverteidigung stripe and the
number 1 were airbrushed and then masked after I had pre-shaded the
model.
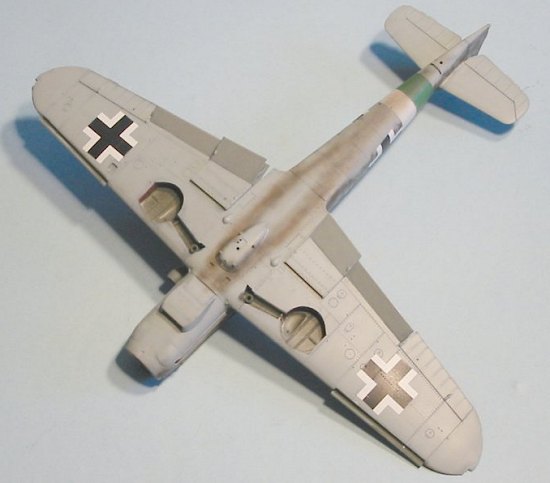 I mixed up my
version of “Messerschmitt Brown” from Tamiya “Khaki” and “Red Brown,”
while the RLM76 and RLM81 were from Gunze-Sangyo. The camouflage pattern
was done from the kit profiles, and freehanded with my Paasche-H
airbrush. I only did a very little bit of post-shading of the paints,
because this airplane would likely have seen very few sunny days in the
first four months of 1945 in northwestern Europe, and likely wasn’t flown
enough to have had much high-altitude sun-fading either.
I mixed up my
version of “Messerschmitt Brown” from Tamiya “Khaki” and “Red Brown,”
while the RLM76 and RLM81 were from Gunze-Sangyo. The camouflage pattern
was done from the kit profiles, and freehanded with my Paasche-H
airbrush. I only did a very little bit of post-shading of the paints,
because this airplane would likely have seen very few sunny days in the
first four months of 1945 in northwestern Europe, and likely wasn’t flown
enough to have had much high-altitude sun-fading either.
Decals:
Decals came from various Cutting Edge and Eagle Editions 1/32 Bf-109 decal sheets. These airplanes at this period were completely anonymous as to unit or individual markings, other than their unit bands on the fuselage.
|
FINAL CONSTRUCTION |
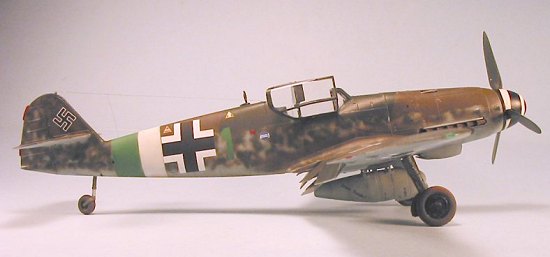
 Carrying on
the philosophy that this airplane likely didn’t see much use in the final
months of the war - which is borne out by close examination of the two
photos - I only “dinged” the Dzus fasteners, the engine panel hinge, the
edges of the engine panels and the foot step where the pilot would have
climbed aboard. I also did some exhaust staining on the fuselage sides
and oil staining on the lower fuselage.
Carrying on
the philosophy that this airplane likely didn’t see much use in the final
months of the war - which is borne out by close examination of the two
photos - I only “dinged” the Dzus fasteners, the engine panel hinge, the
edges of the engine panels and the foot step where the pilot would have
climbed aboard. I also did some exhaust staining on the fuselage sides
and oil staining on the lower fuselage.
When all this was done, the model received two coats of thinned Dullcote, and the landing gear, prop and canopy were attached. I used nylon repair thread for the radio antenna wire.
|
CONCLUSIONS |
 Well, Hasegawa
has now done all the Gustavs and Kurfursts they can, and a
modeler can now have at least one of each of the major sub-types in their
collection. With Hasegawa’s philosophy of providing a basic kit at a
good price that a modeler can super-detail to the level they want with
use of aftermarket parts and decals, you have the opportunity to do any
number of interesting-looking models with these kits, which are easy
enough that anyone from a brand-new “assembler” to a hoary old “master”
can turn into a model they’ll be proud to have sitting on their shelves.
Well, Hasegawa
has now done all the Gustavs and Kurfursts they can, and a
modeler can now have at least one of each of the major sub-types in their
collection. With Hasegawa’s philosophy of providing a basic kit at a
good price that a modeler can super-detail to the level they want with
use of aftermarket parts and decals, you have the opportunity to do any
number of interesting-looking models with these kits, which are easy
enough that anyone from a brand-new “assembler” to a hoary old “master”
can turn into a model they’ll be proud to have sitting on their shelves.
Given that the upper cowling sprue of the Bf-109G-4 kit is labeled “Bf-109F”, I say “Bring on the Friedrich!!” I am sure we will soon see the Bf-109F-2 and Bf-109F-4, and they’ll be very welcome here at Le Chateau du Chat.
The base the model is displayed on is the 1/32 Luftwaffe base from Just Plane Stuff. Painted right, it looks great for displaying your Hasegawa 109s or 190s at the next show. This cast-resin base is available from Just Plane Stuff for $40.00, and is highly recommended.
June 2004
Review kit courtesy of HobbyLink Japan (www.hlj.com)
If you would like your product reviewed fairly and quickly by a site that has over 250,000 visitors a month, please contact me or see other details in the Note to Contributors.