AMtech 1/48
Ta-183
|
KIT # |
484601 |
|
PRICE: |
$39.95 |
|
DECALS: |
Six aircraft |
|
REVIEW : |
Tom Cleaver
|
|
NOTES: |
Kit reviewed is test
shot |
The MiG-15's Daddy:
In late 1942, Focke-Wulf
engineer Hans Multhopp headed up a design team that started aerodynamic studies
for a new turbojet fighter. This culminated in 1945 as a fighter project known
as "Huckebein" (a cartoon raven that traditionally makes trouble for others),
also known as Project V (Project VI in some references) or Design II at
Focke-Wulf and later to be given the designation Ta 183. The wings were very
thin, swept back at 40 degrees and were mounted in the mid-fuselage position. A
tapered main wing spar constructed of two duraluminum I-beams with steel flanges
formed a torque box, with the attachment at the fuselage consisting of a single
bolt. The huge fin was swept back at 60 degrees, with the tailplane mounted on
the top of the fin. The tailplane also exhibited considerable dihedral. Wing
elevons and the rudder provided control, the tailplane control surfaces only
being used for trimming. The pilot sat in a pressurized cockpit with a bubble
canopy which provided excellent all-around vision.
On February 27 and 28, 1945, the Emergency Fighter Competition conference was
held by the OKL and the Ta 183 was chosen to be developed and produced. There
were to be sixteen Versuchs (experimental test series) aircraft: the Ta 183
V1-V3 to be powered by the Jumo 004B turbojet, pending delivery of the He S 011
jet engine, the Ta 183 V4-V14 as 0-series preproduction aircraft and V15-V16 as
static test aircraft. The maiden flight of the first aircraft was planned for
May/June of 1945, and was to test both the Design II and Design III tail
configuration. The first production aircraft were scheduled to be completed by
October 1945, but no examples of the Ta 183 were completed because on April 8,
1945 British troops captured the Focke-Wulf facilities.
After the war, the Ta 183 story continued. The Soviets found a complete set
of plans in Berlin and began construction of six prototypes in March 1946 by the
MIG design bureau. On July 2, 1947, the first Soviet-built Ta 183 took to the
air powered by a British Rolls-Royce "Nene" turbojet. It was found that the
original Ta 183 design needed either automatic leading edge slots or wing
boundary layer fences to alleviate low-speed stalling. Also, as a compromise
between high-speed and low-speed flying, the horizontal stabilizer was moved
approximately one-third down from the top of the vertical tail. The modified Ta
183 first flew on December 30, 1947 and in May 1948 was ordered into production
as the MIG 15.
 Personally, I never
thought in my wildest dreams that I would see a kit of this airplane done to
this standard. While ARBA had done a very good resin kit of this airplane in
1/48, and MPM had done it in limited-run injection plastic in 1/72 (there is
also a very nicely done one by PM of Turkey in 1/72), I would never have
expected a state-of-the-art injection-molded kit, made from steel molds, and of
the standard one would expect of Tamiya or Haseaga. Yet, here it is.
Personally, I never
thought in my wildest dreams that I would see a kit of this airplane done to
this standard. While ARBA had done a very good resin kit of this airplane in
1/48, and MPM had done it in limited-run injection plastic in 1/72 (there is
also a very nicely done one by PM of Turkey in 1/72), I would never have
expected a state-of-the-art injection-molded kit, made from steel molds, and of
the standard one would expect of Tamiya or Haseaga. Yet, here it is.
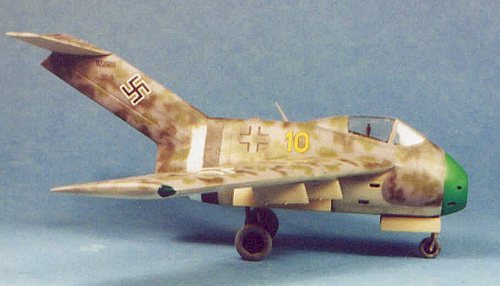
Production Quality and Fit:
The kit I built was my second, and came from the fourth test-run. I had found
in the earlier model - which came from the first test-run - that there were fit
problems. These were not the kind of problems one would even think of as
problems had this been a limited-run kit, involving a need for putty on the nose
intake and exhaust, more putty along the wing-fuselage joint, a bit of a problem
fitting the cockpit into the model, etc. However, with this second kit, there
were no fit problems - it went together as well as any of the recent kits from
Tamiya or Hasegawa, and I only used Mr. Surfacer along the fuselage centerline
joint, to get rid of the seam.
Assembly of this kit is incredibly easy. there are a total of 15 parts to
have the basic model together for overall finishing and painting. If you include
the seat, control stick and cockpit canopy, there are 18 parts. In the amount of
time it took me to Future the canopy and let it dry completely, the rest of the
model was together.
I assembled the main gear wells to the fuselage sides first, then the
nose-gear well to the right side fuselage half. I had painted the cockpit tub
RLM66 and picked out the nice raised detail with a drybrush of Model Master
Aluminum, followed by painting some switches, buttons, etc. in red, blue and
yellow to give the cockpit a bit of color. I then attached the instrument panel
to the cockpit tub and installed the assembly in the right side fuselage half.
With that in, I added some weight atop the nose wheel well.
 The fuselage halves
joined perfectly, and I attached the nose cone and exhaust. I elected to use the
exhaust for the HeS-011 engine, since this was planned to power the production
version.
The fuselage halves
joined perfectly, and I attached the nose cone and exhaust. I elected to use the
exhaust for the HeS-011 engine, since this was planned to power the production
version.
I drilled out the holes on the lower surfaces of the wings for attaching the
pylons, glued the wings together and attached them to the fuselage. The joint
was nice and tight. I then attached the horizontal stabilizer, and the cover for
the weapons bay (I did not install the weapons bay since I was not going to use
it).
After Mr. Sufacer had dried, I sanded all seams, then installed the seat
(with a decal seatbelt) and control stick, then attached the canopy and masked
it off. The model was ready for the paint shop.
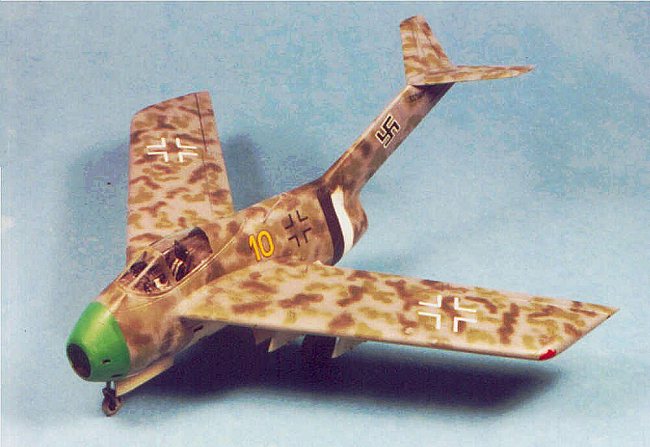
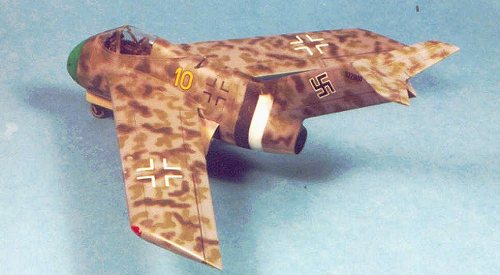
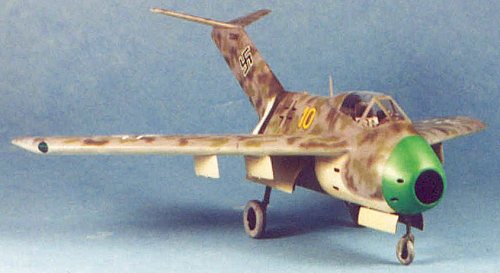
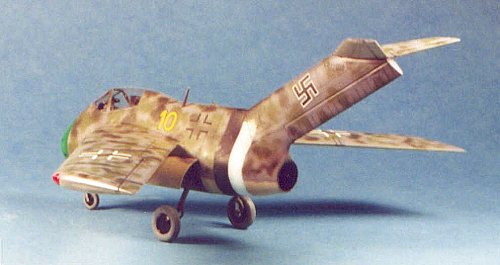
My inspiration for this model came from the Fw-190D-13 flown by Maj. Goetz,
the last Kommodore of JG26. In the "alternative world" this model exists in,
Maj. Goetz took delivery of the airplane in January 1946 as replacement for his
Fw-190D-13, and had it painted similarly to the earlier airplane, as well as
using the "Yellow 10" identification.
 I first shot the entire
model with flat black to "pre-shade" it along panel lines, then shot the wheel
wells, landing gear and interiors of the gear doors with Tamiya "RLM Grey". I
followed that by painting the black/white Rechverteidigung band for JG26, and
the green "staff color" nose, then masked these areas off.
I first shot the entire
model with flat black to "pre-shade" it along panel lines, then shot the wheel
wells, landing gear and interiors of the gear doors with Tamiya "RLM Grey". I
followed that by painting the black/white Rechverteidigung band for JG26, and
the green "staff color" nose, then masked these areas off.
The lower surfaces were painted a "tan" shade of RLM84. Jerry Crandall has
shown me parts from crashed Fw-190s, with two different shades of what might be
RLM84: a tan that is very close to Tamiya "Buff," and a "Sky" color that is
closer to the Gunze-Sanyo "Sky" color, which is more yellow-tinged than other
paints. I chose to use the "tan" color since I had a bottle of Tamiya "Buff"
available. The upper camouflage is RLM75, with RLM82 and RLM83 mottle over that.
Do remember, whatever scheme you do, that the wings of the Ta-183 were to be
made of wood, so you should not ding them to show the metal surface beneath the
paint scheme.
Since my test shot did not come with decals, I scrounged what I used from the
decal dungeon.
I plead guilty to having not been a fan of "Luft '46" what-if models in the
past, if only because there are so many interesting airplanes that really did
fly that have yet to be done in any form.
 I am very happy to say
that this is a fun kit to build. It is extremely well-designed and incredibly
easy to assemble and get a good-looking model as a result, which will allow the
modeler to concentrate on coming up with whatever markings you can imagine,
limited only by your imagination. As Hermann Goering said to Kurt Tank about the
Fw-190: "My dear Tank, you must produce these like hot rolls!" With this kit,
you can do exactly that.
I am very happy to say
that this is a fun kit to build. It is extremely well-designed and incredibly
easy to assemble and get a good-looking model as a result, which will allow the
modeler to concentrate on coming up with whatever markings you can imagine,
limited only by your imagination. As Hermann Goering said to Kurt Tank about the
Fw-190: "My dear Tank, you must produce these like hot rolls!" With this kit,
you can do exactly that.
One friend is doing his as the initial prototype of the license-built version
for the Imperial Japanese Navy, another is contemplating doing one of the
Ta-183s used by the 244th Sentai of the JAAF, yet another has decided to do the
Ta-183 in which Erich Hartman scored his 450th victory, and I am turning my
first one into one of the Ta-183s supplied to the Finnish Air Force.
A modeler of any skill, from beginner to expert, can have fun with this kit.
Highly recommended.
Tom Cleaver
If you would like your product reviewed fairly and quickly by a
site that averages thousands of visits a day, please
contact
the editor or see other details in the Note to
Contributors.
Back to Main Page
Back to Reviews Page 2026