R.V. Resins 1/48 Ta-152C-0
|
KIT # |
? |
|
PRICE: |
$35.00 |
|
DECALS: |
One aircraft |
|
REVIEW : |
|
|
NOTES: |
Resin multimedia kit |
THE ULTIMATE "LANG-NASEN"
|
HISTORY |
The Ta-152C was the airplane Kurt Tank was thinking of when he told the pilots of III/JG54 that the Fw-190D-9 they had just converted onto was "an interim type."
The Focke-Wulf Fw-190 had been plagued from the outset with a lack of high altitude performance, a situation that led to the continued development of the Bf-109 series past its development peak, due to the fact it had outstanding high altitude performance, which became more and more necessary as the Eighth Air Force increased in size and effectiveness with its high altitude daylight assault on Germany.
The Dora-9, powered by the Junkers Jumo 213A - a bomber engine - went some distance in solving the problem of high altitude performance, but the airplane still lost power above 25,000 feet, which was just the altitude the B-17s and B-24s came in at. Tank argued continually with the Reichsluftfahrtministerium (RLM) to be allowed to put a Daimler-Benz DB603 series engine in the Jumo-powered airframe, convinced that such a powerplant would provide the high altitude performance so needed. Tank's success with the high-altitude Ta-152H - the first of the series that carried its designer's name in its designation - which was powered by the Jumo 213E, demonstrated that he was on the right track.
 Finally, in August 1944,
following the failure of the Ta-152B program permission was granted to adapt the
Ta-152B airframe to the DB603 series engine. Tank made a maximum effort to bring
the new type forward, utilizing as much of the B-series airframe as possible.
Plans were afoot to commence production deliveries from the Roland Group by
April 1945.
Finally, in August 1944,
following the failure of the Ta-152B program permission was granted to adapt the
Ta-152B airframe to the DB603 series engine. Tank made a maximum effort to bring
the new type forward, utilizing as much of the B-series airframe as possible.
Plans were afoot to commence production deliveries from the Roland Group by
April 1945.
Two Fw-190D prototypes were modified with DB603L engines as the Fw-190V20/U1 and Fw-190V21/U1; unfortunately, the V20 was destroyed in an air raid on August 5, 1944. The V21 first flew on November 3, 1944, powered by a DB603E. In the meantime, three Ta-152C development aircraft, the V6, V7 and V8, were under construction, with plans to power them with the DB603L.
The Ta-152 V6, powered by a DB603LA engine, was otherwise similar to the Fw-190V21, and made its first flight on December 17, 1944, flown by Hans Sander. The Ta-152 V7 was similar, with the addition of the R-11 all-weather kit, thus representing what would be the Ta-152C-0/R11. This aircraft first flew January 27, 1945, again at the hands of Hans Sander. The Ta-152 V8, with incorporated the new Revi EZ-42 gyro gunsight, was the development prototype of the Ta-152C-1, and flew on January 14, 1945. All three had the heavy armament of a 30mm MK108 Motorkannon, two 20mm MG151s in the upper fuselage ahead of the cockpit, and two 20mm MG151s in the wing roots.
The V6 and V8 were powered by the DB603L, while the V7 was powered by the DB603EM, which offered 1,800 h.p. at takeoff, boosted to 2,250 h.p. with MW50, an improvement of 150 h.p. in both categories over the DB603L. The V7 was the fastest of the three prototypes with a sea level maximum speed of 342 mph and 370 mph without and with MW50, though at higher altitudes the DB603L provided substantially better performance. Unfortunately, both the DB603EM and the DB603L required 96 octane C3 fuel, which was becoming harder to get hold of in 1945 Germany; as a result, it was decided that the production aircraft would be powered by the DB603LA, since this engine could use both 87 octane B4 or the higher-octane C3.
 The production versions
would have been the Ta-152C-1 and Ta-152C-3, with the latter substituting a 30mm
MK103 for the MK108, with all equipped with the R11 all-weather equipment fit.
The production versions
would have been the Ta-152C-1 and Ta-152C-3, with the latter substituting a 30mm
MK103 for the MK108, with all equipped with the R11 all-weather equipment fit.
By the spring of 1945, however, Western and Soviet forces were sweeping into Germany, and there was no more time left for development. The factories where the Ta-152C was to be produced were still at the component production stage when their assembly lines were overrun.
There can be little doubt that, had the war lasted into 1946, that the Ta-152C would have proven a worthy opponent to the Spitfire 22/24 and the P-51H, which were its closest Allied contemporaries.
|
THE KIT |
The only previous kit of the Ta-152C available in 1/48 was the last release by Trimaster, which had resin conversion parts for the engine cowling and wings for its Ta-152H kit. While a Ta-152C could be built from all this, the kit itself suffered from lack of molding quality and fit for the resin parts.
This new kit, a limited-run all-resin version designed by Radek Vavrina from the Czech Republic and marketed by R.V. Resins, effectively makes the old Trimaster kit obsolete, assuming one could find it at less than stratospheric kit collector prices.
One outstanding aspect of this kit is the surface detail. It is perfectly obvious that the roots of this model lie in the Trimaster Ta-152H, and that's not a bad thing, as that kit is still state-of-the-art in surface detail and fit. This resin kit, however, goes even further with very petite and to-scale representations of the flush-riveted skin overall. Once there is a coat of paint on this model, the surface detail pops out in a stunning manner.
The small parts are beautifully molded, with sharp trailing edges on the horizontal stabilizer and prop blades. The cockpit is multi-media, with resin, photo-etch, and a very clear vacuform blown canopy - there is only one canopy, so the vac-challenged will have to be careful here.
|
CONSTRUCTION |
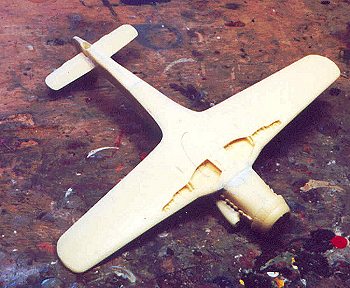
The only really hard part of building this model was to sand down the upper wing parts so that their butt joins matched the joint of the wing fairing, and this wasn't hard at all, just time consuming.
I sanded the centerline joint of the fuselage halves smooth and glued the fuselage together with cyanoacrylate glue, and followed up by gluing the supercharger intake onto the fuselage; I completed the fuselage sub-assembly by attaching the horizontal stabilizers in position, and gluing the radiator cowling and cooling flaps on to the nose.
 I then assembled the
wheel well - which assembles exactly like a DML Dora-o wheel well, and glued it
into the lower wing. Once it was set, I test-fit the lower wing to the fuselage,
then test-fit the upper wing parts to be sure I had everything going right with
no bad fit at the wingtips, etc. All was well, so I glued the upper wing parts
to the lower part, and set all this aside.
I then assembled the
wheel well - which assembles exactly like a DML Dora-o wheel well, and glued it
into the lower wing. Once it was set, I test-fit the lower wing to the fuselage,
then test-fit the upper wing parts to be sure I had everything going right with
no bad fit at the wingtips, etc. All was well, so I glued the upper wing parts
to the lower part, and set all this aside.
The cockpit is resin with most of the detailed parts in photo-etch. I used the photo-etch for the instrument panels and side panels, but replaced the photo-etch seat with a DML Fw-190D-9 seat from the spares box since it was more accurate. Once all was painted and assembled, I glued the photo-etch rear canopy deck to the fuselage, then slipped the cockpit into the fuselage and glued it in once I had it properly positioned. I then glued the photo-etch instrument panel cover in position.
Unfortunately, there is not a resin engine plug for the DB-603 engine, and you cannot substitute a Jumo engine from either Bruce Radebaugh's resin set (http://partsrparts.homestead.com/Partslist~ns4.html) or from an old Ta-152H kit, since the supercharger intake is on the opposite side of the engine in the DB-603 and nothing will fit or look right. Besides, the fuselage halves of this model are molded thick, so it would be difficult to get either of these alternatives into the fuselage looking right at all. While it's certain that this airplane had the open wheel wells like the Fw-190D series and the Ta-152H, leaving it closed up as provided in the kit doesn't harm the overall look of the completed model.
 When I fit the wing
subassembly to the fuselage, it seemed to me that the dihedral of this model was
less than it was on the Fw-190D-9 kits; a quick comparison with a completed Dora
showed this was true. I contemplated finding a way to heat the resin of the
lower center section to bend it up, but didn't see how to do this. I also
compared the model with the Ta-152H model, and there the dihedral of the wings
was the same; the Ta-152H may have had less dihedral due to the longer wings,
but I decided that as long as it looked like something I knew was right, I would
leave well-enough alone. When I later completed the model and sat it on the
workbench so I could look at it from the same angle shown in the one photograph
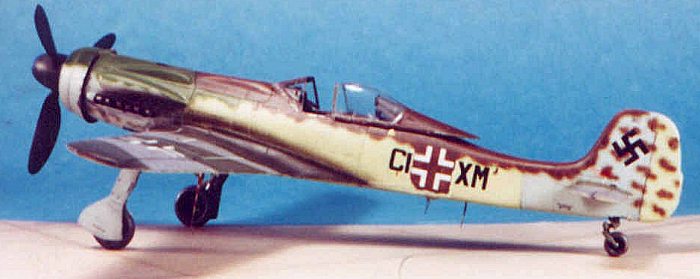
of the Ta-152C-V7 I know of, it seemed to "eyeball" all right.
When I fit the wing
subassembly to the fuselage, it seemed to me that the dihedral of this model was
less than it was on the Fw-190D-9 kits; a quick comparison with a completed Dora
showed this was true. I contemplated finding a way to heat the resin of the
lower center section to bend it up, but didn't see how to do this. I also
compared the model with the Ta-152H model, and there the dihedral of the wings
was the same; the Ta-152H may have had less dihedral due to the longer wings,
but I decided that as long as it looked like something I knew was right, I would
leave well-enough alone. When I later completed the model and sat it on the
workbench so I could look at it from the same angle shown in the one photograph
of the Ta-152C-V7 I know of, it seemed to "eyeball" all right.
I decided to use the injection-molded Ta-152 prop blades from the ProModeler Fw-190D-11 kit, and the spinner from a DML Fw-190D-9, since overall these had a better shape and better fit than the resin parts provided in the kit; however, if these parts had not been available, the kit spinner and prop would have been quite acceptable.
Once I glued the wing and fuselage together, I painted Mr. Surfacer 500 along the fuselage centerline seam and the wing root joint. When it was dry I sanded the seams smooth.
Overall, this was one of the best-designed, best-produced all resin kits I have built. It presented no problems to me, and I would recommend it to any modeler contemplating a first all-resin kit who has done at least a couple limited-run injection molded kits.
|
PAINT & DECALS |
Painting:
 I painted the wheel wells
and landing gear RLM02, since the photo I have of the original airplane shows
these as being dark enough I don't think they were left in natural metal. The
forward half of the lower wing, the ailerons and the flaps were painted RLM76,
while the rear half of the wing lower surface, and the center section of the
lower fuselage were painted to represent aluminum, using SnJ Aluminum paint. I
painted the engine cowling/forward fuselage, and the tail assembly and lower
horizontal stabilizers RLM76, while I painted the central fuselage, the rudder
and lower surfaces of the elevators RLM84. I can't be sure this is right, but
from the one photo I have of the real thing, there do seem to be some tonal
differences in the lower surface colors, past the difference of painted and
unpainted areas.
I painted the wheel wells
and landing gear RLM02, since the photo I have of the original airplane shows
these as being dark enough I don't think they were left in natural metal. The
forward half of the lower wing, the ailerons and the flaps were painted RLM76,
while the rear half of the wing lower surface, and the center section of the
lower fuselage were painted to represent aluminum, using SnJ Aluminum paint. I
painted the engine cowling/forward fuselage, and the tail assembly and lower
horizontal stabilizers RLM76, while I painted the central fuselage, the rudder
and lower surfaces of the elevators RLM84. I can't be sure this is right, but
from the one photo I have of the real thing, there do seem to be some tonal
differences in the lower surface colors, past the difference of painted and
unpainted areas.
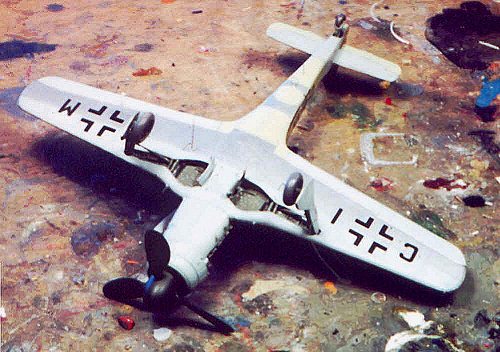
The upper camouflage was RLM81/82 on the fuselage, separated at the upper fuselage gun bay cover and RLM81 blotches on the vertical fin and rudder, with RLM75 and RLM83 on the upper wings and horizonal stabilizer, in the Ta-152 pattern provided in the kit instructions. Once all was dry, I gave the model two coats of Future before turning to the decals.
Decals:
 The kit-supplied decals
are very thin, and have a lot of glue on them, leading to some discoloration for
the lower insignia and radio callsign letters when I applied them. I removed
them and replaced them with decals from the decal dungeon. Further, I replaced
the upper wing national insignia, which seemed too small, with some standard
Fw-190 upper insignia, also from the decal dungeon. I replaced the swastika on
the vertical fin with something from the dungeon, and used the kit supplied
decals for the fuselage insignia and radio call letters. I added wingwalk lines
and stencilling from an Fw-190 stencilling sheet put out by SuperScale, since
these were not provided in the kit and the one photograph did show a could of
the stencils on the lower rear fuselage, leading me to believe they were all on
the original airplane.
The kit-supplied decals
are very thin, and have a lot of glue on them, leading to some discoloration for
the lower insignia and radio callsign letters when I applied them. I removed
them and replaced them with decals from the decal dungeon. Further, I replaced
the upper wing national insignia, which seemed too small, with some standard
Fw-190 upper insignia, also from the decal dungeon. I replaced the swastika on
the vertical fin with something from the dungeon, and used the kit supplied
decals for the fuselage insignia and radio call letters. I added wingwalk lines
and stencilling from an Fw-190 stencilling sheet put out by SuperScale, since
these were not provided in the kit and the one photograph did show a could of
the stencils on the lower rear fuselage, leading me to believe they were all on
the original airplane.
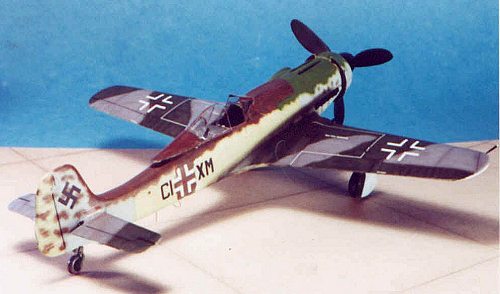
Final Finish and Weathering:
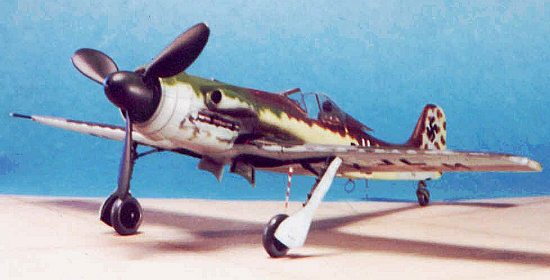
I gave the model two coats of Flat Future. When this was dry, I applied a heavy exhaust stain, using Tamiya Smoke with some Semi-gloss black added for emphasis. The photo of the original clearly shows heavy exhaust staining, which was the only weathering I did to the model.
I attached the canopy in the open position, glued the landing gear in position and attached the prop. I then attached gun barrels in the fuselage and wing root positions, made from plastic dowel.
|
CONCLUSIONS |
This kit is a wonderful addition to anyone's Focke-Wulf Air Force, and is a definite gotta-have for members of the Wurger Fanatics Club. It definitely looks good sitting between an Fw-190D-9 and the Ta-152H, sort of an elongated Dora and a clipped-wing Hermann.
There are only a limited run production of these kits available at Eagle Editions, who have the exclusive North American distribution rights, so if you want one I suggest you not waste any time. At a retail price of US$35, this is an attractive model at a good price.
Contact Eagle Editions at: http://www.eagle-editions.com
Those in Europe or outside North America can contact R.V. Resins at: http://web.quick.cz/rvresin e-mail: r.v.resin@worldonline.cz
Availability:
Eagle Editions will be the exclusive North American distributor of R.V. Resins kits. I am informed they should have kits for delivery by May 1, and are taking pre-orders now for the limited number of kits that will be available. Contact them at: http://www.eagle-editions.com to order yours.
Copyright Modeling Madness.com
If you would like your product reviewed fairly and fairly quickly, please contact the editor or see other details in the Note to Contributors.
Back to Reviews Page 2017