Academy 1/72 Me-163
|
KIT # |
1673 |
|
PRICE: |
$9.00 |
|
DECALS: |
See review |
|
REVIEW : |
|
|
NOTES: |
|
DIE RAUCHEN EI
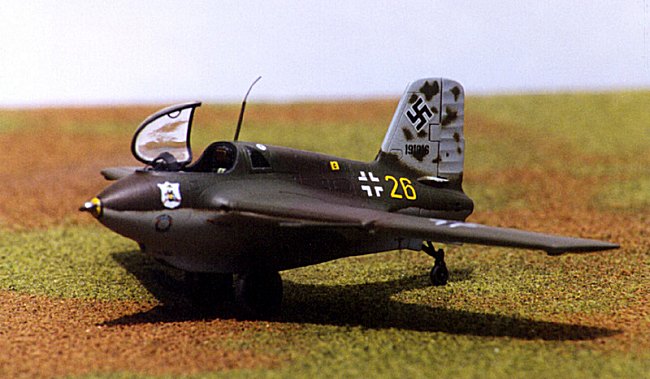
MESSERSCHMITT ME-163B KOMET
I/JG400
BRANDIS, DEUTSCHLAND - MÄRZ 1945
|
HISTORY |
Of all the aircraft that served during World War II, the Me-163 Komet was the most radical and futuristic. The concept of a short-endurance local defense interceptor powered by a rocket engine was certainly valid and might have proved more of a thorn in the Allies' side had the Allied onslaught from two fronts not intervened.
Captain Wolfgang Späte was called in from the Russian front and assigned as Typenbegleiter (Type Leader) and in January 1944. The first Staffel, 20/JG 1, appeared on paper as being stationed at Zwischenahn, although neither crews nor aircraft existed. By February 20/JG 1 was redesignated I/JG 400 by Captain Späte and placed under the command of Oblt. Robert Olejnik. In March, I/JG 400 was sent to Wittmundhafen with 12 pilots, yet no aircraft were available to the Staffel. By late March the first aircraft were delivered and in April the second Staffel, II/JG 400, was formed on paper and assigned to Hptm. Otto Böhner. The first engagement with Allied aircraft occurred on May 13, 1944, but when Captain Späte took off in pursuit of two P-47s. The pursuit proved futile, as his Komet flamed out twice and he returned for a safe landing. Unfortunately in the midst of these combat trials the Nazi leadership transferred Captain Späte back to his old unit, JG 54, to lead the IV Gruppe. Oberst (Colonel) Gordon Gollob was assigned as Type Leader, but his vision of the correct use of the Komet was employed incorrectly.
 Captain Späte had worked hard to disperse the Komets to
airfields at Venlo, Deelen, Bad Zwishenahn, Wittmunhafen, Nordholz, and Husum to
intercept Allied bombers on their way to targets in Germany. However, Oberst
Gollob's vision had all the Komets moved east of Berlin to Brandis, near
Leipzig. This was a blow to all personnel that had trained under Captain Späte
and it meant that by massing all the planes to one field, they had to take off
two or three at a time at 20 second intervals. This resulted in tremendous
landing and serving problems, since most would be returning in groups as they
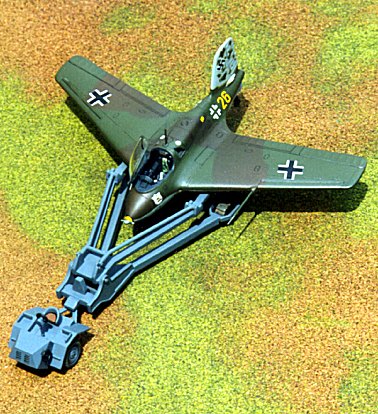
took off. This is what led to the 'Scheuschlepper' (Shy Tug), which was utilized
both to retrieve landed aircraft and also take them to the take off point, as
the Komet could not taxi.
Captain Späte had worked hard to disperse the Komets to
airfields at Venlo, Deelen, Bad Zwishenahn, Wittmunhafen, Nordholz, and Husum to
intercept Allied bombers on their way to targets in Germany. However, Oberst
Gollob's vision had all the Komets moved east of Berlin to Brandis, near
Leipzig. This was a blow to all personnel that had trained under Captain Späte
and it meant that by massing all the planes to one field, they had to take off
two or three at a time at 20 second intervals. This resulted in tremendous
landing and serving problems, since most would be returning in groups as they
took off. This is what led to the 'Scheuschlepper' (Shy Tug), which was utilized
both to retrieve landed aircraft and also take them to the take off point, as
the Komet could not taxi.
There were many engagements with what the Allies called the 'powered egg' and the Allies always referred it to as a jet- propelled aircraft. There are some noted victories by Komet pilots, both over B-17s and P-51s. But it's largest problem lie in its very quintessence, speed. The pilots had never trained at attacking an aircraft at speed approaching Mach 1 and the two 30-mm MK 108 cannon were slow firing weapons. Once a Komet came within range of a bomber formation approaching at 220 - 250 mph, this left an actual closing speed of 340 mph when coming in from the rear. To open fire within 650 - 800 yards was a waste of ammunition, closure from 650 yards to 0 yards was accomplished in about four seconds, and the last 200 yards (about 1.5 seconds) had better be used for climb out over the enemy formation. This meant that a pilot had only 2.5 seconds in which to aim and fire! It is a wonder that any hits were accomplished.
 The little airplane's vulnerability lay in its power plant,
the Walter HWK 509A-2 bi-propellant rocket engine and its two highly volatile
fuels, C-Stoff (hydrazine/methanol) and T-Stoff (concentrated hydrogen
peroxide). If there were any fuel remaining when the Komet landed, any harsh
jolt could mix the two propellants and a fire or explosion could and did occur.
P-51 pilots found out the little plane's other soft belly. Due to its short
endurance, 'Mustang' pilots merely borrowed a little time and when the Komets
ran out of fuel and had to glide to a landing, they were sitting ducks. Six
Me-163s met their fate in such instances. Also, by stationing all the Komets at
one airfield, escort fighters had a field day strafing Komets. As the Allied
onslaught moved further east, the base at Brandis fell into range of
fighter-bombers and lastly on April 20, 1945, the U. S. Army's 9th Armored
Division rumbled into Fliegerhorst/Brandis. By this time Captain Späte was
again in control, but it was too late. He had already dispersed II/JG 400 to
Husum, but they too surrendered to elements of the Royal Air Force Regiment on
May 8, 1945.
The little airplane's vulnerability lay in its power plant,
the Walter HWK 509A-2 bi-propellant rocket engine and its two highly volatile
fuels, C-Stoff (hydrazine/methanol) and T-Stoff (concentrated hydrogen
peroxide). If there were any fuel remaining when the Komet landed, any harsh
jolt could mix the two propellants and a fire or explosion could and did occur.
P-51 pilots found out the little plane's other soft belly. Due to its short
endurance, 'Mustang' pilots merely borrowed a little time and when the Komets
ran out of fuel and had to glide to a landing, they were sitting ducks. Six
Me-163s met their fate in such instances. Also, by stationing all the Komets at
one airfield, escort fighters had a field day strafing Komets. As the Allied
onslaught moved further east, the base at Brandis fell into range of
fighter-bombers and lastly on April 20, 1945, the U. S. Army's 9th Armored
Division rumbled into Fliegerhorst/Brandis. By this time Captain Späte was
again in control, but it was too late. He had already dispersed II/JG 400 to
Husum, but they too surrendered to elements of the Royal Air Force Regiment on
May 8, 1945.
In all 364 Me-163 Komets (including two Me-163S two-seat trainers) were constructed; yet there were never more than twenty operable at any one moment. By November 1944, there were over 100 Me-163Bs stationed at Brandis, but all were grounded due to lack of trained pilots and fuel. Less than 25% of all Komets produced ever saw combat. Many captured examples appear today in museums around the world.
|
THE KIT |
The model 'Yellow 26' represented by the kit decals, was based on a Me-163B Komet, that was originally at the Canadian War Museum and has since been moved to the National Aviation Museum of Canada's restoration facilities. The War Museum had the markings shown as a Komet of I/JG 400, but it has since been discovered by the National Aviation Museum, that the aircraft belonged to II/JG 400. This is reasonable, as the British captured most Komets from this Staffel, while most Komets captured by America were from I/JG 400. If I may slip in a plug, for anyone building a Me-163 Komet in any scale, I highly recommend that you go to Rob de Bie's website at http://www.xs4all.nl/~robdebie/models/me163bh.htm
"DIE RAUCHEN EI" means "THE SMOKING EGG"
|
CONSTRUCTION |
Interior:
What a beauty! The kit contains cockpit tubs, seats, control
sticks and instrument panels for either a Me-163B or the two-seat trainer
prototype Me-163S. If there were any qualms, it would be the lack of properly
represented rudder pedals and the lack of seat belt decals. This is all
nit-picky and can easily be resolved with the cheap purchase of an Eduard 'Zoom'
photoetch fret, which contains everything you'll need for either the B or S
version. I added a bulkhead at the rear of the small rear windows and used my
saved photo of a Me-262 seat belt decal scan to print a copy on plain white
paper. After the ink had dried I coated both sides of the paper with Micro
SuperFilm and let this dry another hour. I cut out the seat belts using a new
#11 X-Acto blade and coat a little watered down Elmer's to the rear of the
belts, then apply the belts as one would a decal. Stay with it for about 5
minutes and slowly form the contours with a blunt tip toothpick. The SuperFilm
helps keep the decal intact and prevent fraying when cutting and applying, try
this technique and I think you'll like it. It's much more
 dimensional than a
decal, yet it's as easy to apply. And you don't have to pay for or paint a
photoetch piece! I also had to add two small pieces of fine wire to simulate
those little attachment braces to the armored glass piece; no Komet looks
complete without them. I should mention that the instructions would have one
install either of the cockpit tubs in the lower fuselage half. I found that by
doing so, the armored headrest sit far too low. This was easily solved by filing
the front of the tub just a bit so that it would clear the instrument panel and
installing the tub in the upper fuselage half. Those building this kit will
quickly see what I am speaking of, but the problem is very easily corrected, so
I have no qualms here. Just be forewarned.
dimensional than a
decal, yet it's as easy to apply. And you don't have to pay for or paint a
photoetch piece! I also had to add two small pieces of fine wire to simulate
those little attachment braces to the armored glass piece; no Komet looks
complete without them. I should mention that the instructions would have one
install either of the cockpit tubs in the lower fuselage half. I found that by
doing so, the armored headrest sit far too low. This was easily solved by filing
the front of the tub just a bit so that it would clear the instrument panel and
installing the tub in the upper fuselage half. Those building this kit will
quickly see what I am speaking of, but the problem is very easily corrected, so
I have no qualms here. Just be forewarned.
I painted the interior RLM 66 and gave the landing skid bay at coat of RLM 66 also. Instrument decals were done using Waldron punched disks of white trim film, followed by Reheat Models Instrument Gauge Decals. Various side panel and instrument buttons were painted white, yellow, and red. A few warning lights were painted silver and given a drop of clear red. I really wanted to use a True details German rudder pedal, because the stumps in the cockpit bay are far too little. I didn't, however, and I still wish I had. I am seriously thinking of painting them and attaching them to the stubs as I write, so don't be surprised if you see them there at some later date. Anyhow, I outlined the rudder stubs with a 0.005-in tech pen and black ink and painted the straps leather. The headrest was also painted leather. After glossing the interior, I gave it a tech pen treatment in the depressions and used the tech pen to also make pin point switches on the side consoles. The canopy-opening lever was painted white and the grip lastly painted red. I use a curved piece of fine wire for the main canopy-closing handle.
Exterior:
The exterior moldings and fit were tremendous. The only flaw I found was the fit of the rear canopy glazing. My sample kit had a slight step at the rear and also on both sides at the lower front. I would have wished that a kit this detailed would have molded the landing skid retracting mechanism, but sadly, like Heller's, this is represented with perfectly fitting slabs of plastic. I pained mine black, then outlined the braces in steel. I had to add the middle brace from sheet styrene, as one is not supplied attached to the kit brace. The wheel dolly was simply painted and installed as per instructions.
The rocket nozzle looked too small in the opening compared to reference photos, so I simply replaced it with a cut section of styrene tube. The tube was thinned on the exposed end using a Dremel tool and a small sanding bit. Rather than having to attach the rear landing rear whilst attaching the two rear fuselage/vertical tail pieces, I cut the top nubs off of the landing gear and slightly enlarged the mounting cutouts in the lower fuselage halves. This way I could either attach the landing gear extended or retracted after cementing and cleaning up the joins. It also aids in sanding and masking to not have to attach the landing gear until final assembly.
I did not like the pitot or the FuG 16zy antenna, as both were too short. I replaced both with hypo tubing and fine wire. I also added a piece of fine wire for the FuG 25a aerial under the port wing. I can say that both kit pieces did fits like a charm, however. The generator propeller was molded very well and I used it, still, a photoetched piece here would look better and it is included in the Eduard 'Zoom' fret, as is the FuG 16zy, but I do not like the flatness of the photoetch on the latter.
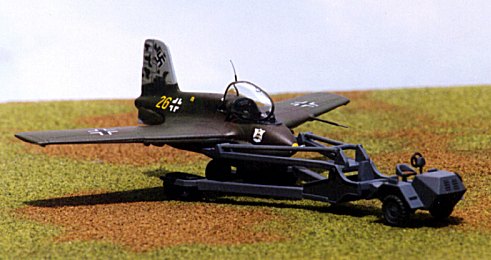
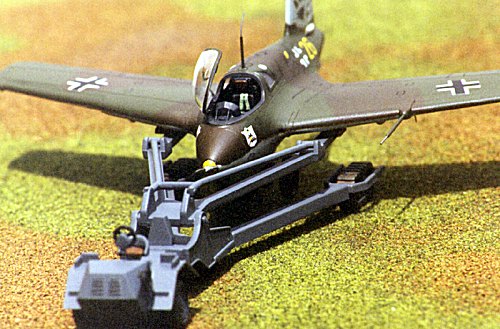
Scheuschlepper:
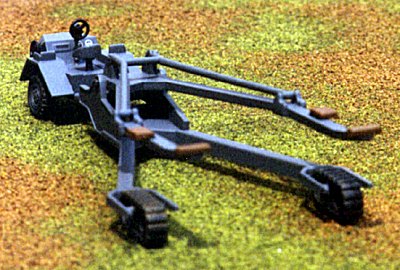 Easy as eating pie. I painted the tow tractor dark panzer
gray. The steering wheel and lift control wheel were painted black. Tires and
treads were painted tire black and given a moderate wash of earth brown. The
seat cushion was painted leather and given a shadowing with the tech pen.
Instruments were done with punched disks of white trim film and Reheat Models
Gauge decals. The front vents were picked with a 0.005 tech pen and the cooling
holes done with punched disks of black trim film. The important thing was to be
sure in final assembly that the tractor sit parallel to the ground and that the
tow mechanism sit so that the Komet is held slightly nose down with the wheel
dolly clearing the ground. There has be some circumspect as to the 'Scheuschlepper'
towing Komets to take-off, but I have photos of both this mechanism and the
inflated bag mechanism towing them in such manner. As mentioned in the text,
Komets had no way of taxing.
Easy as eating pie. I painted the tow tractor dark panzer
gray. The steering wheel and lift control wheel were painted black. Tires and
treads were painted tire black and given a moderate wash of earth brown. The
seat cushion was painted leather and given a shadowing with the tech pen.
Instruments were done with punched disks of white trim film and Reheat Models
Gauge decals. The front vents were picked with a 0.005 tech pen and the cooling
holes done with punched disks of black trim film. The important thing was to be
sure in final assembly that the tractor sit parallel to the ground and that the
tow mechanism sit so that the Komet is held slightly nose down with the wheel
dolly clearing the ground. There has be some circumspect as to the 'Scheuschlepper'
towing Komets to take-off, but I have photos of both this mechanism and the
inflated bag mechanism towing them in such manner. As mentioned in the text,
Komets had no way of taxing.
|
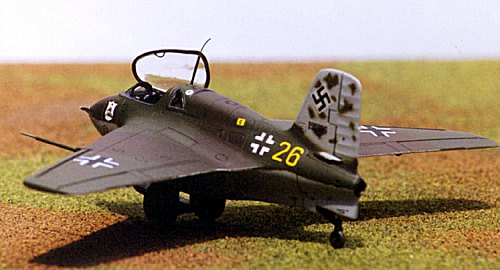
PAINT & DECALS |
 The model was masked and primed overall in RLM 76. Once
cleaned and reprimed, I masked the lower surfaces and vertical tail and gave the
upper surfaces two coats of RLM 81brown-violet. The kit instructions were blown
up to scale and the areas to remain RLM 81 brown-violet were cut out and taped
to the model. I also carefully cut the mottle pattern on the vertical tail mask
with a #11 blade, after applying a little SuperFilm to the mask to keep the cuts
from fraying. The model was then given two coats of RLM 82 dark green. Masking
was removed and a few dust specks sanded away before giving the model two coats
of clear gloss for decal prep.
The model was masked and primed overall in RLM 76. Once
cleaned and reprimed, I masked the lower surfaces and vertical tail and gave the
upper surfaces two coats of RLM 81brown-violet. The kit instructions were blown
up to scale and the areas to remain RLM 81 brown-violet were cut out and taped
to the model. I also carefully cut the mottle pattern on the vertical tail mask
with a #11 blade, after applying a little SuperFilm to the mask to keep the cuts
from fraying. The model was then given two coats of RLM 82 dark green. Masking
was removed and a few dust specks sanded away before giving the model two coats
of clear gloss for decal prep.
Decals from the kit were used and they were very good in color opaqueness and registration. Swastikas were not included, so I had to hit the aftermarket stash for these. The fuselage nose tip was also done in decal and paint. I outlined the nose with a small strip of yellow trim film and once dry, I painted in the tip. The black outline is a small strip of black trim film. The generator propeller was painted steel and polished lightly with SNJ powder.
I would like to personally thank Academy Models and IPMS/USA for giving me the opportunity to build this marvelous little kit. I highly recommend it for modelers of all ages.
May 2000
Copyright ModelingMadness.com
If you would like your product reviewed fairly and fairly quickly, please contact the editor see other details in the Note to Contributors.
Back to Reviews Page 2016