
Airmodel 1/72 He-60
| KIT #: | ? |
| PRICE: | 11 Euros |
| DECALS: | None supplied |
| REVIEWER: | Carmel J. Attard |
| NOTES: | Vacuform kit |
| HISTORY |
The He-60 was a sturdy little plane that was designed to meet
requirement for a shipboard reconnaissance aircraft. The floatplane was designed
by Reinhold Mewes of the Heinkel’s works. The He-60 was capable of being
catapulted from the large German
 warships
like Admiral Scheer and
warships
like Admiral Scheer and
The He-60C differed slightly in
detail improvements from the He-60B and both types served on German battleships
and cruisers as well as equipped four coastal recce wings. The type saw action
even before the Second World War started. Like many German aircraft of the time
it served during the Spanish Civil war when six He-60E were sent to Nationalist
| THE KIT |
| CONSTRUCTION |
 Building
the kit is tackled into two separate sub assemblies before finally joining
all the parts together. These are the twin float
complete with all the struts and additional detail; and the main fuselage,
adding interior detail, closing the fuselage as well as adding on the wings,
struts etc. The instructions depicts several small items which are marked in
italic letters that need to be scratch built, in fact there are no less than 24
in total comprising of wing and tail plane struts, float struts, prop shaft and
cockpit interior parts. Two windshields had to be produced out of clear acetate.
All struts were made from Contrail strips available at Roll Models or Aeroclub.
A camera carried over the lower port wing also had to be made from scrap
plastic.
Building
the kit is tackled into two separate sub assemblies before finally joining
all the parts together. These are the twin float
complete with all the struts and additional detail; and the main fuselage,
adding interior detail, closing the fuselage as well as adding on the wings,
struts etc. The instructions depicts several small items which are marked in
italic letters that need to be scratch built, in fact there are no less than 24
in total comprising of wing and tail plane struts, float struts, prop shaft and
cockpit interior parts. Two windshields had to be produced out of clear acetate.
All struts were made from Contrail strips available at Roll Models or Aeroclub.
A camera carried over the lower port wing also had to be made from scrap
plastic.
The vac form parts were first cut, sanded and prepared for fixing
ensuring that they are a good ‘dry’ fit. The cockpit interior was assembled,
adding seats, control stick and rudder pedals to cockpit floor. The rear seat
for the observer/gunner is merely a round stool that is attached to the
starboard side of fuselage interior by a
 bracket.
The fuselage had surface detail re-scribed and engine exhaust outlets refreshed
using a 1mm twist drill. The floor assembly was fitted to one half of the
fuselage. The fuselage was then closed utilizing added tabs fixed to the inner
face, which assisted for self-alignment of the halves. The entire interior was
medium gray with seats in drab. An instrument panel, black with white dials, was
added. Propeller shaft and prop were to be added at a later stage. Float halves
were joined together, and the wing parts and tail planes cemented together.
bracket.
The fuselage had surface detail re-scribed and engine exhaust outlets refreshed
using a 1mm twist drill. The floor assembly was fitted to one half of the
fuselage. The fuselage was then closed utilizing added tabs fixed to the inner
face, which assisted for self-alignment of the halves. The entire interior was
medium gray with seats in drab. An instrument panel, black with white dials, was
added. Propeller shaft and prop were to be added at a later stage. Float halves
were joined together, and the wing parts and tail planes cemented together.
The complete tail plane was then cut in two portions when dry, a slot
was cut at the rear to take the tail planes. The tail planes had plastic tongues
to locate inside the fuselage slots. Templates made from card were used to align
and fit the wings and the floats
 to the
fuselage. It was essential to measure and cut the struts to the required sizes
and lengths. In the end float water rudders were added to rear of floats. Other
details like the wing-mounted camera, gun mounting at rear of cockpit, crew
figure were all added. Aerial tubes added to upper wing and top of tail fin.
These were made from a small length of metal wire cut to size and cemented with
super glue. Propeller rear was filled with putty, allowed to dry and sanded down
to shape. A small hole was drilled to take a spigot at the rear of the hole and
the propeller was fixed to the front. Rigging was added at this stage using
nylon thread. Wireless was made in same fashion out of nylon thread. Bracing
wires to floats were made out of lengths of steel wire.
to the
fuselage. It was essential to measure and cut the struts to the required sizes
and lengths. In the end float water rudders were added to rear of floats. Other
details like the wing-mounted camera, gun mounting at rear of cockpit, crew
figure were all added. Aerial tubes added to upper wing and top of tail fin.
These were made from a small length of metal wire cut to size and cemented with
super glue. Propeller rear was filled with putty, allowed to dry and sanded down
to shape. A small hole was drilled to take a spigot at the rear of the hole and
the propeller was fixed to the front. Rigging was added at this stage using
nylon thread. Wireless was made in same fashion out of nylon thread. Bracing
wires to floats were made out of lengths of steel wire.
| COLORS & MARKINGS |
Heinkel He-60s were initially finished in overall Hellgrau 63 of a
semi-gloss sheen. The underside of the floats up to t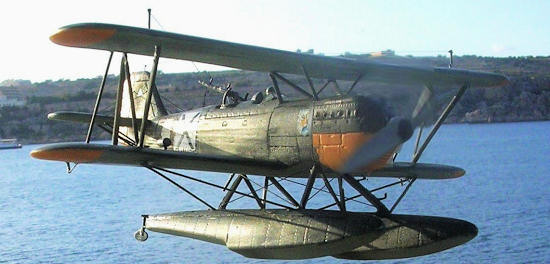 he
waterline was Grun 72. Interior was largely RLM Grau 02. I have completed my
model of the He-60 in colors carried by Bulgarian Navy during the early part of
the war. These were delivered in a batch of either Dunkelgrau 71 or Schwarzgrun
70 for all upper surfaces and the sides with Hellgrau 65 for the undersides.
Identification yellow areas applied to rudder, around the lower side of engine
and under wing tips.
he
waterline was Grun 72. Interior was largely RLM Grau 02. I have completed my
model of the He-60 in colors carried by Bulgarian Navy during the early part of
the war. These were delivered in a batch of either Dunkelgrau 71 or Schwarzgrun
70 for all upper surfaces and the sides with Hellgrau 65 for the undersides.
Identification yellow areas applied to rudder, around the lower side of engine
and under wing tips.
WWII Bulgarian insignias were applied
to all six positions. Squadron insignia appears to forward side of engines,
which was the same squadron equipped with Ar-196, in fact it was a time when the
two types operated alongside each other and possibly the He-60 was at the
phasing out stage of its service life. A white triangle marking on the fin
carried the name and type tag of the aircraft. The model was finally given a
couple overall coats of semi gloss lacquer thereby finishing another enjoyable
project.
| CONCLUSIONS |
 This
was yet another additional type to join my Bulgarian military aircraft
section.
As one can see it was diverse with so many different
types of German origin.
This
was yet another additional type to join my Bulgarian military aircraft
section.
As one can see it was diverse with so many different
types of German origin. October 2011
If you would like your product reviewed fairly and fairly quickly, please contact the editor or see other details in the Note to Contributors.
Back to the Reviews Index Page