
21st Century Toys 1/32 BF-109G-6
| KIT: | 21st Century Toys 1/32 BF-109G-6 |
| KIT #: | ? |
| PRICE: | $15.00 MSRP |
| DECALS: | See Review |
| REVIEWER: | Scott Weir |
| NOTES: | Hasegawa windscreen, True Details wheels |
| HISTORY |
| THE TOY |
This started out as 109 G6, Red 8, of III./ JG300, Mosquito chaser, a pre-assembled, pre-painted toy from 21st Century Toys. The reason it caught my attention on the store shelf was the supercharger intake. I had just completed their F2 model in kit form a year earlier. One of the numerous modifications I had to undertake to make it an F2 is to reduce the size of this intake. The 21st Century F2/4 kit supplies an intake for a early F/G model on. Red 8, a G6 came ready to go with an intake for an early 109 F. Since then on the store shelves I’ve seen F2’s with G parts and G’s with the early F parts and visa versa. This all makes perfectly good sense to anyone who bought their A6M2 kit. There’s a Zero in there but it ain’t no A6M2.
| BUILDING IT |
 dummy moment I had was trying to force the windscreen out
before the fuselage came apart due to the instrument panels’ stubborn
adhesion. The end result is going from a two piece canopy to a three. Wheel
to axle adhesion is pretty firm causing the axles to break away with the
wheels. I would later have to fabricate some tiny little axles to hang the
resin wheels on.
dummy moment I had was trying to force the windscreen out
before the fuselage came apart due to the instrument panels’ stubborn
adhesion. The end result is going from a two piece canopy to a three. Wheel
to axle adhesion is pretty firm causing the axles to break away with the
wheels. I would later have to fabricate some tiny little axles to hang the
resin wheels on.
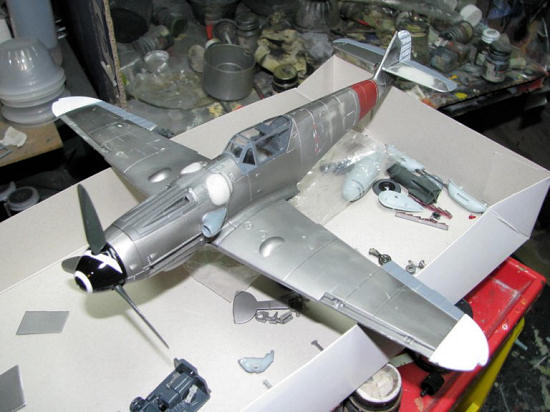 Since this kit was engineered for
mass toy production reassembly is pretty basic and straight forward. Also the
fit for the most part is pretty good. When the flaps are cut away some card
stock was needed inside the back of the wing and trailing edge of the wing
fillet to bring the wings inline with the fuselage. Card stock was also used
to cover the area under the Hadley Page slats. I used the screws to fasten the
wings and fuselage parts together after which glue was applied to all the
joints. At this point it was time to fill in the screw holes and unwanted
seams with some Squadron putty. Since the canopy is engineered to swing open
and closed another strip of card stock was inserted on the right side of the
fuselage where the canopy frame would seat to fill in the gap.
Since this kit was engineered for
mass toy production reassembly is pretty basic and straight forward. Also the
fit for the most part is pretty good. When the flaps are cut away some card
stock was needed inside the back of the wing and trailing edge of the wing
fillet to bring the wings inline with the fuselage. Card stock was also used
to cover the area under the Hadley Page slats. I used the screws to fasten the
wings and fuselage parts together after which glue was applied to all the
joints. At this point it was time to fill in the screw holes and unwanted
seams with some Squadron putty. Since the canopy is engineered to swing open
and closed another strip of card stock was inserted on the right side of the
fuselage where the canopy frame would seat to fill in the gap.
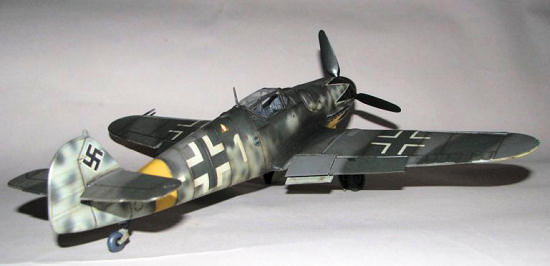
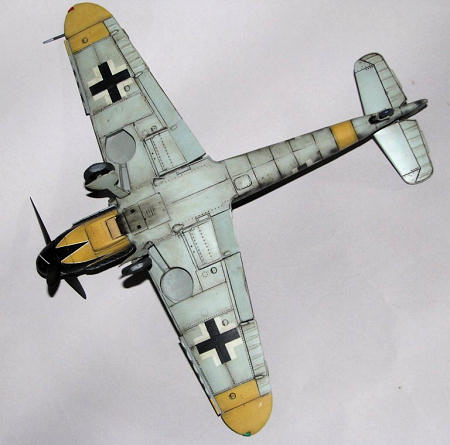
| COLORS & MARKINGS |
After priming the kit with decanted
spray can primer the panel lines were pre-shaded. Testors R.L.M. yellow was
the first color down for the tail band, lower cowling, and wingtips after
which these areas were masked off. My stocks of Floquil R.L.M. 76 blue are
running a bit low so it was time to mix a batch of home brew. For me this is
not the easiest ratio of colors to mix. After a lot hit and miss I’ve ended up
with enough 76 blue to last quite a while. Once the lower surface color is
applied Floquil R.L.M.74 and 75
 were shot for the upper surface. R.L.M.74 was
the primary color used for mottling and inside of the fuselage crosses. Wheel
wells, landing gear and inside gear door covers were painted with Testors
R.L.M. 02. The clear coat is decanted spray enamel which lays down fairly
thick and also helps fills in those ravines and gorges called panel lines.
were shot for the upper surface. R.L.M.74 was
the primary color used for mottling and inside of the fuselage crosses. Wheel
wells, landing gear and inside gear door covers were painted with Testors
R.L.M. 02. The clear coat is decanted spray enamel which lays down fairly
thick and also helps fills in those ravines and gorges called panel lines.
| FINAL CONSTRUCTION |
Now we’re on the downhill slide. The canopy and mast are glued down with Eileen’s craft glue and the flaps along with the wheels and gear door covers are attached with superglue. Seat belts and aileron counter balances to be added later.
| CONCLUSIONS |
 All in all this was a fun budget builder
project. It would be great if 21st Century would release a G6 in
kit form with both canopies and markings for Hartman’s various aircraft. This
kit/toy needs only minor modifications to bring it into the realm of serious
contenders. If one wanted to go the extra mile I could see one of these in
I.P.M.S. competition. Sure, it doesn’t go together like a conventional kit
but, in my opinion that’s not what matters. What does matters is it looks like
a BF109 for which it’s suppose to represent. In that I believe it does a
pretty good job.
All in all this was a fun budget builder
project. It would be great if 21st Century would release a G6 in
kit form with both canopies and markings for Hartman’s various aircraft. This
kit/toy needs only minor modifications to bring it into the realm of serious
contenders. If one wanted to go the extra mile I could see one of these in
I.P.M.S. competition. Sure, it doesn’t go together like a conventional kit
but, in my opinion that’s not what matters. What does matters is it looks like
a BF109 for which it’s suppose to represent. In that I believe it does a
pretty good job.
Scott Weir
March 2008
If you would like your product reviewed fairly and quickly, please contact me or see other details in the Note to Contributors.