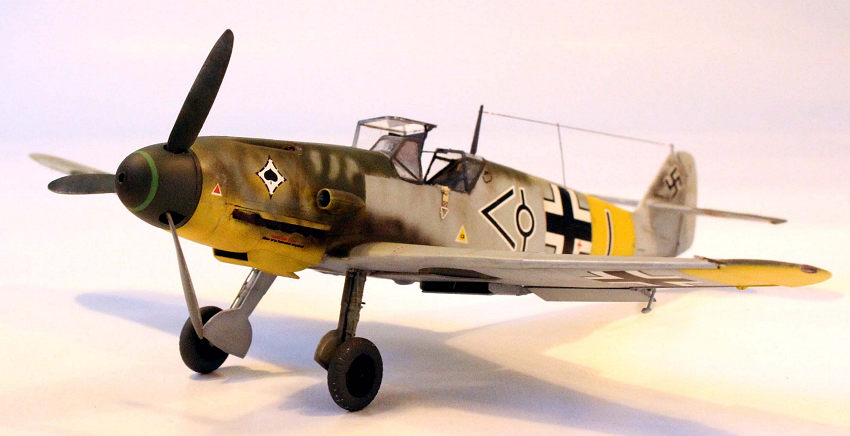
Zvezda 1/48 Bf-109F-2
| KIT #: | |
| PRICE: | |
| DECALS: | |
| REVIEWER: | Fernando Rolandelli |
| NOTES: |
Aeromaster decals |
| HISTORY |
There are several photos of “Single Chevron and Circle”, flown by Lt. Jürgen Harder while serving as Technical Officer of JG53. Lt. Harder was one of a trio of brother pilots, none of whom survived the war (no “Saving-Private-Ryan” policy in the Wehrmacht), which made ace during Barbarossa. He received the Knight’s Cross of the Iron Cross with Oak Leaves in 1944 when reaching 40 victories. He died in an operational accident in Berlin in 1945 while commanding JG11.
| THE KIT |
If something you cannot do towards
Zvezda’s 1/48 109F kit is being indifferent: people either loves or hates it. It
certainly looks like made by people with full access to real, unrestored 109s,
with a decent ruler (and knowledge on how to use it) and with good abilities at
designing parts and pieces. It follows a very “Russian” kit design philosophy,
following the way the real aircraft is built whenever possible. That leads to an
uncompromising accuracy but sometimes to an over engineered and over complicated
kit. Of course, over complicated kits with little or no tolerance are preferred
by some modelers and loathed by others. It must be said that the k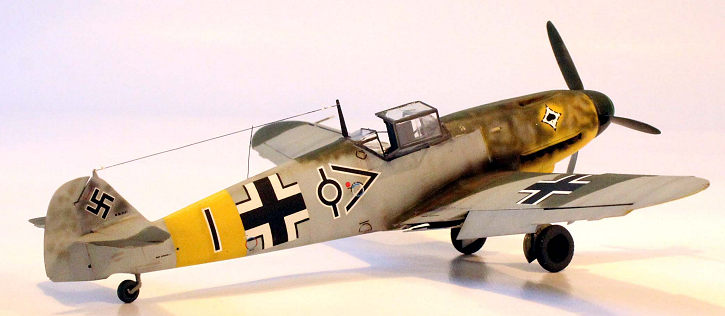 it
is very well made and injected, looking like “an ICM gone good”. It is planned
to be built with engine exposed; though some thought (and extra parts) has been
put into a “buttoned up” option (the one I chose for this build) it doesn’t work
properly, just like any kit made like that. It could have been done with no more
extra pieces than provided.
it
is very well made and injected, looking like “an ICM gone good”. It is planned
to be built with engine exposed; though some thought (and extra parts) has been
put into a “buttoned up” option (the one I chose for this build) it doesn’t work
properly, just like any kit made like that. It could have been done with no more
extra pieces than provided.
Accuracy wise, the kit is very good in general shape and dimensions and details. The comparison to the “new” Eduard’s and nowadays vintage Hasegawa’s kits is virtually mandatory. That’s not easy, and, besides, the way the kits are laid (especially this one) conspires against direct comparison, especially of the fuselages. However, given the lineage of the Zvezda’s kit, we can presume all the dimensions are proportions are correct within the tolerances of the industry. If so, there is really little to choose between the three. Eduard’s still look a bit “beefed up” (but only to a fraction of a millimeter), and some details still look too big (like exhausts –easily the worst part of the kit, though not as noticeable once assembled as they look on the sprues-). Hase’s has some too squarish areas (spine and lower cowling) but to be frank they do not diminish the look of the model in any great deal. Spinner plates are practically the same size in the three kits (though the spinners are “bulbous” –Hase’s-; “less-bulbous” –Eduard’s- and “pointy” –Zvez’s). Ed’s canopy virtually fits Zvez’s: windscreen almost perfectly (thought the actual windscreen is smaller), and the rear part is only a bit wider (see picture); but so is its own! The lack of panel lines on top wing is annoying, though it has been claimed that early examples had them puttied (I chose to scribe them, following the slight but nevertheless weird angle shown in the F-4). Wheel wells are multi part (like Ed’s, but in this case they actually close it!), and offer good detail, especially the holes in the strut recesses (and the actuator seen behind them! Me, who routinely open those, was deeply thankful). Those opened panels on the wing undersurface are really unnecessary, as is the detached central panel.
 The
separated tail was needed to depict the external reinforcement (Hase’s solved
this with four tiny PE parts in some boxings, and simply ignoring them in most;
the same solution is adopted by Ed’s in their F-2 boxing); the join falls
squarely on a panel line and fits remarkably good (as those awkward joins go)
but there are some sink marks left. There is an unexplainable “double step” in
the panel behind the cockpit, one down the whole fuselage and another in the
panel behind the cockpit itself. Every single moving surface is separated, down
to the front radiators’ lips. The kit is keyed to be built with an exposed
engine; this has a basic but good detail (superior to that in, say, Ed’s 109Es)
and the detail on the interior face of the opening panels is excellent. A
simplified assembly sequence (and some extra cowling panels) is provided to
built it “buttoned-up” but, unsurprisingly, it doesn’t work too well. I shall
revisit these issues, as well as others, as assembly goes.
The
separated tail was needed to depict the external reinforcement (Hase’s solved
this with four tiny PE parts in some boxings, and simply ignoring them in most;
the same solution is adopted by Ed’s in their F-2 boxing); the join falls
squarely on a panel line and fits remarkably good (as those awkward joins go)
but there are some sink marks left. There is an unexplainable “double step” in
the panel behind the cockpit, one down the whole fuselage and another in the
panel behind the cockpit itself. Every single moving surface is separated, down
to the front radiators’ lips. The kit is keyed to be built with an exposed
engine; this has a basic but good detail (superior to that in, say, Ed’s 109Es)
and the detail on the interior face of the opening panels is excellent. A
simplified assembly sequence (and some extra cowling panels) is provided to
built it “buttoned-up” but, unsurprisingly, it doesn’t work too well. I shall
revisit these issues, as well as others, as assembly goes.
| CONSTRUCTION |
I decided to follow the instructions
to the letter to assemble a “buttoned up” model. However, I had to depart from
them in several instances. First of all I glued the tail halves to the
corresponding fuselage half. In a previous build, I had followed the
instructions which have you assembly both and then join them; the fit is good
and the “half’n’half” procedure didn’t improve it. Cockpit is really delicately
furnished as is, exception made of course of the instrument panel. I used a Yahu
standalone set, which looked and fitted great, and some spares from an Eduard
set. The “seat” backrest has a strange shape (correct for an early F) seemingly
standing proud over the back pan; you could be tempted to erase it (the guys at
Eduard recommend this in their PE instructions) but once you add the cockpit
sill it lies as flush as it should be (actually protruding just a little). The
back harness I fixed in the first configuration, coming out from the backrest.
The fuel line I glued to the sidewall (I did the same to Ed’s) The cockpit floor
can be added from below once the fuselages are joined; so the rear pan, which
fits really well. The front cowl with the instrument panel is added afterwards;
it pays to take extra time to have it sit flush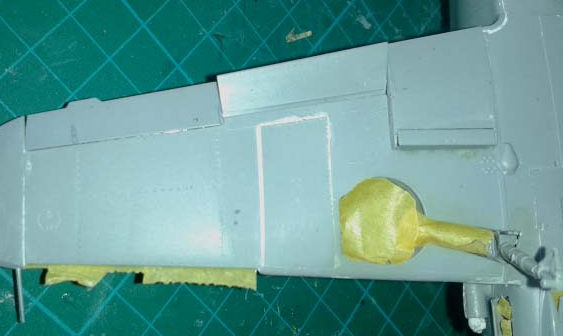 against the fuselage sides. The breakdown is a bit overcomplicated but
everything almost clicks into place.
against the fuselage sides. The breakdown is a bit overcomplicated but
everything almost clicks into place.
Wings were tackled now. The central piece goes reasonably well, but the absurd underwing detached panels didn’t. What they were thinking when designed those, I cannot imagine. I decided to glue them to the lower half first (instructions have you glue the wing halves first) to allow for more comfortable juggling. Even so, a lot of putty and sanding, which spoiled the fine detail, went to have them sit smoothly to the wing. Wheel wells walls are complex but they fit; beware that if they ride just a micron higher than they should, a gap will develop in the wing’s leading edge. I sanded them to minimize this. The strut recesses fitted quite well; in addition to the arm provided, I put some wiring on the inside. Upper wings were glued to the fuselage, and then the lower wing presented. It fitted quite exemplary, though the diedhral looks a bit excessive; at this point it looked quite symmetrical, so I didn’t worry. Then, I had the complete airframe aft the firewall, minus moving surfaces and radiators.
Forward of the firewall things get
complicated. The firewall with the MG17s fit reasonably well, but anything less
than perfect will throw everything in front of it away. Instructions have you
build the engine block complete without accessories and mounts, and glue it to
the firewall by two tiny connectors. They work to a firm jo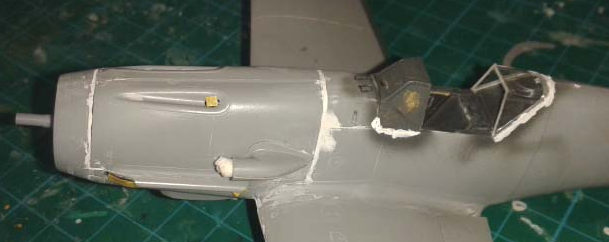 in,
but the attitude is difficult to ascertain, and any small angle will throw away
the fit of the whole cowling. When I checked the fit of the lower cowling, I
found it simply didn’t, but I easily corrected this by not gluing the rocker
covers to the engine. I glued the exhausts, one by one, to the engine, and
painted them. The lateral cowling pieces didn’t fit either. I decided to depart
the instructions and find a path on my own. I glued the exhaust shields to the
cowling pieces (instructions have you glue them to the exhausts themselves);
then glued the side cowling pieces to the fuselage. They didn’t fit without some
juggling and sanding (the firewall bulkhead was probably a micro millimeter
displaced). Once they were firm and in a reasonable angle, I added the lower
cowling. As the forward “ring” is separate, I simply slid in the engine with the
exhausts protruding through their openings in the cowling. Then, I added the
front ring. It worked, though at the cost of extensive puttying and sanding
steps and gaps. If I ever tackle another one, I shall try follow the
time-honored procedure of “building up each fuselage half”, in absolute
departure to the instructions, and see what happens. Spinner and backplate fit
was exemplary.
in,
but the attitude is difficult to ascertain, and any small angle will throw away
the fit of the whole cowling. When I checked the fit of the lower cowling, I
found it simply didn’t, but I easily corrected this by not gluing the rocker
covers to the engine. I glued the exhausts, one by one, to the engine, and
painted them. The lateral cowling pieces didn’t fit either. I decided to depart
the instructions and find a path on my own. I glued the exhaust shields to the
cowling pieces (instructions have you glue them to the exhausts themselves);
then glued the side cowling pieces to the fuselage. They didn’t fit without some
juggling and sanding (the firewall bulkhead was probably a micro millimeter
displaced). Once they were firm and in a reasonable angle, I added the lower
cowling. As the forward “ring” is separate, I simply slid in the engine with the
exhausts protruding through their openings in the cowling. Then, I added the
front ring. It worked, though at the cost of extensive puttying and sanding
steps and gaps. If I ever tackle another one, I shall try follow the
time-honored procedure of “building up each fuselage half”, in absolute
departure to the instructions, and see what happens. Spinner and backplate fit
was exemplary.
The fit of the canopy parts is not
good. If the windscreen sides do not sit flush to the recesses (it clicks
against the rear cockpit sill) the front part will stand proud against the front
cowling. Mine was marred by the Yahu panel, which stood proud; I sanded its
upper lip until the windscreen sat more or less flush to the front cowling (no
worse than in the real plane at least!). The rear fixed part is bigger than the
fuselage; I cannot say anything else. The kit comes with two different ones (one
has the early “l ow”
framing of the E-3 –it looks like a handful planes had this early canopy,
including one of Trauloft’s); they click on the sill, but are bigger than the
spine. Perhaps they tried to minimize this and that’s the reason of the step in
the fuselage? Anyway, old fashioned “putty-compensating” work was called upon.
Probably widening a tiny bit the fuselage upper join could cure this problem, at
the expense of marring the fit of the rear deck.
ow”
framing of the E-3 –it looks like a handful planes had this early canopy,
including one of Trauloft’s); they click on the sill, but are bigger than the
spine. Perhaps they tried to minimize this and that’s the reason of the step in
the fuselage? Anyway, old fashioned “putty-compensating” work was called upon.
Probably widening a tiny bit the fuselage upper join could cure this problem, at
the expense of marring the fit of the rear deck.
I completed the wing, with the radiators. I followed the instructions, but the movable forward lips are better glued first. Then, I added the movable surfaces, suitably deflected, to ease painting; and the wingtips. As any separated wingtips, they developed a step. The position lights were a chore, but ended up fitting reasonably well (and looking great). Then I chose to add the undercarriage, to provide a sit for the model and check the diedhral. The legs join in a way that mimic’s the real plane but lack a firm positive fit (will manufacturers never learn?); however, a good stance could be eventually attained. “Marked toothpick” testing revealed an acceptable symmetry in the diedhral, which was a boost to finish the model, which at this point certainly was tiring me.
| COLORS & MARKINGS |
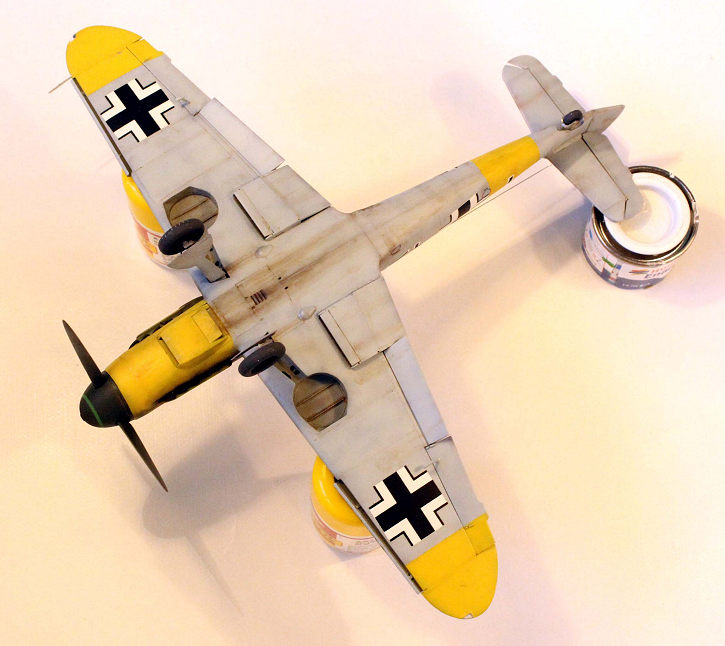
Eventually, the model reached
painting stage (I was building two in parallel, actually). I primed it with
Alclad’s Grey and then applied a Burnt Umber preshade. Then I painted the RLM76,
in an uneven fashion. Harder’s plane had a highly unusual (for the time)
repaint, in what I consider a “retro” fashion, which called for some planning.
Sides were RLM76 to the spine, and then the wings were mainly RLM02. Right wing
has an improvised scheme mimicking the previous E scheme in RLM71, while the
left has almost nothing else. In addition, the spine has a soft RLM02 mottling,
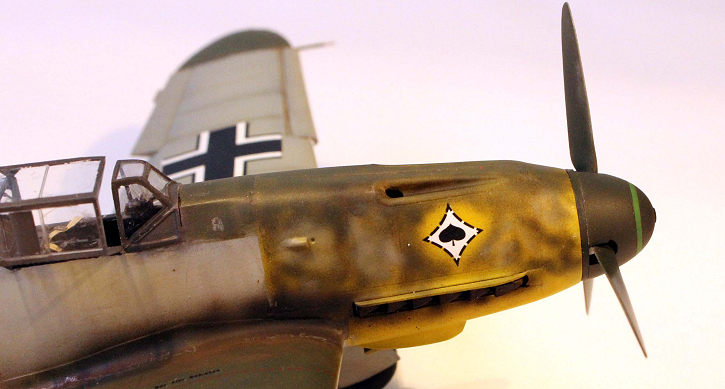
with a stronger 71 next to the cockpit. The cowling should have been RLM04
Yellow, previously, but was darkened with 02 and 71 (this a rather common
procedure after the Soviet bombers started to appear). Fin, where the swastika
is, has a soft mottling which I guessed was left in the original RLM74/75 (also
common practice, never paint over the swastika), while the fin (probably 04
previously) is also repainted 76/02. Finally, 04 recognition bands were present
in rear fuselage and wingtips; while
 canopy
framing remained RLM66. This complex scheme was painted in stages, with a lot of
retouching allowed, entirely with Xtracrylix paints.
canopy
framing remained RLM66. This complex scheme was painted in stages, with a lot of
retouching allowed, entirely with Xtracrylix paints.
Once finished, the model received a gloss coat (Xtracrylix brushpainted), and went to the decal shop.
Specific decals came from an Aeromaste decal sheet, which might well be considered “vintage” nowadays. They were called “Errormaster” and certainly earned the name; in this sheet, there are several mistakes (Hungarian “Red 2” turned into “Yellow 2”). I have already pointed out the mistakes in this particular aircraft (aside from a bogus scheme). General insignia came from the kit, exception made of the upper crosses, which came from the F-4 kit, as the style matched better the photos. It must be said that the F-2 decals were glossy and perfectly usable (though the White was “Hasegawish” and contrasted the purer hue in the Aeromaster decals); the ones in the F-4 were terribly matt and fabric-like but they behaved better than expected. Stenciling is unexplainable incomplete (no walkway lines nor footrests and handholds ) so I resorted to some Ed’s. I used DACO setting solution, which affected the latter adversely; then simply nothing. Old style Solvaset was used in the Aeromasters’. But for the lack of stencils, I would rate the decals as fairly adequate.
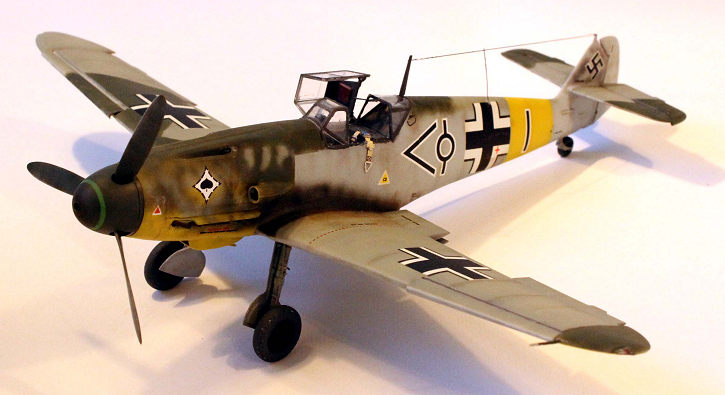
Some weathering with oils and pastels (my favourite method of lately) followed the decals. The pictures show a rather heavy exhaust staining, which I reproduced airbrushing a dark concoction.
| CONCLUSIONS |
 A tiresome
build if there is one. The model looks good, but, even to someone pretty well
used to seeing 109s, at least in kit form; but the easier Ed’s and Hase’s look
almost equally good. Some people like complexity, and some would love the OOB
chance at an opened engine, but the absurd over engineering in the design of
some parts can be really annoying. I built two in parallel (one with, one
without engine) and I think it behaves better with the engine visible (no
surprise) That said, there are some builds in the web from people that
apparently had no problems with the kit in any configuration (even with only one
half cowling opened, a smart attitude) Myself, who likes to build a series of
the same aircraft in different schemes, I wouldn’t use this kit for that. But if
you plan to build one masterpiece of a 109F with plenty of time, this could be
the kit for you.
A tiresome
build if there is one. The model looks good, but, even to someone pretty well
used to seeing 109s, at least in kit form; but the easier Ed’s and Hase’s look
almost equally good. Some people like complexity, and some would love the OOB
chance at an opened engine, but the absurd over engineering in the design of
some parts can be really annoying. I built two in parallel (one with, one
without engine) and I think it behaves better with the engine visible (no
surprise) That said, there are some builds in the web from people that
apparently had no problems with the kit in any configuration (even with only one
half cowling opened, a smart attitude) Myself, who likes to build a series of
the same aircraft in different schemes, I wouldn’t use this kit for that. But if
you plan to build one masterpiece of a 109F with plenty of time, this could be
the kit for you.
If you would like your product reviewed fairly and fairly quickly, please contact the editor or see other details in the Note to Contributors.
Back to the Main Page Back to the Review Index Page Back to the Previews Index Page