Revell 1/32 Bf-109G-10
| KIT #: | 04888 |
| PRICE: | £18. |
| DECALS: | Two options |
| REVIEWER: | Frank Reynolds |
| NOTES: | Montex Super Mask set 32268 £8-50 |
| HISTORY |
In the chaos of the last months of World War 2, as the Nazi empire crumbled, Me109s appeared in a variety of configurations and colour schemes as components from dispersed and often interrupted sub-contractors were assembled to provide viable airframes for the front line squadrons.
In one attempt to bring all of the sub-contracted production into line, an interim “ new” version, incorporating all of the best available features, was to be built at certain nominated factories, including the Erla works at Leipzig, as the Me109G-10, with the first examples emerging in September 1944.
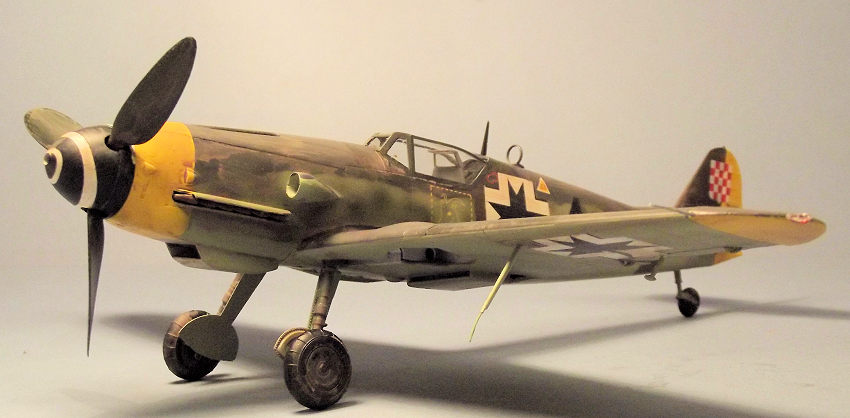
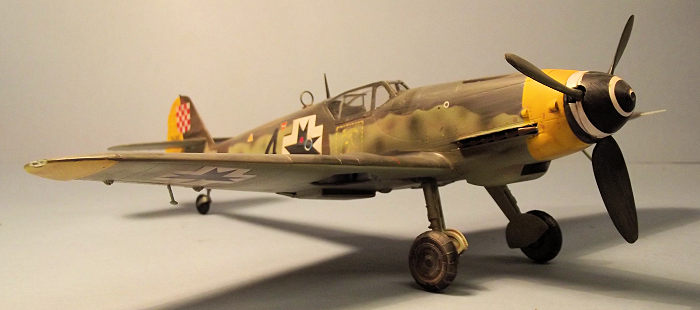
 Characteristic of the Erla-built
109G-10s were the bulbous nose cowl that blended back into the fuselage in
the area of the windscreen and standardisation of the clear view canopy and
a tall tail fin. It was intended that each G-10 would have a revised wing
with distinctive upper surface bulges to accommodate wider main wheels. An
extended tail wheel was fitted in an attempt to improve the pilot’s view
over the nose during take off and landing.
Characteristic of the Erla-built
109G-10s were the bulbous nose cowl that blended back into the fuselage in
the area of the windscreen and standardisation of the clear view canopy and
a tall tail fin. It was intended that each G-10 would have a revised wing
with distinctive upper surface bulges to accommodate wider main wheels. An
extended tail wheel was fitted in an attempt to improve the pilot’s view
over the nose during take off and landing.
This period was also characterised by a complex, sometimes contradictory, series of paint schemes, all allegedly standardised but in fact compromised by a chronic shortage of materials that led to variations in what should have been the same specific colour.
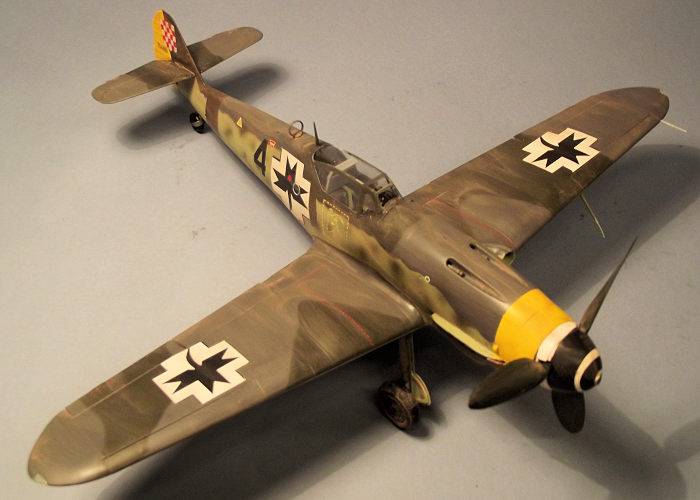
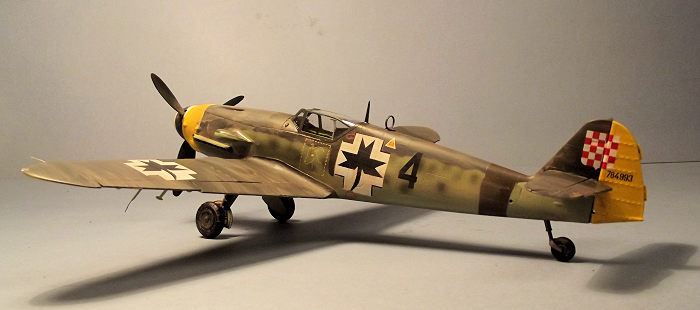
At the same time variants of the Me109 were appearing in the battle space of Eastern Europe carrying the national insignia of nations such as Rumania, Hungary and, in this case, Croatia, each of whom used variations of a cross .
THE PROJECT
Revell’s 109G-10 Erla variant provides an excellent canvas for a rich variety of colour schemes and aftermarket decal producers have given the modelling community a good choice – with the exception of one. I have three or four books from the 1970s which show a photo sourced from the USAF archives of the intriguing Me109G-10 of 15/JG.52 which was surrendered to US forces by its Croatian pilot at Falconara, Italy, in April 1945. The 15th Staffel of JG.52 was composed of Croatian Air Force Personnel, their aircraft carrying the distinctive “Cross of King Svonomir” as a national insignia and the tail carries a red and white chequered shield that in the 21st century is more recognisable as the national colours of Croatia.
This colour scheme has been on my modelling bucket list since it first became widely publicised in aviation-related books in the 1970s so I have waited over 40 years for the resources to produce this model, looking for an appropriate airframe and the right national insignia. Even so I had to stray into the relatively unknown World of Montex’s vinyl masks, since I could not find this scheme on a currently available decal sheet.
| THE KIT |
This kit has already been reviewed for MM so I will keep it simple. Produced by Revell of Germany the bagged parts frames come in their familiar envelope-style box accessed from the end flaps only.
There are twelve parts frames in crisply moulded pale grey plastic and two of clear. A neat decal sheet gives a choice of two Luftwaffe aircraft from the Spring of 1945 – not relevant to this project but much of the stencilling could be used. The parts frames for the tail , wings and ancillaries appear to be common with Revell’s previously released 109G-6.
 The instructions are in
Revell’s standard style of a grey scale printed booklet with 75 pictogram
stages of construction with colour call outs handily referenced to RLM paint
colours.
The instructions are in
Revell’s standard style of a grey scale printed booklet with 75 pictogram
stages of construction with colour call outs handily referenced to RLM paint
colours.
Montex supplies a pack containing three sheets of pre-cut self -adhesive vinyl insignia on backing sheets. One is Black vinyl and provides for the inner and outer surfaces of the canopy and for the main wheels. The remaining two are a pale green-grey and are divided into clearly defined rectangular blocks each of which carries a pre-cut individual subject of the insignia. A small decal sheet is included for some items that would be impractical for masking and painting, such as the chequered shield for the tail fin and a ghosted Ram’s head insignia under the cockpit. Teasingly , Montex include a single example of the King Vonomir Cross as a decal that has been printed to give the impression of damaged paintwork. Two colour side views, upper and underside views are shown on the brief instructions, which identify two different subjects and the colour call outs are RLM paint numbers. Montex calls out the aircraft as Bf109G-14AS, yet my other references say that the Croatian machine is a G-10.
| CONSTRUCTION |
I began with the propeller assembly since I wanted to deal with the potential problem of the spinner spiral. Suitable paint masks are in the Montex pack but I chose to use a decal from a sheet in my decal dungeon. The unassembled propeller spinner and back plate was tacked together with Blu Tack putty, primed and painted in RLM 70 Schwarzgrun using Tamiya XF-27 Black Green and the prop blades the same colour. The white spiral decal was cut into two to make handling easier and carefully fed around the spinner using Micro Sol and Micro set and left to dry. The spinner was sealed with two brushed coats of Future/Klear floor polish then the spinner back plate carefully eased away using a fresh scalpel blade to slice through the joint and the overlapping decal. The propeller was then assembled with glued joints, trapping the blades in place.
Main construction began with the cockpit tub and
Revell provides basic mouldings which build up as a main floor, rear
bulkhead with seat pan and well detailed cockpit side walls with throttle,
trim wheels and se parately moulded pipework and cables. The basic colour of
the cockpit interior was sprayed in Xtracrylix
XA1203 RLM66 Schwarzgrau Matt. The pipes and wires to the side walls were
picked out in Yellow, Silver and Blue according to Revell’s call outs. The
plastic parts have a representation of seat belts moulded in and I applied a
decal from an old Hasegawa sheet over the mouldings, liberally soaked in
Micro Sol, which settled the decals down to give the sort of effect I was
looking for. The instrument panel was sprayed Schwarzgrau Matt and finished
with the kit-supplied decal for the instruments. The substantial wing spar
was glued under the cockpit floor and the sub assembly side aside to harden.
parately moulded pipework and cables. The basic colour of
the cockpit interior was sprayed in Xtracrylix
XA1203 RLM66 Schwarzgrau Matt. The pipes and wires to the side walls were
picked out in Yellow, Silver and Blue according to Revell’s call outs. The
plastic parts have a representation of seat belts moulded in and I applied a
decal from an old Hasegawa sheet over the mouldings, liberally soaked in
Micro Sol, which settled the decals down to give the sort of effect I was
looking for. The instrument panel was sprayed Schwarzgrau Matt and finished
with the kit-supplied decal for the instruments. The substantial wing spar
was glued under the cockpit floor and the sub assembly side aside to harden.
The available photograph clearly shows a small teardrop-shaped bulge in the lower front corners of the engine cowl. I raided my spares box to find a pair of teardrops that had started life as cannon covers on a 1:48 Spitfire and after a session of sanding and fettling tacked these into place using liquid cement.
The fuselage halves were prepared by installing the tailwheel support tube. The exhausts can only be fitted from inside the fuselage halves so they were painted Red-Brown and glued in place. This is a nuisance when it comes to the painting stage but I have not found a way around this. The fuselage halves were joined with the projecting wing spar under the cockpit tub slipped through slots in the wing roots. At the same time the propeller shaft and inner plate for the under cowl intake were slotted into place. The instructions next call out the installation of the supercharger intake to the left side of the cowl. I prefer to add this after the painting stage as it can get in the way of masking out the upper and lower surface colours.
The under cowl intake has moulded detail to the front and rear radiator faces which were painted silver, then the intake lower fairing was added and the exit door glued in place .
The inner panels of the upper
wing were glued in place first, sitting on the wing spar and butting up to
the wing root. Radiator faces and side walls to the wheel wells were added
underneath to form a strong centre
 section. The lower wing panels are each
in one piece from tip to centre line and thanks to Revell’s good engineering
slipped into place without fuss. The upper wing outer panels were added to
complete the basic wing structure.
section. The lower wing panels are each
in one piece from tip to centre line and thanks to Revell’s good engineering
slipped into place without fuss. The upper wing outer panels were added to
complete the basic wing structure.
The upper parts of the tail fin and horizontal tail sections were added to complete the basic airframe. Leading edge slats, elevators, ailerons and wing flaps are all separately moulded and could be posed deflected if required. I chose to fix them all closed up.
It was time to return to some sub-assemblies with construction of the undercarriage. The main gear legs are split in half vertically with the axle unit added separately. A small pipe to the top of the leg and link arms to the oleos completed the assembly, taking care to ensure that all of the joints were sound by a careful application of liquid cement applied with a brush. When dry they were painted RLM Grau 04 to the main legs, with the sliding sections in Silver. The main wheels consist of inner and outer halves with the inners having an inset hub. The inner hubs were painted in Schwarzgrau 66 and the tyres in Tamiya XF-85 Rubber Black. The tailwheel fork is a one piece moulding and the tail wheel simply clips into place. The leg and hub were painted Grau 02 and the tyre Rubber Black.
The next sub-assembly was the belly fuel tank, nicely moulded by Revell and assembled without fuss onto the fuselage belly fairing with four small vertical support struts.
Returning to the main airframe the armoured headrest was painted in dark grey and glued inside the main canopy with Humbrol Clearfix, this after the unwanted canopy side hinges were trimmed away with a scalpel since I planned to have the canopy closed up. The windscreen assembly and canopy were glued in place over the cockpit and masked off with the Montex pre-cut vinyl masks . I find that these are OK for glazed surfaces that are dead flat; less so for compound curves such as the top of the main canopy, so this section was masked using Tamiya tape cut to shape with a scalpel.
The exhausts were masked out with small strips of Tamiya tape and the airframe gently washed down with methylated spirits to remove any greasy finger prints before the radiator intakes were plugged with small offcuts of plastic sponge and the airframe primed with Dark Grey auto primer applied from a rattle can.
| COLORS & MARKINGS |
 This was the crux of the
project, being armed only with a single black and white photo of the
subject, although some colour notes were provided by the Profiles and Aircam
books noted below and by Montex’s instructions. It has been established by
the closing months of World War 2, German aircraft production was so badly
disrupted by Allied bombing that substitutes for standard colours were seen
in an increasing variety. It was, however, Claes Sundin’s careful research
that provided the most intrigue since his book, listed below, shows colour
charts with two different shades of RLM 74, two of RLM 75 and no less than
four of RLM 76.
This was the crux of the
project, being armed only with a single black and white photo of the
subject, although some colour notes were provided by the Profiles and Aircam
books noted below and by Montex’s instructions. It has been established by
the closing months of World War 2, German aircraft production was so badly
disrupted by Allied bombing that substitutes for standard colours were seen
in an increasing variety. It was, however, Claes Sundin’s careful research
that provided the most intrigue since his book, listed below, shows colour
charts with two different shades of RLM 74, two of RLM 75 and no less than
four of RLM 76.
I wanted to replicate late war colours that were noticeably different from my usual interpretation of 74/75/75 which is normally Tamiya XF-13 for the RLM 74 Graugrun, Xtracrylix XA 1207 Grauviolett RLM 75; and Tamiya XF-23 for RLM Lichtblau 76.
By chance the substitute colours that I chose were all from Tamiya’s Japanese aircraft range.Graugrun RLM 74 was represented by XF-13 JA Green, Grauviolett RLM 75 by XF-77 IJN Gray (Sasebo Arsenal) and Lichtblau RLM 76 by XF-14 JA Grey. They were matched to the Claes Sundin chart by eye.
In a radical change from my normal style of build, the national insignia would be painted first, so if it all went horribly wrong I could at least rub down the paintwork, abandon the project and revert to one of the standard Luftwaffe options in the kit.
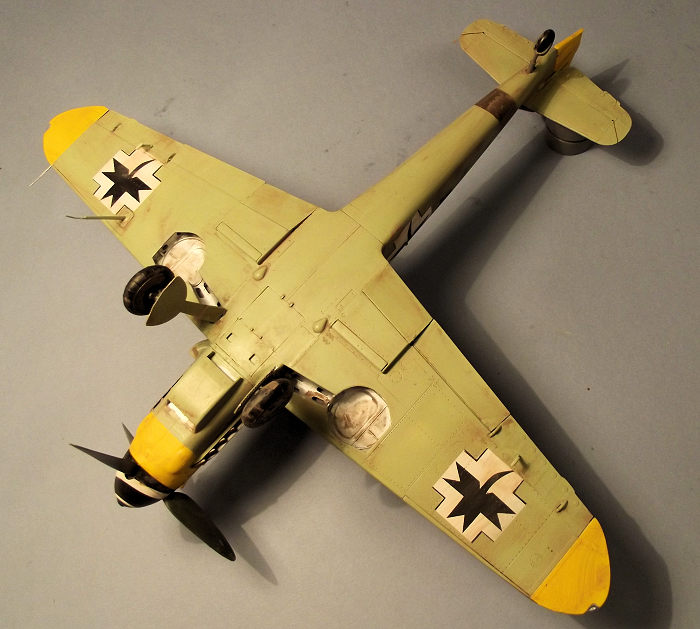
An area greater than the background of each insignia was painted White with Tamiya Ultra Fine White primer from a rattle can to give a satisfactory density of White that would serve as the finished colour. The forward area of the cowling and under side of the wing tips were similarly primed in White, then airbrushed in Xtracrylix XA1011 Yellow and masked off with Tamiya tape. This was a convenient time to paint the Yellow rudder and set it aside for installation later in the build.
Although Montex provides a single example of a fuselage cross in decal form printed to resemble damaged paintwork, I rejected that option since I did not want the problem of trying to match the density of painted colour on the other crosses to the ink of the decal and in any event Montex provides masks for all six crosses.
 Next I turned to the
installation of the masks and I found on-line tutorials to be really useful.
I had long wondered how to lift multi-part insignia from the backing sheet
without distorting them or leaving some parts behind and Montex have some
good advice - the first being to draw a large pencilled asterisk across the
face of each separate subject so that they individual parts can be
re-aligned if required. The second is to create some temporary adhesive
straps across the face of the subjects so that they can be lifted, complete
with their surround, from the backing sheet and the whole rectangle of
mask/surround can be transferred to the model. The pencilled-on asterisk
datum lines can be aligned with appropriate panel lines on the airframe to
get the masks in the right place. I also set up some datum lines on the
airframe with thin strips of Tamiya tape to help with the process. Once the
mask surround has been settled into place with gentle burnishing with the
back of a small spoon, the surface straps can be removed.
Next I turned to the
installation of the masks and I found on-line tutorials to be really useful.
I had long wondered how to lift multi-part insignia from the backing sheet
without distorting them or leaving some parts behind and Montex have some
good advice - the first being to draw a large pencilled asterisk across the
face of each separate subject so that they individual parts can be
re-aligned if required. The second is to create some temporary adhesive
straps across the face of the subjects so that they can be lifted, complete
with their surround, from the backing sheet and the whole rectangle of
mask/surround can be transferred to the model. The pencilled-on asterisk
datum lines can be aligned with appropriate panel lines on the airframe to
get the masks in the right place. I also set up some datum lines on the
airframe with thin strips of Tamiya tape to help with the process. Once the
mask surround has been settled into place with gentle burnishing with the
back of a small spoon, the surface straps can be removed.
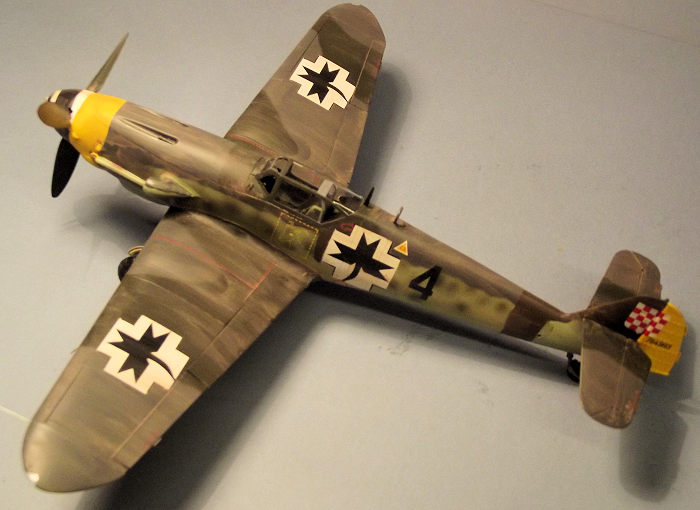
The areas of insignia to be painted Black were carefully lifted with a scalpel blade and returned to their backing sheets. These consisted of the central “cross with a tail” and the right angled strips that define the corners of the overall cross insignia. The exposed areas were gently airbrushed with thin misted coats of Tamiya XF-1 Flat Black since I was anxious not to create ridges in the paintwork. All of the Montex masking was then stripped away and the painted insignia gently buffed with an Ultra Fine sanding stick to ensure that they had a smooth surface. Each insignia was then carefully covered up with Tamiya tape masking aligned with the arms of each cross. I then had an odd looking grey primered airframe with masked off national insignia, so the main painting could begin.
The under surfaces and fuselage sides were painted in RLM76 and left to dry. The drop tank assembly and gear doors were painted at this point. The under surfaces were then carefully masked with Tamiya tape.
The colour dividing line on the fuselage sides was achieved by cutting a card pattern onto a thin piece of card cut from a kit box and taped in place along the fuselage sides. With the lower surface paintwork partially covered with this ragged-edged cardboard strip, the remaining areas were covered with Tamiya tape while the upper surfaces were painted RLM 75 Grauviolett. Once dry, and with more masking, the counter shading of RLM 74 was be applied.
Most of the upper surface masking was then be stripped away so that the fuselage sides could be mottled. Using the airbrush at 10psi, I attempted to puff just a minimum of 74 and 75 over the pale background to provide a mottle.
The airframe was then stripped of all masking except to the cockpit glazing and checked over for any small areas that needed to be touched in.
There was just a little more
painting to do before the decals were applied. The side number “4” was
applied using the Montex mask and the value of the pencilled datum lines was
demonstrated when the tiny triangle in the centre of “4” was lifted off
accidentally and needed to be refixed prior to painting. The fuselage number
was airbrushed in Black and the rear fuselage band hand-painted over with
Xtracrylix XA1210 Braunviolett; this colour was also carried over the
fuselage spine onto the tail fin. Two further small areas of overpainting
were required just forward of the fuselage crosses. I found that my masking
of the fine Bla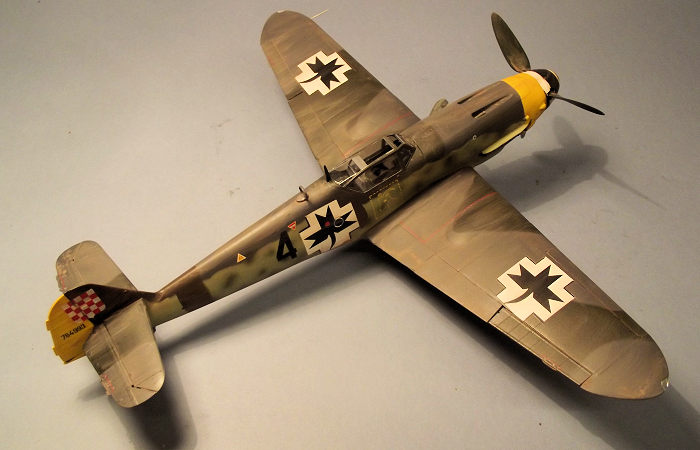 ck lines at the edges of the crosses had been less than
perfect in some areas, so the lines were repaired with strips of Black
lining from a Superscale sheet that I keep in the decal dungeon for just
such a purpose and these were sealed with a small amount of Future/Klear
varnish to stabilise them before the whole airframe was treated with two
hand brushed coats of Future/Klear to give a smooth base for the decals.
ck lines at the edges of the crosses had been less than
perfect in some areas, so the lines were repaired with strips of Black
lining from a Superscale sheet that I keep in the decal dungeon for just
such a purpose and these were sealed with a small amount of Future/Klear
varnish to stabilise them before the whole airframe was treated with two
hand brushed coats of Future/Klear to give a smooth base for the decals.
The decals mainly consisted of Luftwaffe stencilling from the kit’s decal sheet, Montex’s contribution being confined to the red and white shield on the tail, the Ram’s head insignia under the cockpit and a small serial number.
A last coat of Klear sealed the decals and the aircraft began to take shape with the installation of the cowl side intake, rudder, landing gear, drop tank, aileron mass balances and aerials. The whole airframe was sprayed with Xtracrylix flat varnish, and then received a generous wash of hand-brushed Pro Modeller Earth Brown, which was wiped away with a damp sponge to leave just a trace of dirt. The canopy masking could finally be removed.
The final detail was to add the wing tip light covers.
| CONCLUSIONS |
For a 1:32 fighter project, the price was remarkably low, £26-00 including the masks.
This is my second attempt at Montex masks, driven by the fact that I could find no alternative method for this particular colour scheme. It was a satisfactory result and if the process took me out of my comfort zone maybe this is no bad thing.
Revell’s 109G-10 offers has much scope for those who like to go to town with aftermarket and super detailing, yet it is a satisfying build with minimal alteration for those who are happy to settle for a simpler life.
Highly recommended to all.
| REFERENCES |
Profile Publications No 113, The Messerschmitt 109G by J.R.Smith and I. Primmer. June 1972.
Aircam Aviation Series No 40. Messerschmitt 109F-G in Luftwaffe and Foreign Service by Francis Mason and Richard Ward, Osprey Publishing Limited, 1973
Luftwaffe Fighters by Claes Sundin, Mortons Media Group Ltd, 2016
13 November 2017
Project courtesy of my wallet.
If you would like your product reviewed fairly and fairly quickly, please contact the editor or see other details in the Note to Contributors.
Back to the Main Page Back to the Review Index Page Back to the Previews Index Page