Revell 1/32 Bf-109G-6/R6 trop
| KIT #: | 04665 |
| PRICE: | £17-00 for basic kit |
| DECALS: | Two options |
| REVIEWER: | Frank Reynolds |
| NOTES: | Aftermarket decals. mild conversion |
| HISTORY |
The Me109 series dominated the conduct of the European Air War from the firing of the first shots in 1939 to the last in the Spring of 1945. Limited numbers were supplied by Germany to approved Allies and satellite states, including Bulgaria, Croatia, Finland, Hungary, Italy, Romania, Slovakia, Switzerland and Yugoslavia.
Italy somehow struggled to produce adequate
numbers of indigenous fighter aircraft and began to equip some of it squadrons
with the 109G variant in mid-1943 just as the Allies built up pressure with the
invasion o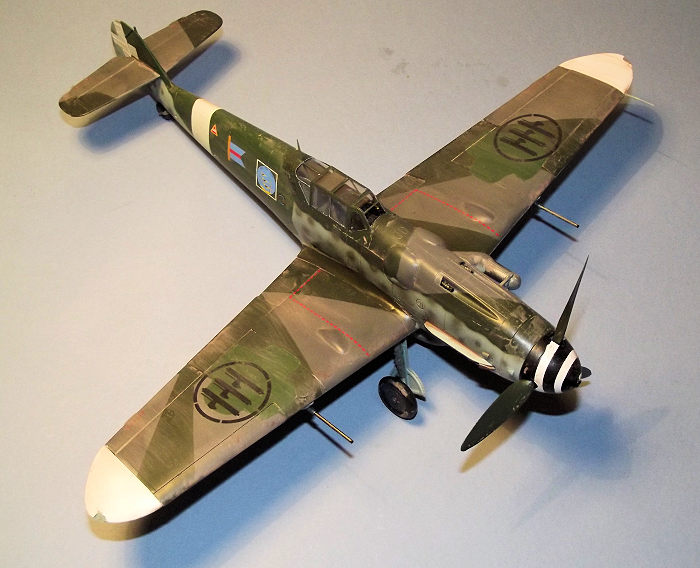 f Sicily. They were issued to units of the Regia Aeronuatica. The use
of the Me109Gs by the Regia Aeronautica was sporadic and chaotic as the Axis
Alliance came under pressure in the Mediterranean Theatre of operations and the
aircraft issued from Luftwaffe stocks were hastily repainted by their new
operators with just minimal alterations to the finish to show their new
ownership.
f Sicily. They were issued to units of the Regia Aeronuatica. The use
of the Me109Gs by the Regia Aeronautica was sporadic and chaotic as the Axis
Alliance came under pressure in the Mediterranean Theatre of operations and the
aircraft issued from Luftwaffe stocks were hastily repainted by their new
operators with just minimal alterations to the finish to show their new
ownership.
In September 1943 the Allies invaded Italy and within days the Italian Government concluded an Armistice. Italy split into two factions, the Allied-occupied South and the German-occupied North. Elements of Italy’s Regia Aeronautica made their own decisions as to which side of the divide they wanted to be and around 8th September 1943 two separate Italian Air Forces came into being. In the South, the Italian Co-Belligerent Air Force structured itself along the lines of the USAAF and RAF and to the North the Aeronautica Nazionale Repubblicana (ANR) modelled itself upon the Luftwaffe. The Italian – operated 109s were confined to the Northern factions, so for the second time they changed their paintwork to represent a different user.
The Regia Aeronautica 109s had just a brief appearance in history but still an interesting one
| THE KIT |
Produced by Revell of Germany the bagged parts frames come in their familiar envelope-style box accessed from the end flaps only. The kit is marketed as “Early and late” so has a generous range of build options with a choice of upper engine cowls, original framed or Erla canopies, standard or tall fin/rudder, standard or long tailwheel.
There are fifteen parts frames in crisply moulded
pale grey plastic and two of clear. A neat decal sheet gives a choice of two
Luftwaffe aircraft from early 1944 and the Spring of 1945 – not relevant to this
project but much of the stencilling could be used. Parts are crisply moulded
with virtually no flash present and the wh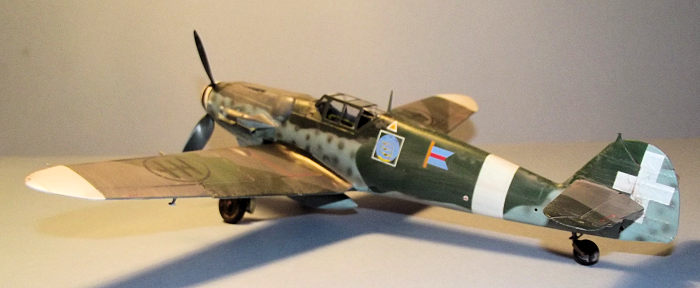 ole package oozes a quality that
belies the price asked.
ole package oozes a quality that
belies the price asked.
The instructions are in Revell’s standard style of a grey scale printed booklet with 83 pictogram stages of construction with colour call outs handily referenced to RLM paint colours. 83 stages of construction may sound like a complex kit but so many features such as each gear leg and each wheel has its own assembly pictogram.
I am aware that the aftermarket offers a number of upgrade sets to compensate for reported design defects in the kit, such as the spacing between the upper cowl guns being incorrect and the lower cowl oil cooler intake having the wrong profile but the general form of the kit looks OK for my needs.
In order to model a G-6/R6/trop I turned to my spares box, where I had squirrelled away a pair of under wing cannon surplus from a build of a Trumpeter 109 and a tropical filter from one of Hasegawa’s offerings.
| CONSTRUCTION |
Much of my modelling is influenced by shapes and colours. The built up kit is the means to display a colour scheme. I do enjoy seeking out different paint schemes and often look to the aftermarket for the unusual or colourful. This is one such case.
I am gradually building up a representative
collection of 109s to reflect the war paint of the different operators.
Obtaining a set of Chris Busbridge decals for Regia Aeronautica 109s offered an
embarrassment of choice, with no less than 14 subjects of F-4, G-2,G-4 and G-6
in both Luftwaffe standard and Desert colours, each scheme modified in a
different way, probably at unit level, for Italian service. Each subject is
illustrated with a single left side view and there is a generic plan view so it
can only be speculated if the right side of each subject is the same. The one
that I chose seemed to have the maximum amount of paint alterations, with the
bonus that it was a tropicalized variant fitted with the R6 field modification
of underwing cannon. It seemed logical for modelling to mimic full size practice
by building the 109 and finishing it with a standard Luftwaffe camouflage
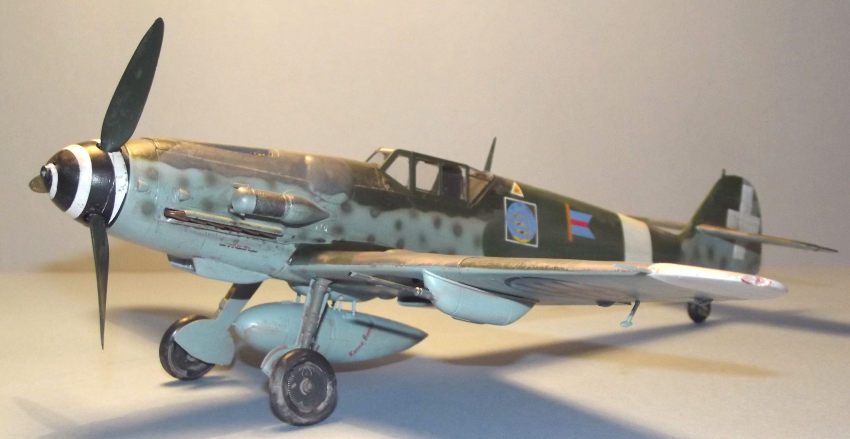
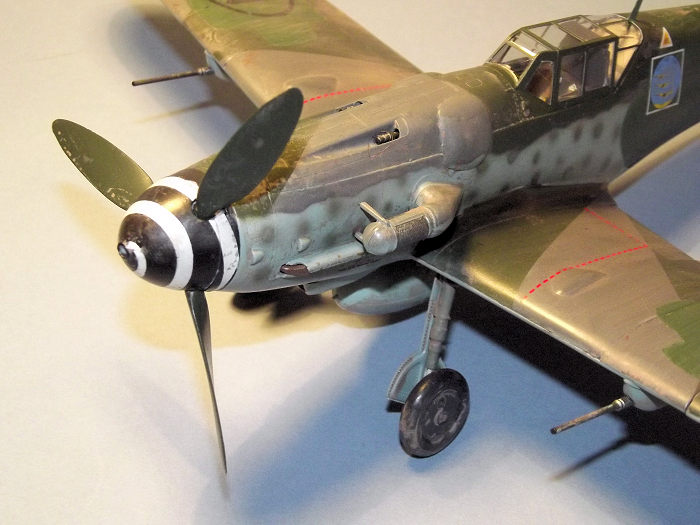
scheme, then overpainting the relevant areas. The subject chosen was described
as a 109G6/R6/Trop of unknown werk number, assigned to 150 Grupo Autonomo,
Sciacca, July 19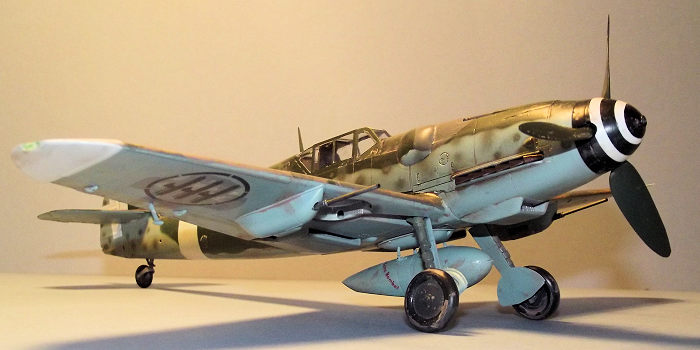 43. The presence of a Group Commander pennant on the rear
fuselage suggested that it was flown by Magg. Antonio Vizotta. The finish shows
how the aircraft were hastily transferred from Luftwaffe stocks, since, apart
from the basic camouflage colours, it retains a white rear fuselage band and
wing tips that are a characteristic of Luftwaffe units assigned to the
Mediterranean Theatre of operations.
43. The presence of a Group Commander pennant on the rear
fuselage suggested that it was flown by Magg. Antonio Vizotta. The finish shows
how the aircraft were hastily transferred from Luftwaffe stocks, since, apart
from the basic camouflage colours, it retains a white rear fuselage band and
wing tips that are a characteristic of Luftwaffe units assigned to the
Mediterranean Theatre of operations.
The parts frames were decanted into an old Hasegawa Me109 box and Revell’s outer packaging sent for recycling.
A few sub-assemblies are always a good way to kick start a build and I began with the propeller unit. The blades were sprayed in RLM 70 Schwarzgrun using Tamiya XF-27 Black Green. The unassembled propeller spinner and back plate were tacked together with Blu Tack putty, and painted with Tamiya Fine White Primer from a rattle can. This has good enough density to serve as a finished coat of paint. Although a spinner spiral is included on the kit’s decal sheet I chose one from Eduard’s JX502 mask set which gives a choice of nine different spirals. This was wound around the spinner which was then airbrushed in Tamiya XF-1 Flat Black. The mask was removed and the assembly sealed with two brushed coats of Future/Klear floor polish then the spinner back plate carefully eased away using a fresh scalpel blade to slice through the joint. The propeller was then assembled with glued joints, trapping the blades in place.
Next came the undercarriage. The main gear legs are split in half vertically with the axle unit added separately. A small pipe to the top of the leg and link arms to the oleos completed the assembly, taking care to ensure that all of the joints were sound by a careful application of liquid cement applied with a brush. When dry they were painted RLM Grau 04 to the main legs, with the sliding sections in Silver.
 The main wheels consist of inner and outer halves
with the inners having an inset hub. The inner hubs were painted in Schwarzgrau
66 and the tyres in Tamiya XF-85 Rubber Black. The tailwheel fork is a one piece
moulding and the tail wheel simply clips into place. The leg and hub were
painted Grau 02 and the tyre Rubber Black.
The main wheels consist of inner and outer halves
with the inners having an inset hub. The inner hubs were painted in Schwarzgrau
66 and the tyres in Tamiya XF-85 Rubber Black. The tailwheel fork is a one piece
moulding and the tail wheel simply clips into place. The leg and hub were
painted Grau 02 and the tyre Rubber Black.
Main construction begins with the cockpit tub and Revell provides a reasonable set of basic mouldings which builds up as a main floor, rear bulkhead with seat pan and well detailed cockpit side walls with throttle, trim wheels and separately moulded pipework and cables. The plastic parts have a representation of seat belts moulded in although I used a set of the excellent HGW models etch and fabric seat belts no 132011 which is a generic set for German World War 2 types.
The basic colour of the cockpit interior was sprayed in Xtracrylix XA1203 RLM66 Schwarzgrau Matt. A touch of colour was introduced by picking out the pipes and wires to the side walls in yellow, silver and blue according to Revell’s call outs. The instrument panel was sprayed Schwarzgrau Matt and finished with the kit-supplied decal for the instruments. The substantial wing spar was glued under the cockpit floor and the sub assembly side aside to harden.
The fuselage halves were prepared by installing the tailwheel support tube. The exhausts can only be fitted from inside the fuselage halves so they were painted Red-Brown and glued in place.
The fuselage halves were joined with the projecting wing spar under the cockpit tub slipped through slots in the wing roots. At the same time the propeller shaft and inner plate for the under cowl intake were slotted into place. The under cowl intake has moulded detail to the front and rear radiator faces which were painted silver, then the intake lower fairing was added and the exit door glued in place .The fuselage assembly was strapped up with sticky tape and left for a few days to harden.
The forward fuselage has an open framework to
which the cowl panels are attached. The top cowl was added next, followed by the
large “beule” bulges that cover the cannon breeches. This highlights one of the
weaknesses of the kit’s design. On the one hand, tooling the inserts to coincide
with panel lines might seem to be a good idea, but any builder like me ,of
average ability, will be challenged to get the joints to match the delicately
engraved panel lines of the main components. A bit of glue squeezing out of the
joints or the need for some filler makes it hard to match the joints with the
engraving. A small point and a small price to pay for w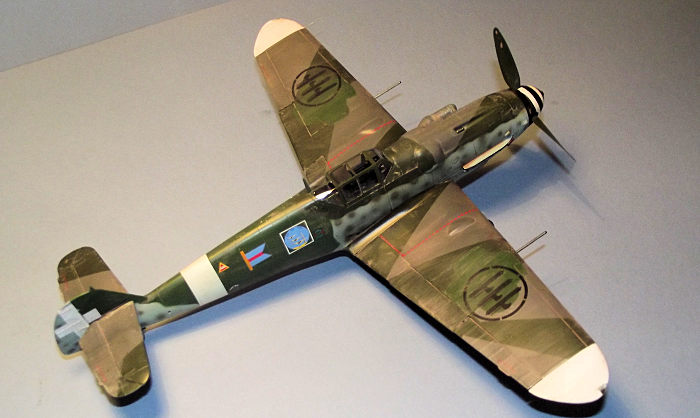 orking with a kit that
represents such good value, but it remains a minor irritation.
orking with a kit that
represents such good value, but it remains a minor irritation.
The instructions next call out the installation of the supercharger intake to the left side of the cowl. I prefer to add this after the painting stage as it can get in the way of masking out the upper and lower surface colours.
The inner panels of the upper wing were glued in place first, sitting on the wing spar and butting up to the wing root. Radiator faces and side walls to the wheel wells were added underneath to form a strong centre section. The lower wing panels are each in one piece from tip to centre line and thanks to Revell’s good engineering slipped into place without fuss. The upper wing outer panels were added to complete the basic wing structure, again highlighting the need to deal with a joint along the panel line to the upper wing surface.
The upper parts of the tail fin and horizontal tail sections were added to complete the basic airframe. Leading edge slats, elevators, ailerons, rudder and wing flaps are all separately moulded and could be posed deflected if required. I chose to fix them all closed up. The flaps need to be trimmed to fit in the closed position since they are moulded with prominent hinges for display in the deployed position.
The next sub-assembly was the belly fuel tank, nicely moulded by Revell and assembled without fuss onto the fuselage belly fairing with four small vertical support struts. It was set aside to be added at the end of the build
Returning to the main airframe the armoured headrest was painted in Schwarzgrau 66 and glued inside the main canopy with Humbrol Clearfix. The unwanted canopy side hinges were trimmed away with a scalpel since I planned to have the canopy closed up. The windscreen assembly and canopy were glued in place over the cockpit and masked off with Tamiya tape trimmed to fit with a fresh scalpel blade.
The exhausts were masked out with small strips of Tamiya tape and the airframe gently washed down with methylated spirits to remove any greasy finger prints before the radiator intakes were plugged with small offcuts of plastic sponge and the airframe primed with Dark Grey auto primer applied from a rattle can. The areas of the rear fuselage and wing tips to be finished White were sprayed in Tamiya Fine White primer and masked over with Tamiya tape.
| COLORS & MARKINGS |
For the basic paint scheme I chose for the upper
surfaces: Xtracrylix XA 1207 Grauviolett RLM 75 and Tamiya XF -13 for the RLM 74
Graugrun. The under surfaces a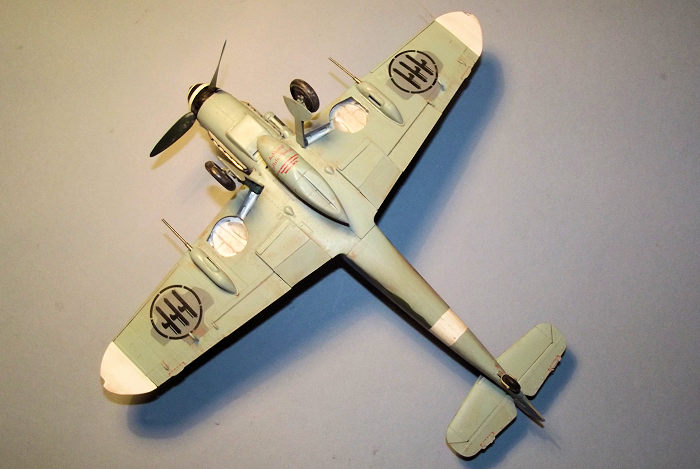 nd fuselage sides were painted Tamiya XF-23 for
RLM Lichtblau 76, using my Iwata HP-C airbrush. The drop tank assembly and gear
doors were painted at this point.
nd fuselage sides were painted Tamiya XF-23 for
RLM Lichtblau 76, using my Iwata HP-C airbrush. The drop tank assembly and gear
doors were painted at this point.
The colour dividing line on the fuselage sides was defined by cutting a pattern of an irregular line onto a thin piece of card, such as strip cut from a kit box and taped in place along the fuselage sides. With the lower surface blue partially covered with this ragged-edged cardboard strip, the remaining areas were covered with Tamiya tape while the upper surfaces were painted RLM 75 Grauviolett. Once dry, and with more masking, the counter shading of RLM 74 applied.
Most of the upper surface masking was stripped away so that the fuselage sides could be mottled. Using the airbrush at 10psi, I attempted to puff just a minimum of 74 and 75 over the pale blue to provide a soft mottle.
In order to replicate the overpainting of the factory-applied Luftwaffe insignia, wing masks were made using Tamiya tape and the rear fuselage edged with Blu-tack low tack putty. Reference to the kit’s decal sheet gave the appropriate dimensions of the outline crosses to the upper and under wings . These were roughly hand drawn onto the Tamiya tape using a pencil, then cut out freehand with a scalpel blade. The airbrush was fired up again and the upper wing crosses painted in, (or painted out?), with Tamiya XF-26 Deep Green, then the rear fuselage and fin received the same colour. The Busbridge decal sheet calls out Verde Olivia Scuro for the fuselage overpainting. I just went for the best contrasting Dark Green available in my paint locker for maximum contrast. I really wanted that overpainting to show up – it was the reason for the project. The areas of the under wing insignia received a coat of Neutral Grey XF-53 for the same reason.
The airframe was then stripped of all masking except to the cockpit glazing and checked over for any small areas that needed to be touched in before the paint was sealed with two hand brushed coats of Future/Klear varnish to give a smooth base for the decals.
The Chris Busbridge Decals sheet no CB32002 is
printed by Fantasy Printshop to their usual good standard and at the time of
writing was still available from them at £10-95. The sheet provides all of the
code letters and numerals and unit badges for each subject but only one set of
wing insignia. The decals went on easily without assistance from setting
solutions. Airframe stencilling came from the Revell sheet since I assumed t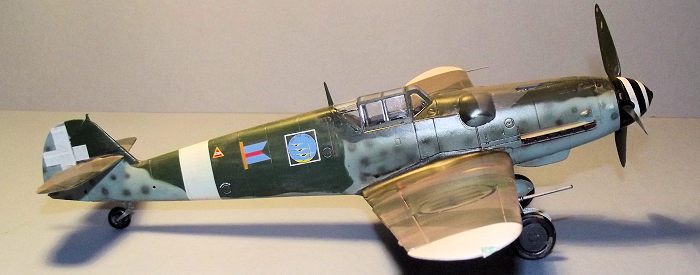 hat
the German language stencils would have remained unaltered.
hat
the German language stencils would have remained unaltered.
A last coat of Klear sealed the decals and the aircraft began to take shape with the installation of the cowl side intake, landing gear, drop tank, aileron mass balances and aerials. The Hasegawa air filter fixed onto the cowl intake without fuss and Trumpeter’s under wing cannon assemblies glued into place as though they had been designed for the Revell kit. The propeller assembly was glued in place. A light coating of Tamiya Smoke was airbrushed to lower cowl and fuselage sides to provide some exhaust stains.
The whole airframe was sprayed with Xtracrylix flat varnish, and then received a generous wash of hand-brushed Pro Modeller Earth Brown, most of which was wiped away with a damp sponge to leave just a trace of dirt. The canopy masking could finally be removed.
The final detail was to add the wing tip light covers.
| CONCLUSIONS |
Revell’s 109G-6 is amazing value for money, certainly in the UK market place. It is a little fiddly to build with the number of inserts and options on the airframe, and if money were no object, I would still go for the Hasegawa equivalent, but that would be fully three times the price. At three Revell for the price of one Hasegawa I have already ordered two more for my stash.
The object of the exercise was to illustrate the peculiar colour schemes of the Regia Aeronautica 109s and I am happy with the result.
Revell’s offering has scope for those who like to go to town with aftermarket and super detailing, yet it is a satisfying build with minimal alteration.
| REFERENCES |
Regia Aeronautica Vol.1 & Vol.2 by F. D’Amico and G. Valentini. Squadron Signal Publications 1986.
November 2017
Copyright ModelingMadness.com
Project courtesy of my wallet.
Thanks to
for the preview kit. You can find this kit at your favorite hobby shop
or on-line retailer. If you would like your product reviewed fairly and
fairly quickly, please
contact
the editor
or see other details in the
Note to
Contributors.
Back to the Main Page
Back to the Review
Index Page
Back to the Previews Index Page