| KIT #: | 04888 |
| PRICE: | £22.00 |
| DECALS: | Two options |
| REVIEWER: | Frank Reynolds |
| NOTES: | Aftermarket decals. Mild conversion by cross kitting Revell parts. |
| HISTORY |
With over 33,000 examples built the Messerschmitt 109 series remains the most numerous fighter aircraft type in history. Built in an almost bewildering variety of sub-types by a large number of dispersed sub-contractors, the later the version, the harder it is to pin down all of the detailed features applicable to a particular airframe.
As World War 2 progressed German industrial production was progressively disrupted by the Allied bombing campaign and it was decided to build one version of the Me109 that would incorporate all of the best features of the differing variants, including a powerful new engine in the form of the DB 605. This was to emerge as the Me-109K. Pending arrangements to bring all of the sub-contracted production into line, an interim “ new” version, incorporating all of the best available features, was to be built at certain nominated factories, including the Erla works at Leipzig, as the Me109G-10, with the first examples emerging in September 1944.
Characteristic of the Erla-built
109G-10s were the bulbous nose cowl that blended back into the fuselage in the
area of the windscreen and standardisation of the clear view canopy and a tall
tail fin. It was i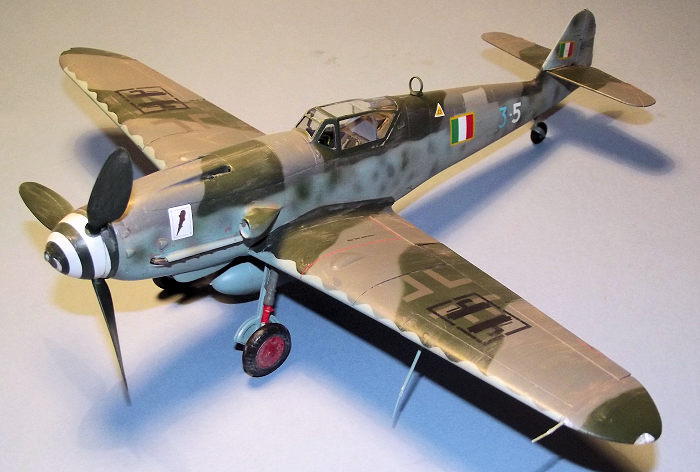 ntended
that each G-10 would have a revised wing with distinctive upper surface bulges
to accommodate wider main wheels. Problems in the supply chain would force the
factory to use the earlier wing structure on some of the airframes so the small
wing bulges and standard main wheels could be found on some examples.
ntended
that each G-10 would have a revised wing with distinctive upper surface bulges
to accommodate wider main wheels. Problems in the supply chain would force the
factory to use the earlier wing structure on some of the airframes so the small
wing bulges and standard main wheels could be found on some examples.
In September 1943 the Allies invaded Italy and within days the Italian Government concluded an Armistice. As the Allied Armies continued to advance on Rome, in the face of resistance by German troops, Italy effectively spilt into two factions, the South and the German-occupied North. Elements of Italy’s Regia Aeronautica had made their own decisions as to which side of the divide they wanted to be and around 8th September 1943 two separate Italian Air Forces came into being. In the South, the Italian Co-Belligerent Air Force structured itself along the lines of the USAAF and RAF and to the North the Aeronautica Nazionale Repubblicana (ANR) modelled itself upon the Luftwaffe. By the autumn of 1944 the ANR began to receive limited numbers of Me109s, willingly supplied by Germany on the basis that a well-equipped ANR would enable the Luftwaffe to concentrate upon the defense of the Reich, while Axis ground troops continued to slow the Allied advance up the mountainous peninsula of Italy. The 109s were much prized in the defence of Italy’s Northern industrial areas against Allied bombing.
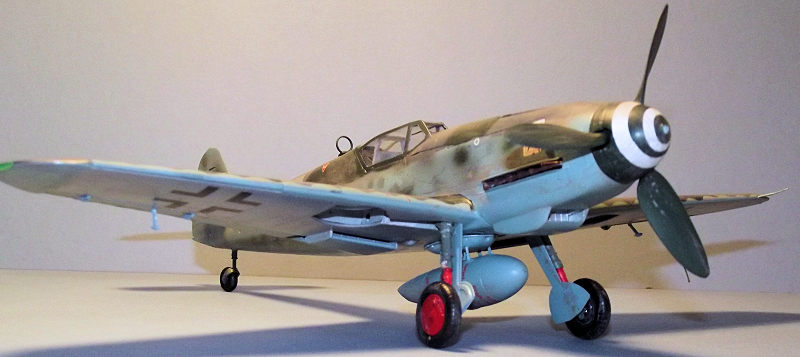
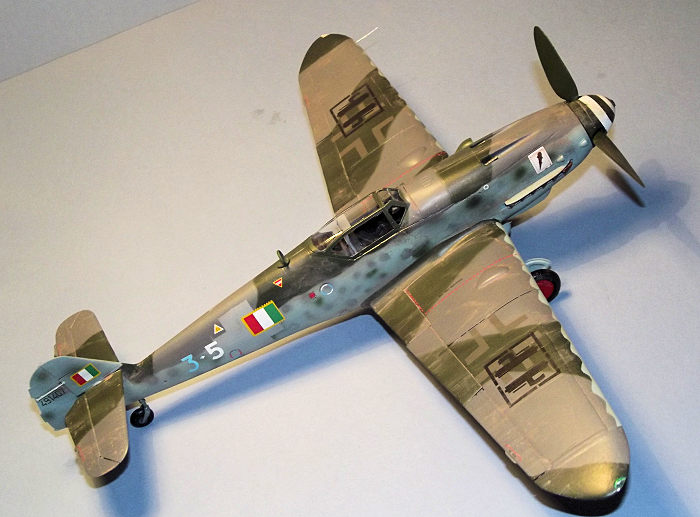
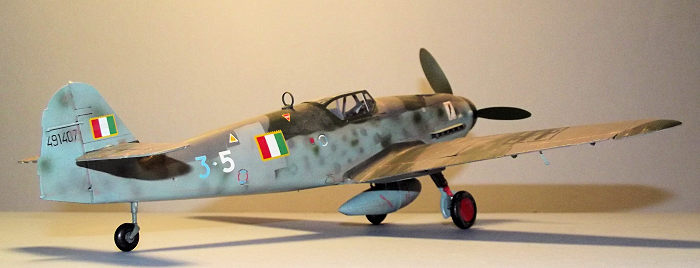
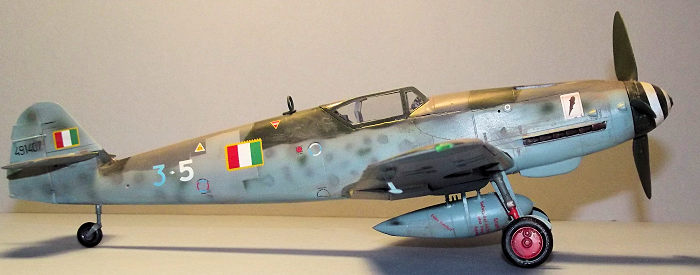
Me109G-10 Werk No. 491407 had a brief career. It is recorded as having been flight tested at the Erla factory on 18 February 1945 when the Third Reich was only a few months from collapse. It was delivered to the ANR almost immediately and on 14 March is reported to have a landing gear repair while serving with 1o Gruppo. Days later it was abandoned after an emergency landing following air combat with P-47Ds of the 305th Fighter Group. 491407’s colour scheme and configuration speak much about the chaos surrounding its manufacture and operation. It was supplied from the Erla factory with major components painted in the standard Luftwaffe colours and insignia of the period, yet in the rush for assembly the underside of the main wings was left unpainted even though the wing ancillaries carry paint. The ANR overpainted the Luftwaffe insignia on the upper wings and fuselage but the under wing crosses remained. It was also fitted with the “wrong” wing of earlier type.
THE PROJECT
 Much of
my modelling is to do with shapes and colours. I am not a super-detailer and
rarely do I finish a kit with cowlings or canopies open or even with control
surfaces deflected. If a kit captures the shape of the subject to my
satisfaction then I am not too worried about hatches and panel lines needing to
be rescribed but I do enjoy paint schemes and often look to the aftermarket for
the unusual or colourful. This is one such case.
Much of
my modelling is to do with shapes and colours. I am not a super-detailer and
rarely do I finish a kit with cowlings or canopies open or even with control
surfaces deflected. If a kit captures the shape of the subject to my
satisfaction then I am not too worried about hatches and panel lines needing to
be rescribed but I do enjoy paint schemes and often look to the aftermarket for
the unusual or colourful. This is one such case.
I am a late comer to the world of Me109s and only in the last ten years have I developed enough confidence with an airbrush to attempt German WW2 camouflage. Even so, I cannot get fuselage side blotches down small enough for 1:48 or 1:72 scales so I restrict myself to 1:32 for these subjects. In terms of detailing I treat these large scale kits as giant versions of 1:48 scale with minimal additional detailing usually restricted to seat belts and maybe a few cockpit placards. If I can’t see it, then it will not be going in since the finished article will live in a glass-fronted display case so it needs to be “two footer” at best.
For my choice of subject in this build, some modification was necessary, having identified that this Italian RSA-operated G-10 had the smaller wing bulges. These were obtained from Revell’s closely related 109G-6 kit that I recently converted to an Avia S-199 with the result that the inner wing panels and associated wheels were conveniently swapped between the two Revell kits. It Is not an absolute requirement to go this route since a resin conversion providing the “small bulge” inner wing panels as an accessory set is available in the UK from A2Zee models for a reasonable £5-50.
| THE KIT |
Produced by Revell of Germany the bagged parts frames come in their familiar envelope-style box accessed from the end flaps only.
 Revell
have gone the logical route for an Erla ‘109 and have moulded a fuselage that is
specific to the 109G-10 so this is not a kit that can be readily tweaked to
provide another variant.
Revell
have gone the logical route for an Erla ‘109 and have moulded a fuselage that is
specific to the 109G-10 so this is not a kit that can be readily tweaked to
provide another variant.
There are twelve parts frames in crisply moulded pale grey plastic and two of clear. A neat decal sheet gives a choice of two Luftwaffe aircraft from the Spring of 1945 – not relevant to this project but much of the stencilling could be used. The parts frames for the tail , wings and ancillaries appear to be common with Revell’s previously released 109G-6.
The instructions are in Revell’s standard style of a grey scale printed booklet with 75 pictogram stages of construction with colour call outs handily referenced to RLM paint colours. 75 stages of construction may sound like a complex kit but each so many small features such as each gear leg and each wheel has its own assembly pictogram. Some 25 parts are marked as not for use.
| CONSTRUCTION |
I often look for a few sub-assemblies with which to start a kit so I can get a feel for the plastic and how it reacts to trimming and gluing
In this case I began with the propeller assembly since I wanted to deal with the potential problem of the spinner spiral. Suitable paint masks are available from Eduard but I chose to use a decal from a sheet in my decal dungeon. The unassembled propeller spinner and back plate was tacked together with Blu Tack putty, primed and painted in RLM 70 Schwarzgrun using Tamiya XF-27 Black Green and the prop blades the same colour. The white spiral decal was cut into two to make handling easier and carefully fed around the spinner using Micro Sol and Micro set and left to dry. The spinner was sealed with two brushed coats of Future/Klear floor polish then the spinner back plate carefully eased away using a fresh scalpel blade to slice through the joint and the overlapping decal. The propeller was then assembled with glued joints, trapping the blades in place.
Main construction begins with the cockpit tub and Revell
provides a reasonable set of basic mouldings which builds up as a main floor,
rear bulkhead with seat pan and well detailed cockpit side walls with throttle,
trim wheels and separately moulded pipework and cables. The plastic parts have a
representation of seat belts moulded in and I settled for a representation of
the belts by applying a decal from an old Hasegawa sheet over the mouldings,
liberally soaked in Micro Sol, which settled the decals d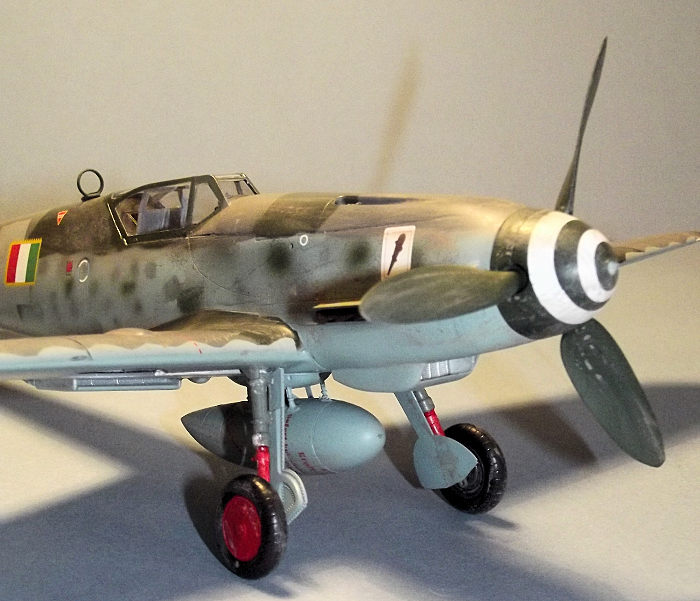 own
to give the sort of effect I was looking for. The basic colour of the cockpit
interior was sprayed in Xtracrylix XA1203 RLM66
Schwarzgrau Matt. A touch of colour was introduced by picking out the pipes and
wires to the side walls in yellow, silver and blue according to Revell’s call
outs. The instrument panel was sprayed Schwarzgrau Matt and finished with the
kit-supplied decal for the instruments. The substantial wing spar was glued
under the cockpit floor and the sub assembly side aside to harden.
own
to give the sort of effect I was looking for. The basic colour of the cockpit
interior was sprayed in Xtracrylix XA1203 RLM66
Schwarzgrau Matt. A touch of colour was introduced by picking out the pipes and
wires to the side walls in yellow, silver and blue according to Revell’s call
outs. The instrument panel was sprayed Schwarzgrau Matt and finished with the
kit-supplied decal for the instruments. The substantial wing spar was glued
under the cockpit floor and the sub assembly side aside to harden.
The fuselage halves were prepared by installing the tailwheel support tube. The instructions are vague on this point since the drawings appear to show the installation of a short tail wheel at an angle, not the more vertical long type. I found this out late in the build and had to make some adjustments. The exhausts can only be fitted from inside the fuselage halves so they were painted Red-Brown and glued in place. This is a nuisance when it comes to the painting stage but I have not found a way around this. The fuselage halves were joined with the projecting wing spar under the cockpit tub slipped through slots in the wing roots. At the same time the propeller shaft and inner plate for the under cowl intake were slotted into place. The instructions next call out the installation of the supercharger intake to the left side of the cowl. I prefer to add this after the painting stage as it can get in the way of masking out the upper and lower surface colours.
The under cowl intake has moulded detail to the front and rear radiator faces which were painted silver, then the intake lower fairing was added and the exit door glued in place .
Attention now turned to the wing structure and Revell have a specific build sequence that is worth following. The inner panels of the upper wing were glued in place first, sitting on the wing spar and butting up to the wing root. Radiator faces and side walls to the wheel wells were added underneath to form a strong centre section. The lower wing panels are each in one piece from tip to centre line and thanks to Revell’s good engineering slipped into place without fuss. The upper wing outer panels were added to complete the basic wing structure.
The upper parts of the tail fin and horizontal tail sections were added to complete the basic airframe. Leading edge slats, elevators, ailerons and wing flaps are all separately moulded and could be posed deflected if required. I chose to fix them all closed up.
It was time to return to some
sub-assemblies with construction of the undercarriage. The main gear legs are
split in half vertically with the axle unit added separately. A small pipe to
the top of the leg and link arms to t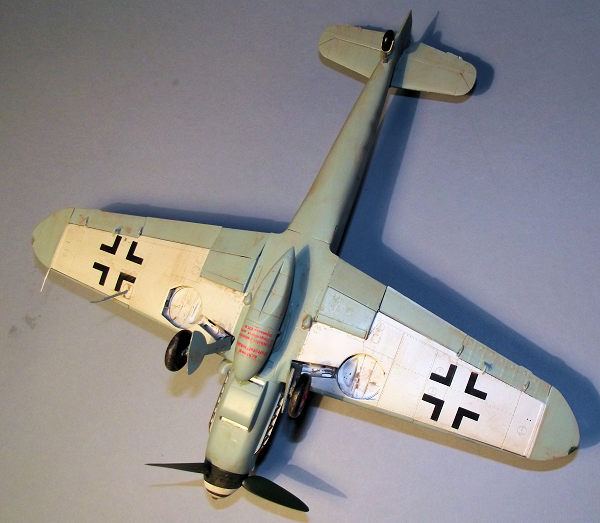 he
oleos completed the assembly, taking care to ensure that all of the joints were
sound by a careful application of liquid cement applied with a brush. When dry
they were painted RLM Grau 04 to the main legs, with the sliding sections in
Silver and the lower legs in the bright Red that add a bit of individual colour
to this aircraft, having been applied in service at squadron level.
he
oleos completed the assembly, taking care to ensure that all of the joints were
sound by a careful application of liquid cement applied with a brush. When dry
they were painted RLM Grau 04 to the main legs, with the sliding sections in
Silver and the lower legs in the bright Red that add a bit of individual colour
to this aircraft, having been applied in service at squadron level.
The main wheels consist of inner and outer halves with the inners having an inset hub. The inner hubs were painted in Schwarzgrau 66 and the tyres in Tamiya XF-85 Rubber Black. The tailwheel fork is a one piece moulding and the tail wheel simply clips into place. The leg and hub were painted Grau 02 and the tyre Rubber Black.
The next sub-assembly was the belly fuel tank, nicely moulded by Revell and assembled without fuss onto the fuselage belly fairing with four small vertical support struts. I added a retaining strap around the tank from a strip of 5thou. plastic card.
Returning to the main airframe the glazed armoured headrest was painted in dark grey primer and glued inside the main canopy with Humbrol Clearfix, this after the unwanted canopy side hinges were trimmed away with a scalpel since I planned to have the canopy closed up. The windscreen assembly and canopy were glued in place over the cockpit and masked off with some Montex pre-cut vinyl masks ( set no SM 32144). I find that these are OK for glazed surfaces that are dead flat; less so for compound curves such as the top of the main canopy, so this section was masked using Tamiya tape cut to shape with a scalpel.
The exhausts were masked out with small strips of Tamiya tape and the airframe gently washed down with methylated spirits to remove any greasy finger prints before the radiator intakes were plugged with small offcuts of plastic sponge and the airframe primed with Dark Grey auto primer applied from a rattle can.
| COLORS & MARKINGS |
I knew from the start that the multi-colour paint scheme would be the focus of the build, so I gathered up the colours needed. Although I have about 22 different Luftwaffe colours from the Hannants Xtacrylix range, my preference is to use Tamiya acrylics where the appropriate colour is available so I chose for the upper surfaces: Xtracrylix XA 1207 Grauviolett RLM 75; Tamiya XF 13 for the RLM 74 Graugrun. The under surfaces were painted Tamiya XF-23 for RLM Lichtblau 76 and XF-17 Flat Aluminium.
The paint and decal finish was supported by Sky Models decal sheet 32045 which provides a choice of seventeen Italian-operated 109s.
With my Iwata HP-C airbrush loaded
and ready it was time to begin. The under surfaces and fuselage sides were
painted in XF-23 Light Blue and left to dry. I ensured that the Blue was taken
over the wing leading edges. The drop tank assembly and gear doors were painted
at this point. Most of the under
 surfaces
were then carefully masked with Tamiya tape and the remaining fixed parts of the
wing were painted in XF-16 Flat Aluminium.
surfaces
were then carefully masked with Tamiya tape and the remaining fixed parts of the
wing were painted in XF-16 Flat Aluminium.
The multi coloured upper surfaces required some planning. The scalloped pattern to the wing leading edges was achieved by laying a length of 10mm Tamiya masking tape on a sheet of glass and cutting a meandering line down the centre of the tape with the tip of a scalpel blade. Each side of the tape could then be picked up and positioned wrapped around the leading edge to cover the Blue paint.
The colour dividing line on the fuselage sides was achieved with the help of a neat stainless steel stencil, sold by Hannants, which is pierced and shaped with irregular mottle lines and patterns, specifically for Luftwaffe camouflage schemes. . It is intended to be used held against the airframe but I find it just as useful to cut a pattern onto a thin piece of card, such as strip cut from a kit box and tape this in place along the fuselage sides. With the lower surface blue partially covered with this ragged-edged cardboard strip, the remaining areas can be covered with Tamiya tape while the upper surfaces are painted RLM 75 Grauviolett. Once dry, and with more masking, the counter shading of RLM 74 can be applied.
Most of the upper surface masking can then be stripped away so that the fuselage sides can be mottled. Using the airbrush at 10psi, I attempted to puff just a minimum of 74 and 75 over the pale blue to provide a mottle.
There was just a little more
painting to do before the decals were applied. In order to replicate the
overpainting of the factory-applied Luftwaffe insignia, new masks were made
using offcuts of Montex’s masking film. Reference to the kit’s decal sheet gave
the appropriate dimensions of the outline crosses to the upper wings and to the
fuselage sides. These were roughly hand drawn onto the masking film using a
pencil and ruler, then cut out freehand with a scalpel blade. The masks were
positioned on the airframe and surrounded with blankets of old newspaper tacked
to the edges of the vinyl masks with Tamiya tape. The airbrush was fired up
again and the upper wing crosses painted in Khaki Drab and the fuselage panels
in Lig ht
Grey.
ht
Grey.
The airframe was then stripped of all masking except to the cockpit glazing and checked over for any small areas that needed to be touched in before the paint was sealed with two hand brushed coats of Future/Klear varnish to give a smooth base for the decals.
Although the Sky Models decal sheet includes plenty of stencils and wing walk lines, my tidy mind persuaded me to use the kit’s decal sheet for all of the Luftwaffe stencilling and basic airframe markings and the main national insignia came from an old Cutting Edge Decal sheet, No CED 32029 “Foreign Gustavs Part 2” since I preferred their interpretation to that on the Sky’s decal sheet.
A last coat of Klear sealed the decals and the aircraft began to take shape with the installation of the cowl side intake, landing gear, drop tank, aileron mass balances and aerials. It was at this point I discovered that I had misaligned the tail leg support tube when the plug-in tail wheel assembly assumed a sharp rearward angle. This was corrected by slipping the point of a scalpel into the hole for the tail gear housing and hacking away at the rear face of the support tube until it split open enabling the leg to be glued up to, rather than into, the tube. Crude, but effective, and a lesson for next time I do a Revell 109 to ensure that the internal assembly is correctly aligned for the type of tail wheel to be installed. Revell use the same pictogram for both their G-10 and G-6 instructions so I seem to have sleep walked into that one.
The whole airframe was sprayed with Xtracrylix flat varnish, and then received a generous wash of hand-brushed Pro Modeller Earth Brown, which was wiped away with a damp sponge to leave just a trace of dirt. The canopy masking could finally be removed.
The final detail was to add the wing tip light covers.
| CONCLUSIONS |
 For
my money, Revell’s 109G-10 is a winner, it is not too far from a shake and
bake assembly project and at the price asked in the UK market it is
astonishing value for money.
For
my money, Revell’s 109G-10 is a winner, it is not too far from a shake and
bake assembly project and at the price asked in the UK market it is
astonishing value for money.
The ANR’s Me109s have a story all of their own and one that is well worth researching. This is one model that took me into a whole new area of World War 2 history. The ghost Luftwaffe markings under the ANR insignia certainly draw some attention.
Revell’s offering has much scope for those who like to go to town with aftermarket and super detailing, yet it is a satisfying build with minimal alteration for those who are happy to settle for a simpler life.
Highly recommended to all.
| REFERENCES |
Regia Aeronautica Vol.2 by F. D’Amico and G. Valentini. Squadron Signal Publications 1986.
Air Modeller Issue 42 June 2012 . AFV Modeller Ltd
27 July 2017
Copyright ModelingMadness.com
Project courtesy of my wallet.
If you would like your product reviewed fairly and fairly quickly, please contact the editor or see other details in the Note to Contributors.
Back to the Main Page Back to the Review Index Page Back to the Previews Index Page