Eduard/Alley Cat 1/32 Bf-109D
| KIT #: | 3001/AC 32007C |
| PRICE: | £24-00 for the conversion, around £30-00 for a donor 109. |
| DECALS: | Two options |
| REVIEWER: | Frank Reynolds |
| NOTES: | Surprisingly few decals used. Montex masks were a surprise hit. |
| HISTORY |
Switzerland has a history of robust neutrality. In spite of being located in Europe, a continent that has a history of armed conflict going back centuries, a combination of mountainous topography, a determined and well trained people’s militia and the shrewd purchase of the right kind of military equipment has seen it maintain its independence through all the turmoil. During World War 2, its location at the crossroads of France, Germany, Austria and Italy tested its ability to stay out of the conflict. The increasing sophistication of military aircraft and their ability to fly at ever higher altitudes caused the Swiss to seek numbers of interceptor fighters to protect their airspace. As World War 2 continued the Swiss were also called upon to intercept and escort damaged Allied aircraft that had strayed, or knowingly diverted, into Switzerland.
 The Swiss
armed forces were an early user of a monoplane fighter that was the sensation of
its age when it first appeared, the Messerschmitt Bf 109 and they acquired 10
examples of the third production variant, the BF109D, which began deliveries in
December 1938 and were quickly joined by an order for Bf109Es. The Swiss have a
habit of getting long service out of their aircraft procurement programmes and
the Dora versions remained in limited service until the end of World War 2, even
though they had been supplanted by numbers of the much more capable Bf109G.
The Swiss
armed forces were an early user of a monoplane fighter that was the sensation of
its age when it first appeared, the Messerschmitt Bf 109 and they acquired 10
examples of the third production variant, the BF109D, which began deliveries in
December 1938 and were quickly joined by an order for Bf109Es. The Swiss have a
habit of getting long service out of their aircraft procurement programmes and
the Dora versions remained in limited service until the end of World War 2, even
though they had been supplanted by numbers of the much more capable Bf109G.
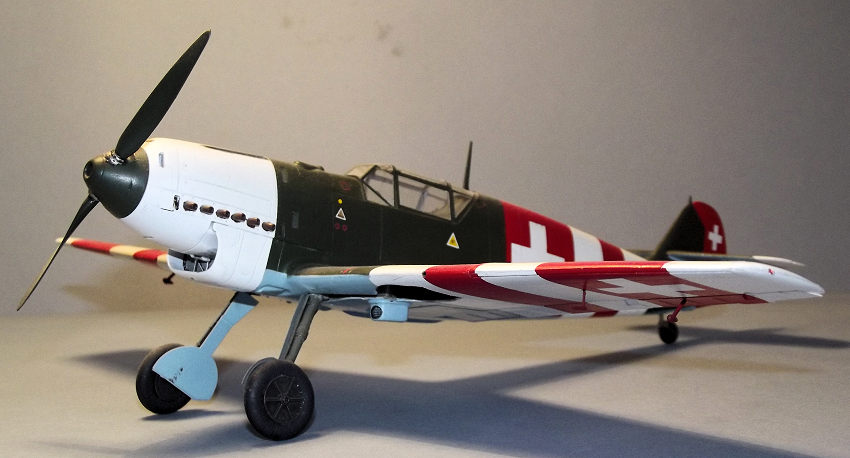
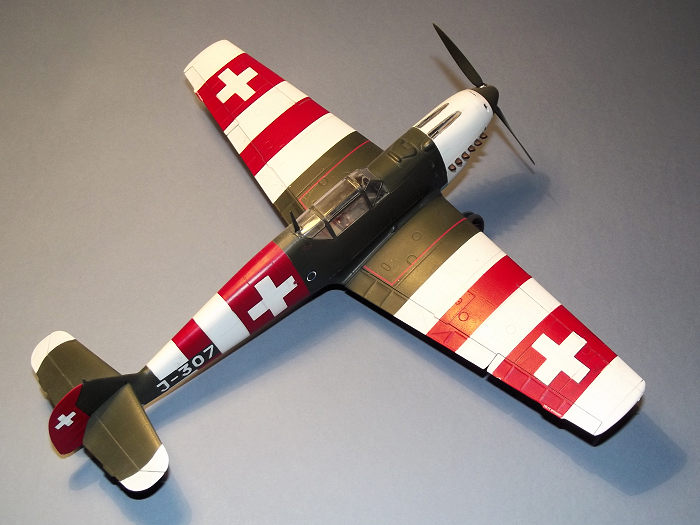
As armed conflict in Europe continued the Swiss found that they were ever -increasingly encountering Allied aircraft. With the operation of fighters that had an unmistakeable “German” shape, it became necessary to ensure that there could be no mistake as to their operator. Swiss BF109s became known for their spectacular “neutrality” colour schemes. In the early years of World War 2 the BF109Ds carried a typical colour scheme for European based fighter aircraft, with Dark Green upper surfaces, blue undersides and national insignia of a white cross on a red disc. As their “trade” increased so a variety of spectacular colour schemes, predominantly of Red and White stripes was adopted.
| THE KIT |
Alley Cat do around ten major 109 conversion sets in 1:32 scale and about as many minor ones. This one is specifically marketed as a Swiss version. Eduard’s Bf109E-1 is the recommended donor kit but an E-3 will do with minor adjustments to the wings, by deleting the small under wing gun blisters.
The intention of this build was to simply go for an example demonstrating the maximum amount of bright colouring displayed on a Swiss 109.
Alley Cat’s conversion
comes packed in a stout box that reveals forty eight resin parts that are
cleanly cast in a pale grey showing good subtle engraved surface detail that
matches well to Eduard’s plastic. There are four pages of instructions that
critically include nineteen colour photographs highlighting different aspe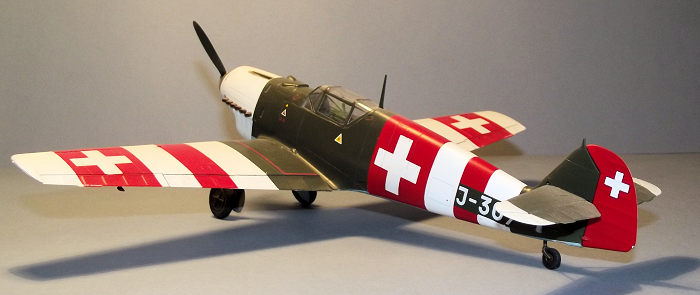 cts
of what to cut where and how to modify Eduard’s parts – an excellent idea. There
are two further pages of colour profiles highlighting the early war Dark Green
finish and the spectacularly striped 1944 finish. A well printed decal sheet
offers national markings and serial numbers for all ten of the Doras that served
with Switzerland. Alley Cat intends that the red and white identification
stripes will be painted.
cts
of what to cut where and how to modify Eduard’s parts – an excellent idea. There
are two further pages of colour profiles highlighting the early war Dark Green
finish and the spectacularly striped 1944 finish. A well printed decal sheet
offers national markings and serial numbers for all ten of the Doras that served
with Switzerland. Alley Cat intends that the red and white identification
stripes will be painted.
This is an exercise in backdating a BF109E by deleting the underwing radiators, providing a two-bladed propeller and replacing the DB601 engine with a Junkers Jumo 210.
Eduard’s 1:32 scale 109Es have a justified reputation for being of good quality. This E-1 came from their Profipack range which includes full colour instructions, canopy masks and two frets of coloured etch that include instrument panels and set belts. The later proved to be very useful since the sparse cockpit interior, lacking an armoured head rest, is clearly visible through the curved-edge early canopy. Six major parts frames and two minor ones were neatly bagged and the parts were found to be cleanly moulded with simple recessed panel lines. Although Eduard’s Luftwaffe decals were not relevant to this build, their range of airframe stencils was put to use.
| CONSTRUCTION |
 The resin
parts were washed in a mild detergent to remove mould release and various pour
stubs removed with a fine toothed craft saw. Alley Cat’s design ensure that
these are essentially straight lines cuts that require minimal clean up with a
sanding stick. It is always a good idea to wear a filter mask during these
operations since the resin dust can be harmful if inhaled.
The resin
parts were washed in a mild detergent to remove mould release and various pour
stubs removed with a fine toothed craft saw. Alley Cat’s design ensure that
these are essentially straight lines cuts that require minimal clean up with a
sanding stick. It is always a good idea to wear a filter mask during these
operations since the resin dust can be harmful if inhaled.
Next the parts that Eduard call out as “not for use” were consigned to the spares box, including the centre section fuel tank.
It was time to attack the Eduard plastic and cut away the areas that would not be required. The one piece lower wing panels required the removal of the prominent radiator assemblies and a large section at the leading edge of the centre section to accommodate the new chin radiator housing. This last cut is perilously close to the landing gear bays but with care it can be done. The modified wing section flops around noticeably and this is a good time to glue in the resin lower wing inserts using super glue. They are well moulded to provide a good fit and even have rivet detail on the surface that is a close match to the plastic. Two semi-circular sections can also be glued in place over the gear leg tunnels to stiffen up the structure. I also took the opportunity to glue the circular walls of the wheel wells to the underside of the upper wing.
The new resin nose is
designed to fit along a natural panel line on the fuselage but it helps to build
the fuselage up first before any major surgery is undertaken. Eduard’s cockpit
is well designed and sufficiently detailed for most. The cockpit side walls have
moulded in ribs and a series of chains, levers and boxes are glued on to provide
good three-dimensional detail. The basic colour of the cockpit area is RLM Grau
02 and most of the parts were airbrushed in Tamiya XF-22 while still on the
parts frame. The bucket seat is located on convincing brackets and the rudder
pedals built up from a plastic swivel section with etch metal footboards. The
very distinctive flap lever and trim wheels are located next to the seat alo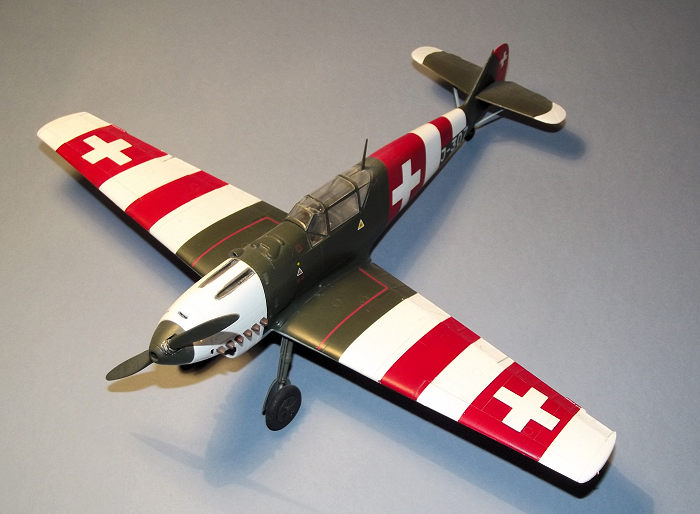 ng
with an oxygen bottle. The control stick is replaced with a resin item that
features a loop handle. The basic cockpit is completed with a pedestal mounted
instrument panel which is built up from a sandwich of painted etch parts.
Eduard’s instructions helpfully include detailed notes on the colours of
individual cockpit parts. The seat belts were built up from the etch parts
provided and tacked onto the seat with super glue.
ng
with an oxygen bottle. The control stick is replaced with a resin item that
features a loop handle. The basic cockpit is completed with a pedestal mounted
instrument panel which is built up from a sandwich of painted etch parts.
Eduard’s instructions helpfully include detailed notes on the colours of
individual cockpit parts. The seat belts were built up from the etch parts
provided and tacked onto the seat with super glue.
Eduard provides a firewall and shelf for the nose guns and associated ammunition boxes. Only the bulkhead and shelf, unadorned, are required so the raised detail was cut away. The cockpit assembly and firewall was glued into the right hand fuselage half, leaving the left half unglued while the new nose section was test fitted. The projecting lower cowl panels of the unwanted DB engine were cut away along a panel line according to Alley Cat’s instructions, then test fitting the hollow cast resin nose revealed where glue should be applied. This is intended to be a butt joint but I fashioned some small plastic studs to fit inside the cowl joint to provide some strength.
The fuselage halves were glued together and left overnight to set after which the resin cowling was attached using two part epoxy glue.
Next the lower wing panel was installed followed by the upper wing panels and again the structure was left to settle. The large and impressively detailed casting for the lower cowling intake was fettled into position but little adjustment was necessary so it was secured with superglue.
The rest of the
construction rolled along nicely, aided by Eduard’s well designed and
well-engineered parts. The tailplane horizontal structures consist of upper and
lower panels with single piece elevators t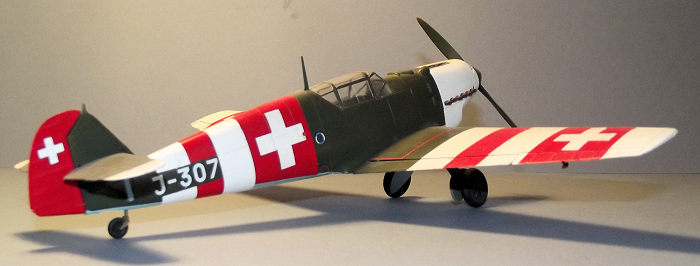 hat
could be displayed deflected but I chose to glue them in the neutral position.
The tail support struts and rudder were set aside to be installed after
painting. The wings were completed with the installation of the new resin flaps,
plastic ailerons and leading edge slats, all glued shut.
hat
could be displayed deflected but I chose to glue them in the neutral position.
The tail support struts and rudder were set aside to be installed after
painting. The wings were completed with the installation of the new resin flaps,
plastic ailerons and leading edge slats, all glued shut.
I then checked over the basic airframe, filling and scribing a few amendments to the panel lines as set out by Alley Cat and glued in the lower radiator flap and a small oil cooler under the left wing.
The canopy and windscreen were masked up with the Eduard pre-cut masks and the canopy fixed in place with Humbrol Clearfix. I omitted the canopy head armour which was apparently not fitted to the Swiss Doras.
| COLORS & MARKINGS |
It was now decision time for the paintwork. Out of curiosity I had also bought a Montex Super Mask for the Swiss 109E-3 which had markings in the same proportions as the 109D. Good as the Alley Cat decals might be, I was unsure how their printed white crosses would sit upon painted red areas, perhaps showing slightly pink. So I went the Montex route.
The cockpit area was sprayed over with Dark Grey auto primer from a rattle can to give a grey interior to the Perspex framing. Next the whole airframe was sprayed with Tamiya Ultra Fine White primer which would also serve as a finished coat for the White areas.
 The areas
that were to remain White were covered over, the striping and engine cowling
with strips of Tamiya tape and the national insignia crosses with pre-cut Montex
masks. The translucent olive drab coloured Montex masks were carefully lifted
from their backing sheet with the assistance of the tip of a scalpel blade and
carefully pressed into position.
The areas
that were to remain White were covered over, the striping and engine cowling
with strips of Tamiya tape and the national insignia crosses with pre-cut Montex
masks. The translucent olive drab coloured Montex masks were carefully lifted
from their backing sheet with the assistance of the tip of a scalpel blade and
carefully pressed into position.
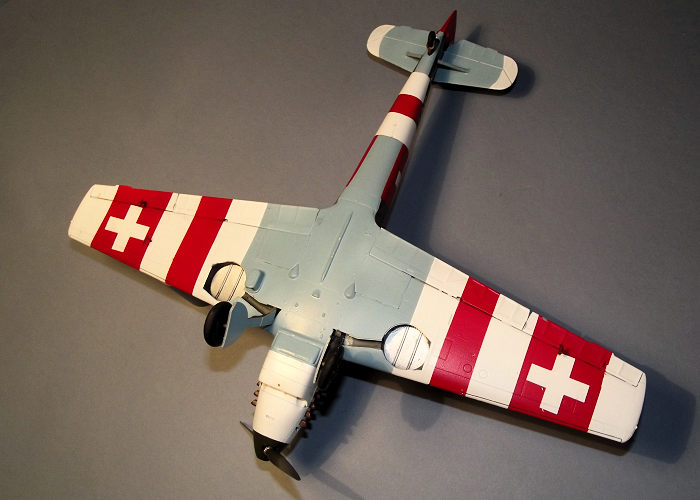
The Red areas were painted next, airbrushed with Tamiya XF-7 Flat Red. The Red paintwork then received its share of masking. The underside of the airframe was airbrushed with RLM 65 Helgrau (XA1202 from the Xtracrylix range). With yet more masking of the underside, the final application of paint was to the upper surfaces where I chose Tamiya XF-61 Dark Green as a suitable contrast with the bright colours. I airbrushed the undercarriage legs and inner faces of the doors with Grau 02 and brush painted the interior of the wheel wells with Grau 02 to the side walls and Silver to each bay roof.
The moment of truth came when all of the layers of masking were stripped away to reveal the spectacular colours in their glory and there was little to do by way of decals apart from the application of the fuselage numbers from the Alley Cat sheet. Their white colouring seemed perfectly good when applied over the green area of the rear fuselage but I will never know how they might have performed over the red paintwork. The airframe stencils were lifted from Eduard’s sheet and applied in accordance with the chart supplied in the ‘E-1 kit.
 The twelve
tiny exhaust stubs had been painted Red-Brown while still on their casting frame
and they were carefully removed and secured into precisely defined holes in the
cowl sides with a dab of super glue. The two machine guns were painted gun metal
and the cowl troughs in the same colour then the guns were installed , another
spot of super glue securing each one.
The airframe was sealed with
a hand brushed coat of Future/Klear floor polish, then an airbrushed coat of
Xtracrylix Matt Varnish.
The twelve
tiny exhaust stubs had been painted Red-Brown while still on their casting frame
and they were carefully removed and secured into precisely defined holes in the
cowl sides with a dab of super glue. The two machine guns were painted gun metal
and the cowl troughs in the same colour then the guns were installed , another
spot of super glue securing each one.
The airframe was sealed with
a hand brushed coat of Future/Klear floor polish, then an airbrushed coat of
Xtracrylix Matt Varnish.
The resin propeller and spinner seemed almost identical to the plastic one apart from the number of blades so I chose to use two of the Eduard plastic blades set into the resin 2-blade spinner and everything fitted just fine. The assembly was painted Black Green (Tamiya XF-27).
Assembly was finished with the installation of the rudder, landing gear and tail support struts. The canopy masking was stripped away and the job was complete.
| CONCLUSIONS |
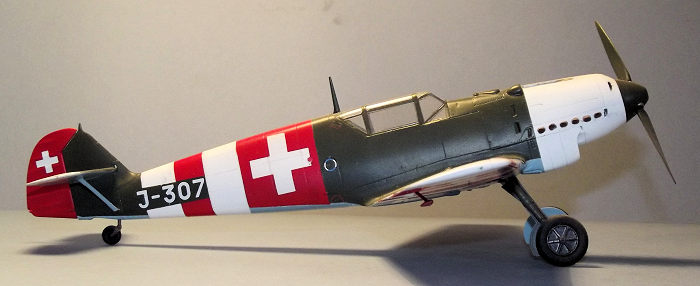
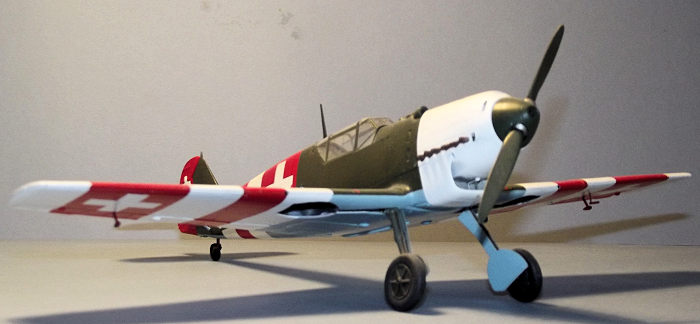
The BF109D seems strangely frail when compared with the heavyweight 109Gs of later years, the absence of underwing radiators, the two-bladed prop and the unobstructed cockpit glazing are very distinctive features. The finished machine looks good on my display shelf among a series of Bf109s.
Alley Cat provides a well -designed product that is relatively easy to use and this could serve as a first attempt at a resin conversion. Eduard’s Bf109s are of consistently good quality and provide a fuss-free build. I was happy with the performance of the Montex masks and this might encourage me to try a more ambitious project with them.
Recommended by me.
| REFERENCES |
The internet; Alley Cat’s instructions.
August 17, 2017
Copyright ModelingMadness.com
Kit courtesy of my wallet.
If you would like your product reviewed fairly and fairly quickly, please contact the editor or see other details in the Note to Contributors.
Back to the Main Page Back to the Review Index Page Back to the Previews Index Page