Eduard 1/48 Bf-109G-6 (late)
| KIT #: | 82111 |
| PRICE: | $50.00 SRP |
| DECALS: | Five options |
| REVIEWER: | Andrew Garcia |
| NOTES: | Retool |
| HISTORY |
For a good history of this variant and some closure on the first effort by Eduard to bring out the best Bf-109G-6, in 1/48th scale to date (a big event in 2014) please see Tom Cleaver's build and review of the original kit here.
| THE KIT |
Eduard's kit 82111, a 1/48 Bf-109G-6 Late, is
their reprise from a flawed release in 2014. Despite an intensive effort to come
up with the best Bf-109G kit possible some unfortunate flaws were incorporated
into the design and initial release (kit # 8268). In the June 2014 Info Eduard,
an on-line newsletter available from the Eduard website, Vladimir Sulc of Eduard
said of their Bf-109G-6 kit # 8268, .... “Unfortunately, we do have to admit
that our kit is definitely larger than the scale for which it was designed, and
therefore oversized. It is our fault. We admit that. We wrongly calculated the
expected dimensional attributes of the fi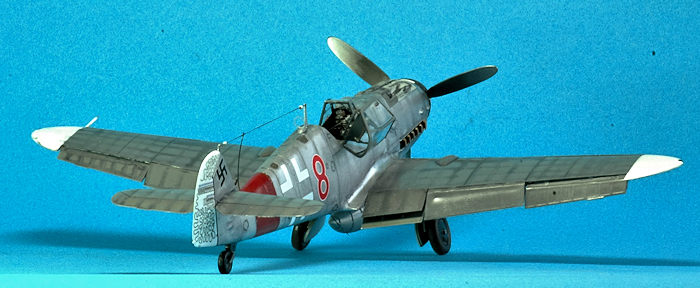 nal model, in comparison with the
master model we were using. In our case, this is a virtual 3D master model. If
we accept 9020 mm as a correct length of the real aircraft, then we are about
some 3 mm longer in scale, which means the kit is about 1.5% larger than it
should be, and therefore gives an overall scale of 1:47.26. Concerning the
wingspan, we are wider in overall span by about 2.6mm on each half of the wing,
giving an average oversize of around 2.5%. I want to let you know that I’m
personally very sorry that this has happened.”
nal model, in comparison with the
master model we were using. In our case, this is a virtual 3D master model. If
we accept 9020 mm as a correct length of the real aircraft, then we are about
some 3 mm longer in scale, which means the kit is about 1.5% larger than it
should be, and therefore gives an overall scale of 1:47.26. Concerning the
wingspan, we are wider in overall span by about 2.6mm on each half of the wing,
giving an average oversize of around 2.5%. I want to let you know that I’m
personally very sorry that this has happened.”
Of the old 2014 Bf-109G-6 release positives were noted such as beautiful surface textures, high level of detail and a large selection of included options. Their use of Cartograf decals were also a cut above the rest of the competition. I found that release to have well thought out engineering and what I liked most was it was a fast build with excellent fit. So let’s put that episode to rest and get on with the latest, revised and totally new Bf-109G-6, kit 82111, a 1/48 Bf-109G-6 Late because it is a beauty.
I found the 2014 release Bf-109G-6 kit # 8268 had movable horizontal tail surfaces (parts I23+I24), and separate wing tips (parts I52 & I54). These design features do not appear in the new 2016 Eduard kit 82111, 1/48 Bf-109G-6 Late. In general that was the most significant parts change in the sprues recognizing they are totally different and the new Bf-109G-6, kit 82111 is redesigned.
| CONSTRUCTION |
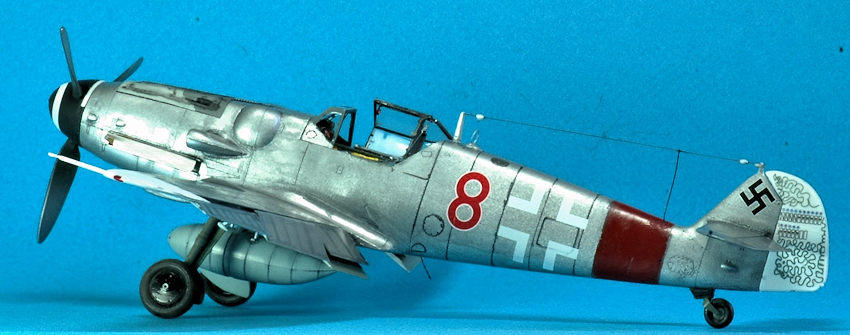
I decided, and it was a very hard choice due to so many beautiful alternative markings, to model a Bf-109G-6 Late, kit profile “D” for Oblt. Kurt Gabler, 8./JG 300, Jüterbog – Waldlager Air Base, Germany, July, 1944. I went through the instructions circling or yellow highlighting the specific airframe changes or selections that are required for this aircraft in each assembly step.
Construction starts with the cockpit and is fast,
easy and is straightforward. It helps if you have used etched metal before since
there are many detailing components using the fantastic Eduard “coloured etch”
inserted at almost all steps in the build. It is suggested you read the
instructions once, and completely, before starting the build. When you have such
a beautiful piece of plastic in hand, and knowing experienced modelers just want
to see what it looks like and how it builds, you have to resist the temptation
to cut and paint without a glance at the instructions. It is a fast build once
your overall cockpit color is applied. When t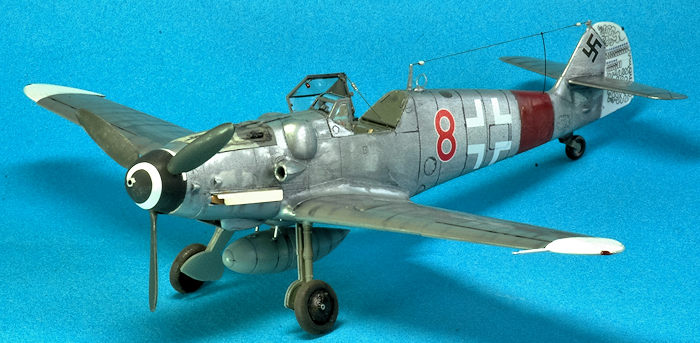 he etch is positioned and glued in
place the results are superb. A truly beautiful highly detailed OOB cockpit in
record time. The instructions are excellent, printed on glossy paper with color
callouts using Gunze paints.
he etch is positioned and glued in
place the results are superb. A truly beautiful highly detailed OOB cockpit in
record time. The instructions are excellent, printed on glossy paper with color
callouts using Gunze paints.
For those who savor detailed wheel wells Eduard gives three choices. With some Payne’s gray oil wash the details popped out showing off the retrained and very finely done panel lines and moulding. No putty was needed and everything fit snuggly together. Movable surfaces on the main wings are dropped allowing more detailing and a realistic appearance. Just follow the kits assembly instructions and you will not find any problems with the fit or look of assembled components. It just comes together quickly and is ready for painting in a few days.
The OOB detailing is among the best I have seen with any kit. The attachment bracket for the tail antenna wire is on the etched metal fret (part PE36). While attaching it I lost it three times, constructed two scratch built replacements from the Eduard etched metal fret “sprues” and then found the actual “lost” PE36 part successfully applying it after about a thirty-minute effort (but it was worth it)! Other details such as PE25, a hand grip inside the main canopy requiring a tiny piece of plastic rod glued to part PE25 was successful and once painted looked fantastic. The wire DF loop antenna, both in plastic and etched are there. I used the etched component and it is still there after days of handling the kit. Even the two hand grips inside the upper front canopy, often seen in close up photos of the front canopy, are there – kudos to Eduard for making such a highly detailed OOB kit.
I added several small detailing items such as a
wire spring on the canopy restraint cord (part PE41). I was successful cutting
some very fine copper wire and wrapping it around a drill bit to create the
spring that I attached to the PE41 canopy restraint cord. In my next Eduard
Bf-109 build I am going to use a piece of sma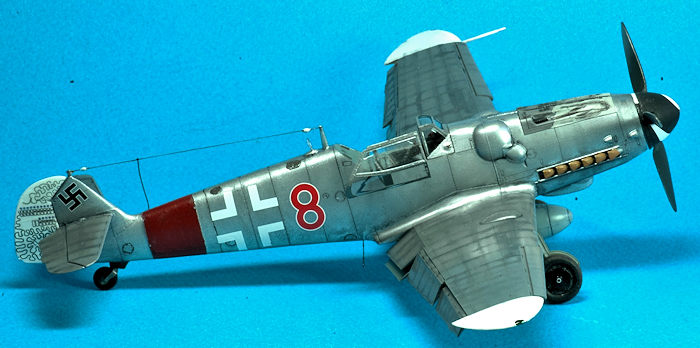 ller/thinner fine guitar wire to
wrap the copper wire around for the spring.
ller/thinner fine guitar wire to
wrap the copper wire around for the spring.
The main antenna wire is E-Z-Line for the horizontal segment with white glue used for the insulators. For the drop wire into the fuselage radio I used “Dai-Riki 3X .008mm fishing line” because E-Z-Line is so flexible it is hard to use in certain positions like a vertical insert into a tiny hole.
I used a toothbrush bristle for the IFF antenna (identification friend or foe) located under the fuselage. It is in a precarious location underneath and sticking out as it does it is subject to easy damage. Using the kit supplied plastic or etched metal antenna usually results in damage to the IFF antenna during construction. It is your choice and I did pause to think if I was going to use the kit supplied etched metal part PE28. I did use the etched metal base, a small ring shaped component PE37 with the toothbrush bristle. A flexible toothbrush bristle is just the right diameter and its flexibility is perfect for my use alleviating breakage issues.
| COLORS & MARKINGS |
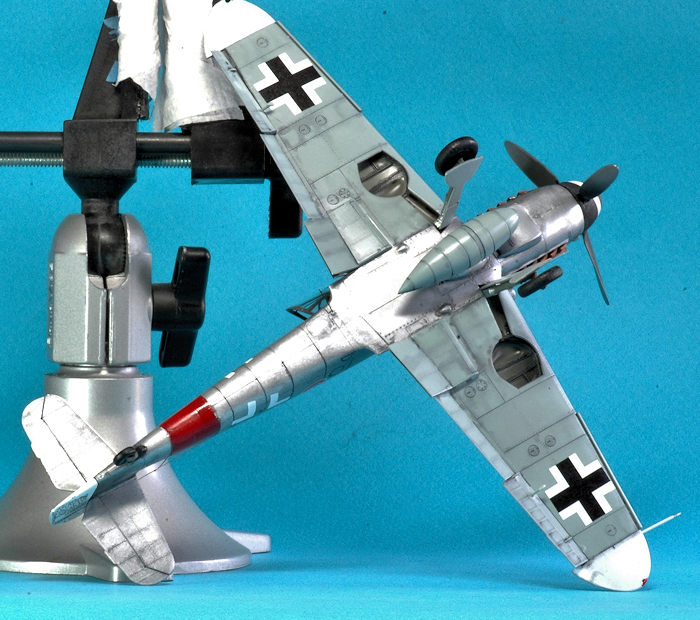
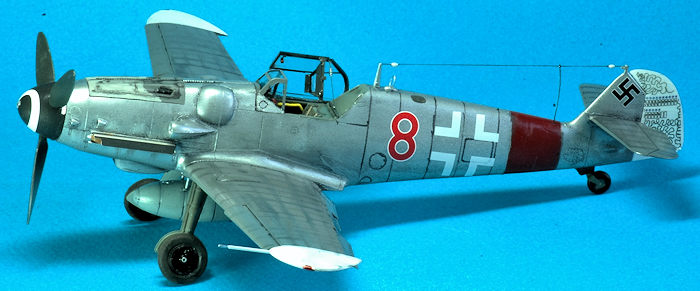
I was fortunate to have some friends provide limited photos of this airframe, a Bf-109G-6 Late, kit profile “D” for Oblt. Kurt Gabler, 8./JG 300, Jüterbog – Waldlager Air Base, Germany, July, 1944. It is an unusual color scheme for a Bf-109G-6. The fuselage is overall bare natural metal, supposedly the worn factory camouflage was sanded off and the hard usage of the airframe caused the metal to acquire a very worn and dirty appearance. The engine cowling was heavily weathered and remained in the original RLM 74/75 colors (or was a replacement cowl?) as an exception to the bare metal fuselage color. The upper wings were entirely RLM 75 gray with white wingtips. The underside of the wing was RLM 76 blue gray with white wingtip coloring.
It did help confirm it was heavily weathered,
quite shopworn and with bare metal on the main airframe and monochromatic upper
wings with no national markings (the Luftwaffe cross) on the upper wings. G.R.
Morrison, a very kind and knowledgeable modeler told me: "Note also the wear
pattern on the rear face of the prop blades - this is common." I agreed with his
observation. I used some SNJ aluminum powder, rubbing the powder on the rear of
the prop to create the exposed metal on the prop edges and especially the rear
of the top half of
 the Bf-109 prop. I carefully rubbed the metal powder on the
RLM70 painted prop blades until they matched the photo I was working from.
the Bf-109 prop. I carefully rubbed the metal powder on the
RLM70 painted prop blades until they matched the photo I was working from.
I used Alclad Aluminum for the overall metal finish and Gunze Acrylics (they are still available in Europe and I acquired some during a vacation). I also used some Tamiya acrylics that are available at most hobby outlets for other parts. Eduard supplies their superb paper masks which worked very well. Once all the paint was dry I spent more time than usual with an oil wash using Windsor & Newton oil colour paints (Payne’s Gray color) and Gunze acrylics for detail painting trying to get the weathered look just right.
The decals are very good in all respects. They are thin and conform to surface textures admirably. I can say the decals went on well but caution you to be prepared to place them exactly where you want them in your first effort to place them on the kit. Those who like to move their decals around for proper positioning will have to use the saliva base technique to lubricate the decal or it will adhere ferociously on whatever spot it first comes into contact. Because the decal is so thin it is prone to folding on itself and becoming difficult to apply if you are not pleased with the initial placement. Once they were on I used Micro sol setting agent on the decals. They look excellent once dry.
During this build while I was doing some internet reading and research, I found Eduard also sells complete airframe masks for the Bf-109. Maybe they would be useful when building one of the jagged edge camo schemes for Bf-109G-6’s manufactured by the Erla factory?
| CONCLUSIONS |
 I found this release to be the most enjoyable and
complete OOB Bf-109G-6 in 1/48th scale I have built. All things needed are in
this kit. The kit plastic is sublime with petit moulding, beautiful surface
features, thin recessed panel lines, and many options. It appears great care and
thought went into making this kit buildable as well as highly detailed with a
wide variety of options. You will have many left over parts, a sign of both more
variants to come as well as the careful research by Eduard into the subject. The
Bf-109 as you may know has such a diverse construction history with many
manufacturers (AGO, Arado, Erla, Messerschmitt Regensburg and WNF), toiling at
geographically dispersed plants utilizing changes sometimes just for their
production location that providing accurate plastic is a challenge. Eduard has
met the challenge. Thank you Eduard for bringing such a gem to the modeling
world!
I found this release to be the most enjoyable and
complete OOB Bf-109G-6 in 1/48th scale I have built. All things needed are in
this kit. The kit plastic is sublime with petit moulding, beautiful surface
features, thin recessed panel lines, and many options. It appears great care and
thought went into making this kit buildable as well as highly detailed with a
wide variety of options. You will have many left over parts, a sign of both more
variants to come as well as the careful research by Eduard into the subject. The
Bf-109 as you may know has such a diverse construction history with many
manufacturers (AGO, Arado, Erla, Messerschmitt Regensburg and WNF), toiling at
geographically dispersed plants utilizing changes sometimes just for their
production location that providing accurate plastic is a challenge. Eduard has
met the challenge. Thank you Eduard for bringing such a gem to the modeling
world!
When I finished the kit online modeler forums were discussing the “incorrect” landing gear leg. Apparently there is a slight difference in appearance of the main landing gear leg among Bf-109’s. The Eduard Bf-109G-6 kit, so the experts say, has a landing gear used by the Bf-109F through G-2/ and maybe early G-4. The leg design changed with the Bf-109G-4 late continuing through to the Bf-109K-4. There are three differences which you can find by looking for these threads. In 1/48th scale it did not pass the “must fix” problem barometer for me.
It is a beautiful kit building experience. I found the kit to be accurate with a high level of detail including fine surface features that impress. I admired the crisply recessed panels and fine rivet divots where appropriate before and after building the kit. The kit includes color photo-etched parts with some tiny detail parts and many useful options including framed and three styles of Erla canopies. I admired the variety of included tail options, standard and tall tails, both the long and short tail wheels, if needed the battery-box cover, as well as under wing cannon gondola, three propeller blade choices, four types of tires with a choice of main wheel hubs, and oil cooler housings.
 You will also find a choice of antenna aerial
masts, bomb racks, the trop filter and two supercharger intakes. Although they
are not Cartograph decals this time, I did find the kit decals to be of high
quality – thin, clearly printed and with precise registration. They were a bit
troublesome to use since they stuck upon contact and I suggest you take great
care when applying them with maybe the saliva application approach required to
permit positioning of the decal. You also get Eduard’s high-quality die-cut
canopy masks. All in all a wonderful high-quality building experience.
You will also find a choice of antenna aerial
masts, bomb racks, the trop filter and two supercharger intakes. Although they
are not Cartograph decals this time, I did find the kit decals to be of high
quality – thin, clearly printed and with precise registration. They were a bit
troublesome to use since they stuck upon contact and I suggest you take great
care when applying them with maybe the saliva application approach required to
permit positioning of the decal. You also get Eduard’s high-quality die-cut
canopy masks. All in all a wonderful high-quality building experience.
I have about thirty-three Bf-109’s in my built kits display, composed of Monogram, Revell, Hasegawa, Tamiya, Airfix and Otaki/Ari variants but this one really looks better than all the rest. I only had two questions at the end of the build. Are the main gear oleos too uncompressed? Should the antenna mast be unpainted natural wood in the version I built? The kit instructions show aluminum NMF. Other than that I am delighted with this kit. I do feel this kit should be highly recommended. I have noticed many Hasegawa Bf-109G kits for sale on eBay recently. Although Hasegawa’s Bf-109G series of re-boxed Bf-109G variants are still nice kits, the Eduard offering is a cut above Hasegawa in all aspects except parts count.
7 October 2016
Copyright ModelingMadness.com
If you would like your product reviewed fairly and fairly quickly, please contact the editor or see other details in the Note to Contributors.