Trumpeter 1/24 Bf-109G-6
|
KIT #: |
G2408 |
|
PRICE: |
$76-125,00 |
|
DECALS: |
Two options |
|
REVIEWER: |
H.Davis Gandees |
|
NOTES: |
Every model I build
is inspired by a photo or an article I’ve read. This model is about a
58-year-old story and two Black & White photos of a Bf109G discovered in
an Atlanta back yard in 1965!
My best friend and
aviation illustrator, Terry Williams was an FAA controller at the
Atlanta Center and was told by a co-worker of this Bf109 in a nearby
back yard, that Terry found hard to believe. Who has an iconic Luftwaffe
WWII fighter in their back yard? So, during a lunch break, off they went
to the site and Terry took photos dated March 1965.
These photos and
Terry’s incredible story are what inspired this Bf109G-6 project. A week
after our phone conversation discussing the story and photos with him, a
1:24 Trumpeter kit # 2408, Bf109G Late Version, arrived from him. This
was going to be an interesting model build!
The story of how
this aircraft ended up in a man’s back yard is quite interesting. After
WWII, the aircraft was returned to the U.S. for evaluation at Wright
Field and ended up at the Georgia Institute of Technology and was
eventually sold to an FAA inspector who stored it in his back yard!
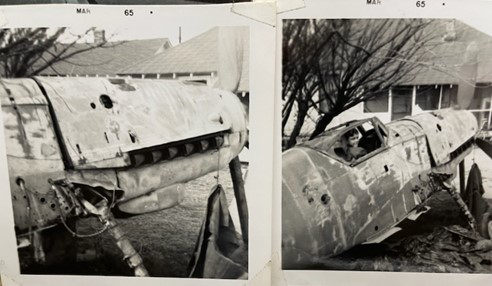
This is the same
Bf109G-10 restored in markings of JG300 as it is now displayed in the
National Museum of the USAF since 1999. Quite a transformation since
1965!
|
The Bf109 design first flew
in 1935 and continued with the Luftwaffe until the end of the war with many
iterations over its demanding service life. The featured model build is a
Bf109G-6 that was 100 mph faster than earlier Bf109 models. It had a top speed
of 390 mph at 20,000 ft. and had a 3,600 fpm climb rate. It was armed with a 20
or 30mm canon that fired through the prop spinner and two 13mm machine guns
synchronized to fire between the prop blades. It was often armed with two
additional 20mm canons in gondolas under the wings to improve firepower against
U.S. bombers. But they reduced performance considerably and many “Experten”
refused to use them. If jumped by a Mustang or Thunderbolt, the Bf109 pilot
would not want all that extra weight and drag under each wing.
The kit was originally released by Trumpeter in 2001 as a G-2, my G-6
kit #2408 was released in 2004 and a G-10 and K-4 version in 2005.
There were 16 pages of very good directions and diagrams with color
callouts. There are 10 well molded sprues with very good, recessed panel lines.
There are 2 excellent decal options for Willi Reschke of JG302 and Eric Hartmann
of JG53.
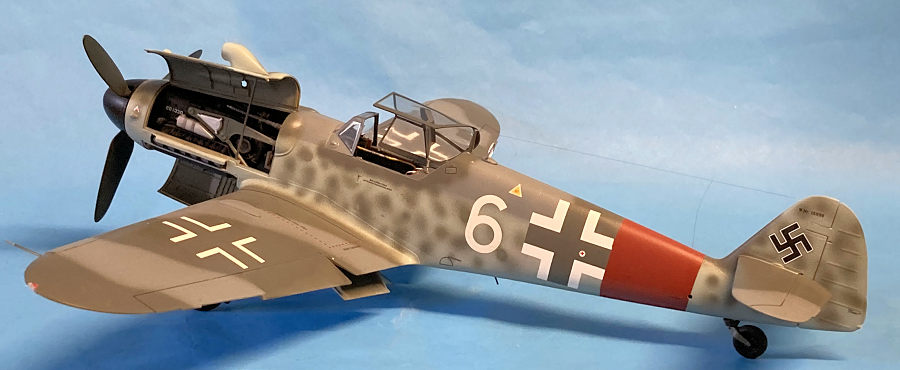
 I
selected the box cover scheme of Willi Reschke’s White 6. Initially the huge
20x12x4 inch box and large sprues of over 270 parts were intimidating to a 1:48
scale builder. After spending a couple days researching Bf109Gs and perusing the
instruction booklet, I dove right in starting for some strange reason with the
propellor. The spinner was painted RLM 66 black, the blades RLM 70 black-green
and the hub aluminum. When dry the assembly was bagged and put away until the
end of the build.
I
selected the box cover scheme of Willi Reschke’s White 6. Initially the huge
20x12x4 inch box and large sprues of over 270 parts were intimidating to a 1:48
scale builder. After spending a couple days researching Bf109Gs and perusing the
instruction booklet, I dove right in starting for some strange reason with the
propellor. The spinner was painted RLM 66 black, the blades RLM 70 black-green
and the hub aluminum. When dry the assembly was bagged and put away until the
end of the build.
The engine is well detailed
and was painted NATO black. The vinyl ignition wires were a bit fiddly but look
convincing when done. For additional detail, an engine number was applied using
very small decals. The number is one digit off from a similar late model
Bf109G-6 in the Air and Space Museum. There is no known work number for
Reschke’s white 6.
The 20mm cannon was painted
gunmetal and dry brushed with steel and mounted into the rear of the engine.
Individual exhaust stacks were also painted gunmetal and dry brushed with steel.
My main complaint with the
Trumpeter kit is multiple sink holes throughout the model. I filled all the ones
with Tamiya white primer that would be visible once the model was completed.
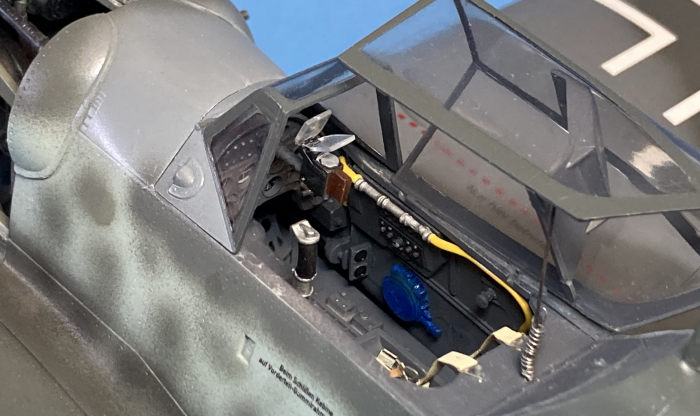
The cockpit was very
accurate with an instrument film mounted under the panel face. My only other
complaint is there was no seatbelt/harness included in this expensive kit. I
installed a beautiful set of Airscale laser cut paper belts and PE hardware that
really finished off the cockpit. The cockpit was attached to the engine
assembly, and it all fit the fuselage perfectly.
The cockpit/engine assembly
was installed along with the tail wheel, and the fuselage was closed up aligning
the halves carefully. The real Bf109 fuselages were assembled in halves just
like the kit, so a pronounced panel line was left on the top and bottom.
 The
radiators were painted aluminum and given a black wash and installed in the
wings. The mounting holes for the gondolas were filled as they would not be
mounted.
The
radiators were painted aluminum and given a black wash and installed in the
wings. The mounting holes for the gondolas were filled as they would not be
mounted.
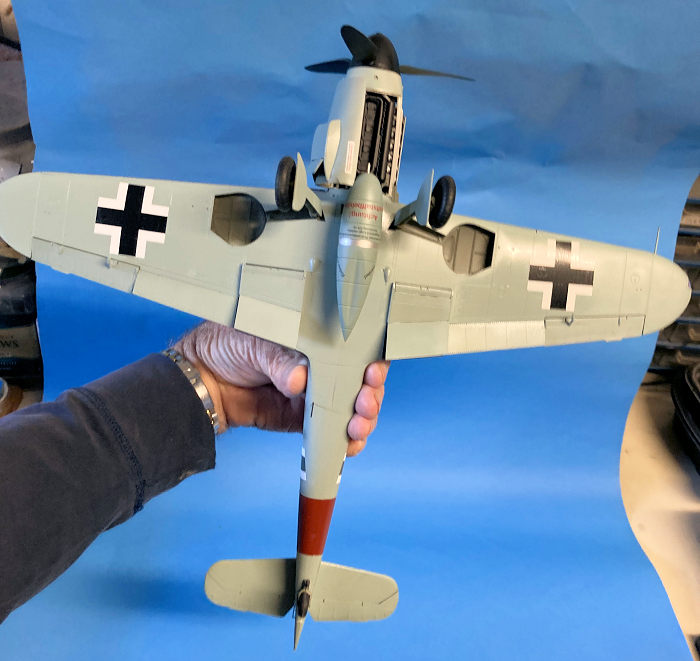
The wings were attached to
the fuselage requiring a small amount of putty. Masking tape held the correct
wing dihedral while drying. The upper radiator cooling flaps were installed even
with the wings. When dry, the wheel wells were masked. and the entire undersides
of the fuselage and fuselage sides were painted RLM 76 light blue.
I am not a fan of movable
control surfaces so solid styrene rods were fitted and control surfaces attached
solidly. The landing and radiator flaps arrangement is quite complex, and I
checked many photos to get a correct angle setting for them at rest on the
ground.
The clear nav light parts
were drilled and painted to replicate the red and green nav lights.
The landing gear has odd
angles, fore and aft and side to side so I checked references closely to get the
correct attitude. I think this strange landing gear arrangement contributed to
more Bf109 losses than from Allied aircraft, especially with novice pilots!
Oil cooler and coolant
radiators were painted aluminum and given a black wash that give them a more
realistic appearance.
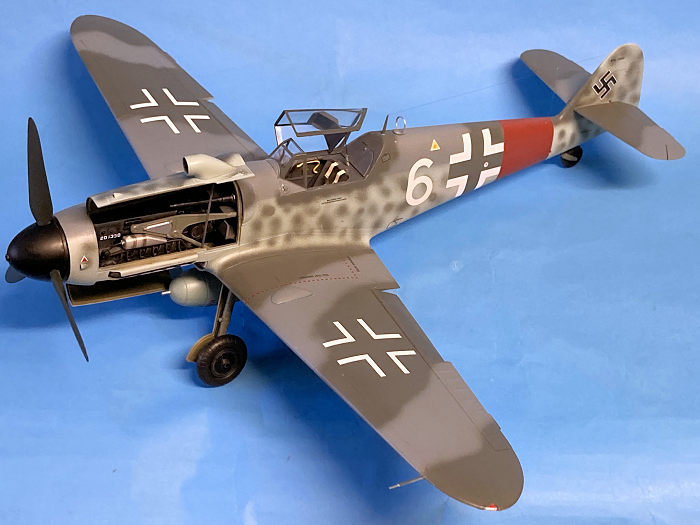
The canopy was positioned
open with a fabricated restraining cable and spring not included in the kit. The
left cowling was supported exposing the DB605 engine and 13mm machine gun. Yes,
I noticed the lower cowling does not clear the drop tank that may have been the
case in 1:1 scale as well.
Almost every photo of a
Bf109 shows a starting crank in position for a quick engine start if needed. Not
included in the kit, this one was fabricated from aluminum tube and styrene.
 I must
confess here, that with the demise of my favorite Model Master RLM range of
colors I have transitioned to Tamiya XF acrylics that require mixing colors to
achieve correct RLM Hues. I found a conversion table that provides RLM standard
equivalents that I compared my color blends to the for accuracy. I have been
very pleased with Tamiya paint.
I must
confess here, that with the demise of my favorite Model Master RLM range of
colors I have transitioned to Tamiya XF acrylics that require mixing colors to
achieve correct RLM Hues. I found a conversion table that provides RLM standard
equivalents that I compared my color blends to the for accuracy. I have been
very pleased with Tamiya paint.
All interior structure,
landing gear struts and inner doors is RLM 02. The cockpit is RLM 66. The camo
scheme for “White 6” is the mid-late war grays consisting of upper RLM 74/75
over lower RLM 76. The JG 1 rear fuselage home defense band was painted Tamiya
TS-33 Dull Red, a close match to RLM 23. Fuselage mottling is with RLM 75 and
02.
Light exhaust staining was
applied with a soft brush and black/brown pastel chalk. Highlighting was done
with a Prismacolor silver pencil. A nylon antenna wire was installed. The final
coat was semi-gloss clear after decaling over a gloss finish.
Kit decals were applied
over the gloss finish and then sealed with a semi-gloss final coat. A correct
size swastika was sourced from the decal bin. I applied all the stencil decals
as the model represents a fairly new aircraft, not knowing what any of them
meant. A modeling friend in Holland translated the stencils on the drop tank,
the most interesting, “Keine Bombe” meaning “not a bomb” on both sides! Light
exhaust staining was applied with a soft brush and black/brown pastel chalk.
Highlighting was done with a Prismacolor silver pencil. The canopy and
windscreen were masked with Tamiya tape. A nylon antenna wire was installed, and
the model was finished.
 The Bf109G-6
was finished over a 2-month period of 84 hours of pleasurable modeling, the most
I’ve ever spent on an aircraft model. I sent work in progress photos to Terry
who when it was finished insisted I keep the model and I thank him very much for
it! I am tempted to build more 1:24 aircraft, but I would need a larger house!
The Bf109G-6
was finished over a 2-month period of 84 hours of pleasurable modeling, the most
I’ve ever spent on an aircraft model. I sent work in progress photos to Terry
who when it was finished insisted I keep the model and I thank him very much for
it! I am tempted to build more 1:24 aircraft, but I would need a larger house!
If a Bf109G in an Atlanta
back yard is not enough of an odd story, I should add there was a “long nose”
FW190-D13 as well! It too was restored and is now with the Flying Heritage
Collection at Paine Field, Everett, Washington.
Squadron Signal Bf109 in Action Part 2, #57
H.Davis Gandees
11 December 2025
Copyright ModelingMadness.com. All rights reserved. No
reproduction in part or in whole without express permission.
If you would like your product reviewed fairly and fairly quickly, please
contact
the editor or see other details in the
Note to
Contributors.
Back to the Main Page
Back to the Review
Index Page
Back to the Previews Index Page