| THE KIT |
Hasegawa 1/48 Bf-109E-3
| KIT #: | Jt 123 |
| PRICE: | $Gift |
| DECALS: | Two options |
| REVIEWER: | Lee Fogel |
| NOTES: |
Detail set $5 at show |
| THE KIT |
A very good friend of mine sent me this kit at
the end of 2007.
He was never going
to build it and he felt bad that I did not have much to build since my wife and
I had moved to
-Initial Assessment-
 So, what can I say about this kit that has not
already been said?
This is the
revised E molding (Jt series) that
was released in the early 1990’s.
The prior J series has a few shape issues, primarily with the nose, and some
folks recommend that it be avoided altogether.
Based off the Jt11 release, you have a choice of three canopy types with
this particular boxing (E-3, E-4 and
Adolf Galland’s personal mount) along with a drop tank and a bomb.
The cockpit, though good when initially released, has been surpassed and
is the only part of the kit that needs any help in my opinion.
The instructions are clear and complete.
However, this is the “Galland” release and therefore if you decide to use
any of the optional parts you are on your own as they are not mentioned.
In the mid to late 1990s Hasegawa teamed up with Aeromaster to produce
limited-run kits with Aeromaster markings hence the inclusion of Aeromaster
decals.
They appear to be typical
Aeromaster quality with concise instructions for color and placement.
Finally there is a small PE fret that includes the radiator screens,
chin screen and rear armor plate.
So, what can I say about this kit that has not
already been said?
This is the
revised E molding (Jt series) that
was released in the early 1990’s.
The prior J series has a few shape issues, primarily with the nose, and some
folks recommend that it be avoided altogether.
Based off the Jt11 release, you have a choice of three canopy types with
this particular boxing (E-3, E-4 and
Adolf Galland’s personal mount) along with a drop tank and a bomb.
The cockpit, though good when initially released, has been surpassed and
is the only part of the kit that needs any help in my opinion.
The instructions are clear and complete.
However, this is the “Galland” release and therefore if you decide to use
any of the optional parts you are on your own as they are not mentioned.
In the mid to late 1990s Hasegawa teamed up with Aeromaster to produce
limited-run kits with Aeromaster markings hence the inclusion of Aeromaster
decals.
They appear to be typical
Aeromaster quality with concise instructions for color and placement.
Finally there is a small PE fret that includes the radiator screens,
chin screen and rear armor plate.
Sadly, the Teknics cockpit detail set has been
out of production for many years now.
I was fortunate to score mine years ago at the annual IPMS show in
| CONSTRUCTION |
I started things off by painting and assembling
the Teknics cockpit.
There are a
few kit parts that you will use with the set.
Everything fit together very well and soon I was ready to button this up.
The main parts were painted Model Master RLM 02 with the smaller details
picked out with RLM 66, flat black, red, yellow and white.
A simple dry brush with Testors Silver was done and
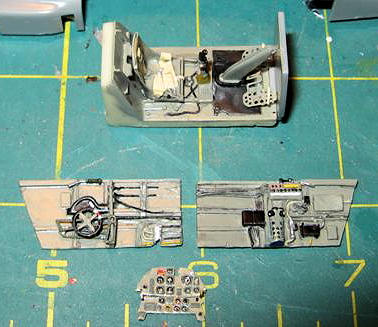 some light weathering
with pastels finished this off.
I
do have to admit here that I know the instrument panel should be RLM 66.
I honestly forgot that and just painted it RLM 02.
Still, I was really pleased with how my work on the instruments turned
out so I just left it as is.
some light weathering
with pastels finished this off.
I
do have to admit here that I know the instrument panel should be RLM 66.
I honestly forgot that and just painted it RLM 02.
Still, I was really pleased with how my work on the instruments turned
out so I just left it as is.
Next I moved to the fuselage.
I glued the Teknics cockpit in place and added the PE chin scoop screen.
Then both halves were glued together and set aside to dry.
Next up I glued the upper and lower wing sections together making sure to
place the PE radiator screens in place.
This is straightforward and the fit is good.
However you will have a bit of a step where the slats are located and
this will need to be sanded down.
Upon cleaning up this area the rest of the build really was academic.
I mated the fuselage to the wing section with nary a gap topside.
On the bottom there is an small gap midsection that joins to the
fuselage.
I just used a few passes
with Plastistruct liquid glue to fill the area in.
It’s not perfect but with some putty and sanding you can make this area
flush if you so choose.
The flaps
and slats are separate for the kit and you simply attach them to their
respective spots.
The slats have
will actually fit snug into place so that come painting time they are in place.
The flaps I used a
 bit of DAP yellow tac to keep them in place.
The upper cowling is molded as one piece and it takes a bit of lining up
to get a clean fit to it.
Just take
your time and triple-check it before you whip out the glue!
bit of DAP yellow tac to keep them in place.
The upper cowling is molded as one piece and it takes a bit of lining up
to get a clean fit to it.
Just take
your time and triple-check it before you whip out the glue!
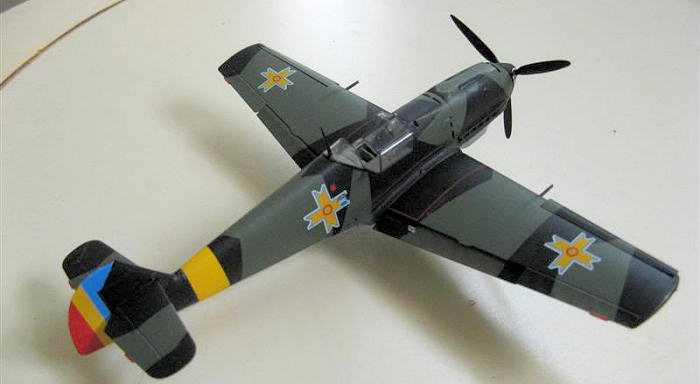
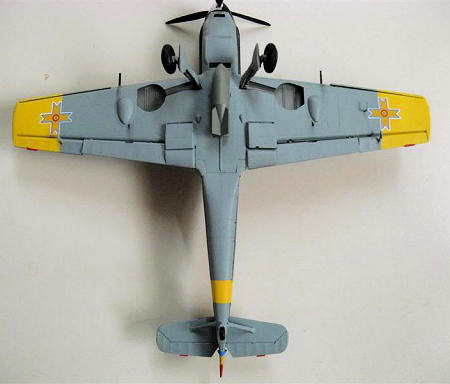
The rear stabs, braces and landing gear all fit perfect. Matter of fact the landing gear has a tight fit and near foolproof molding to ensure that the gear legs are indeed at the proper angle. To my untrained eye it appears that the legs may be a bit too splayed out but I’ll leave that to the experts. As mentioned earlier this kit comes with three different three-piece canopy options. I chose to build my kit as an E-4 and glued the appropriate canopy in place using Bare Metal Foil to mask it off and attaching it with 5-minute epoxy. I did add the bomb rack for my kit to do something a bit different as the Romanian Air Force apparently used these war weary ex-Luftwaffe Emils for some bombing sorties. (Note: later information has shown this not to be the case). The bomb is a two-piece affair that goes together as expected and looks the part with crisp details. I assembled it, sanded the seams and set it aside for paint.
| COLORS & MARKINGS |
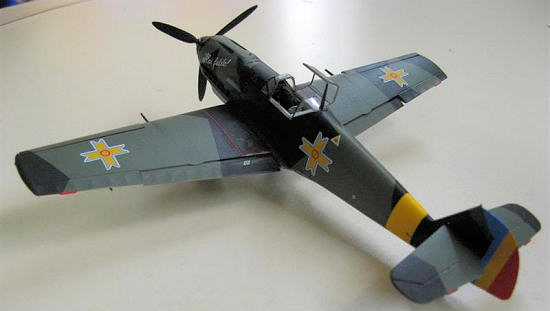
I chose to use the kit supplied Aeromaster
decals for a Bf 109 of the Romanian Air Force in 1942.
The decals were printed by Aeromaster and are typical good quality from
this company.
There is an addendum
sheet ad ded along with the kit decal sheet showing proper placement and colors.
Sadly the Hasegawa decals do not come with the kit so you will have to
scrounge up stencils to add.
I
started by painting MM Flat White on the lower wing tips and rear fuselage for
the ID band and tips.
I then used
Floquil RLM 04 and painted over the white areas and then masked the same areas
for the remainder of the painting. For other shades, I used
Floquil German Lt. Blue (65) F303245,
Floquil Blk. Green (70) F303241, and Model Master Dunkelgrun RLM 71 2081 The
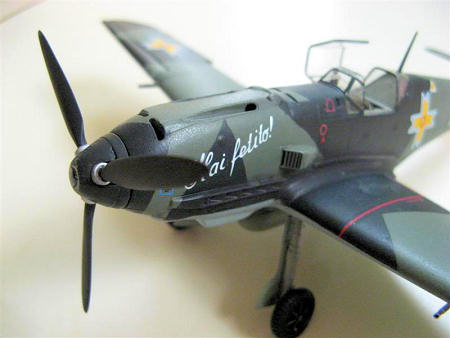
exhausts were painted MM flat black the dry brushed with MM rust, MM bronze
metalizer and then Testors steel.
ded along with the kit decal sheet showing proper placement and colors.
Sadly the Hasegawa decals do not come with the kit so you will have to
scrounge up stencils to add.
I
started by painting MM Flat White on the lower wing tips and rear fuselage for
the ID band and tips.
I then used
Floquil RLM 04 and painted over the white areas and then masked the same areas
for the remainder of the painting. For other shades, I used
Floquil German Lt. Blue (65) F303245,
Floquil Blk. Green (70) F303241, and Model Master Dunkelgrun RLM 71 2081 The
exhausts were painted MM flat black the dry brushed with MM rust, MM bronze
metalizer and then Testors steel.
Weathering consisted of using Formula P3
| CONCLUSIONS |
 What is there that has not been said about the
Hasegawa E series?
The fit is very
good, the details are sharp and it comes together quickly and effortlessly.
Couple this with the extra parts, canopies and unique selection of decals
provided by Aeromaster and you have a bona-fide winner on your hands.
Having that said, it
would
have been nice if Hasegawa had included the kit decal sheet so that the modeler
would not have to scrounge up stencils.
The Teknics cockpit set is top-notch with outstanding details and ease of
assembly although the instructions could have been clearer in a few spots.
It’s a shame that this line is no longer around as it really offers
excellent value and detail for the dollar.
What is there that has not been said about the
Hasegawa E series?
The fit is very
good, the details are sharp and it comes together quickly and effortlessly.
Couple this with the extra parts, canopies and unique selection of decals
provided by Aeromaster and you have a bona-fide winner on your hands.
Having that said, it
would
have been nice if Hasegawa had included the kit decal sheet so that the modeler
would not have to scrounge up stencils.
The Teknics cockpit set is top-notch with outstanding details and ease of
assembly although the instructions could have been clearer in a few spots.
It’s a shame that this line is no longer around as it really offers
excellent value and detail for the dollar.
Two thumbs up for both the kit and the cockpit
set.
The E series by Hasegawa is a
real joy to build, goes together quickly and convincingly looks the part.
The Teknics cockpit set really stands out and elevates this kit to
another level.
Highly recommended
for both the novice and expert modeler!
| REFERENCES |
German Aircraft Cockpits 1911-1970,
Cohausz, Peter W., Schiffer Publishing, 2003. ISBN: 0-7643-1873-X.
The Great Book of World War II Airplanes,
Grinsell, Robert, Zokeisha Publications, 1984.
ISBN: 0-517-459930.
Osprey Masterclass: World War 2 Luftwaffe
Fighter Modeling, Coughlin, Geoff,
Osprey Publishing, 2000.
ISBN:
1-84176-060-9
Romanian Aces of World War 2 (Aircraft of the Aces 54).
Bernád, Dénes. Botley, Oxford, UK: Osprey Publishing, 2003. ISBN: 1-84176-535-X.
December 2010
If you would like your product reviewed fairly and quickly, please contact me or see other details in the Note to Contributors.