Tamiya 1/32 A6M5 Zero
|
KIT # |
|
|
PRICE: |
$99.99 |
|
DECALS: |
Four aircraft |
|
REVIEWER: |
Brian Shields |
|
NOTES: |
Multimedia plastic kit with metal, photoetch and rubber parts. |
|
THE KIT |
 Tamiya has once again pulled out their bag
of tricks and the result is stunning. The packaging of this kit is even a work
of art. Upon opening the rather large box, you are greeted by several large
plastic trees sealed in individual bags and a piece of cardboard with smaller
parts sealed in plastic bubbles attached to it. The plastic parts are cast
intricately and every rivet is finely recessed in its place. The ribs are molded
in place on the inner fuselage hinting that we might see a clear fuselage
version later. There was absolutely no flash anywhere on my kit, and I suspect
no one else will encounter any. The clear parts are the best I have ever seen.
There is no need for a vacu-formed replacement. The canopy frames are molded
very crisply and the “glass” is flawless. Tamiya has also included preprinted
masks for the canopy! The photo-etch parts are made of a hard metal instead of
brass, which doesn’t present a problem since none of the parts needs to be bent
to form.
Tamiya has once again pulled out their bag
of tricks and the result is stunning. The packaging of this kit is even a work
of art. Upon opening the rather large box, you are greeted by several large
plastic trees sealed in individual bags and a piece of cardboard with smaller
parts sealed in plastic bubbles attached to it. The plastic parts are cast
intricately and every rivet is finely recessed in its place. The ribs are molded
in place on the inner fuselage hinting that we might see a clear fuselage
version later. There was absolutely no flash anywhere on my kit, and I suspect
no one else will encounter any. The clear parts are the best I have ever seen.
There is no need for a vacu-formed replacement. The canopy frames are molded
very crisply and the “glass” is flawless. Tamiya has also included preprinted
masks for the canopy! The photo-etch parts are made of a hard metal instead of
brass, which doesn’t present a problem since none of the parts needs to be bent
to form.
|
CONSTRUCTION |
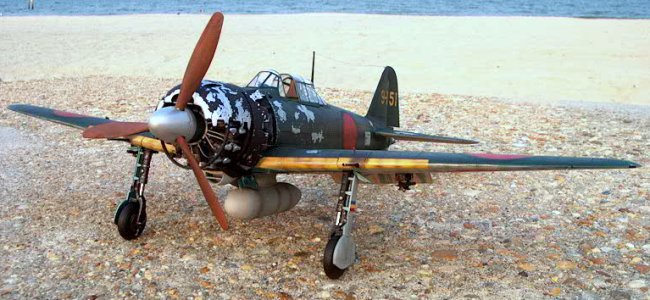
I chose to build the detailed Sake 21
engine first since it is a small kit by it’s self. The trees that contain these
parts are silver so they are a little tricky to work with when it comes to
sanding seams. The only downfall to the entire assembly is with the decision to
mold the engine cylinders in two halves. This makes a nearly impossible surface
to mate together. I was able to get them nearly perfect after several evenings
of work with a very tiny file to help blend the cooling fins together. The
completed engine is comprised of nearly fifty pieces! More than most 1/48 scale
kits have all together! I chose to add fine
 copper wire to simulate the plug
wires. This required some slight modifications to the wiring harness and
drilling a small hole in each cylinder. Surprisingly this was accomplished in
just a few hours and added just the right amount of detail. I painted the engine
using Testor’s flat black, and dry brushed it with silver to achieve the worn
look. I painted the exhaust pipes with the same flat black but treated them with
a dusting of rust colored pastels before sealing them with Testor’s clear
lacquer flat.
copper wire to simulate the plug
wires. This required some slight modifications to the wiring harness and
drilling a small hole in each cylinder. Surprisingly this was accomplished in
just a few hours and added just the right amount of detail. I painted the engine
using Testor’s flat black, and dry brushed it with silver to achieve the worn
look. I painted the exhaust pipes with the same flat black but treated them with
a dusting of rust colored pastels before sealing them with Testor’s clear
lacquer flat.
The cockpit was my next order of business
since it too was like a separate kit. The detail here was also fantastic. There
is absolutely no need for any after market items, and assembly was
straightforward following the kit instructions. The decals for the instruments
worked great and really look like miniature gauges in the panel. I chose to make
my own seatbelts out of lead foil since the ones provided in the kit are made of
adhesive vinyl and look like a toy. I did however, use the buckles provided on
the photo etch fret. I simulated the buckle holes on the belt by drilling tiny
holes 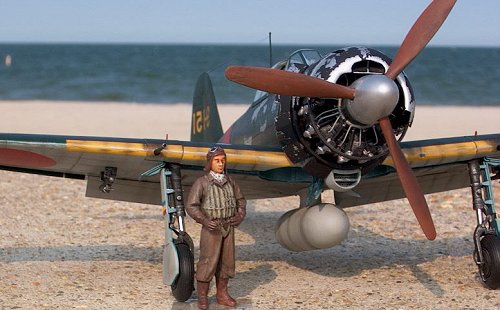 through the lead and painted the belts a light brown color. Once the
cockpit was complete I painted it a green color I custom mixed that “looked
right” according to some of the reference photos I have seen. I actually bought
the Tamiya interior color, but to me it just didn’t look right. After completing
the cockpit I felt bad about having to hide all of that detail in the fuselage!
through the lead and painted the belts a light brown color. Once the
cockpit was complete I painted it a green color I custom mixed that “looked
right” according to some of the reference photos I have seen. I actually bought
the Tamiya interior color, but to me it just didn’t look right. After completing
the cockpit I felt bad about having to hide all of that detail in the fuselage!
Now it was time to unite my two subassemblies together! I began by putting the fuselage halves together followed by the wings and the control surfaces. The fit of all of the major components was perfect and required no filling at all. The wing root to fuselage joint was especially surprising in that it needed no special attention to fit. The control surfaces were next. They are hinged together with tiny photo etch parts that are easy to lose so be careful. I found that they went together quite easily and worked just like the real thing when completed. Now it was time to do the landing gear. I chose to glue the gear in a stationary position, because they seemed too fragile to be pulling on in the future. The decision to make the gear inoperable didn’t save me any time since all of the parts still had to be used. Now that it finally looked like a Zero, I was ready to start painting.
|
PAINT & DECALS |
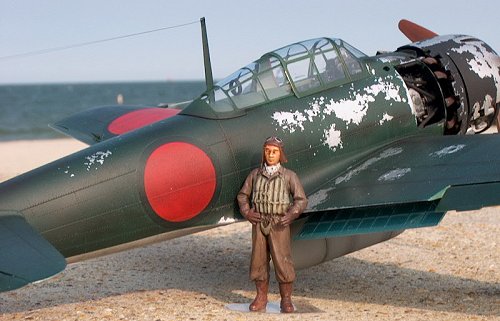
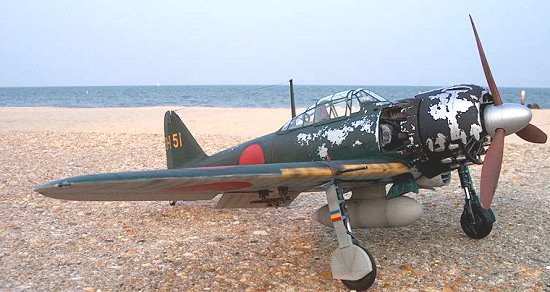
Since this was going to be a fairly simple
paint scheme I decided I would try to enhance it by severely weathering it. I
first shot the entire plane with a coat of Testor’s German silver and allowed it
to dry overnight. The next evening I randomly masked off areas that were to
appear chipped with rubber cement. After the cement had dried I shot the top and
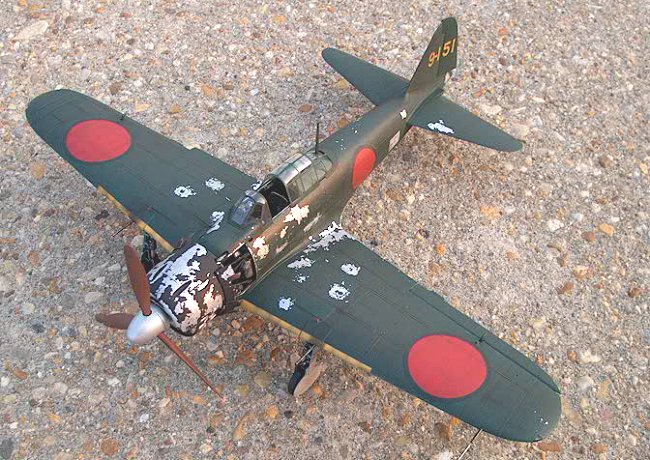
sides with 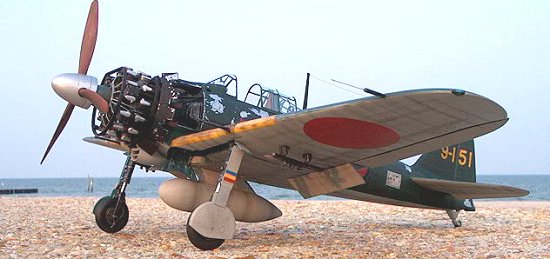 Japanese Army Navy green and allowed it to again dry overnight. Once
it had dried, I masked off the topsides and shot the bottom with Japanese sky
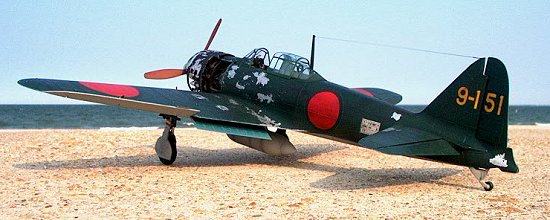
gray. The kit supplied decals were then applied using the instructions as a
guide. I had read in FSM that they seemed too thick, but mine worked great. I
did however, use a tiny amount of Solva-Set to help snug them to the surface. I
would like to point out that I do that on all of my decals, whether they are
after market or kit supplied.
Japanese Army Navy green and allowed it to again dry overnight. Once
it had dried, I masked off the topsides and shot the bottom with Japanese sky
gray. The kit supplied decals were then applied using the instructions as a
guide. I had read in FSM that they seemed too thick, but mine worked great. I
did however, use a tiny amount of Solva-Set to help snug them to the surface. I
would like to point out that I do that on all of my decals, whether they are
after market or kit supplied.
A final coat of Testor’s clear lacquer flat was then applied to seal everything off. Once the flat had dried, I used a small piece of masking tape to remove the rubber cement to reveal the shiny silver “bare metal “ areas. I waited until the end of the process to remove the masks because I wanted the silver to appear a little brighter then the rest of the finish. This was, as you can imagine a hard thing to do because it was really an all or nothing situation since the cement could have lifted the silver paint with it when I removed it. If you try this just give the paint ample time to dry and you shouldn’t run into any problems.
I weathered all of the panel lines using black pastel chalk. I started by using it very sparingly and gradually built up the application little by little. Sealer wasn’t used because it adhered very well to the flat paint and I didn’t have any smears after numerous times handling the plane.
|
ADDING DETAILS |
 I painted and installed the canopy next
using the masks provided. Although you have to trim them out yourself they work
great and adhere to the curves with no difficulty. The engine and antennas were
then added and everything fit great. I chose to replace the pitot tube with a
guitar string to prevent any damage to it in the future. The navigation lights
were painted Tamiya clear green and red and attached using white glue.
I painted and installed the canopy next
using the masks provided. Although you have to trim them out yourself they work
great and adhere to the curves with no difficulty. The engine and antennas were
then added and everything fit great. I chose to replace the pitot tube with a
guitar string to prevent any damage to it in the future. The navigation lights
were painted Tamiya clear green and red and attached using white glue.
|
CONCLUSIONS |
Well it sure looks like a Zero to me and it was a lot of fun to build! I read a review in Finescale Modeler that said it was a little short in scale, I think they should build more and nit pick less. With the shortage of materials in Japan during the war, I’m sure there were a lot of various size Zeros! Tamiya’s Zero kit is great and hopefully we’ll see more 1/32 WWII aircraft from them in the future. I would also like to thank all of the contributors of Modeling Madness for inspiring me to work harder!
July 2002
If you would like your product reviewed fairly and quickly, please contact me or see other details in the Note to Contributors.