Hasegawa 1/72 Ki-61 Tony
| KIT #: | JS-091 |
| PRICE: | $? |
| DECALS: | Three options |
| REVIEWER: | George Oh |
| NOTES: | Now I know what a 'shake and bake' kit is. |
| HISTORY |
 Even before the outbreak of WWII (Dec 1941), the Japanese and the Germans
were sharing technology. One result was that the Japanese received at
least one Me.109E that the Allies saw and code-named a MIKE. The other was
that the Japanese received (& I think license-built as the Ha.40) some
Daimler-Benz DB601A inline-engines. These were mated to a new airframe to
produce the Ki.61 called Hein (= Swallow) by the Japanese and Tony by the
Allies. For a more detailed history, see Tom Cleaver’s 1/48-scale Ki-61-1c
elsewhere in this site.
Even before the outbreak of WWII (Dec 1941), the Japanese and the Germans
were sharing technology. One result was that the Japanese received at
least one Me.109E that the Allies saw and code-named a MIKE. The other was
that the Japanese received (& I think license-built as the Ha.40) some
Daimler-Benz DB601A inline-engines. These were mated to a new airframe to
produce the Ki.61 called Hein (= Swallow) by the Japanese and Tony by the
Allies. For a more detailed history, see Tom Cleaver’s 1/48-scale Ki-61-1c
elsewhere in this site.
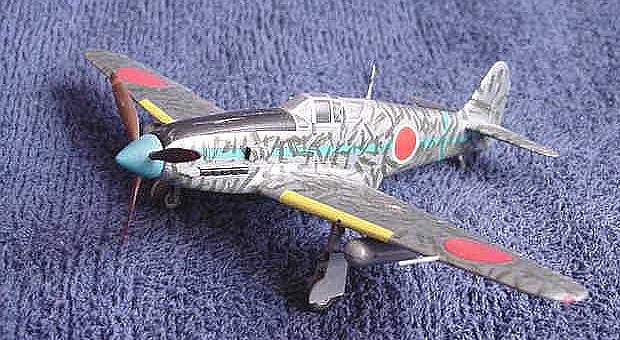
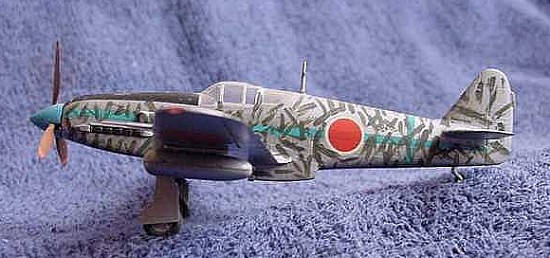
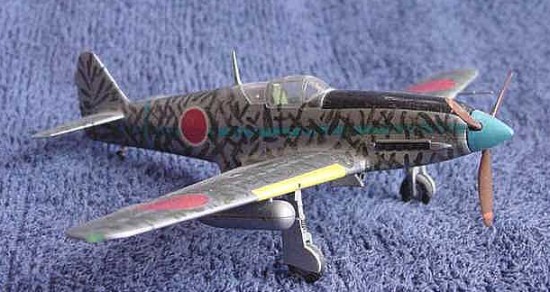
I got this kit when I won the club raffle. I built it because research showed me some really pretty colour schemes for it, ranging from all-over dark green to an all-over natural metal, and various schemes in-between. One was labelled palm frond camouflage. This was just a random pattern of dark green lines slashed almost anywhere on the aircraft. It appealed to me because here was a scheme that nobody could say was wrong.
| THE KIT |
This was my first Hasegawa kit. It might be one of their earlier release (30 parts + 1 clear), but it featured very subtle recessed surface detail. It was only marred by a slight mould seam on the undercarriage legs and the one-piece undercarriage doors that need to be cut apart (my pet hate). The cockpit was basic (seat, floor and panel) but adequate. An open canopy was not an option, but you got two pilots – one seated and one standing & saluting (I’m gunna’ put him next to my Baka/Ohka). The decal sheet was small. It had all required markings, including the yellow wing leading edge stripes, but no stencilling. The instruction sheet (printed in 1987) was for the right aircraft, but a different boxing, because it showed different markings.
| CONSTRUCTION |
My intention to do this as an Out Of Box (OOB) lasted 5 seconds because the seatback was missing. A gravestone-shaped piece of plastic card and some Milliputt fixed that. This put it in the MODified category, so I MODded it a bit more by adding seatbelts, pedals, side-wall details and a stick as well.
 I didn’t have any Malachite green for the cockpit, so I sub’ed-in Citadel
Minatures Goblin Green (for the wheel wells & doors, too) and highlighted
the details with a light grey. A splash of black inside the belly radiator
(& exhausts) and the fuselage went together. I did not require any putty
on this model (for a change) – just a light wet-sanding to remove the
plastic bead from the seam lines. At the same time, the wing halves (upper
& lower) and the drop-tanks were assembled. Bettcha you thought I forgot
to mask-off the wheel wells – no, I didn’t.
I didn’t have any Malachite green for the cockpit, so I sub’ed-in Citadel
Minatures Goblin Green (for the wheel wells & doors, too) and highlighted
the details with a light grey. A splash of black inside the belly radiator
(& exhausts) and the fuselage went together. I did not require any putty
on this model (for a change) – just a light wet-sanding to remove the
plastic bead from the seam lines. At the same time, the wing halves (upper
& lower) and the drop-tanks were assembled. Bettcha you thought I forgot
to mask-off the wheel wells – no, I didn’t.
I took two short modelling sessions to attach the wings, then the canopy & tail-planes, to the fuselage. Each time, the model rested on its belly radiator while the pieces (supported by coins) were attached. In fact, masking the canopy took the longest session.
| COLORS & MARKINGS |
 I sprayed it with Testors stainless steel metalliser (spray it on then buff
it up) that I sealed with their metalliser sealer. No, I didn’t forget the
U/C doors, belly cooler, side intake and drop tanks. This left me with an
aircraft looking like a new 50c piece. This is when I decaled it, and I
didn’t even need setting solutions. I had to pull (VERRRRRY gently) the
long blue fuselage stripes fore and aft to get it straight. Now, I took a
small 1mm-wide brush (= @ a 3” brush), a tin of dark green paint, and
attacked the airframe. I took the approach that two ground crewies did the
cam. One did a series of crosses while the other did a series of
radiating lines then moved up a bit and did another fan. Note that they
put the cam everywhere except the belly and over the national & the ID
markings (= yellow wing stripes).
I sprayed it with Testors stainless steel metalliser (spray it on then buff
it up) that I sealed with their metalliser sealer. No, I didn’t forget the
U/C doors, belly cooler, side intake and drop tanks. This left me with an
aircraft looking like a new 50c piece. This is when I decaled it, and I
didn’t even need setting solutions. I had to pull (VERRRRRY gently) the
long blue fuselage stripes fore and aft to get it straight. Now, I took a
small 1mm-wide brush (= @ a 3” brush), a tin of dark green paint, and
attacked the airframe. I took the approach that two ground crewies did the
cam. One did a series of crosses while the other did a series of
radiating lines then moved up a bit and did another fan. Note that they
put the cam everywhere except the belly and over the national & the ID
markings (= yellow wing stripes).
I played around with a bit of light blue paint and white paint till it was close in shade to the blue fuselage stripe, and painted the spinner. The wheels, U/C legs, prop and a few more last bits were painted then attached, and my Tony was done.
| CONCLUSIONS |
I like the bright look of my Tony – even if I’ve just noticed that it is missing an inner U/C door. If I had to do it again, I’d replace the relatively thick U/C doors with a metal foil or thin card.
I thoroughly enjoyed this project because, despite the kit’s age, I didn’t need to use any filler. So naturally I’d recommend it to even a beginner or a junior. And I love the fact that nobody can say that the cam pattern is wrong.
| REFERENCES |
“Flying Colours” by William Green & Gordon Swanborough. Salamander Books, 1981 & 97.
October 2004
Copyright ModelingMadness.com. All rights reserved. No reproduction in part or in whole without express permission.
If you would like your product reviewed fairly and fairly quickly, please contact the editor or see other details in the Note to Contributors.