Hasegawa 1/48 Ki-84 'Hayate' (Frank)
|
KIT # |
JT 67 (9067) |
|
PRICE: |
$21.98 |
|
DECALS: |
Two aircraft |
|
REVIEWER: |
Paul Mahoney |
|
NOTES: |
Aeromaster 'Special Attack Squadron' Decals |
|
HISTORY |
The Nakajima Ki84 Hayate (translated as Hurricane, or Gale) was without a doubt one of the best fighters produced by Japan during WWII. It marked the evolution of the series of fighters produced by Nakajima starting with the Ki27 'Nate', and continuing with the Ki43 'Oscar' and Ki44 'Tojo.' Easily a match for the Hellcats, Corsairs, and Mustangs that were the opposition, the Ki84 was a cutting edge piston engine-driven aircraft. The designers' thoughts in creating the Ki84 were to combine the nimbleness of the Ki43 with the heavy firepower of the Ki44. In addition to the marriage of these two desirable characteristics, the manufacturing time of the Ki84 was only 14,000 man hours (as compared with 24 - 25,000 man hours for either of it's predecessors). From initial discussions with the Japanese Army to the development of the prototype Ki84 took an amazingly short 10 months, and the first flight of the new fighter took place in April 1943. By June of that year the prototype was demonstrated at the Akeno Flying School, and the test pilot explained that flying the new craft could easily be learned in a short amount of time.
The ease of production, quick learning curve, and heavy firepower (2 12.7mm machine guns and 2 20mm cannon), combined with the power of a new 2,000 h.p. engine and the maneuverability of the Ki43 (more or less) provided a significant jump in the technology of the JAAF's stable. After some time in training regiments to work out the bugs of the pre-production models (83 evaluating models and 42 pre-production models were built), mass production was authorized in April of 1944. By June of that year 100 aircraft were being produced a month, and by October the number was over 300 per month. In late August of 1944, the Ki84 first entered combat over China with the 22nd Air Regiment (this Regiment had been involved in the testing/training period of the new fighter). Initial results were excellent, catching the American Army Air Force pilots completely off guard. They were used to the slower, less well-armed Japanese fighters previously encountered. Several crack pilots from other units were transferred to the 22nd Air Regiment, leading to a fearsome reputation for both the unit and the new fighter. Command of the skies over China briefly switched to the Japanese side.
 While the air war over China took a turn in Japan's favor, the rest of the
war was rapidly going against the Japanese. As things progressed, the 22nd and
other units were pulled back to defend the Philippines and eventually the Home
Islands. Production of the Ki84s increased, but production quality control
decreased rapidly in an effort to crank out as many fighters as possible.
Straws were often drawn in combat units to see who would get the 'lemons' and
who would get the properly-functioning aircraft. While a skilled pilot with a
'good' Ki84 was at least an even match for the US pilots and planes, the
majority of Ki84s lost in the Philippine battles were destroyed on the ground.
Overwhelming numbers of US planes (Navy and AAF) meant the Ki84s in the air were
also soon fighting a losing battle.
While the air war over China took a turn in Japan's favor, the rest of the
war was rapidly going against the Japanese. As things progressed, the 22nd and
other units were pulled back to defend the Philippines and eventually the Home
Islands. Production of the Ki84s increased, but production quality control
decreased rapidly in an effort to crank out as many fighters as possible.
Straws were often drawn in combat units to see who would get the 'lemons' and
who would get the properly-functioning aircraft. While a skilled pilot with a
'good' Ki84 was at least an even match for the US pilots and planes, the
majority of Ki84s lost in the Philippine battles were destroyed on the ground.
Overwhelming numbers of US planes (Navy and AAF) meant the Ki84s in the air were
also soon fighting a losing battle.
With the fall of the Philippines, focus started shifting to defense of the Home Islands of Japan. It is ironic that the situation had become so desperate that the best fighter the JAAF had was soon being sent on one-way trips as a Kamikaze aircraft. While initially Kamikaze aircraft were pulled from war-weary or obsolete stock, the cutting-edge Ki84 was used as a quicker aircraft that could probably evade defenses and find it's mark. As the war drew to a close, newer models of the Ki84 incorporated wood in their construction, as strategic materials in Japan became more scarce. By the end of the war over 4,000 Ki84s of all models were produced. As a final note, Ki84s abandoned or captured in China were pressed into use on both sides of the Civil War that erupted there after the close of WWII. Eventually, the last of these fighters to see combat were grounded by maintenance issues, concluding the aircraft's career.
|
THE KIT |
The kit looks sharp in the box. Cockpit is loaded with detail and all engraving looks typical Hasegawa - that is very crisp and very detailed. Soft plastic grommets (similar to those used for attaching props in most Hasegawa kits) are used for attaching landing gear, wheels, droptanks, as well as the prop. Decals look comprehensive, yet a little on the thick side. Schemes offered seem very generic.
|
CONSTRUCTION |
I began this kit not knowing what the final paint scheme would be. I was looking for an easy build, and this one certainly did not disappoint.
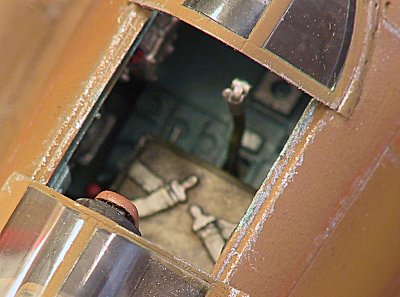
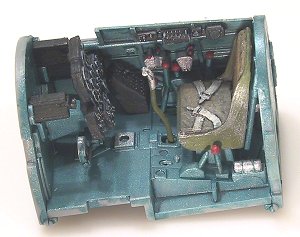 Construction, as usual, began with the cockpit. There is virtually nothing
to add in here. This is one highly detailed assembly! I have read some other
reviews suggesting that Hasegawa used a museum a/c as their 'blueprint', and
that this was equipped with American radios installed after capture. Apparently
Hasegawa recreated this 'extra' in the interior detail. Omitting the little
side panel will fix this glitch. Rarely do you find 'too much' interior detail
straight out of the box! I thought Hasegawa included molded in seatbelts on top
of some very nicely molded seat cushions within the seat. Further reading (after
the fact) has led me to believe this is a parachute pack, with it's
corresponding attachment belts. I had already closed up my fuselage by the time
I discovered this, and liked the look so I left it. The cockpit was painted in
various tones of Aotake, natural metal, and bamboo green. The instrument panel
is nicely done with raised detail, so I drybrushed this white over a base of
flat black, rather than use the decal. I weathered the green painted areas by
dry brushing some aluminum, and gave the whole area a dark gray wash to bring
out the detail.
Construction, as usual, began with the cockpit. There is virtually nothing
to add in here. This is one highly detailed assembly! I have read some other
reviews suggesting that Hasegawa used a museum a/c as their 'blueprint', and
that this was equipped with American radios installed after capture. Apparently
Hasegawa recreated this 'extra' in the interior detail. Omitting the little
side panel will fix this glitch. Rarely do you find 'too much' interior detail
straight out of the box! I thought Hasegawa included molded in seatbelts on top
of some very nicely molded seat cushions within the seat. Further reading (after
the fact) has led me to believe this is a parachute pack, with it's
corresponding attachment belts. I had already closed up my fuselage by the time
I discovered this, and liked the look so I left it. The cockpit was painted in
various tones of Aotake, natural metal, and bamboo green. The instrument panel
is nicely done with raised detail, so I drybrushed this white over a base of
flat black, rather than use the decal. I weathered the green painted areas by
dry brushing some aluminum, and gave the whole area a dark gray wash to bring
out the detail.
 After installing the cockpit, the rest of the assembly went very smoothly.
Several of those little soft plastic grommets must be installed prior to closing
up the wing assembly, and there are some different sized ones, so pay close
attention to the instructions. All joints fit either extremely well, or nearly
so. I used some Mr. Surfacer 500 to fill in a few seams along the trailing edge
of the wing/fuselage join, and a little around the stabilizer joins, but that
was it. A little light sanding and the seams disappeared.
After installing the cockpit, the rest of the assembly went very smoothly.
Several of those little soft plastic grommets must be installed prior to closing
up the wing assembly, and there are some different sized ones, so pay close
attention to the instructions. All joints fit either extremely well, or nearly
so. I used some Mr. Surfacer 500 to fill in a few seams along the trailing edge
of the wing/fuselage join, and a little around the stabilizer joins, but that
was it. A little light sanding and the seams disappeared.
About the only problem I had was installing the underwing oil cooler. First, the instructions would have you mount this item backwards. Second, this is another spot where the grommets are used for installation. I guess Hasegawa's thinking was that you could remove all the items on the underside of the a/c (drop tanks, landing gear, oil cooler) for transport? Whatever the case, I am not a fan of these things. The grommet for the oil cooler is to be dropped into a vertical slot, yet the mounting base for the cooler should lie flat against the wing underside. Since the underside of the wing is not horizontal, the piece will not lie flush. The grommet is at a 90 degree angle with the horizon, yet the wing underside is not. In the end, I just cut off the mounting peg on the cooler and glued it directly onto the wing. Problem solved.
 There are several individual exhaust pipes that are best painted and attached
after the model has been painted, but they need to be installed before the
cowling is attached. I omitted these, and used blu-tak to temporarily attach
the cowling for a uniform paint job. Since the cowling mounts onto the engine,
which then mounts onto the fuselage, I had to paint and install the engine into
the cowling first. I then masked over the engine front to protect it from the
impending airbrushing. I used Scotch Magic Tape (in the plaid green box) to
mask the canopies, then trimmed around the frame with a new Xacto blade. After
this was done I burnished the edges down with a wooden toothpick. Of all the
methods for masking canopies, I have found this to be the one that works best
for me. I have not used the newer, specially-produced canopy masks as I am
afraid I would get addicted to those. They have to be easier than this method,
but I somehow feel like I am doing a bit more 'real' modeling using this
technique. I know it's a little weak, but it works for me...
There are several individual exhaust pipes that are best painted and attached
after the model has been painted, but they need to be installed before the
cowling is attached. I omitted these, and used blu-tak to temporarily attach
the cowling for a uniform paint job. Since the cowling mounts onto the engine,
which then mounts onto the fuselage, I had to paint and install the engine into
the cowling first. I then masked over the engine front to protect it from the
impending airbrushing. I used Scotch Magic Tape (in the plaid green box) to
mask the canopies, then trimmed around the frame with a new Xacto blade. After
this was done I burnished the edges down with a wooden toothpick. Of all the
methods for masking canopies, I have found this to be the one that works best
for me. I have not used the newer, specially-produced canopy masks as I am
afraid I would get addicted to those. They have to be easier than this method,
but I somehow feel like I am doing a bit more 'real' modeling using this
technique. I know it's a little weak, but it works for me...
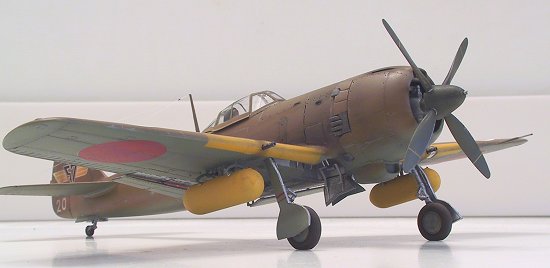
After painting was complete I removed the cowling, installed the exhaust pipes and all the other small parts. Mounting the landing gear in the dreaded grommets was another exercise in frustration. The softness of the grommets does not result in a positive locking-in of the proper angle for the gear. The fit is mushy and has a fair amount of play in it. I ended up using cyano and permanently fixing the gear once I had the proper alignment. I might point out here that the gear bays are as well detailed as the rest of the a/c - a nice wash brings out the detail and makes this area look great. I did add brake lines to the gear as one of the few additions to this kit. Hasegawa is nice enough to provide two sets of wheels - one with slightly flattened spots, and the other perfectly round. One other 'addition' Hasegawa made is some sort of clamping assembly onto the wheels. Again, from what I have gathered on the web these were directly copied from the museum aircraft, and appear to be some sort of locking device that was not present on the original airframe. A simple matter of omitting them takes care of this.
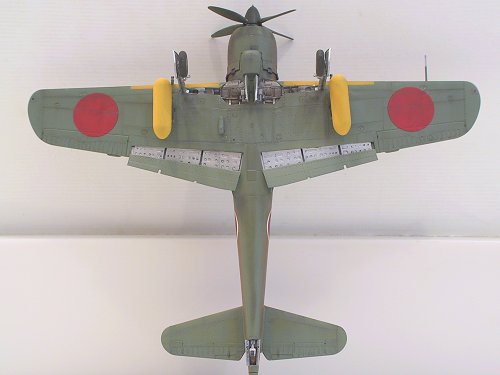 The underside wing racks on this kit are extremely well detailed like
everything else. Like everything else on the underside, these too attach via
the grommets. No problems here though. A little bit of cleaning up of the
molding lines is necessary, but once done this area looks very good. I did find
that the piping from the drop tanks to the underside of the wing did come up a
bit short. However, I think this might have been something I did wrong in the
construction and will not blame Hasegawa for it. To remedy this, I cut off the
molded-in piping and attached slightly longer pieces of stretched sprue. If you
do not wish to use the drop tanks, alternate parts are provided to complete the
racks. While addressing the underside, I must say I like Hasegawa's recent
trend of allowing for lowered flaps on most of their newer releases.
Unfortunately in this case (and in the newer Ki43 Oscars), the flaps of the Ki84
were 'butterfly' combat flaps that were rarely seen open on the ground. Sort of
the inverse of the leading edge slats on the Me262 that were always lowered on
the ground. Hasegawa does not provide the option of having these in the closed
position. Well, between liking this feature and the amount of surgery needed to
display them in the closed position, I attached the flaps as called for in the
instruction sheet. Not 100% historically accurate, but I like seeing some of
the 'moving' parts of the aircraft shown as operated.
The underside wing racks on this kit are extremely well detailed like
everything else. Like everything else on the underside, these too attach via
the grommets. No problems here though. A little bit of cleaning up of the
molding lines is necessary, but once done this area looks very good. I did find
that the piping from the drop tanks to the underside of the wing did come up a
bit short. However, I think this might have been something I did wrong in the
construction and will not blame Hasegawa for it. To remedy this, I cut off the
molded-in piping and attached slightly longer pieces of stretched sprue. If you
do not wish to use the drop tanks, alternate parts are provided to complete the
racks. While addressing the underside, I must say I like Hasegawa's recent
trend of allowing for lowered flaps on most of their newer releases.
Unfortunately in this case (and in the newer Ki43 Oscars), the flaps of the Ki84
were 'butterfly' combat flaps that were rarely seen open on the ground. Sort of
the inverse of the leading edge slats on the Me262 that were always lowered on
the ground. Hasegawa does not provide the option of having these in the closed
position. Well, between liking this feature and the amount of surgery needed to
display them in the closed position, I attached the flaps as called for in the
instruction sheet. Not 100% historically accurate, but I like seeing some of
the 'moving' parts of the aircraft shown as operated.
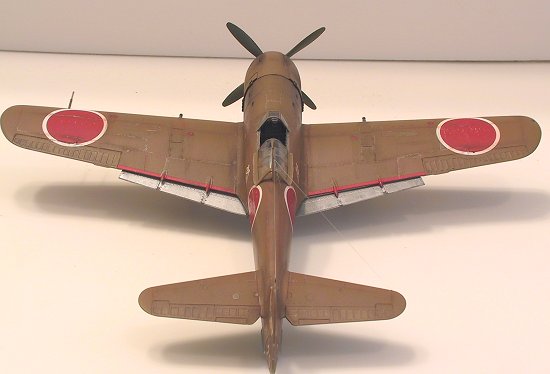
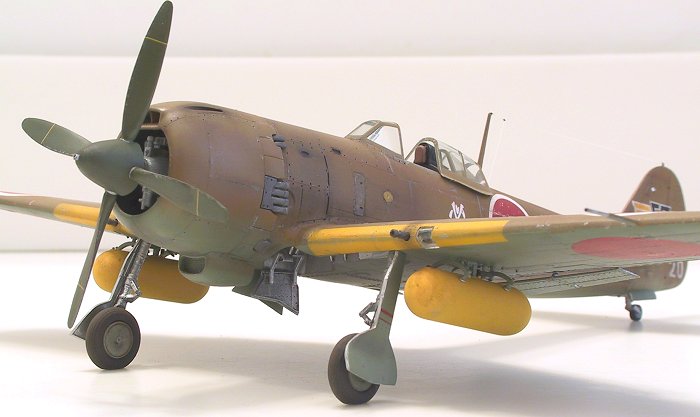
All the clear parts are extremely thin and very clear. There are several tiny clear parts provided for the various lights on the wingtips and tail. I like the effect these have when the area underneath is painted in the appropriate color. I flooded the tiny depressions in each spot (after painting) with Future, and then dropped the tiny parts into the depression. This was the best way I could find to affix these tiny pieces. The leading edge landing light cover is a snap fit that is perfect.
I used stretched clear sprue for the antenna wires. The artwork on the box provides the proper arrangement for the wires - there is one running from the antenna mast to the tail, another running from this wire down to the fuselage, and a third running from this wire to the right stabilizer.
|
PAINTING & MARKINGS |
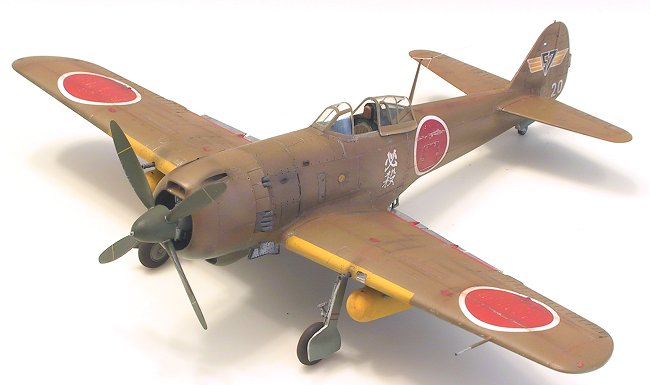
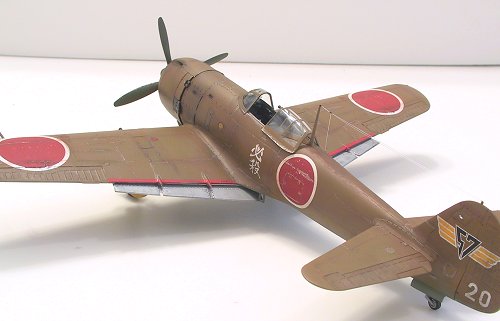
After pondering several schemes, I decided to use Aeromaster's Special Attack Squadrons (Kamikaze) sheet for the markings. I was intrigued by this scheme with some writing on the side of the fuselage. According to Aeromaster (always worth double checking...) this Frank was flown by 2nd Lt. Tetsujiro Karasawa from the Shimodate Air Base, Ibaraki Prefecture. This group trained at Shimodate, then moved to the Miyakonojo-Higashi Air Base in the Miyazaki Prefecture on 24 May, 1945. On 28 May this group attacked U.S. ships off of Okinawa. Karasawa's aircraft carried the motto Hissatsu (sure to kill) on his aircraft.
 I used Gunze Sangyo Mr. Color Army Grey-Green for the undersurfaces, and
Model Master Military Brown (with touches of yellow and red to match
descriptions in my references) for the topsides. Prior to painting the brown, I
sprayed some Interior Aotake along the canopy frames so it would show through
from the interior. Aeromaster Japanese ID Yellow was used for the leading
edges, and Model Master Yellow used for the droptanks. Droptanks at this stage
in the war were found in a variety of paint schemes - newly manufactured ones
were often kept in primer colors or painted a brighter color in order to aid in
locating the ejected tanks for re-use. I have read descriptions of these tanks
ranging from bright green, to yellow green, to yellow. I have also seen them
described as being left in natural metal, or painted the same color as the
undersurface of the aircraft. Yellow seemed a good balance to this scheme, so
that determined the paint job. The prop and hub were painted with RLM 82 Dark
Green from Model Master. My research showed almost all Franks had this color
(not actually RLM, but a close match) applied to this area.
I used Gunze Sangyo Mr. Color Army Grey-Green for the undersurfaces, and
Model Master Military Brown (with touches of yellow and red to match
descriptions in my references) for the topsides. Prior to painting the brown, I
sprayed some Interior Aotake along the canopy frames so it would show through
from the interior. Aeromaster Japanese ID Yellow was used for the leading
edges, and Model Master Yellow used for the droptanks. Droptanks at this stage
in the war were found in a variety of paint schemes - newly manufactured ones
were often kept in primer colors or painted a brighter color in order to aid in
locating the ejected tanks for re-use. I have read descriptions of these tanks
ranging from bright green, to yellow green, to yellow. I have also seen them
described as being left in natural metal, or painted the same color as the
undersurface of the aircraft. Yellow seemed a good balance to this scheme, so
that determined the paint job. The prop and hub were painted with RLM 82 Dark
Green from Model Master. My research showed almost all Franks had this color
(not actually RLM, but a close match) applied to this area.
After painting, a coat of Future was handpainted to prepare for the decals. I still have not mastered getting the stuff to come out of an airbrush properly, but handpainting seems to work just fine for me. The self-leveling quality eliminates brushmarks as long as you do not go back over areas you just applied the Future to. Once this set up, I applied the Aeromaster decals, as well as some of the kit-provided ones for stenciling. As usual, the Aeromaster ones went on perfectly and conformed beautifully around all the panel lines. I cannot say the same for the Hasegawa ones. It seems Hasegawa decals are always some sort of a random adventure. I have used ones in the past that are so sensitive Micro Set and/or Sol just destroy them. I have also used ones that are so thick they stand out no matter what solvent you use. Unfortunately, the Frank's decals fell in the latter category. They did conform to all the panel lines, but stood out sorely. A lot of strong setting solution helped, but it is discouraging to have all the great stencils and be hampered by their thickness. I elected to paint the various refueling ports rather than use the decals.
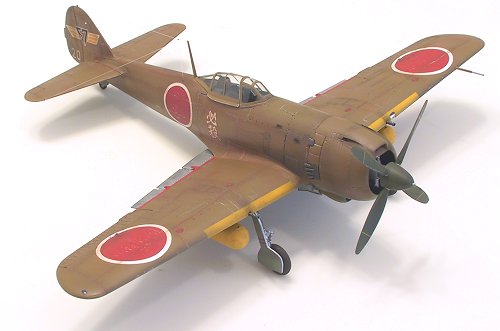 After flat-coating with Model Master 'Lusterless' finish, I began some
weathering. Pastels were used to provide some tonal variation, and several
doses of talcum powder were used to 'fade' the control surfaces. This effect in
the photos is somewhat lost, but I was looking for some subtlety here. I used
some dark brown and gray watercolors to depict streaking and fluid spills,
particularly on the droptanks. A combination of a silver pencil, Testors
aluminum, and Floquil Old Silver was used for the paint chipping. In
retrospect, perhaps a bit more chipping should have been done, but overall I am
happy with the effect.
After flat-coating with Model Master 'Lusterless' finish, I began some
weathering. Pastels were used to provide some tonal variation, and several
doses of talcum powder were used to 'fade' the control surfaces. This effect in
the photos is somewhat lost, but I was looking for some subtlety here. I used
some dark brown and gray watercolors to depict streaking and fluid spills,
particularly on the droptanks. A combination of a silver pencil, Testors
aluminum, and Floquil Old Silver was used for the paint chipping. In
retrospect, perhaps a bit more chipping should have been done, but overall I am
happy with the effect.
Finally,I used Floquil Old Silver to represent the natural metal surfaces of the wheel wells and flap interior. I have been reading about this paint for years, but this was my first attempt using it. I liked the results - sort of a 'dulled down' natural metal look. Quite convincing I think. I used a dark gray watercolor wash to bring out highlights in both areas. I also used a bit of brown wash in the wheel wells. After assembling and painting the landing gear, various coats of brown pastels were used for dirt and dust
|
CONCLUSIONS |
I was extremely happy building this kit. I think it is extremely good value for the money - I have seen these kits on eBay for under $12. Can whole-heartedly recommend this one. Nothing on here that a first-timer would have problems with - in fact, this might make an excellent first kit if the builder is comfortable with lot of small pieces. It falls together, and comes out highly detailed with minimal effort.
|
REFERENCES |
Bueschel, Richard M., Nakajima Ki84a/b Hayate in Japanese Army Air Force Service, Schiffer, 1997.
Fearis, Peter J., The Samurai's Wings (Army): A Modeller's Guide to the Colour Schemes and Markings of Imperial Japanese Army Aircraft., Peter J. Fearis, 1998.
Mikesh, Robert C., Japanese Aircraft Interiors 1940-1945, Monogram, 2000.
Sakaida, Henry, Japanese Army Air Force Aces 1937-45, Osprey, 1997.
Scott, Peter, Emblems of the Rising Sun: Imperial Japanese Army Air Force Unit Markings, Hikoki, 1999.
The Japanese Army Wings of the Second World War, KokuFan/Burin Do, 1972.
Thorpe, Donald, W., Japanese Army Air Force Camouflage and Markings World War II, Aero Publishers, 1968.
www.j-aircraft.com (where you can find the REAL experts, and great data/info on Japanese aircraft - an indispensable resource on the web!!)
Photos downloaded from a walk-around of the sole surviving Ki84 in the Kyoto-Arashiyama Museum http://www.ifa.hawaii.edu/~msc/hayate.html (As a note, this aircraft had been restored to flying condition by Planes of Fame before being sold for what was a considerable sum. Ed)
If you would like your product reviewed fairly and fairly quickly, please contact the editor or see other details in the Note to Contributors.
Back to Reviews Page 2015