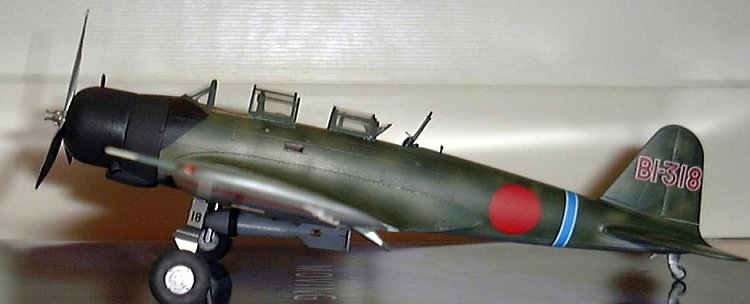
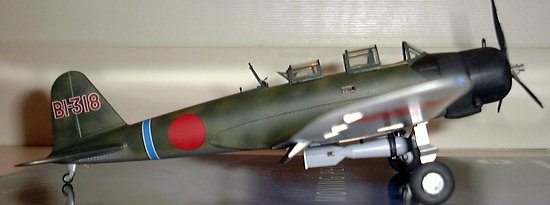
Hasegawa 1/48 B5N2 'Kate'
|
KIT # |
JT 76 (9076) |
|
PRICE: |
$28.98 |
|
DECALS: |
2 Pearl Harbor attackers |
|
REVIEW : |
|
|
NOTES: |
Airwaves Japanese seat and belt set used. |
|
HISTORY |
 The Nakajima B5N Type 97 Carrier Attack Bomber was the first all-metal
construction attack plane in service with the Imperial Japanese Navy.
First built in 1937, this aircraft featured all the modern developments of the
era: all metal construction, retractable landing gear, folding wings for carrier
storage, and an adjustable pitch, all-metal propeller. These aircraft,
along with the dive-bombing 'Val,' were the main attackers at Pearl Harbor.
In fact, the actual order to commence the attack was issued by Commander Fuchida
from a Kate.
The Nakajima B5N Type 97 Carrier Attack Bomber was the first all-metal
construction attack plane in service with the Imperial Japanese Navy.
First built in 1937, this aircraft featured all the modern developments of the
era: all metal construction, retractable landing gear, folding wings for carrier
storage, and an adjustable pitch, all-metal propeller. These aircraft,
along with the dive-bombing 'Val,' were the main attackers at Pearl Harbor.
In fact, the actual order to commence the attack was issued by Commander Fuchida
from a Kate.
Kates carried the now infamous shallow water modified torpedoes (the harbor at Pearl was deemed too shallow for effective use of aerial torpedoes - at least the movie got THAT right!). They also carried specially-designed armor piercing bombs to be dropped from level flight. These bombs were modified from 16 inch naval artillery shells by the addition of tail fins. This kit is equipped with one of these bombs.
From it's entrance as a cutting edge, modern aircraft in the early years of the War, the Kate was quickly outdated as the War progressed and they were relegated to second tier duties such as anti-submarine patrols. Despite attempts to upgrade it's performance, some Kates ended the War doing Kamikaze attacks (not always intended) against the ever advancing US Naval armada.
|
THE KIT |
This is a great new release from Hasegawa - it seems like each new issue gets more detailed and has more features. This is Hasegawa's first issue of the Kate, and comes with an armor/deck piercing bomb. I would assume a torpedo-armed version is in the works. There are flashed over holes in the sides of the fuselage and wings that are for the antennae arrays/radar that were mounted on Kates later in the war. I can only assume something along these lines will be released in the near future as well. Hasegawa has taken a page out of Tamiya's book and allows you to pose the flaps down if you wish. I hope this will be new standard for Hasegawa as it seems to be for Tamiya of late.
|
CONSTRUCTION |
The cockpit is extremely well detailed.
Instrument panels and radio faces have crisp molded in detail (which can be
sanded off and replaced by the included decal if you wish). I prefer to
leave the raised detail as is and drybrush it with white, gray, and silver to
bring out the dials and knobs. One interesting touch which I don't think
worked out too well on Hasegawa's part was the pilot's seat. They have
provided a decal with black dots that is to be applied to the back of the seat
to The wings went together well, except for one small
molding blemish on one of the joining pins that caused a plastic bump to appear
on the join of the leading edge. One quick cut with the Xacto took care of
that, and the join was perfectly smooth. The flap arrangement requires you
to cut specific tabs off of the flaps, depending on whether they will be
displayed up or down. In addition, if you are displaying them lowered, you
will need to cut out the channels in the lower wing for the guide rails on the
flaps. The instructions are very clear on which tabs to cut off, but a
little vague on how the channels get cut out. I held my lower wing up to a
light, and could then see where the thinned plastic is that is meant to be cut
away. One look at the instructions, and a quick hold up of the lower wing
and you will see what I mean. Flap area notwithstanding, the wings went
together well.
After this set I used Mr. Surfacer to fill the
join, wiping off the excess with denatured alcohol. This is an absolutely
great product I do not know how I lived without. Over the years I have
tried many methods to fill small cracks or seams without destroying the engraved
lines around them, or tried to fill areas that I did not want (or wasn't able)
to sand smooth afterwards. I have tried using white glue and/or wood glue
to some success, filling the crack and then smoothing it with my finger. I
have also tried thinning Green Putty with lacquer thinner and painting it it
into the seam. This works well if you get it right the first time.
Any additional smoothing with lacquer thinner has the unfortunate side effect of
melting the surrounding plastic. Finally, I discover Mr. Surfacer after
reading about it on the web in several reviews. This fills the seam in
nicely, and the excess wipes away with denatured alcohol, not hurting the
surrounding plastic a bit! Great stuff.
The horizontal tail pieces are molded in one
piece per side, with the attachment tabs interlocking when you join them to the
fuselage. Simple and perfectly aligned the first time! While on the
subject, the rudder which is molded into the fuselage is done extremely well,
and looks almost like a separate piece. Once again Hasegawa's crisp
molding stands out.
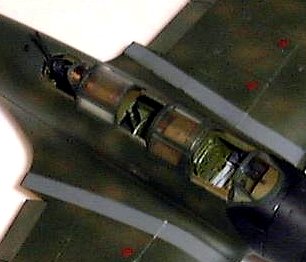
The engine is pretty adequately detailed - the
front row of cylinders is molded in one piece, with the back row molded into a
firewall. There are some additional separate pieces that help spruce
things up a bit, and with some judicious painting it will look good. One
problem I did have was in removing the sprue gates from the cowling. The
front piece of the cowling (back to the flaps) is molded as one piece, and there
are thick sprue gates present inside the cowl opening. This thick sprue
must have been necessary to get the crisp molding of the cowl, but it is
extremely difficult to remove without damaging the cowling itself. There
are four attachment points on the inner lip of the cowl opening to be cut away.
Let me suggest you do so by cutting with a knife as opposed to clippers or sprue
cutters. I used my sprue cutters and ended up cracking the cowling in
several places due to the stress I put on the piece while I tried to cut out the
sprue. I painted the interior of the cowl Model Master Japanese Interior
Metallic Blue (meant to represent the clear, blue-tinted protective coating that
was used to seal areas of the airframe left in their natural metal state).
I left off the engine and cowling until after the entire model had been painted.
This reduced the amount of masking necessary for the all black cowl.
Finally I installed the one piece, closed up canopy using a couple of dabs of
white glue to protect the cockpit, as I would later used the opened up pieces on
the finished kit. I masked off the window openings in the sides and
underbelly using liquid mask.
For as much as this is a state of the art kit, I
was surprised to find some rather pronounced mold lines on the landing gear.
This took a bit of filing to clean up. There are also lots of ejector
marks on the landing gear covers and on the bomb pieces. I added hydraulic
lines for the brakes down the back of the main gear using wire. The main wheels
look well detailed, and have a very minor flattened spot to represent the weight
of the aircraft on the tires. So subtle that i suggest noting where it is
before painting - otherwise almost impossible to find! On the downside,
the tail wheel and it's strut/fairing are molded as one piece, making painting a
bit difficult. The rest of the bits and bobs were added per the kit
instructions and went fairly smoothly.
 represent the lightening holes present in the real item. Initially I
thought about applying the decal, then drilling out the holes with a pin vise
using the decal as a guide. Instead I decided to use the etched brass seat
that is on Airwaves Japanese Aircraft Accessory set. This seat, and the
seatbelts from the same set, were the only additions or changes I made to
Hasegawa's excellent cockpit. All sorts of levers, boxes, wiring, etc. are
present. The built up cockpit looks cramped and busy, as it should.
The addition of the brass pilot's seat really makes things look much better, as
the kit piece (besides needing the holes drilled out) is way too thick. I
painted the majority of the interior in 'bamboo green,' which I made by adding
some tan to Model Master Interior Green until I got a color I was happy with.
All other details were painted per kit instructions, using Monogram's Japanese
Cockpit Interiors book to augment as necessary. The finished interior fits
nicely between the fuselage sides with no hassles. One very nice touch is
that the little windows for the sides of the fuselage (as well as the one in the
bottom) fit in from the outside, making it much easier to add these after
painting.
represent the lightening holes present in the real item. Initially I
thought about applying the decal, then drilling out the holes with a pin vise
using the decal as a guide. Instead I decided to use the etched brass seat
that is on Airwaves Japanese Aircraft Accessory set. This seat, and the
seatbelts from the same set, were the only additions or changes I made to
Hasegawa's excellent cockpit. All sorts of levers, boxes, wiring, etc. are
present. The built up cockpit looks cramped and busy, as it should.
The addition of the brass pilot's seat really makes things look much better, as
the kit piece (besides needing the holes drilled out) is way too thick. I
painted the majority of the interior in 'bamboo green,' which I made by adding
some tan to Model Master Interior Green until I got a color I was happy with.
All other details were painted per kit instructions, using Monogram's Japanese
Cockpit Interiors book to augment as necessary. The finished interior fits
nicely between the fuselage sides with no hassles. One very nice touch is
that the little windows for the sides of the fuselage (as well as the one in the
bottom) fit in from the outside, making it much easier to add these after
painting.
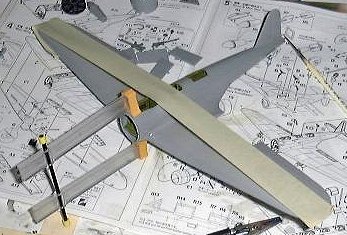 Attaching the wing to the fuselage, however, was a
little less pleasant of an experience. For some reason most of the recent
Hasegawa kits have problems at the wing joins, particularly where the trailing
edge meets the fuselage. Several dry-fit runs confirmed that I would have
some difficulty here. Perhaps I didn't assemble the wing halves or the
fuselage halves quite correctly, but since I have had this problem with their
kits before, I'll say this time it wasn't 'operator error.' I ended up
using cyano glue to fasten the rear-most part of the wing underneath the
fuselage, since that set up almost immediately. I then press-fit the rest
of the wing onto the fuselage, and used masking tape from tip to tip to pull
them taut against the fuselage and give the proper dihedral. Finally I
used a clamp to hold the front-most section of the wing up snugly against the
fuselage (see photo). At this point only the rear part of the wing was
glued to the fuselage. I then brushed small amounts of liquid glue along
all the join lines, letting capillary action help to draw the glue down the
join. I tried to be very careful here so as not to destroy the delicate
rivet and panel scribing. The join where the wing fairs into the fuselage
fits well, it's just that rear-most area that's a problem.
Attaching the wing to the fuselage, however, was a
little less pleasant of an experience. For some reason most of the recent
Hasegawa kits have problems at the wing joins, particularly where the trailing
edge meets the fuselage. Several dry-fit runs confirmed that I would have
some difficulty here. Perhaps I didn't assemble the wing halves or the
fuselage halves quite correctly, but since I have had this problem with their
kits before, I'll say this time it wasn't 'operator error.' I ended up
using cyano glue to fasten the rear-most part of the wing underneath the
fuselage, since that set up almost immediately. I then press-fit the rest
of the wing onto the fuselage, and used masking tape from tip to tip to pull
them taut against the fuselage and give the proper dihedral. Finally I
used a clamp to hold the front-most section of the wing up snugly against the
fuselage (see photo). At this point only the rear part of the wing was
glued to the fuselage. I then brushed small amounts of liquid glue along
all the join lines, letting capillary action help to draw the glue down the
join. I tried to be very careful here so as not to destroy the delicate
rivet and panel scribing. The join where the wing fairs into the fuselage
fits well, it's just that rear-most area that's a problem.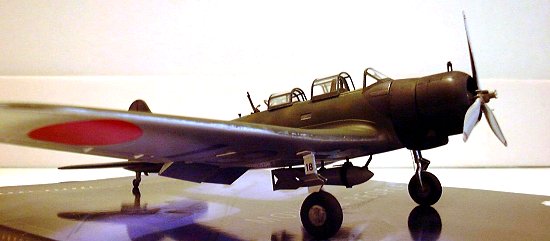 One other area that posed a problem was the front
of the wing root. There is a small gap where the wing halves (top and
bottom) meet one another, and where they join the fuselage.
Unfortunately this is also where a prominent panel line is. The panel join
(fillet) running around the wing root is slightly raised compared to the
rest of the fuselage, and the join runs right through this. Not
impossible, but messy to fix. Some putty and lots of delicate sanding were
required to smooth out the small gap and seam. Tricky to do in this area
of multiple curves and panel lines.
One other area that posed a problem was the front
of the wing root. There is a small gap where the wing halves (top and
bottom) meet one another, and where they join the fuselage.
Unfortunately this is also where a prominent panel line is. The panel join
(fillet) running around the wing root is slightly raised compared to the
rest of the fuselage, and the join runs right through this. Not
impossible, but messy to fix. Some putty and lots of delicate sanding were
required to smooth out the small gap and seam. Tricky to do in this area
of multiple curves and panel lines.
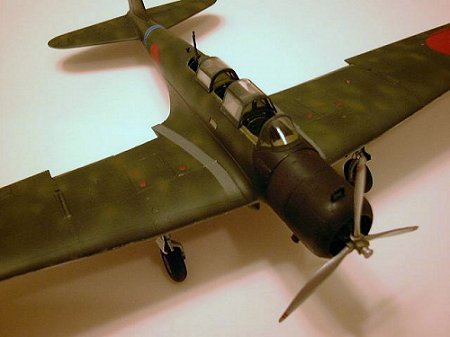
After painting (see below) I added on all the final touches. The canopies
were masked with Scotch Magic Tape, the frames cut out using a new Xacto knife,
and were sprayed first with Model Master Japanese Interior Blue, then with IJN
Green. This allows the primed bare metal to show through on the
interior of the frames. Hasegawa gives you all the pieces to show the
greenhouse canopy in the open position, but this is a little tricky. The
gunner's canopy and the rear fairing both slide back and under the rearmost
fixed portion. Getting all these lined up on top of one another
successfully is not that easy. After much trial and error, I glued the
gunner's canopy into the fixed section, then glued these two down to the
fuselage. Once dry, I carefully inserted the end piece underneath both of
these. I needed to fair in the fixed portions of the canopies using
Kristal Kleer, which I painted over when dry. The windshield fit
beautifully. I ended up replacing the two little side windows with clear
acetate - despite my best efforts cutting them from the sprue, I ended up with
little blemishes on the kit pieces that just didn't look right. They were
easy enough to duplicate using the kit pieces as templates.
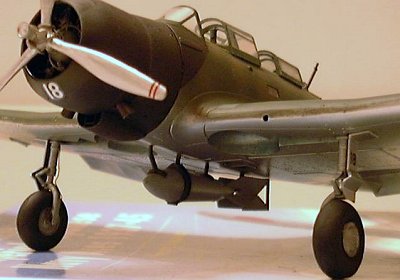 The torpedo sight on the cowling is a nice addition, but it is a little thick
for this scale. I sanded it down and added it to the top of the cowl.
The sprues do include the torpedo sighting device that is meant to be installed
on the cockpit glare shield, but the instructions do not mention this.
After skimming my research material, I saw several cockpit photos without this
device, and two holes present as in the kit. I think it is reasonable that
they may not have carried this device when being used as a bomber. I added
a brass photoetch cross hair sight to the rear gun to replace the kit's, which
was also very thick. I also drilled out the gun barrel tip using a pin
vise.
The torpedo sight on the cowling is a nice addition, but it is a little thick
for this scale. I sanded it down and added it to the top of the cowl.
The sprues do include the torpedo sighting device that is meant to be installed
on the cockpit glare shield, but the instructions do not mention this.
After skimming my research material, I saw several cockpit photos without this
device, and two holes present as in the kit. I think it is reasonable that
they may not have carried this device when being used as a bomber. I added
a brass photoetch cross hair sight to the rear gun to replace the kit's, which
was also very thick. I also drilled out the gun barrel tip using a pin
vise.
|
PAINT & MARKINGS |
I had always wanted to do one of the 'mottled' Kates I had seen pictures and profiles of over the years. After much research using my library and many requests to the J-aircraft board, I ended up with a dilemma. Several sources say these a/c were originally overall natural metal, and the mottling applied per directives just before Pearl Harbor. Others say they were overall light gray, similar to Zekes of that time period, and the mottling applied over this. Knowing full well that whichever scheme I chose will inevitably be the wrong one, I went with the natural metal base. I am sure within days I will find a full color photo of exactly this a/c and I will be wrong!! I really wanted to try out the new Alclad II metal finishes and this seemed like a way to ease into it, rather than breaking out a B-29 and going to town on a true 'full metal jacket.' Reviews of Alclad II were raving, but I was still dubious. I emailed Scott Van Aken (our host here at M2) and he was extremely helpful. Alclad II needs a barrier between it and the bare plastic, and they suggest something that is acrylic. In an attempt to take the lazy method out, I had decided I might be able to get away with a spray can for the undercoat. My local hobby shop (one of the last ones left in NY) had plenty of spray cans, but none that were acrylic. I decided to tempt fate and picked up a can of Tamiya semi-gloss black. I have not used spray cans in years and was amazed at the smooth coverage this spray provided. Very thin, very smooth - airbrush quality results. I was very impressed. Anyway, I coated the whole built-up model with this and let it dry. Being semi-gloss, scratches and blemishes in the plastic would show up. I sanded these out as necessary, and re-painted.
 Alclad goes on ultra thin, but with the paint barrier underneath there is no
need to polish the plastic for a good finish - just be sure the major scratches
are out. The Alclad sprayed on beautifully using my Aztek airbrush.
I used two coats and covered the entire model. It was dry to the touch in
about 15 minutes. I elected not to polish it, but according to the
instruction this can be done. I imagine some SNJ powder could also be used
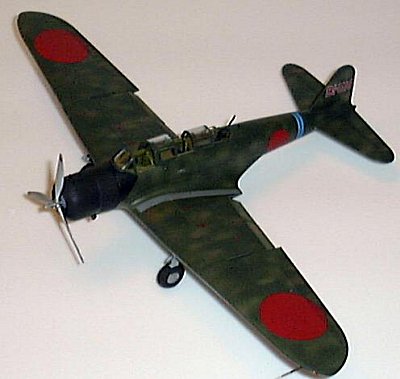
with good results. I then freehand mottled Floquil IJN Green on top
- giving it relatively heavy coverage, but allowing a little of the metal to
show through. I then went back and dappled in some Model Master Dark
Earth. I lightly oversprayed this with the IJN Green again, touching up
spots here and there with both colors until I was happy with the result. I
ended up having barely any Natural Metal showing on the topsides, but liked the
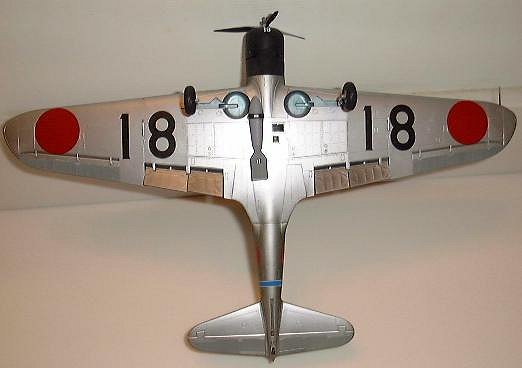
outcome so I left it. The fabric portions of the control surface
undersides were masked off and painted in IJN Gray. I masked and painted
the anti glare panel Flat Black, and painted the cowling (which I left off the
a/c while painting) at the same time. Alclad passed the masking test with
flying colors - I peeled off the regular masking tape I used on the control
surfaces, and no damage had been done. I handled this kit considerably
during the painting stages, and again NO blemishes of any kind. As a
confirmed Natural Metal scheme avoider, I am rethinking things now!
Alclad goes on ultra thin, but with the paint barrier underneath there is no
need to polish the plastic for a good finish - just be sure the major scratches
are out. The Alclad sprayed on beautifully using my Aztek airbrush.
I used two coats and covered the entire model. It was dry to the touch in
about 15 minutes. I elected not to polish it, but according to the
instruction this can be done. I imagine some SNJ powder could also be used
with good results. I then freehand mottled Floquil IJN Green on top
- giving it relatively heavy coverage, but allowing a little of the metal to
show through. I then went back and dappled in some Model Master Dark
Earth. I lightly oversprayed this with the IJN Green again, touching up
spots here and there with both colors until I was happy with the result. I
ended up having barely any Natural Metal showing on the topsides, but liked the
outcome so I left it. The fabric portions of the control surface
undersides were masked off and painted in IJN Gray. I masked and painted
the anti glare panel Flat Black, and painted the cowling (which I left off the
a/c while painting) at the same time. Alclad passed the masking test with
flying colors - I peeled off the regular masking tape I used on the control
surfaces, and no damage had been done. I handled this kit considerably
during the painting stages, and again NO blemishes of any kind. As a
confirmed Natural Metal scheme avoider, I am rethinking things now!
 I coated the painted upper surfaces with Model Master Gloss in preparation for
decaling. I used the kit's decals for an aircraft that flew off the Soryu
in the first wave of the Pearl Harbor attack. My past experience with
Hasegawa decals was that they were somewhat thick, and didn't settle down
particularly well. My last experience in using their decals, however, was
quite some time ago as I usually do not do out of the box schemes. These
decals certainly looked good on the sheet and this was a scheme I really wanted
to do. I started with the wingtop Hinomarus as I wasn't really sure how to
attack laying the decals over the natural metal surfaces. Based on my past
experiences, I used the Micro Scale method, putting down Micro Sol, then the
decal, then some Micro Set on top to snuggle it down. The decal turned
into a complete and utter mess, crinkling up and not settling down at all.
Remembering reading something about them having an adverse affect to setting
solutions (after the first decals were laid down of course), I peeled off the
two decals on the upper wings, and reapplied the second pair of Hinomarus with
no setting solutions added. Perfect! In fact the settled right into
all the panel lines with no coaxing at all.
I coated the painted upper surfaces with Model Master Gloss in preparation for
decaling. I used the kit's decals for an aircraft that flew off the Soryu
in the first wave of the Pearl Harbor attack. My past experience with
Hasegawa decals was that they were somewhat thick, and didn't settle down
particularly well. My last experience in using their decals, however, was
quite some time ago as I usually do not do out of the box schemes. These
decals certainly looked good on the sheet and this was a scheme I really wanted
to do. I started with the wingtop Hinomarus as I wasn't really sure how to
attack laying the decals over the natural metal surfaces. Based on my past
experiences, I used the Micro Scale method, putting down Micro Sol, then the
decal, then some Micro Set on top to snuggle it down. The decal turned
into a complete and utter mess, crinkling up and not settling down at all.
Remembering reading something about them having an adverse affect to setting
solutions (after the first decals were laid down of course), I peeled off the
two decals on the upper wings, and reapplied the second pair of Hinomarus with
no setting solutions added. Perfect! In fact the settled right into
all the panel lines with no coaxing at all.
Now the only problem was I had to find another set of meatballs for the underwings. With the first decals settling down so smoothly, I instantly got braver and started applying the decals on the natural metal surfaces. Again, they went down perfectly and looked great. Lesson learned: test a decal that you won't use somewhere else first, so you don't botch up decals you intend to use. After scrounging around in my decal box I found some Aeromaster Hinomarus and chose the closest size possible to apply under the wings. Just the opposite problem here. Loads and loads of setting solution - Sol underneath, Set on top, and more and more applications of Set, and still they didn't shrink into the panel lines nearly as neatly as the kit decals. Who would have thought Aeromaster decals would be trumped by out of the box ones? One minor glitch - there are some distinctive raised panels on the lower wings that are outlined in red - Hasegawa provides these outlines in decal form as one 'box' with clear film in the middle. Since I would be applying this decal over some prominently raised areas, I thought I would be clever and cut away the clear film. So I traced around it carefully with an Xacto, and when I soaked the decal I gently pulled away the excess clear. Trying to apply a thin hollow box outlined decal became an exercise in frustration. Were I to do it again, I would cut each side separately and apply them, rather than attempt to slide the whole decal onto the wing.
After giving everything a few days to settle in, I coated the topsides with Testors Dullcoat. Since the decals were flat to begin with, there was no need to overcoat the ones on the underside. One last point on the decals - even though the kit provides only two options, there are plenty of extra numbers and tail codes on the sheet that should help you make up just about any Kate that participated in the Pearl Harbor attack. A nice little unadvertised bonus courtesy of Hasegawa.
|
CONCLUSIONS |
 Another great release from Japan. With minimal effort a beginning modeler
can turn out a good looking product. Overall great fit, except for the
wing trailing edge/fuselage join, great decals, and excellent cockpit details.
Very happy with the kit and would definitely recommend it. The overall
quality of the kit allowed me to concentrate on an interesting paint scheme and
to try out the new technique (to me) of using Alclad II.
Another great release from Japan. With minimal effort a beginning modeler
can turn out a good looking product. Overall great fit, except for the
wing trailing edge/fuselage join, great decals, and excellent cockpit details.
Very happy with the kit and would definitely recommend it. The overall
quality of the kit allowed me to concentrate on an interesting paint scheme and
to try out the new technique (to me) of using Alclad II.
|
REFERENCES |
Famous Airplanes of the World No. 32, Burin
Do Co., Ltd, 1992.
Hawkins, Dr. M.F., Aircraft in Profile #141, Nakajima 'Kate', Doubleday
& Company, Inc., 1967.
Mikesh, Robert C., Monogram Close Up #14, Japanese Cockpit Interiors
Part 1., Monogram Aviation Publications, 1976.
Thorpe, Donald W., Japanese Naval Air Force Camouflage and Markings of World
War II, Aero Publishers, Inc., 1977.
Copyright ModelingMadness.com
If you would like your product reviewed fairly and quickly, please contact
the editor or see other details in the Note to
Contributors.
Back to Reviews Page 2020