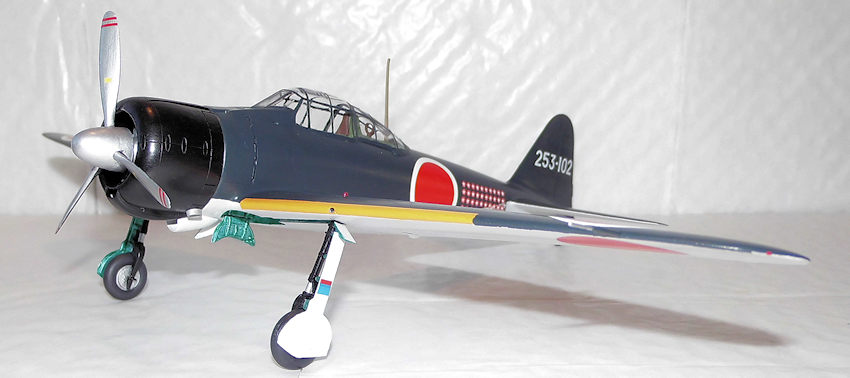
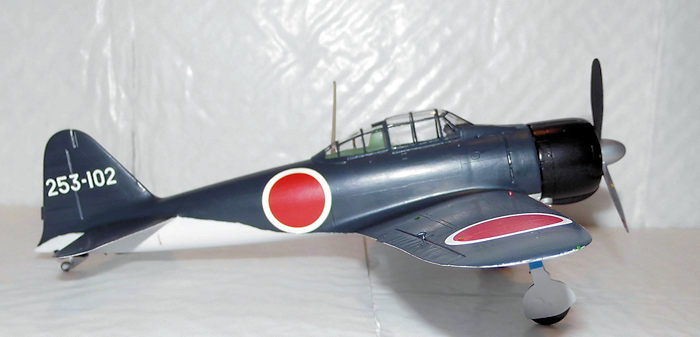
Tamiya 1/48 A6M2 Zero
| KIT #: | 61016 |
| PRICE: | |
| DECALS: | Five options |
| REVIEWER: | Nicolai Plesberg |
| NOTES: | 1973 issue – all Japanese instructions! |
| HISTORY |
Reisen. Zero-Sen. Zeke. Zero. Many names, but they were all referring to the same aeroplane: the Mitsubishi A6M Zero, that was the main fighter aircraft of the Imperial Japanese Navy Air Force (IJNAF) during the course of World War II, from its baptism of fire in the summer of 1940 in China, to the last desperate kamikaze attacks five years later.
Its requirement originated in the wish of a replacement of its predecessor, the Mitsubishi A5M then entering service. They called for a speed of 600km/h, a climb to 3000m in 3.5 min, an endurance with a drop tank mounted; of two hours at normal power and six to eight hours at economical cruising speed, an armament consisting of two 20mm cannons and two 7.7mm machineguns. Manoeuvrability should be at least equal to the A5M and the wingspan should not exceed 12 meters in order to ease carrier operation. On top of that it was demanded that all this should be accomplished with existing power plants, which turned out to be the Achilles heel of the design limiting future development. It turned out not to be an easy task to fulfil all these requirements, but Jiro Horikoshi, Mitsubishi’s chief designer, felt it was only if the aircraft was made as light as possible, that the requirements could be met. So every possible weight-saving measure was incorporated in the design and resulting in the exclusion of self-sealing fuel tanks as well as protection for the pilot made the new Mitsubishi fighter very vulnerable to enemy fire.
The prototype, designated A6M1, flew on April 1 1939 with a Mitsubishi Zuisei 13 engine of 780 hp, but it was found to be a bit underpowered, so for production aircraft the Nakajima Sakae 12 of 950 hp was adopted and the aircraft exceeded all design specifications.
Due to the fact that the A6M2 entered service in the Japanese
year 2600, it was officially designated Type 0 Carrier Fighter, the 0
came from the last digit of the Imperial year it entered service (2600)
hence the Imperial Navy type designation Reishiki
Kanjo sen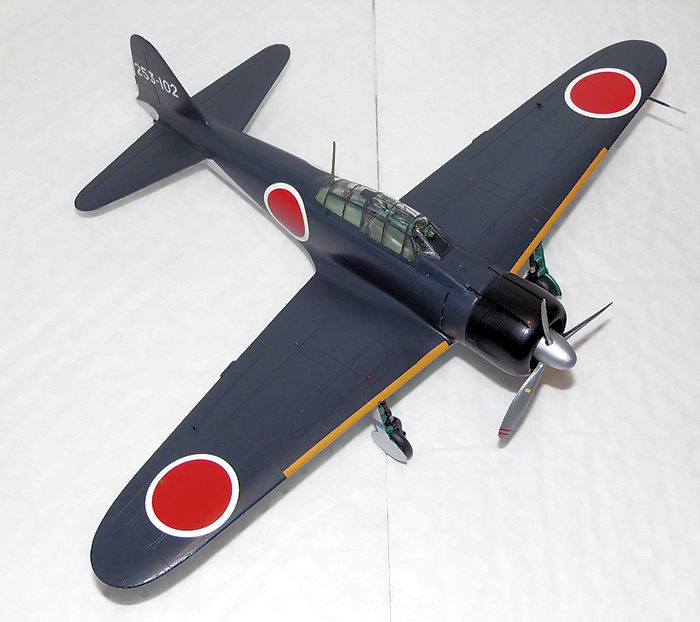 toki,
or Reisen, meaning “zero fighter”; the fighter that
entered service in the 0th
year. Japanese pilots most commonly called it
Zero-sen,
where sen
is the first syllable of the word
sentoki
meaning fighter in Japanese. When the Allies introduced the system of
codenames to easily identify Japanese aircraft, the A6M was given the
codename of “Zeke”, though it actually became more commonly known as the
“Zero” to millions of its opponents.
toki,
or Reisen, meaning “zero fighter”; the fighter that
entered service in the 0th
year. Japanese pilots most commonly called it
Zero-sen,
where sen
is the first syllable of the word
sentoki
meaning fighter in Japanese. When the Allies introduced the system of
codenames to easily identify Japanese aircraft, the A6M was given the
codename of “Zeke”, though it actually became more commonly known as the
“Zero” to millions of its opponents.
The A6M2 entered, as mentioned above, service in the summer of 1940 over China where it received the reputation as being a fearsome opponent. It simply eliminated all air opposition as if none had existed, something that Gen. Claire Chennault, commander of the Flying Tigers volunteer force, forcefully reported to Washington, but his reports were read with disbelief and considered in error until after the attack at Pearl Harbor had occurred. In the first months of the Pacific War, the Zero, along with its experienced pilots were generally victorious against US fighter aircraft. However, slowly the Allied pilots gained some equality by the introduction of new tactics, such as “Thach Weave”, then especially Wildcat pilots gained victories against the Zero, until newer and much superior aircraft, namely the F6F Hellcat and F4U Corsair, replaced Wildcats and other obsolete designs, which had been easy meat for the Zero. When that happened the combat losses of Zeros almost skyrocketed, since it only took a few rounds of .50 cal ammunition to destroy a Zero; either hitting the fuel tanks the Zero would literally burst into a fireball immediately or killing the pilot, the plane would also go down.
Approximately 3600 A6M2 Zeros were produced not only by Mitsubishi but also under licence, by Nakajima, who built the majority of the type. Later variants pushed the total produced number of Zeros up to almost 11000 which makes the Zero the most produced Japanese warplane of World War II.
Tetsuzo Iwamoto
was one
of the top scoring aces of the IJNAF of WWII. Joining the Imperial Navy
in 1934, he completed pilot training in December 1936 and his combat
career commenced over China in 1938. He emerged from that conflict as
the top scoring naval ace, being credited with 14 victories. When the
Pacific War broke out in December 1941, Iwamoto flew Zeros from the
aircraft carrier Zuikaku including in the Battle of the Coral Sea in May
1942. From late 1943, Iwamoto’s air group was sent to Rabaul and
involved in the most intense air battles with Allied air forces for
three months; it was also h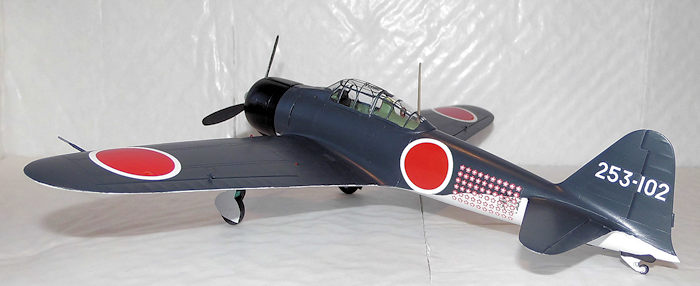 ere that he scored most of his victories.
Subsequent assignments were Truk Atoll and the Phillipines, but when
these had to be evacuated following the defeat at the Leyte Gulf battle
in October 1944, Iwamoto was reassigned to defence of the home islands
and also the training of kamikaze pilots.
ere that he scored most of his victories.
Subsequent assignments were Truk Atoll and the Phillipines, but when
these had to be evacuated following the defeat at the Leyte Gulf battle
in October 1944, Iwamoto was reassigned to defence of the home islands
and also the training of kamikaze pilots.
Like many Japanese veterans, Iwamoto was reported to have fallen into depression after the war. After his death in 1955, his diary was found with claims of 202 Allied aircraft destroyed. To verify this, two Japanese historians, Dr. Yasuho Izawa and Professor Ikuhito Hata, tried to reckon this figure around 80 or 87+ victories in their research work in January 1971. However, after more than 20 years of research, Dr. Izawa concluded, that Iwamoto was virtually the top ace of the IJNAF.
An interesting note should be made here: according to his diary, Iwamoto scored no less than 48 victories (one unconfirmed) over the F4U Corsair. Should this claim be accurate it would mean, that Iwamoto personally would have killed 25 percent of all F4U’s lost in combat in WWII meaning he was one of the best of the Japanese pilots to kill the Corsair if not the best, presuming no other Japanese pilot achieved more Corsair kills than Iwamoto!
| THE KIT |
This is the old tool Tamiya Zero kit from the early 1970s, which in its day was indeed a very accurate rendition of the most famous Japanese combat aircraft of World War II. It features a mix of raised as well as engraved panel lines (most of the latter actually) and 51 parts in grey plastic and 5 parts in clear.
As
this kit appeared to be from one of the first batches exported to Denmark,
its instructions were only in Japanese, so that initially presented a
problem especially regarding the painting instructions, as I
 don’t speak or
read Japanese; however, the solution came right up, since during one of my
shopping sessions at Hannants my Dad had delivered a list of items, that he
wanted with, among them was a reissue of the old tool Tamiya Zero kit with a
modern multiple language instruction sheet. As soon as the package arrived
at my place, I took the instruction sheet from the Zero kit and simply
copied it on my multi-function-printer. As I also discovered in the reissue
was that the biggest change seemed to be the gun sight (part A17 in my kit)
had been included on the clear sprue in the reissued kit. The decal options
were exactly the same in the two kits (impressive!) among them being the
plane of ace Saburo Sakai when he was stationed at Denpasar with Tainan Air
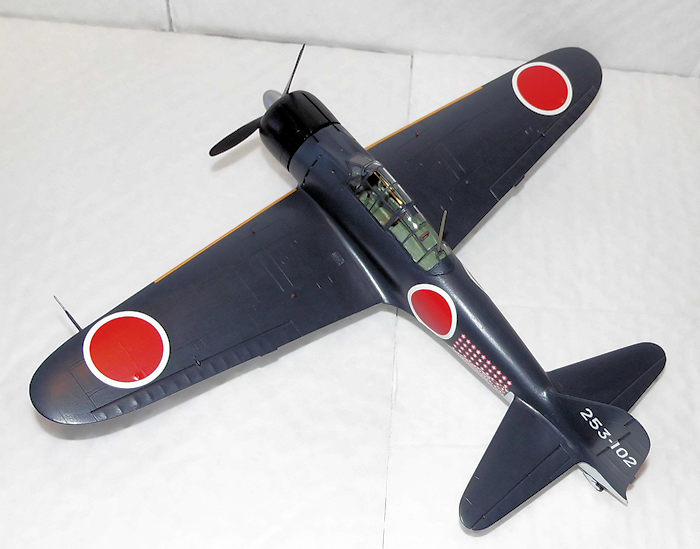
Group in February 1942 and the plane of ace Tetsuzo Iwamoto when he was with
the 253rd
Air Group at Tobera, Rabaul in January 1944. As being a fan of aces
aircraft, I decided to model Iwamoto’s Zero.
don’t speak or
read Japanese; however, the solution came right up, since during one of my
shopping sessions at Hannants my Dad had delivered a list of items, that he
wanted with, among them was a reissue of the old tool Tamiya Zero kit with a
modern multiple language instruction sheet. As soon as the package arrived
at my place, I took the instruction sheet from the Zero kit and simply
copied it on my multi-function-printer. As I also discovered in the reissue
was that the biggest change seemed to be the gun sight (part A17 in my kit)
had been included on the clear sprue in the reissued kit. The decal options
were exactly the same in the two kits (impressive!) among them being the
plane of ace Saburo Sakai when he was stationed at Denpasar with Tainan Air
Group in February 1942 and the plane of ace Tetsuzo Iwamoto when he was with
the 253rd
Air Group at Tobera, Rabaul in January 1944. As being a fan of aces
aircraft, I decided to model Iwamoto’s Zero.
| CONSTRUCTION |
I began construction by gluing wing and cowling pieces together and partially the interior bits. Only the seat and instrument panel was omitted to ease the painting and attaching the instrument panel decal as well. The propeller / spinner were also glued together at this stage. Some filling and sanding was necessary to get smooth and invisible seams, but as soon as that had been dealt with the interior parts were readied for paint (i.e. washed).
The color I chose for the interior was Humbrol 120 Light Green, which I must say look indeed very close a rendition of the Mitsubishi Interior Green the original was painted with. After the obligatory two layers, I cut out some Tamiya masking tape as seatbelts, got them painted in suitable colors and glued the seat in place. The instrument panel decal went on next, when dry secured with Humbrol Matt Cote and the finished instrument panel glued to the interior. After some detail painting the interior was glued into the left fuselage half; then the fuselage was glued together.
When the fuselage had dried, filling and sanding sessions were employed to eliminate the seam line; then wings and tail planes were glued in place needing only light seam treatment when dry – the fit on this kit is absolutely compatible with modern kits. In the course of sanding the fuel filler cap in front of the windscreen had virtually disappeared, but a round piece of Tamiya tape corrected that easily.
The engine and propeller was next; the engine was painted burned metal (cylinders) while crankcase went silver and ignition wires were dry brushed with black together with cylinder heads. Propeller and spinner went silver; the backside of the blades went flat black and the cowling was painted satin black both on the outside as well as the inside. The exhaust stubs were glued onto the cowling then painted metallic grey (Humbrol 56).
 To
finish the cockpit, the headrest and DF loop was painted red brown (Humbrol
160), while the antenna mast went natural wood (Humbrol 110). The green
color was of course also touched up where necessary. The gun sight was
modified by cutting off the reflector plate and replacing it with one made
from transparent material. The gun sight was then painted flat black and
glued in place; touch up with the black was necessary and, together with the
part of the instrument panel shroud which would be covered by the
windscreen, was also painted black at the same time.
To
finish the cockpit, the headrest and DF loop was painted red brown (Humbrol
160), while the antenna mast went natural wood (Humbrol 110). The green
color was of course also touched up where necessary. The gun sight was
modified by cutting off the reflector plate and replacing it with one made
from transparent material. The gun sight was then painted flat black and
glued in place; touch up with the black was necessary and, together with the
part of the instrument panel shroud which would be covered by the
windscreen, was also painted black at the same time.
The DF loop and antenna mast were then glued in place; canopy was inserted on top to ensure correct alignment of the mast, while it dried. The canopy had a few scratches, which were polished out with toothpaste and then cleaned with soap and water, which then was wiped off with an antistatic cloth and glued on top of the cockpit with Humbrol Gloss Cote. The propeller also got the Gloss Cote touch because of the decals that would enhance it.
While all this dried, I removed all parts of the gear including the doors from the sprues and cleaned them up. The few ejector pin marks, that were present, were filled and sanded smooth when dry. The gear legs were painted satin black, oleos went silver together with the wheel hubs and gear bays. Tires went black (Xtracolor X505).
The decals went on the prop blades, they worked fine maybe because I had given them a thin layer of Mr. Metal Primer to prevent them to break up in water, because one of the Hinomarus looked suspicious on the sheet. After they had dried they were Gloss Coted together with the gaps around the canopy were filled with gloss, which was sanded with a light hand once dry. Then the engine was glued to the fuselage and before the glue was dry, I dry fitted the cowling to make sure that the engine didn’t dry in a position to make attaching the cowling later impossible!
Now
I was forced to do something that I don’t do very often: namely to mix
colors! The trouble was that the gear bays should be painted in that blue
green primer, which the Japanese used as a protective primer to prevent
corrosion. As I’ve read about the primer, called aotake iro, it was actually
a transparent blue green lacquer painted directly on the bare metal. How do
you reproduce that on a model? Simple! You paint the surface bare metal as
I’ve already described. Then I took my transparent blue color (Model M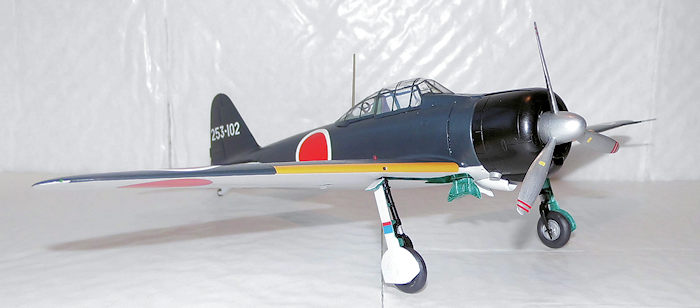 aster
4658) and the transparent green color (Vallejo 70936) and mixed a few drops
of each in a ratio of 1 to 1 in an empty and cleaned potlet, from an Airfix
gift set that included potlets of acrylic paint. However, the result was not
satisfying; it still looked too green to my eyes so I added more clear blue,
until I was satisfied it had the right suitable blue greenish tint to it.
Then it was applied in one layer to the gear bays as well as the inner side
of the gear doors. The effect was startling, simply a superb finish!
aster
4658) and the transparent green color (Vallejo 70936) and mixed a few drops
of each in a ratio of 1 to 1 in an empty and cleaned potlet, from an Airfix
gift set that included potlets of acrylic paint. However, the result was not
satisfying; it still looked too green to my eyes so I added more clear blue,
until I was satisfied it had the right suitable blue greenish tint to it.
Then it was applied in one layer to the gear bays as well as the inner side
of the gear doors. The effect was startling, simply a superb finish!
The engineering of the gear and bays meant that it would be a good idea to paint the underside color around the gear bays before attaching the gear, as was the case with the outer side of the doors! Also, discovered with the dry fit of the cowling to the fuselage, I decided to paint a small strip of the fuselage front edge (with cowling removed!) also to prevent touching the cowling with the green color for the upper surfaces!
After those things were accomplished the gear was assembled and after the inevitable touch up sessions the whole airframe was cleaned and after drying the gear plus doors and other smaller details were glued in place before the model went to the paint shop.
| COLORS & MARKINGS |
Before I began the big paint job, I painted the windscreen frames flat black so that it would show through the green color they would be painted in soon. The under surfaces were painted in an old Humbrol Authentic Colour called HJ.2 A/N.2 Grey. Four layers were required before the coverage was perfect although it could also be the fact, that I had to stir vigorously well and pour some (maybe too much) Humbrol Enamel Thinners in it caused the not so well coverage in the first place.
The sides and all upper surfaces were painted with the second Humbrol Authentic Colour Enamel that I used for this project, called Green N.1 / HJ.1 Green, which would be identical to IJN Green. This color was apparently in better shape, because I don’t recall that I used thinners for this one or at least very little, and it stirred out more easily so two layers were sufficient to get a satisfactory coverage. Just for the fun of it, I compared the IJN Green with RLM 70, because I initially thought they looked much the same, but in the end it turned out that IJN Green is definitely lighter and with an obvious bluish tint to it; RLM 70 is much greener and darker than IJN Green.
The
next thing to do was to mask off the leading edges for the yellowish
identification bands attached to Japanese aircraft from the su mmer of 1943.
The color used for this, was the one specified in the instructions of two
1/72 Hasegawa Zeros, I build in parallel to this one, namely H24 Orange
Yellow from Mr. Hobby (formerly Gunze Sangyo) Aqueous Hobby Color. Being
water based it was a nice relief compared to the first two smelly colors,
but it took three layers before the coverage was satisfying and removing the
masking tape immediately after the third layer had been applied.
mmer of 1943.
The color used for this, was the one specified in the instructions of two
1/72 Hasegawa Zeros, I build in parallel to this one, namely H24 Orange
Yellow from Mr. Hobby (formerly Gunze Sangyo) Aqueous Hobby Color. Being
water based it was a nice relief compared to the first two smelly colors,
but it took three layers before the coverage was satisfying and removing the
masking tape immediately after the third layer had been applied.
I then had to deal with the demarcation lines. Obviously when that happens touch up will be necessary and as I was bound to touch up the IJN Green as well, I took the opportunity to correct a slight mistake, namely that the IJN green color actually goes around the leading edges of the outer wing sections, so more masking tape was used in order to get the paint job done correctly. The pitot probe was actually also glued in place at this stage because some of it would also be painted IJN green. During the touch up session with the green color I accidentally got a splash of paint out on one of the orange yellow edges. Taking a cotton bud moisted with thinner, I carefully tried to remove the green splash only to find out that the thinner also removed the orange yellow color! I have tried before to remove enamel splashes from dried acrylic colors (namely Humbrol acrylics) with thinners, but in this case it didn’t work out! Anyway it didn’t matter because I also had to touch the under surface color up as well so one more color to redo, too….well…
After all that touch up had been done and also after a mixing session with my aotake iro brew, as I ran out, the whole model was given a coat of Humbrol Gloss Cote to prepare for the decals. At this stage I found a convenient handle in the engine which had been glued in place earlier!
The decals worked okay although they were a little stiff, presumably caused by the layer of Mr. Metal Primer, that I had given them in order to make sure they stayed together when soaking them in water. Some of the Hinomarus did break up, but mostly at the edges so touch up with white paint became necessary but of course done when the decals had dried. Also touch up with red became necessary but that was also done post decaling. When decals and touch ups had dried they were given a Gloss Cote; when dry the whole model was given Humbrol Matt Cote since aircraft in the Pacific quickly bleached under the sun and didn’t look clean and shiny for very long.
The last things to be attached were the cowling, arrester hook, air intake under the engine, the propeller and last paint jobs (among them the remaining canopy framing) and the position lights the model was finished.
| CONCLUSIONS |
Well a 40+ years or so old model, but it does make an accurate representation of Japan’s most known combat aircraft of WWII. It’s also value for money since the newer Tamiya tool Zero (for example) do have much more petite detail in especially cockpit and engine, but costs three or four times as much as the old one. Nevertheless the old tool Tamiya Zero is definitely worth building if you have it, even if you’re a relative beginner, because there are no really traps or anything difficult by constructing this kit. You can, of course, buy aftermarket bits to dress up the engine and cockpit, but I found it satisfying without the aftermarket bits which just would make things more expensive.
| REFERENCES |
The Illustrated Encyclopedia of Combat Aircraft of World War II By Bill Gunston, Tiger Books International PLC, London 1990, ISBN 1-85501-096-8
Profile Publications no 129: The Mitsubishi A6M2 Zero-Sen, René J. Francillon, Ph.D. ,1966
http://en.wikipedia.org/wiki/Mitsubishi_A6M_Zero
http://en.wikipedia.org/wiki/Tetsuz%C5%8D_Iwamoto
6 September 2016 Copyright
ModelingMadness.com
If you would like your product reviewed fairly and fairly quickly, please contact the editor or see other details in the Note to Contributors.