Hasegawa 1/48 A6M1 12-shi experimental Zero fighter
|
KIT #: |
09840 |
|
PRICE: |
$35.15 from Great Models
|
|
DECALS: |
Two Options |
|
REVIEWER: |
Bill Koppos |
|
NOTES: |
|
Born to Be Bad
Planning an aggressive war of expansion across far-flung regions, the
Japanese Navy was looking for an air-superiority fighter with extreme long range
capabilities. The specification 12-shi included range and armament
requirements that scared off all bidders except one-Mitsubishi, with talented
head designer Jiro Horikoshi leading the team. The new airframe was built with
lightness paramount, as with the available engines the specs could only be met
if every spare ounce was pared off. Extra-Super-Duralumium, an ultra light new
alloy, was employed in the main spars. Pilot armor was not considered. To keep
fuel capacity at a maximum, no fuel tank protection was used, and a droppable
underbelly fuel tank planned from the start. Watching European developments, the
J.N. required 20 Millimeter Cannon main armament. One was planned for each wing,
along with the usual 2 7.7 machine guns. Wanting to use a company engine, the
Mitsubishi Zuisei 13 powerplant of 870 hp was installed in the machine. As
there was no airfield adjacent to the factory, the aircraft had to be
disassembled and transported (allegedly by oxcart!) 25 miles to Kagamigahara
airfield in Nagoya. Mitsubishi's legend first took to the air on 1 April 1939.
 Except
for top speed, the fledgling fighter performed well, exceeding the 12-shi
rquirements. One problem was a dangerous vibration, another poor lateral
stability.A second slightly modified prototype was added to the test
program, this crashed without explanation, but testing went on. The
vibration problem went away when a three bladed propeller replaced the
original two blade unit, the stability fixed by lengthening the fuselage and
redesign of the rudder and stabilizers slightly. The more powerful, but
Nakalima designed Sakae 12 engine solved the speed problem. Thus appeared
the familiar Zero-Sen, conqueror of the Pacific.
Except
for top speed, the fledgling fighter performed well, exceeding the 12-shi
rquirements. One problem was a dangerous vibration, another poor lateral
stability.A second slightly modified prototype was added to the test
program, this crashed without explanation, but testing went on. The
vibration problem went away when a three bladed propeller replaced the
original two blade unit, the stability fixed by lengthening the fuselage and
redesign of the rudder and stabilizers slightly. The more powerful, but
Nakalima designed Sakae 12 engine solved the speed problem. Thus appeared
the familiar Zero-Sen, conqueror of the Pacific.
Been waiting for this one since Hasegawa released the all-Zero
boxed set that included all their Zeroes and two new ones, the two seat
trainer AND the 12-shi prototype. I never even saw this set, never mind
being able to afford it, so the wait was worth it. Six sprues are in the
box, one of which is clear, one a new 12-shi cowling and one containing the
new fuselage halves which are the prototype's main di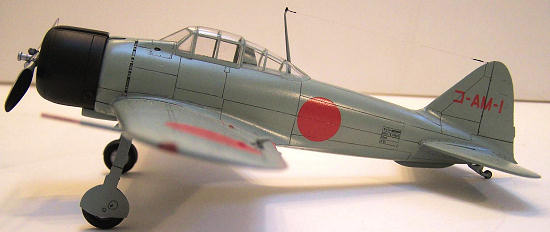 fference.
Sprue V has new stabilizers, scoops for the first or second versions, the
Zuisei 13 engine, and the neat 2 blade prop. Decals are provided to
represent either of the first two A/C.
fference.
Sprue V has new stabilizers, scoops for the first or second versions, the
Zuisei 13 engine, and the neat 2 blade prop. Decals are provided to
represent either of the first two A/C.
Now that it's in my little hands, I
realize how little information is available on the Mother of all Zeroes.
I've never seen a photograph, and publications over the ages have different
takes on how it looked. My ancient Arco-Aircam book has it in blaze Orange,
with a "2" on it's tail. Other sources say grey, now I'm told Mr. Horikoshi
said it was "Ash Green" on roll out. Hasegawa calls for "grey green". I am
left with several questions on mechanics. All feature a scoop on top of the
cowl, where this Hasegawa kit does not. Two types of under fuselage fin
strakes are given, neither of which looks like a tail hook. The box art
features the obvious headrest of all Zero models, but the assembly plans
ignore it, and the parts on the sprue layout indicate "not used". Huh?
Hasegawa is a great outfit, but can sometimes leave me scratching my head.
 Let's cut sprue on a prototype. After drilling out the lightening holes in
the seat, all the cockpit parts were painted Tamiya "cockpit green", gloss
coated, and the kit decals used for the instruments. They fit well. I find
Hasegawa Zeroes all have the seat too far forward, move it back some by
trimming the mounting lumps underneath. It should be about an eighth of an
inch from the bulkhead. After detail painting a black wash was applied to
the areas, and then assembled. I left out the machine gun butts parts E34
and E35 and the gunsight as I assumed (uh.oh) a first prototype would not
yet be armed. Fuselage and wing assembly, with it's wheel well insert, fit
well with minimal seam cleanup. .At this point I decided to put on the
controversial headrest as carrier planes needed such things. I hope the
plans were in error.
Let's cut sprue on a prototype. After drilling out the lightening holes in
the seat, all the cockpit parts were painted Tamiya "cockpit green", gloss
coated, and the kit decals used for the instruments. They fit well. I find
Hasegawa Zeroes all have the seat too far forward, move it back some by
trimming the mounting lumps underneath. It should be about an eighth of an
inch from the bulkhead. After detail painting a black wash was applied to
the areas, and then assembled. I left out the machine gun butts parts E34
and E35 and the gunsight as I assumed (uh.oh) a first prototype would not
yet be armed. Fuselage and wing assembly, with it's wheel well insert, fit
well with minimal seam cleanup. .At this point I decided to put on the
controversial headrest as carrier planes needed such things. I hope the
plans were in error.
The machine gun insert in front of the windscreen needed some minor
filling work. Sonofagun, ready for paint already! I would recommend the
Hasegawa Zeroes as a first kit for anyone.
Controversy again. I decided to go with Jiro Horikoshi's memory
and use "Ash green" For this I went with Model Master's Japanese Army Light
Green, which is close to Tamiya's new J.N. Green/Grey. (I hate using Acrylic
paints unless absolutely
 necessary).
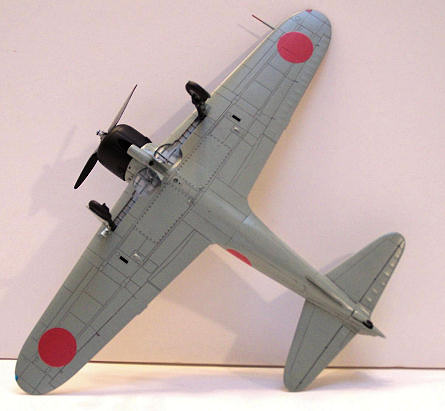
I applied this straight, no shading of any kind, as we are dealing with a
brand new kite here. I sprayed the interiors of the landing gear doors and
wheel wells aluminum, then gritting my teeth, oversprayed with Tamiya Clear
green/Blue Acrylic, mixed thin. This represents the "Aotake" preservative
well to my eyes. The cowling was sprayed flat black, and all oversprayed
with Testor's Metallizer Sealer as a glosscoat prep for decals.
necessary).
I applied this straight, no shading of any kind, as we are dealing with a
brand new kite here. I sprayed the interiors of the landing gear doors and
wheel wells aluminum, then gritting my teeth, oversprayed with Tamiya Clear
green/Blue Acrylic, mixed thin. This represents the "Aotake" preservative
well to my eyes. The cowling was sprayed flat black, and all oversprayed
with Testor's Metallizer Sealer as a glosscoat prep for decals.
Decals are done by Cartograph. They are a bit thick but work OK,
settling down with light application of Solvaset. The wingroot "NoStep"
stripes were a bit fiddly, but I got 'em. I laid on a panel line wash of my
sludge mix, and brought it back to the assembly hall.
 I glued the engine assembly on, and after some drying time attempted to put
the cowling over it. I found it very tough to get over the engine, and after
a couple of minutes the front part of the engine came off. Did I do
something wrong? Taking the thing apart, I thinned out the areas of the cowl
flaps that I noticed were too thick anyway. Leaving the engine loose in the
cowling, I applied glue to the rear of it, and installed the cowl and engine
at the same time, lining everything up until the glue set. Tricky.
I glued the engine assembly on, and after some drying time attempted to put
the cowling over it. I found it very tough to get over the engine, and after
a couple of minutes the front part of the engine came off. Did I do
something wrong? Taking the thing apart, I thinned out the areas of the cowl
flaps that I noticed were too thick anyway. Leaving the engine loose in the
cowling, I applied glue to the rear of it, and installed the cowl and engine
at the same time, lining everything up until the glue set. Tricky.
Landing legs were sprayed black, with silver hydraulic rods.
Gear doors were attached to them, then installed. Now everything got another
Metallizer Sealer coat, left glossy for that "new plane" look. The canopy
work starts now, (the part of WW2 models I hate). These were really hard to
mask using my usual method of placing Tamiya tape on the area to be done,
then cutting on the frame lines with a new #11 blade, due to the very
lightly engraved lines on the moldings. So I decided to cheat. I cut long,
thin strips of tape and laid them out along the frame lines, first the
vertical ones, then BRUSH painted them. After these dried the tape was
removed and the horizontals done the same way. It got a bit hairy on the
curved bits and really was just as aggravating as regular masking, but
finally it was job done. A set of Eduard masks would come in very handy
here, if they are available.
I sealed the decals and wash in with another coat of sealer,
then installed the canopy parts with white glue. They fit well. The sliding
portion WILL go over the back glass if desired, but I closed my canopy as I
thought it looked sleeker that way. I then installed the antenna, it's wire
of 2 pound fishing line, and pitot tube. Very important for testing to know
the airspeed, right?
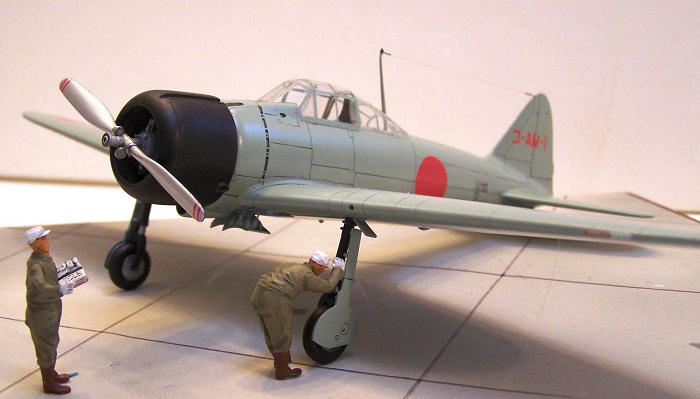
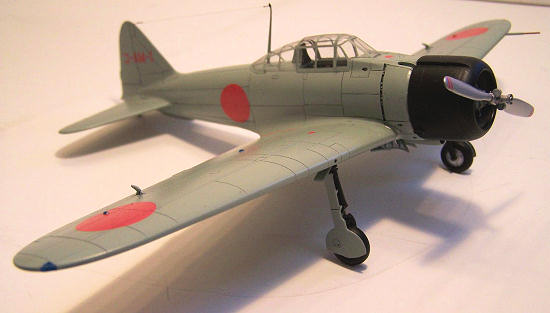 Nice. Actually a typical Hasegawa Zero, a very easy build except perhaps for
the fiddly cowling. I absolutely cannot say if it looks right or not,
because I've never seen the real thing. On this one we are totally dependent
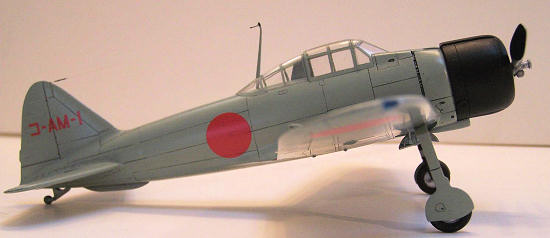
on Hasegawa's sources. On it's own though, I think it is a nice-looking
plane. Very clean of line, the shorter tail and 2-blade prop gives it a real
"early monoplane" look. One can see how the early reports of Zero encounters
referred to them as "Seversky-type" fighters. Recommended as an easy model
if one wants a break from a huge project, or just a good looking airplane
model.
Nice. Actually a typical Hasegawa Zero, a very easy build except perhaps for
the fiddly cowling. I absolutely cannot say if it looks right or not,
because I've never seen the real thing. On this one we are totally dependent
on Hasegawa's sources. On it's own though, I think it is a nice-looking
plane. Very clean of line, the shorter tail and 2-blade prop gives it a real
"early monoplane" look. One can see how the early reports of Zero encounters
referred to them as "Seversky-type" fighters. Recommended as an easy model
if one wants a break from a huge project, or just a good looking airplane
model.
Kit courtesy of my ever-expanding budget deficit.
A6M Zero in Action Squadron/Signal Pubs. A/C # 59
A6M1/2 2N Zero-Sen Arco-Aircam No. 18 1970! (Gad this thing
is old)
Wikepedia
Bill Koppos
March 2009
If you would like your product reviewed fairly and quickly, please
contact
me or see other details in the
Note to
Contributors.
Back to the Main Page
Back to the Reviews Index Page