| KIT #: | 80288 |
| PRICE: | $11.99 |
| DECALS: | Two options |
| REVIEWER: | Brian Baker |
| NOTES: | Easy assembly kit |
| HISTORY |
The Mitsubishi A5M series was the first carrier fighter type that represented original Japanese design thinking, as previous aircraft were usually influenced by foreign influences. In 1934, the Navy issued a specification for a high performance fighter, and of several competing designs, the Mitsubishi offering, under the direction of Jiro Horikoshi, appeared in 1935 with inverted gull wings, while later prototypes used the now famous elliptical wings . The upgraded prototype prompted the Army to order the type as the Ki-18, but the type was eventually rejected in favor of the Nakajima Ki-27 “Nate” fighter. Following flight tests, which revealed excellent flying characteristics, large scale production orders were received, with later models being manufactured until 1940.
 The
production breakdown is as follows:
The
production breakdown is as follows:
A5M1 had a two bladed prop and cut down rear fuselage, with a rollover pylon behind the cockpit.
A5M2a (early) cut down fuselage as A5M1, with pop-up rollover pylon
A5M2a (late) Raised fairing behind the cockpit, similar to later A5M4’s.
A5M2b (early) Enclosed cockpit, but also flown without the canopy.
A5M2b (late) Open cockpit. Looks like A5M4.
A5M3 Two prototypes built, powered by a French Hispano Suiza 12 cylinder liquid cooled engine, with 20 mm cannon firing through prop hub. Not produced, because they didn’t want to depend on foreign supplier for engines.
A5M4. Large scale production model with minor changes, but basically similar to late model A5M2b’s.
The A5M2 and A5M4 fighters were sent to China in 1938, where they operated as long range fighters against a disorganized Chinese Air Force, flying a motley collection of older fighters, including American, British, French. Russian, and Italian types. The highly trained Japanese Navy pilots did well against the Chinese, but early in the war, the Navy switched its operations to the Pacific, and the A5M’s were gone by 1942. By 1941, the development of the A5M’s successor, the A6M2 “Zero” resulted in the Zero becoming the standard Japanese carrier-based fighter, with the A5M’s taking little part in post Pearl Harbor actions, except for a brief attack on Davao early in the war. By this time, most of the A5M’s had been issued to training units, and a two seat training variant was produced in small numbers. As the war approached its conclusion, most remaining A5M’s were expended in Kamikaze attacks against ships off the coast of Japan.
I’ve seen photos of several A5M’s that survived the war in various stages of disrepair, but, unfortunately, none is known to have survived the scrapping frenzy that followed the war. But during its time, it was one of the world’s best carrier fighters, and it allowed the Japanese Navy to achieve air supremacy over China early in the war.
| THE KIT |
This is the third kit of this aircraft to appear in 1/72 scale. First was the old Nichimo kit, labeled as an A5M4, which has to date back to the mid seventies. I have one I built in 1976, and I don’t think it was a new kit even then. In 1996, Fujimi produced a kit of the A5M2b, which of course, could be built either as that model or the A5M4. It is probably the best kit to date of this aircraft, with excellent detail and an accurate outline. I have one of these, but haven’t yet built it. Then, about a year ago, Hobby Boss issued its version, identifying it as an A5M2. It is one of those easy assembly kits, with around 20 parts molded in light grey styrene.
 The kit
is well molded, with very little flash, and packed to survive a nuclear
explosion, with parts wired to cardboard sheets and some packed in foam. Hobby
Boss has been noted for this, and although it takes wire cutters to get at the
parts, they always emerge undamaged. There are some questions as to the accuracy
of the outline of the kit, especially on the engine cowling, which should be
much more bulbous than it is. The engine facing looks a little strange. The
cockpit interior consists of a floor, seat, and control stick, with no
instrument panel. The exterior panel lines are nicely done, and the join lines
on the fuselage are easy to hide with a little sanding and scraping. I didn’t
need any putty at all.
The kit
is well molded, with very little flash, and packed to survive a nuclear
explosion, with parts wired to cardboard sheets and some packed in foam. Hobby
Boss has been noted for this, and although it takes wire cutters to get at the
parts, they always emerge undamaged. There are some questions as to the accuracy
of the outline of the kit, especially on the engine cowling, which should be
much more bulbous than it is. The engine facing looks a little strange. The
cockpit interior consists of a floor, seat, and control stick, with no
instrument panel. The exterior panel lines are nicely done, and the join lines
on the fuselage are easy to hide with a little sanding and scraping. I didn’t
need any putty at all.
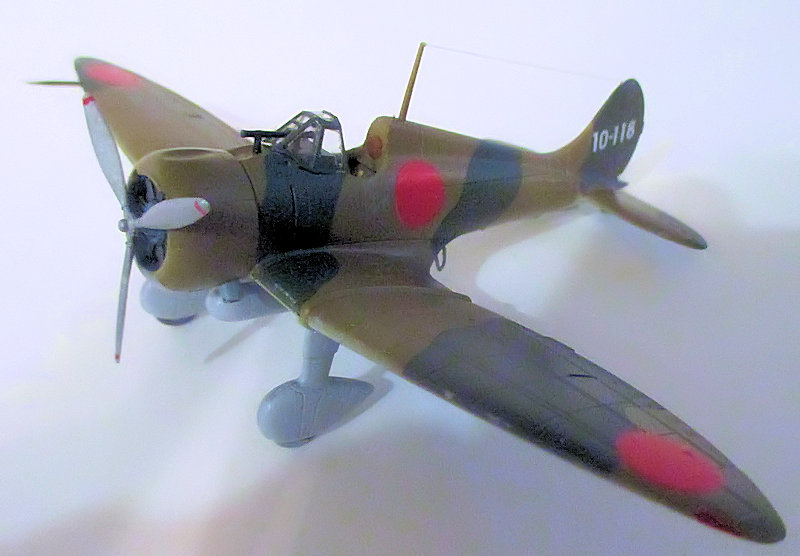
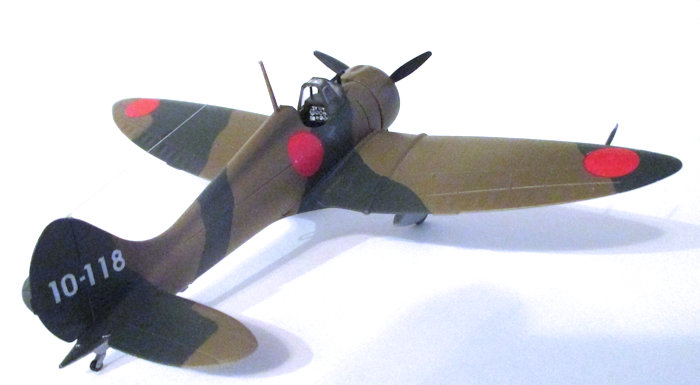
Hobby Boss instructions are pretty standard. They are in color, with a fine flying photo of the silver fighter over scattered cumulous with some buildups in the background. The prop shows movement, but there is no pilot in the cockpit. Maybe it is a drone. The inside pages have a sprue diagram and an exploded drawing demonstrating how the kit goes together. A trained monkey could follow these instructions. The back page has two four-view color drawings of two aircraft, none of which is identified as to unit, location, date, or anything that tells anything about the airplane. Colors and decal locations are clearly shown.
| CONSTRUCTION |
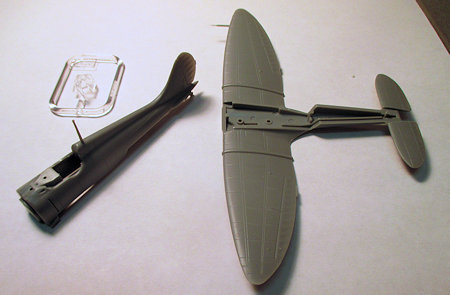
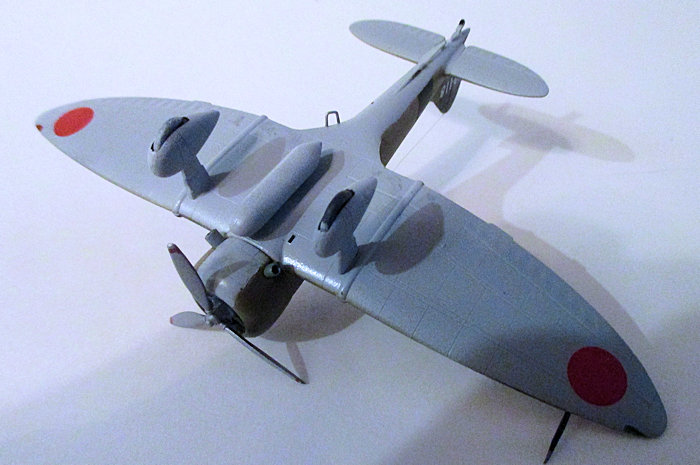
The
kit goes together easily, as one would expect for this kind of kit. After gluing
the seat in place, and installing the control stick, the cockpit unit fits into
its position in the front of the lower fuselage half. This part also has the
wings and horizontal tail surfaces, so thes e
have no alignment problems. After painting the cockpit interior (The
instructions say to paint them H126 cockpit color, whatever that is) the
fuselage parts can be glued together with a drop of glue on three little
receptacles. I also ran some glue alongside the fuselage at the join line, and
put a couple of heavy clamps on them until the glue set up. The engine cowling
is a rather interesting proposition, with the outer cowl, an insert that
contains the two exhaust stacks, and a hole in front for the prop shaft and
retaining ring. I painted the cowling, prop, and engine first, and waited until
I had painted the rest of the airframe before attaching it to the firewall of
the airplane.
e
have no alignment problems. After painting the cockpit interior (The
instructions say to paint them H126 cockpit color, whatever that is) the
fuselage parts can be glued together with a drop of glue on three little
receptacles. I also ran some glue alongside the fuselage at the join line, and
put a couple of heavy clamps on them until the glue set up. The engine cowling
is a rather interesting proposition, with the outer cowl, an insert that
contains the two exhaust stacks, and a hole in front for the prop shaft and
retaining ring. I painted the cowling, prop, and engine first, and waited until
I had painted the rest of the airframe before attaching it to the firewall of
the airplane.
The landing gear assemblies consist of two sides and one wheel each. I painted the wheels, put them in position, and glued the gear fairings together. It took a slight amount of sanding to take care of the seams. The drop tank has to be glued together and the seams sanded down, and it snaps into place, although on the real airplane, there was a rack that is not include in the kit. With the gear in place, the plane is ready for painting. I selected the camouflaged scheme.
 For an
accurate, state-of-the-art model of this airplane, the Fujimi kit is the way to
go. It has better detail, a more accurate outline, and a better set of
instructions. For fun, however, this is not a bad kit, and it would be a good
one to give to the kids for Christmas, as a means of giving them a kit that
comes out fine without a lot of required modeling skills. However, for the
purist, the kit lacks an accurate cowling, a detailed cockpit interior, and an
accurate fuel tank mounting rack. The small parts, the gun sight and tailhook,
are OK, although on some versions, photos show the hook mounted several feet
forward of the kit’s position, and the windshield took some trimming to get the
gunsight to fit. An instrument panel can be easily improvised. I did mine with a
piece of square plastic strip with a paper panel glued in place. I also added
some sidewall details made from strips. But even without the additions, the
model does look like the airplane, and that is the main thing. It is easy to
build, and very robust, although you have to be careful with the radio mast and
pitot tube, which are molded in place on the model. These won’t break off during
shipping, but they can be knocked off during handling and assembly.
For an
accurate, state-of-the-art model of this airplane, the Fujimi kit is the way to
go. It has better detail, a more accurate outline, and a better set of
instructions. For fun, however, this is not a bad kit, and it would be a good
one to give to the kids for Christmas, as a means of giving them a kit that
comes out fine without a lot of required modeling skills. However, for the
purist, the kit lacks an accurate cowling, a detailed cockpit interior, and an
accurate fuel tank mounting rack. The small parts, the gun sight and tailhook,
are OK, although on some versions, photos show the hook mounted several feet
forward of the kit’s position, and the windshield took some trimming to get the
gunsight to fit. An instrument panel can be easily improvised. I did mine with a
piece of square plastic strip with a paper panel glued in place. I also added
some sidewall details made from strips. But even without the additions, the
model does look like the airplane, and that is the main thing. It is easy to
build, and very robust, although you have to be careful with the radio mast and
pitot tube, which are molded in place on the model. These won’t break off during
shipping, but they can be knocked off during handling and assembly.
| CONCLUSIONS |
For what it is, this is worth getting. As the definitive kit, no way. But that’s not the point here. It is an easy kit to build, and won’t be a challenge to a youngster getting started. It’s nice to see models of this type issued by Hobby Boss. Even for an experienced modeler, it is fun to do one of these once in a while. Try one.
January 2016
Copyright ModelingMadness.com
If you would like your product reviewed fairly and fairly quickly, please
contact the editor
or see other details in the
Note to
Contributors.