Tamiya 1/48 Aichi M6A1 'Seiran'
| KIT #: | ? |
| PRICE: | ? |
| DECALS: | Several tail code options |
| REVIEWER: | Michael Rohde |
| NOTES: |
| HISTORY |
At the beginning of 1942 the Imperial Japanese Navy decided to plan surprise attack missions to destroy the locks of the Panama Canal by special submarine borne attack aircraft. Aichi was issued with the specifications and was charged with the development of such an aircraft .
In November 1943 the first proto type made its maiden flight. The Aichi M6 A 'Nanzan' proto type was initially tested and refined as a land based aircraft equipped with retractable landing gear. After undergoing several stages of improving the proto type, by May 1944 the Aichi Aircraft Company received an order to build a small number of aircraft for the Navy.
 The power plant used on the limited production series was
a license built Daimler Benz DB 603 ,ie the 12 cylinder liquid cooled Aichi
Atsuta 32. Defensive armament consisted of one 12.7 mm Type 2 Machine gun on
a flexible mount operated by the radio operator. Offensive armament was
either a 800 kg Type 91 'long lance' torpedo , a 850 kg HE bomb or 2x 250 kg
bombs.
The power plant used on the limited production series was
a license built Daimler Benz DB 603 ,ie the 12 cylinder liquid cooled Aichi
Atsuta 32. Defensive armament consisted of one 12.7 mm Type 2 Machine gun on
a flexible mount operated by the radio operator. Offensive armament was
either a 800 kg Type 91 'long lance' torpedo , a 850 kg HE bomb or 2x 250 kg
bombs.
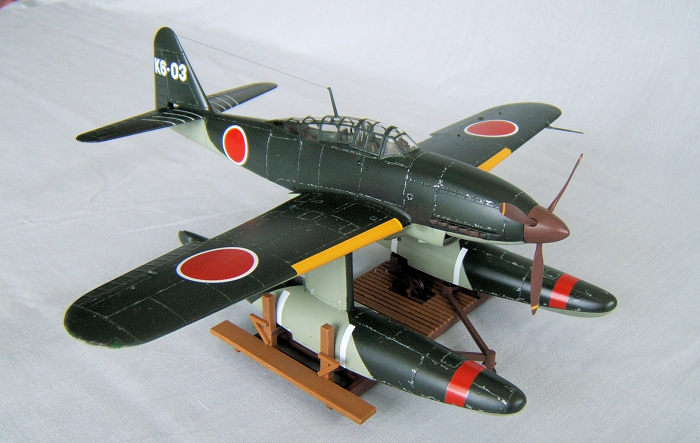
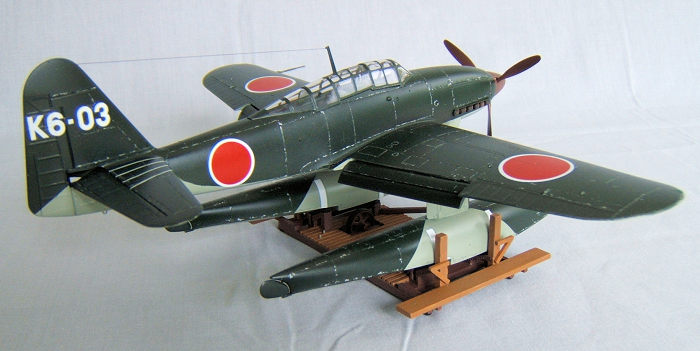
The'Seiran' was designed in such a way that it could be stowed away on the I -400 class submarine carrying a tube of 4,2 m diameter and a length of 30,5 meters. This meant that three 'Seirans' could be carried on each I-400. The aircraft rested on catapult launching carts with their respective bombload already attached.This helped to reduce launch time to a minimum after surfacing.
To cope with the space limitations, the aircraft had folding wings which were pivoted around the main spar where they joined the fuselage.By rotating the leading edge of the wing downwards , the wing could lie back flat against The keel surfaces of the fuselage.This was achieved by using oil hydraulic pressure from an ship board system. Stabilizer and elevators were hinged at about 90 centimeters from the fuselage center line and folded downward. Vertical clearance was achieved by folding the tip of the fine sideways to the right. For certain operations the 'Seiran' could be be launched without floats and abandoned after the mission
 Altogether twenty-eight 'Seiran'
( including one prototype 'Nanzan')were produced by 1945 and the submersible
carriers ( I 400 and 401)were completed almost simultaneously..
Altogether twenty-eight 'Seiran'
( including one prototype 'Nanzan')were produced by 1945 and the submersible
carriers ( I 400 and 401)were completed almost simultaneously..
In the meantime the mission target had been changed from the Panama locks to the US Navy aircraft carriers staged at the Ulithi Atoll due to a change in priorities dictated by the war . The 1st Submarine Flotilla, including the I -400 and I -401 with three 'Seiran 'each departed Japan on the 23rd July 1945 for their first and last mission. On the 15th August a radio message from headquarters reached the flag ship I- 400 , informing them of Japan's surrender and the flotilla was ordered to return to the nearest port in Japan.
One Aichi M6 A1 Seiran was restored at the Smithsonian National Air and Space craft Museum,s Paul E Garber Preservation Facility in Maryland in 1997.
| THE KIT |
As always ,Tamiya's high quality
standarts apply to this kit. Consisting of a total of 76 parts ( 4 in clear
plastic) ,details are finely engraved and as crisp as they can get. The clear
parts are highly transparent
 without any distortions whatsoever. A weight is
included ( to be installed forward in either float)to prevent the model from tailsitting . To be precise: There are actually two models in the kit. One is
the aircraft, the second is a very nicely detailed transport dolly.
without any distortions whatsoever. A weight is
included ( to be installed forward in either float)to prevent the model from tailsitting . To be precise: There are actually two models in the kit. One is
the aircraft, the second is a very nicely detailed transport dolly.
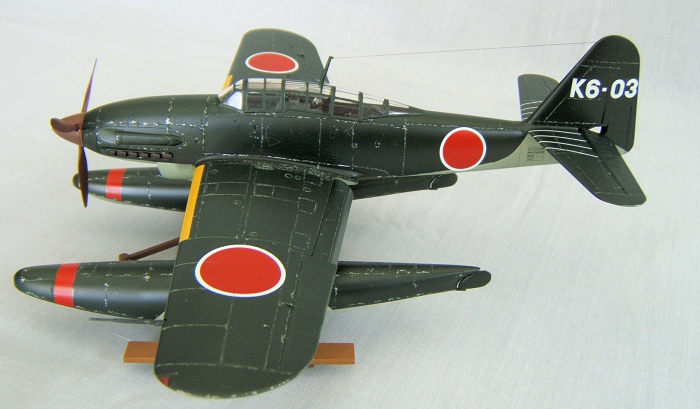
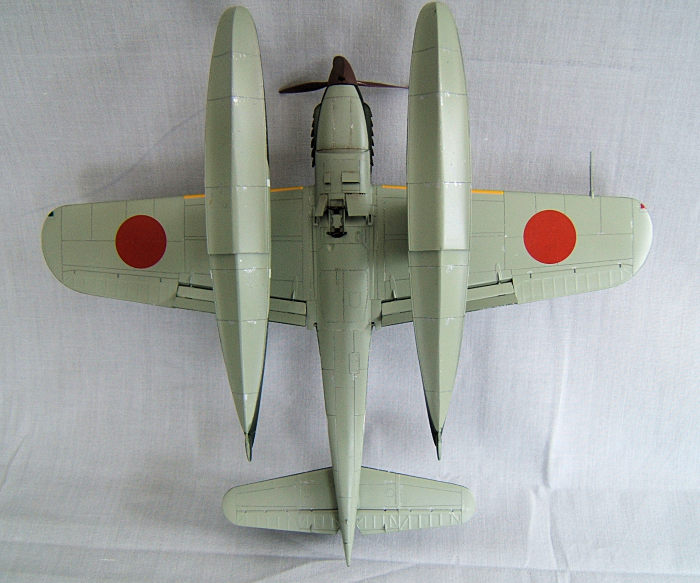
Decals are provided for one unit only ( 631st Kaigun Kokutai) with the option to choose from tail markings K 6 -zero one to twelve.
Two nicely detailed crew figures can be placed in the cockpit which unfortunately is provided in closed position only.So it might be better to leave them so not to obscure( as much as possible)all the nice details in the cockpit area. The instructions are concise and easy to follow. Besides , this kit is rather uncomplicated anyway.
| CONSTRUCTION |
After separating all parts from the sprues needed for this part of the build I prepped everything to get painted. The instructions tell us to use Tamiya X 22 RLM for most bits including the interior side walls but I decided to mix a bit of Tamiya flat white into it to brighten up the standart RLM to appear more than the RLM 02 shade.
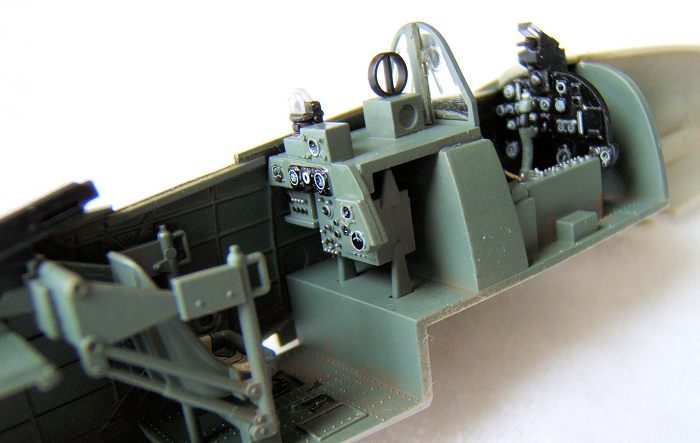 Consoles and radio set etc
received quite a bit of attention by painting all the details by hand using 10
fold magnification. The instrument panels received nicely detailed decals from
the decal sheet supplied. Items on the cockpit sidewalls were highlighted by
painting details by hand.
Consoles and radio set etc
received quite a bit of attention by painting all the details by hand using 10
fold magnification. The instrument panels received nicely detailed decals from
the decal sheet supplied. Items on the cockpit sidewalls were highlighted by
painting details by hand.
Seat harnesses come as decals and since we do not have an open cockpit option these do just nicely and look the part. A bit of dry brushing to give the interior a slightly worn look made this step complete. Finally I assembled all the parts ( see photos) and was ready to close up the fuselage.
After closing up the fuselage I moved on to prepare all the parts for assembly. We are talking about altogether 19 items here meaning that it did not take long at all to put these together . Due to the good fit of all the parts there was precious little to be done to rectify problems like cleaning up seams etc.
I took great care to make sure the canopy and windshield were fitting nicely before painting. Again, there was very little I needed to do to make that happen.We have a choice of two different wind screens here . One comes with an opening for a telescopic sight . The other one is closed and we use the internally installed gun sight instead. That also applies to the propeller hub. One is more pointed the other more rounded. I have chosen the pointed propeller hub and the closed wind screen for my model.
The radiator flaps are mounted in the open position. The exhausts were drilled out to make these look more realistic. I made sure that these were sliding into their respective recesses easily before painting. Before I started airbrushing I glued the prepainted windscreen into place and dryfitted the prepainted canopy. Then I carefully masked off the entire greenhouse to make sure no overspray could get to the clear parts.
| COLORS & MARKINGS |
 Now it was
time to start airbrushing . First I painted the entire model with Tamiya chrome
silver and left to dry completely.( I come to explain why later). Next I painted
the undersides with Tamiya JN grey and left to dry overnight. Before painting
the upper surfaces with Tamiya JN green I masked off the entire underside of the
model.
Now it was
time to start airbrushing . First I painted the entire model with Tamiya chrome
silver and left to dry completely.( I come to explain why later). Next I painted
the undersides with Tamiya JN grey and left to dry overnight. Before painting
the upper surfaces with Tamiya JN green I masked off the entire underside of the
model.
After all the paint has dried overnight I carefully removed all the masking tape ( except the canopy) and touche up the demarkation lines between JN Grey and Green where necessary. Last I applied a thin coat of Tamiya Gloss clear all over for the decals.( The smoother the surface the lesser the problem to get silvering of the decals.)
The decals went on nicely with the help of magic Microsole. A final thin coat of Tamiya Gloss Clear sealed the decals. To give the plane a slightly worn and weathered look I carefully chipped the top layer of JN green along the panel lines and used Pastel colours to do the exhaust stains and the panel lines underneath the engine.
| FINAL CONSTRUCTION |
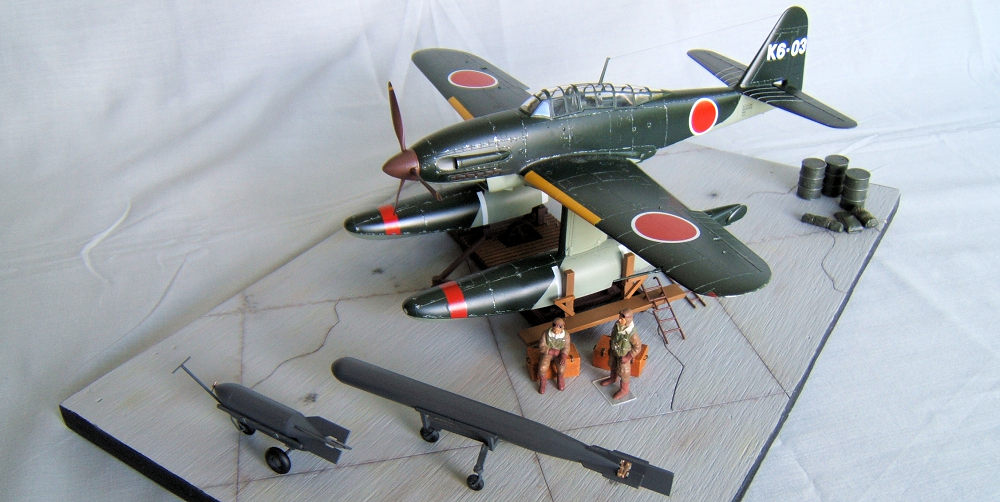
As I already mentioned we have actually two models here. The second is the dolly which was used to move the aircraft around on the ground. 18 parts need to be assembled for this.
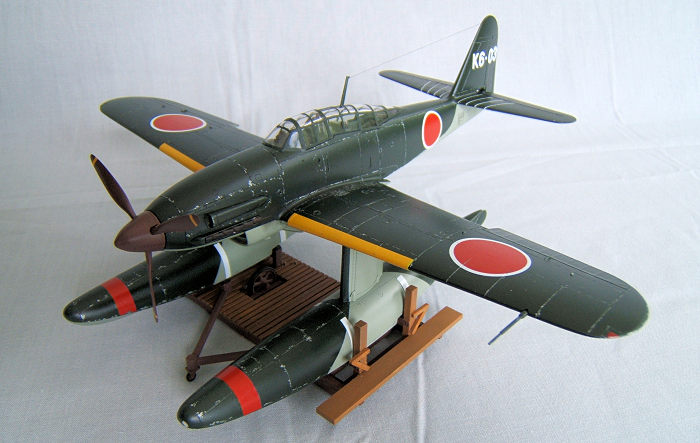 I cleaned
up all bits and prepainted these before assembly. The steel frames and
wheels I painted in a dark hull red. For this I mixed Humbrol 160 rustbrown
and Humbrol 19 bright red to get the desired effect. The wooden gangways
support structures and slats were painted with Tamiya flat earth. The rubber
supprts and the wheels were painted with Tamiya flat black.
I cleaned
up all bits and prepainted these before assembly. The steel frames and
wheels I painted in a dark hull red. For this I mixed Humbrol 160 rustbrown
and Humbrol 19 bright red to get the desired effect. The wooden gangways
support structures and slats were painted with Tamiya flat earth. The rubber
supprts and the wheels were painted with Tamiya flat black.
To get the wood grain effect I applied amber oilpaint with a stubbled brush carefully drawing the brush in a slightly meandering motion over the surface to achieve this. Oil paints are very slow drying and I had to leave things alone for 3 days before I could go ahead with putting all the bits together. Having done that I gave the dolly a thin coat of Humrol 135 Satin and left it to dry overnight.
In between things I put together a Type 92 Torpedo from a Hasegawa kit)and the kit 850 kg HE bomb to be placed on dollies next to the aircraft for a small diorama.
| CONCLUSIONS |
This Tamiya kit gives us a nice model of one of the most elegant float plane designs which I would dare to compare with the beauty of the Schneider Trophy Supermarine floatplane racer of the 1920's.
A relaxing build indeed and highly recommended to all the float plane lovers out there.
Michael Rohde
19 February 2018 Copyright ModelingMadness.com If you would like your product reviewed fairly and fairly quickly, please contact the editor or see other details in the
Note to
Contributors. Back to the Main Page
Back to the Review
Index Page
Back to the Previews Index Page