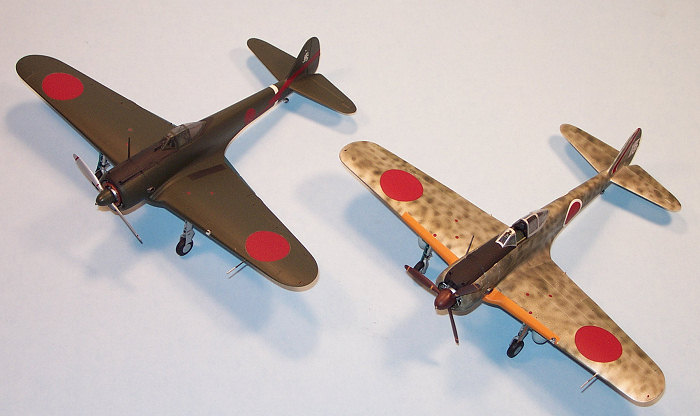
| KIT: | Hasegawa 1/48 Ki-43 'Hayabusa' |
| KIT #: | Jt 80/82 |
| PRICE: | $27.95 MSRP |
| DECALS: | Two options |
| REVIEWER: | Kevin Thompson |
| NOTES: |

| HISTORY |
About two years ago, I began to get serious about starting a collection of 1/48 scale WWII Japanese aircraft. In my stash at the time was a mixed bag of past releases from Otaki (Arii), some earlier Tamiya stuff, and a couple of the older Nichimo kits (the B5N2 and Ki-45), which, by the way, are still quite good today. I wanted to “standardize” my fighter collection with a complete series of the most recent kits from one or two major companies, namely Hasegawa and Tamiya. In the last ten years or so, Hasegawa had gone on a rampage, covering just about every significant Japanese Army and Navy single-engined fighter or attack aircraft, and Tamiya had covered some very interesting subjects as well, such as the M6A1 Seiran, N1K1 Kyofu, J1N1 Gekko, and some of the Ki-46 variants. So I began to build up the stash with the Hasegawa offerings, many of which I was able to purchase at swap meets or on ebay at a substantial discount.
 The Nakajima Ki-43 Hayabusa
(Peregrine Falcon) was the follow-on fighter to the Ki-27 and was designated as
the Army Type 1 Fighter, denoting its 1941 service debut. It was a lightweight
fighter, highly maneuverable, with retractable landing gear, a combat-flap
arrangement, and an engine of roughly 1,000 horsepower (later up to 1,120 hp).
It retained the excellent dogfighting characteristics of its predecessor, with a
higher top speed (about 35-40 mph faster than the Ki-27), and was armed with two
12.7mm machine guns. It’s weight, fully loaded, was only 2,590 kg, or about
5,700 lb., and was (like the Navy’s Zero Fighter) built light, sacrificing pilot
and fuel tank protection. During the war it was given the Allied code-name
“Oscar”.
Early in the Pacific War and the China-Burma-India theatre, the Ki-43 was superior to most of the older Allied planes like the Buffalo, Hurricane and early P-40 variants, and many IJAAF pilots enjoyed success with the Hayabusa. As the war progressed however, and with the introduction of the Spitfire, P-38 and other newer Allied types, the Ki-43 was outgunned and outperformed. Like the Mitsubishi A6M Type 0 Carrier Fighter (the main Japanese Naval fighter of the Pacific War, and the most famous of all Japanese aircraft), the Ki-43 had only minor improvements throughout its service life, was lightly armed and became outclassed by bigger, more powerful Allied fighters and ever-changing tactics. The Ki-43 soldiered on until the end of the war, and with over 5,900 examples being built, was the most widely produced Japanese Army fighter (second in production to only the Zero among all Japanese aircraft). It served on all main fronts from China to the Philippines, and even participated as a fighter/trainer in the defense of the Japanese home islands near the end of the war.
| THE KIT |
Released in 2001, Hasegawa kits JT80
and JT82 represent Ki-43-I and Ki-43-II aircraft respectively. Before these two
kits were on the market, modelers had three choices of 1/48 Oscars; an Otaki
Ki-43-II offering from the early 70s, a Nichimo Ki-43-I from a couple of years
earlier, and a Fine Molds kit that was from the early 90s. While each of these
earlier kits decently represented the Oscar, the Otaki kit suffered from some
basic shape and propo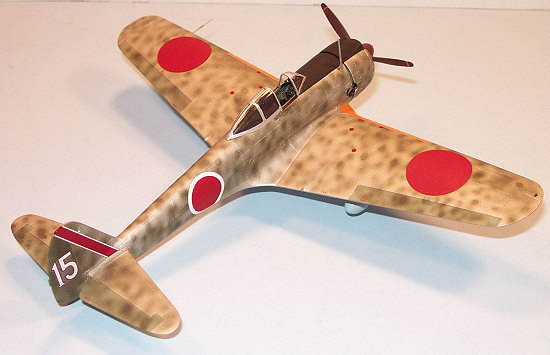 rtional
problems. The Nichimo kit was from a series of very well engineered kits for the
time (late 60s) that included a Ki-45 Toryu, Ki-51 Sonia, Ki-9 Spruce and a B5N2
Kate. These Nichimo offerings were ahead of their time. The Fine Molds kit (a
much more modern and accurate tooling), while good, was just too expensive and
limited-run.
Hasegawa (as well as Tamiya) is creating state-of-the-art kits of late, and these Oscar kits are no exception. Roughly 76 parts make up each of these kits, and are of the usual Hasegawa quality, with crisp molding, engraved panel lines and the customary gray plastic with excellent fit throughout. The Hayabusa went through about four main changes from the Mk I to the Mk II. The first and most obvious is the wingspan, which on the Mk II was reduced at the tips by just a couple feet, in an attempt to give the later version a better roll rate. Each kit comes with the identical upper and lower main wing assemblies, with the tips as separate pieces (the longer ones in the Mk I, shorter in the Mk II), attaching onto the main wing assembly. This allowed Hasegawa to mold the same main wing pieces for both kit versions. The second major change was the cowling and oil cooler installation. The Mk I featured a radial oil cooler on the front of the engine and a two-bladed propeller, while the Mk II oil cooler was in a fairing beneath a much more streamlined cowl. Mk II Oscars had a three-bladed propeller. The last two differences are mainly in the gun sight/canopy, and the drop tanks. Mk I Oscars had a telescopic gun sight, while Mk IIs were fitted with a reflector-type gun sight, necessitating changes to the windshield and canopy, as well as an attempt to improve the overall visibility. Each kit has the corresponding drop tanks correct for the version.
Other than these differences, the two kits are about 85% common parts. The engine is well detailed, has an option of two different exhaust stacks to choose from, as well as cowl flaps in either the opened or closed positions. The kit is also engineered to have the wing flaps in the down position, which is a nice touch, but is curious because all the photos of parked Oscars that I have ever seen had the flaps in the up position. Decals are for two aircraft from the 64th Sentai in the Mk I, while the later kit has decals for two 54th Flight Regiment machines. Hasegawa decals are always a bit thick, and I was looking for some different markings, so I will go with aftermarket decals. If the kit builds as good as it looks on the sprue, it should be a winner. Let’s get started with these two Oscars.
| CONSTRUCTION |
 The cockpit consists of ten
pieces, including floor, seat, seatback, stick, rudder pedals, instrument
panels, and side panels. There are two decals for the instrument panels. Cockpit
offers plenty of detail for a kit this size, though some may want to venture out
into the aftermarket for even more details. Cockpit was painted in the Japanese
“Army” or Nakajima chromate green, a mixture of Tamiya Sky, Olive and Yellow
acrylics. The small details were painted black, highlighted and dry-brushed with
aluminum. The cockpit side panels are installed in each fuselage half, and the
main cockpit assembly, once completed, fits into the assembled fuselage through
the bottom. Fit and alignment are trouble-free and true. Unfortunately, not a
lot of the cockpit is visible once assembled, as the Hayabusa has a narrow
fuselage and an even narrower cockpit opening.
Once the fuselage halves were mated,
wing assembly was next. Each kit has seven pieces to the wing; main wing lower,
left and right upper wing pieces, and two wingtip halves on each side. This
sounds more complex than it is, and was engineered to allow same main wing
molding for both kits. Fit of wing tips is OK, but needs to be done precisely
with no droop to look correct once finished. Wing-to-fuselage fit is good, with
only a minor amount of sanding and/or filler at the rear underside where it
meets lower fuselage. The tail feathers were installed next, and are a slightly
loose fit, so alignment checks were made a few times until cement was dry. The
combat flaps were installed next, and each flap is held in place by two guide
tabs. Since I was building two different kits, I wanted them to be different in
a few details, so I decided to build the Ki-43-I with the flaps down, as the kit
is intended. On the Ki-43-II, however, I wanted the flaps closed, so it took a
little bit of sanding and thinning down of the flaps to get a flush fit into the
lower wing. The end result was not perfect, perhaps, but the flaps on the MK II
did fit flush w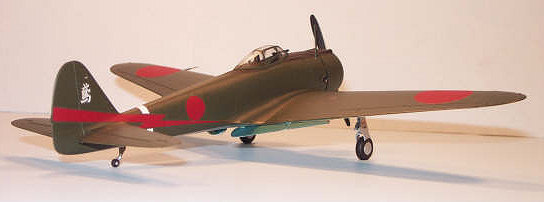 hen completed. The
detail inside the flaps and flap wells is also a nice touch, but is, of course,
only visible with open flaps. Now that the basic airframe was complete, the
seams were sanded (very little effort needed here) and wet-sanded. It was now
time to do the engine and cowling.
This is a fine, trouble-free kit to begin with, but it is the engine and cowling that really are strong points. The engine consists of front and rear cylinder rows, a “poly cap” for the propeller shaft, with crankcase and pushrods as a separate front piece. On the Oscar I, the radial oil cooler fits atop the crankcase piece, and is a great, centered fit. On the Mk II, the oil cooler is located beneath the cowl, necessitating removal of the locating pins on the crankcase/ pushrods assembly. This is not mentioned in the kit instructions, but makes sense without the radial oil cooler. Engine cylinders were painted with Tamiya steel, crankcase and pushrods done in silver or aluminum, and the radial oil cooler in copper. Before the engine assembly can be installed in the fuselage, the exhaust stacks must be installed in the fuselage bulkhead. The Oscar II has a choice of two different exhaust configurations, depending on which aircraft is chosen. Exhaust stacks were painted with a mixture of steel and brown, making a nice metallic/rust exhaust color. Bulkhead was painted with the same interior green as used in the cockpit, as was the inside of the cowl. After completed engine was installed on the front of fuselage, the cowl flaps were cemented to each side of the cowl. Again, there is a choice here in cowl flaps, depending on which exhaust is chosen. The way the cowl fits to the top of the engine cylinders is a dream; it is near perfect, and allows a dead-centered cowl and engine relationship to the fuselage. After test fitting, the cowl is installed over the engine and allowed to dry. OK, I have completed airframes with seams filled and sanded, and the power units and cowls are now in place. It is now time to install some of the small fragile pieces such as the headrest, radio mast, and pitot tube. After these are dry, it is time for painting.
| COLORS & MARKINGS |
 When I set out to do these two
kits, I wanted them to be as different from one another as possible. On the Mk I
for instance, it was decided to have the flaps open, canopy closed, and no drop
tanks fitted. On the Mk II, it was to be the opposite, with drop tanks fitted. I
also wanted the paint schemes to be different from one another as well. Using
Aero Master sheet number 48-381 “Ki-43 IJAAF Falcons Pt. III” and Henry
Sakaida’s excellent book “Aces Of The Rising Sun 1937-1945” (published by
Osprey), two attractive but different schemes were chosen. Sakaida’s book is a
“must-have” for any Japanese aircraft modeler, historian or enthusiast.
When the Hayabusa first entered
service, they were usually painted in Nakajima Dark Green on the upper surfaces,
with the underside being either IJA Grey or left in natural metal. The later
Oscars were usually in natural metal overall with green mottle camouflage
applied in the field to the upper surfaces and fuselage sides. Because the
mottle was applied in the field, no two aircraft were alike. The earliest
Oscars, like all Japanese aircraft in the very beginning of the conflict, had no
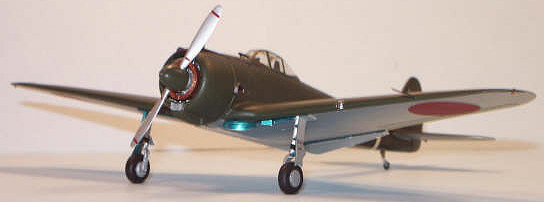
orange-yellow ID bands on the wing leading edges. For the Mk I, the control
surfaces were painted in IJA Gray on the undersides, and the anti-glare panel
(which also goes behind the canopy in a slight teardrop shape) painted in flat
black. These were then masked and the upper s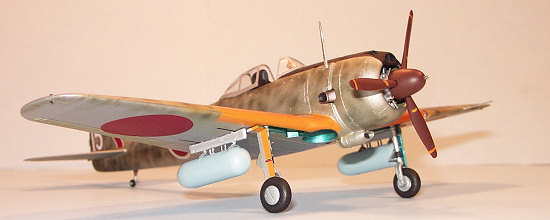 urface
painted in Tamiya IJA Green. Once this had dried thoroughly, the demarcation
between top and bottom (which is sharp-edged) was masked, and the underside shot
with Tamiya Flat Aluminum. As someone who is used to using Testors lacquer-based
metalizers, this Tamiya acrylic-based aluminum paint impressed me by its dried
appearance and sheen, ease of application, and strength against moderately
sticky masking tape.
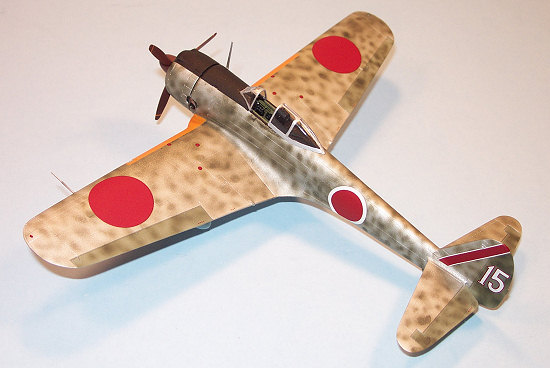
On the Mk II, the same initial painting and masking was undertaken, but with the control surfaces on both top and bottom sides being in the IJA Gray. Also, leading-edge ID bands were done with Gunze-Sangyo Orange-Yellow. This aircraft was then shot overall with the Tamiya Flat Aluminum. Once the aluminum had dried, it was time to do the green “mottle” on the upper sides. This was fun to do, and requires patience with the airbrush to result in a uniform finish, even if many of the real aircraft weren’t so evenly painted! Once both of these airframes were dry, the masking was removed and minor touch ups done.
 Using the Aero Master decal
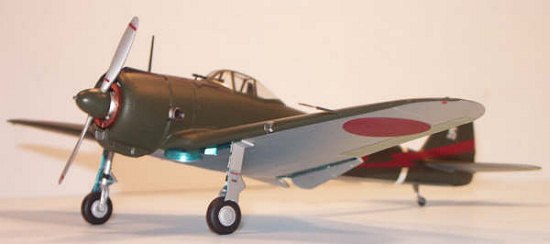
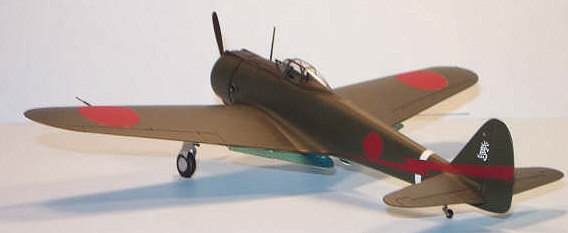
sheet, the Mk I was done in the markings of Sgt. Isamu Sasaki, 50th
Hiko-Sentai, Burma 1942. Sasaki survived the war and claimed 38 kills. This
aircraft has a green spinner, silver propeller blades with flat black on the
back sides, and the upper surface green wraps well around the wing leading edge
and tips to the underside, which is natural metal. Sasaki’s aircraft has a white
fuselage band, Hinomarus in six positions with no white surround, and a
brilliant red lightning bolt from the rudder down to the rear of the fuselage
wing root. The white kanji character on the fin reads “Tobi”, which is Japanese
for black kite (a bird of prey within the hawk family).
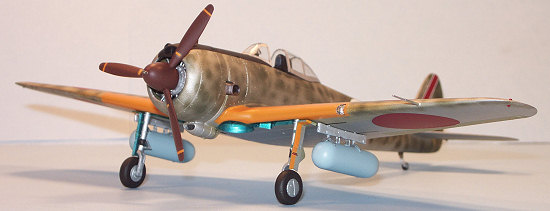
The Mk II is the aircraft of Sgt. Kushiro Otake, 25th Sentai, in Nanking, China in the summer of 1943. Otake also survived the war, and claimed 15 victories. This aircraft features orange-yellow ID bands, an all-brown 3-bladed prop, with mottled green spots over natural metal. Hinomarus in six positions, and with white surrounds on fuselage only. There is a red and white stripe on fin with number 15 on the rudder. This is a simple, but attractive scheme, and is representative of what the majority of Ki-43-IIs looked like from 1943 onwards. Both of these aircraft were subject to rough duty, and although I did not choose to “weather” them, several coats of dull coat were applied once decals were set. There was some slight silvering of the fuselage Hinomaru on the Mk I, where the lightning bolt intersects the Hinomaru. That’s life.
| FINAL BITS |
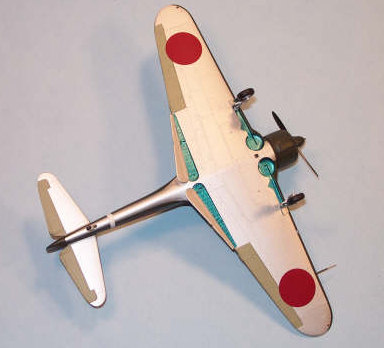 Propeller, landing gear, drop
tanks (on the Mk II) and canopies were all that remained to finish these two
Oscars off. The drop tank pylon holes in the bottom wing of the Mk I were left
closed, and these were opened on the Mk II. Painting guide made reference to the
tanks being “RLM 65 Light Blue”, which I thought was curious, but I went ahead
and painted them accordingly. Gun sights were installed, and windshields
installed with white glue. Canopy framing on Mk I is dark green, and Mk II is in
natural metal. As mentioned previously, canopy was closed on the Mk I, but
opened on the Mk II, for a contrast.
The landing gear is beautifully done and has weighted tires, which need to be positioned correctly while the glue dries! Gear legs are in aluminum and semi-gloss black. Inside of gear wells, gear doors, flap wells and flaps were painted in Gunze-Sangyo Metallic Blue Green, or “Aotake”, as was common practice on most Japanese aircraft. It is possible that the flaps are not this color on their upper surfaces, but the kit recommended this in the painting instructions, and as mentioned earlier, I have no photos of these aircraft with flaps open to go by. I know that Scott Van Aken did his Hasegawa Mk I in a similar scheme, and painted his flap upper surfaces in green. You can check out his review for comparison. With the propeller shafts lightly oiled for free spinning and props inserted into the engines, these Japanese “Falcons” are now complete.
| CONCLUSIONS |
 I have always had a huge
interest in Japanese WWII planes, and am pleased that most of the important ones
are really well kitted these days. Looking at these two Ki-43s, it is easy to
see the Nakajima family resemblance to both the earlier Ki-27 and later Ki-44
and Ki-84 types, and this aircraft really “bridges the gap” between them. I was
pleased to have done two distinctively different aircraft, and they really look
great next to each other. These were accurate, no-hassle builds, and were fun to
do. To anyone interested in Japanese aircraft, or WWII aircraft in general, I
highly recommend these kits. They were very rewarding.
February 2007
| REFERENCES |
Aero Master sheet 48-381 “Ki-43 IJAAF Falcons Pt III”, Aero Master Decals, April 1998.
“Aces Of The Rising Sun 1937-1945” by Henry Sakaida, Osprey Publishing, 2002.
If you would like your product reviewed fairly and quickly by a site that has over 350,000 visits a month, please contact me or see other details in the Note to Contributors.