Hasegawa 1/48 Ki44-II ko Shoki (Tojo)
| KIT #: | Jt 37 |
| PRICE: | $25.00 (not current prices) |
| DECALS: | Two options |
| REVIEWER: | Paul Mahoney |
| NOTES: |
All markings were
hand-painted using Koku-Fan book for reference |
| HISTORY |
Not to take the easy route, but there has been good in-depth history of this a/c written up in other reviews on Modeling Madness, most notably Tom Cleaver’s review of the 1/32nd kit by Hasegawa.
Basically, the Ki 44 was
 This was quite a major philosophy shift for Japanese military aviation, which
had continually stressed maneuverability over all else.
The first prototypes were flown in August of 1940 and failed to live up
to expectations. By 1942,
improvements were made and production began.
The engine powering the first production models was the Nakajima Ha 42,
generating 1184 h.p. The Ki 44-I
model still did not attain the speed demanded by the Army (one of the tests was
to be able to intercept a Ki 46 “Dinah” recon aircraft, which this first model
Ki 44 could not accomplish).
This was quite a major philosophy shift for Japanese military aviation, which
had continually stressed maneuverability over all else.
The first prototypes were flown in August of 1940 and failed to live up
to expectations. By 1942,
improvements were made and production began.
The engine powering the first production models was the Nakajima Ha 42,
generating 1184 h.p. The Ki 44-I
model still did not attain the speed demanded by the Army (one of the tests was
to be able to intercept a Ki 46 “Dinah” recon aircraft, which this first model
Ki 44 could not accomplish).
Only 40 units of the Ki 44-I
were produced before production switched to the Ki 44-II, which was powered by
the more powerful Ha 109 engine generating up to 1520 h.p. at take off.
This later model had the power and speed originally envisioned for an
‘interceptor’ type of aircraft.
Over 1000 units of this model were produced, with sub-models varying mostly in
the type of armament carried.
Although ultimately replaced
by the much more-impressive Ki 84, Ki 44s were still used until the end of the
War to intercept the continuous waves of B-29s that hammered
| THE KIT |
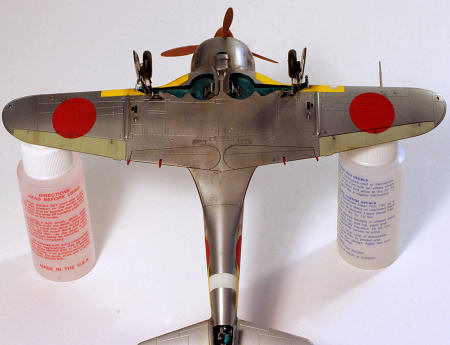
This kit is typical of the Hasegawa kits released in the 1990s – beautifully engraved panel lines and other surface details, a very nice cockpit, crystal clear canopy, and decals that can vary from mediocre to very good (in a seemingly random fashion).
| CONSTRUCTION |
 This kit went together as
well as most Hasegawa kits of the same vintage.
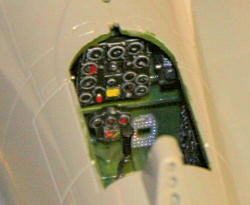
Kits of this series all have very good cockpit detail, especially those
of Japanese a/c, and the Ki44 was no exception.
I did a quick comparison of Hasegawa’s cockpit to photos in my
references, and they show things to look fairly accurate in here.
I added Eduard pre-painted seatbelts, and everything else in the cockpit
was out of the box. A little work
on the painting and the details pop out nicely.
I especially like the raised details on the instrument panel.
A little drybrushing, drops of Kristal Kleer on the instruments, and it’s
good to go. I used Tamiya’s cockpit
green, thinned with their
This kit went together as
well as most Hasegawa kits of the same vintage.
Kits of this series all have very good cockpit detail, especially those
of Japanese a/c, and the Ki44 was no exception.
I did a quick comparison of Hasegawa’s cockpit to photos in my
references, and they show things to look fairly accurate in here.
I added Eduard pre-painted seatbelts, and everything else in the cockpit
was out of the box. A little work
on the painting and the details pop out nicely.
I especially like the raised details on the instrument panel.
A little drybrushing, drops of Kristal Kleer on the instruments, and it’s
good to go. I used Tamiya’s cockpit
green, thinned with their
 X20A thinner, and painted the main part of the cockpit
by hand. Various
X20A thinner, and painted the main part of the cockpit
by hand. Various
The rest of the kit went together very quickly. I did use putty on the lower wing/fuselage join (as I seem to do in this exact spot with every Hasegawa kit), but other than that all that was needed was a little scraping and sanding for a very nice fit. In looking into other reviews of this kit, I noticed our editor here at MM had some struggles with the cowling fitting. I didn’t experience this, and it fell into place pretty easily. I left off the canopy and landing gear until after the majority of painting was done.
| COLORS & MARKINGS |
This turned out to be the
biggest challenge of the build. I
wanted a Ki44, but for once didn’t have the scheme picked out ahead of the
build. As I thumbed through my
various Aeromaster sheets, I realized that most of the decals
I had for the Ki44 were for the later model aircraft with a reflector gunsight. My kit featured the
telescopic gunsight. The only
schemes I had decals for were those of the kit, or ones in all natural metal –
none of which appealed to me.
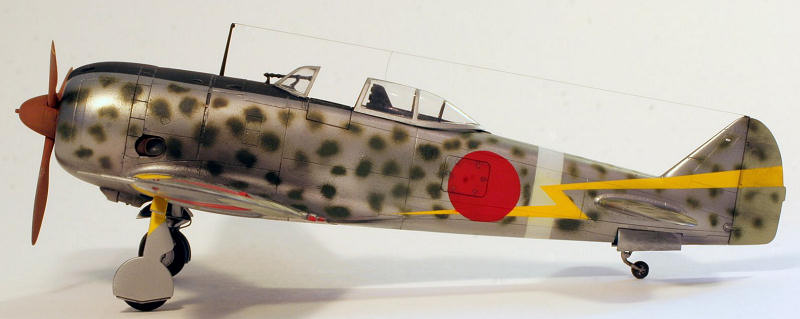
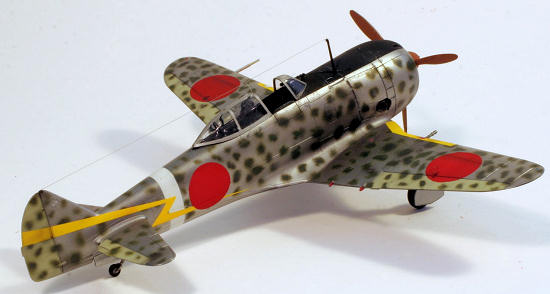
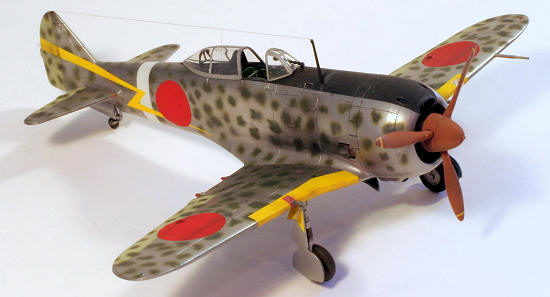
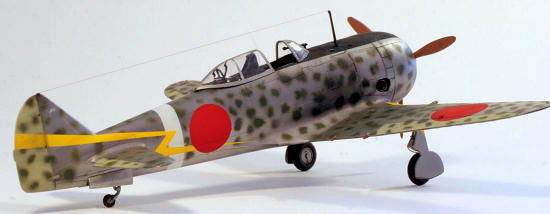
I did notice an interesting
profile and a few photos of a scheme in my Koku-Fan booklet on the Ki4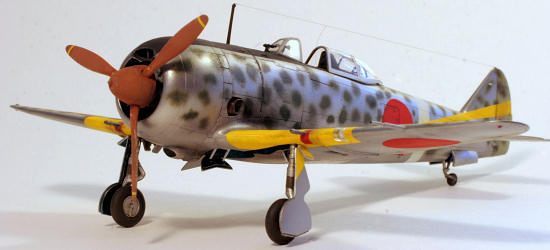 4 that
appealed to me. This a/c was
finished in natural metal, with the splotches added (in the field?) topsides, an
uncharacteristically wide white fuselage band, and a striking lightning bolt
running from the rudder across the fuselage.
This was the one I liked, but I would have to create all those markings
myself!
4 that
appealed to me. This a/c was
finished in natural metal, with the splotches added (in the field?) topsides, an
uncharacteristically wide white fuselage band, and a striking lightning bolt
running from the rudder across the fuselage.
This was the one I liked, but I would have to create all those markings
myself!
Having gotten comfortable
with using Alclad II, I decided the natural metal part of the build wouldn’t be
that difficult, and it would be pushing the envelope slightly (for me, anyway)
to paint all the markings. I would use
Tamiya tape for all the masking – I have yet to ever have a problem with bleed
through or ripped up paint using this stuff.
In addition, the edges are already cut quite straight and crisp, so it
can be used to directly mask lines and get a crisp edge.
The assembled model got an undercoat of
Tamiya semi-gloss black (from a rattle can) as prep for the Alclad.
I used Alclad’s Duraluminum to spray the entire airframe, then masked a
few panels and sprayed them with Alclad’s Aluminum for some tonal variation.
Next, I masked off all the fabric control surfaces and sprayed them with
Tamiya Japanese Army AF Grey. After
looking closely at the profile and supporting photos, I measured the fuselage
band, masked it off and painted it with Tamiya flat white.
Next came the antiglare panel, which I painted using a mix of approx 75%
Tamiya flat black and 25% Tamiya flat blue.
The kit included decals for the antiglare panels, so I used these as a
template for masking the area behind the cockpit (which follows the outline of
the canopy when it is in the open position).
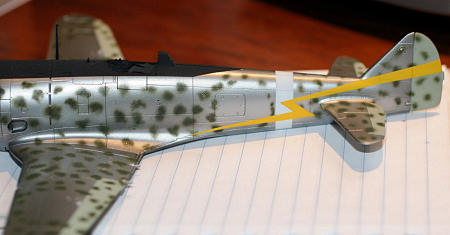
From my scrutiny of the
photos, I tried to figure out the sequence of painting on this airc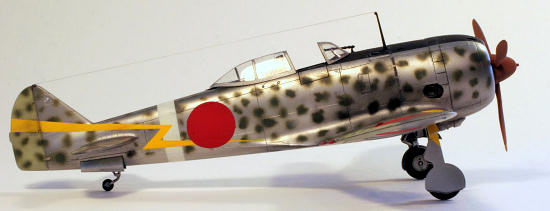 raft.
I’m assuming it came from the factory with natural metal finish and the
antiglare panel. The blotches were
added in the field as they clearly are applied around the insignia.
The white fuselage band appears to have been added (or modified) in the
field, as it goes directly OVER some of the blotches.
This is in comparison to the blotches around the hinomarus – these were
clearly applied around the insignia without getting too close to it.
The lightning bolt on the side was applied over the blotches and the
white band. The only anomaly to all
this is that fuselage hinomarus appear to be applied over the lightning bolt.
A closer look revealed to me that the bolt was applied right up to either
side of the fuselage hinomaru. So
the sequence seems to me to be: blotches, white band, thunderbolt.
raft.
I’m assuming it came from the factory with natural metal finish and the
antiglare panel. The blotches were
added in the field as they clearly are applied around the insignia.
The white fuselage band appears to have been added (or modified) in the
field, as it goes directly OVER some of the blotches.
This is in comparison to the blotches around the hinomarus – these were
clearly applied around the insignia without getting too close to it.
The lightning bolt on the side was applied over the blotches and the
white band. The only anomaly to all
this is that fuselage hinomarus appear to be applied over the lightning bolt.
A closer look revealed to me that the bolt was applied right up to either
side of the fuselage hinomaru. So
the sequence seems to me to be: blotches, white band, thunderbolt.
I cut circular masks the
approximate size of the hinomarus using the kit decals as a guide.
These were placed in the appropriate positions on the wings and fuselage.
My idea was to use these as a guide to paint the blotches around, without
getting right up next to them, thus being able to replicate the idea of the
blotches being applied around the national insignia.
The masking tape circles would prevent any errant spraying from ruining
the insignia that would be added later.
Next, I masked off the antiglare panel and white fuselage band, and
applied the blotches usin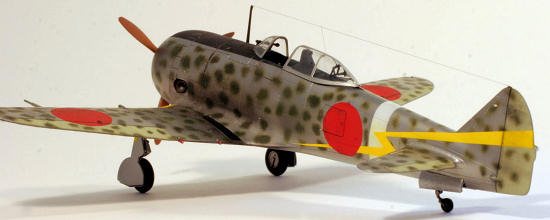 g Tamiya’s Japanese Army AF Green, thinned about 2
parts thinner to 1 part paint, with a drop or two of retarder added in as well.
I was able to spray this through my H+S airbrush for the whole pattern
without any clogs. I have not been
able to spray small patterns for any length of time (without clogs) using
acrylics unless they are heavily thinned and retarder is added, but in this case
my mixture did the trick.
g Tamiya’s Japanese Army AF Green, thinned about 2
parts thinner to 1 part paint, with a drop or two of retarder added in as well.
I was able to spray this through my H+S airbrush for the whole pattern
without any clogs. I have not been
able to spray small patterns for any length of time (without clogs) using
acrylics unless they are heavily thinned and retarder is added, but in this case
my mixture did the trick.
Next up was the lightning
bolt. Painting on markings may be
old hat to some, but to me this was new.
I have painted on stripes, D-Day markings, and that sort of thing, but
never an actual shape or design.
After lots of pondering and measuring, I decided the best course of action would
be to paint the bolt in stages, one direction at a time.
The idea was to mask and paint the first ‘slash’ from the rudder to the
fuselage using two strips of masking tape that taper slightly, then mask and
paint the short section that is heading toward the tail, and finally mask and
paint the long section that ends in the point toward the trailing edge of the
wing. A lot of masking and
measuring was done, and the end result was quite acceptable to me.
The biggest challenge I had was the translucency of the Tamiya yellow
paint I used. This required several
coats until it turned opaque, and since I was doing this in steps, the result
was some paint buildup at the masking lines where my masking overlapped an
already-painted area within the bolt.
A lot of sanding with a very fine polishing stick (and a few touchups)
later, and things started looking good.
While I had the airbrush loaded up with the yellow for the last time, I
also masked and painted the leading edge ID strips.
 Since I had come this far
without the aid of decals, I thought I would try my hand at painting the hinomarus as well. I used an Olfa
P-cutter and cut the circular patterns on yet more Tamiya tape using the kit
decals for a measurement guide. The
biggest challenge to me in doing this was in getting proper placement of the
masks on the aircraft. With decals
you can obviously tweak them into just the right location after they have been
applied, but with masks you get one shot.
And it would not have been easy to go back and repaint an entire section
of natural metal and blotched camouflage if I needed to do this over!
In the end, while cutting the masks was very easy, the placement of these
masks took a lot of time. I mixed
up some flat red, red-brown, and a little neutral grey (all Tamiya) to get a
color I was happy with, and sprayed it on.
I added a little more straight flat red to get a little variance in the
color and lightly sprayed that over my initial pass.
Since I had previously used the masking circles in all the national
insignia locations, I was spraying these onto a natural metal undercoat (ie no
varying colors underneath), so a few thin coats did the trick.
Since I had come this far
without the aid of decals, I thought I would try my hand at painting the hinomarus as well. I used an Olfa
P-cutter and cut the circular patterns on yet more Tamiya tape using the kit
decals for a measurement guide. The
biggest challenge to me in doing this was in getting proper placement of the
masks on the aircraft. With decals
you can obviously tweak them into just the right location after they have been
applied, but with masks you get one shot.
And it would not have been easy to go back and repaint an entire section
of natural metal and blotched camouflage if I needed to do this over!
In the end, while cutting the masks was very easy, the placement of these
masks took a lot of time. I mixed
up some flat red, red-brown, and a little neutral grey (all Tamiya) to get a
color I was happy with, and sprayed it on.
I added a little more straight flat red to get a little variance in the
color and lightly sprayed that over my initial pass.
Since I had previously used the masking circles in all the national
insignia locations, I was spraying these onto a natural metal undercoat (ie no
varying colors underneath), so a few thin coats did the trick.
Normally at this stage I
would glosscoat the model using Future in preparation for applying decals.
No decals on this build, so no gloss necessary – on to the finishing-up
stage.
| FINAL CONSTRUCTION |
 After the painting was
completed and several deep breaths of relief were taken, I added on all the
finishing bits and bobs. The wing
cannon were drilled out with a pin vise, and painted with Vallejo Gunmetal Grey.
The red panels directly around these cannon were painted with Vallejo
flat red. I augmented the kit’s
landing gear with brake lines made from copper wire.
These were painted with Vallejo paints as well.
Stretched sprue was used for the antenna wire.
I used Microscale Kristal Kleer to attach the windscreen and canopy, as
well as the landing light cover.
This stuff is fairly strong, won’t mar the clear finish, and works well to fill
any gaps that might be present at the same time.
In fact, there were some small gaps around the windscreen that the
Kristal Kleer filled in nicely.
After it dried I went back with the black/blue mixture and touched up this area.
Finally the prop and hub were painted with a recently-discovered bottle
of Aeromaster Warbird Colors Japanese Primer Brown.
I remember fondly how well this stuff sprayed through an airbrush, and
this bottle was no exception. Too
bad it’s been OOP for years now.
After the painting was
completed and several deep breaths of relief were taken, I added on all the
finishing bits and bobs. The wing
cannon were drilled out with a pin vise, and painted with Vallejo Gunmetal Grey.
The red panels directly around these cannon were painted with Vallejo
flat red. I augmented the kit’s
landing gear with brake lines made from copper wire.
These were painted with Vallejo paints as well.
Stretched sprue was used for the antenna wire.
I used Microscale Kristal Kleer to attach the windscreen and canopy, as
well as the landing light cover.
This stuff is fairly strong, won’t mar the clear finish, and works well to fill
any gaps that might be present at the same time.
In fact, there were some small gaps around the windscreen that the
Kristal Kleer filled in nicely.
After it dried I went back with the black/blue mixture and touched up this area.
Finally the prop and hub were painted with a recently-discovered bottle
of Aeromaster Warbird Colors Japanese Primer Brown.
I remember fondly how well this stuff sprayed through an airbrush, and
this bottle was no exception. Too
bad it’s been OOP for years now.
I weathered the gearbays and
landing gear using heavily thinned-down “Payne’s Grey” oil paint from Windsor
Newton. I also ran
 this wash in the
control surfaces and some panel lines.
I chipped away at the antiglare panel and the walkway panel with
toothpicks and an xacto blade to show ‘dings’ by exposing the Alclad underneath
these. Paint chips were added
to the propeller and hub using a silver Prismacolor pencil.
Finally I brushed on some ground up pastels (various shades of greys,
browns, and blacks) in the exhaust area and some selected other spots.
Pastels were also used on the wheels to dirty them up.
this wash in the
control surfaces and some panel lines.
I chipped away at the antiglare panel and the walkway panel with
toothpicks and an xacto blade to show ‘dings’ by exposing the Alclad underneath
these. Paint chips were added
to the propeller and hub using a silver Prismacolor pencil.
Finally I brushed on some ground up pastels (various shades of greys,
browns, and blacks) in the exhaust area and some selected other spots.
Pastels were also used on the wheels to dirty them up.
I had no decals to blend in,
and all the paints I used (except for the Alclad) were flat, so there was no
need for a final flat coat on this build.
Some people like to use one to seal the pastels, but I have never had an
issue with pastels coming off.
Finally, I wanted to retain the somewhat-shiny effect of the Alclad but keep the
full-flat effects of the rest of the paint.
Any topcoat would have altered that somewhat.
| CONCLUSIONS |
This was a fun build.
The cockpit has excellent detail, and the kit goes together pretty well.
Having a hassle-free build allowed me to focus on the painting.
I enjoyed expanding my skills and trying my hand at painting all the
markings on.
There are some interesting
schemes for the Ki44, and a number of aftermarket decal sheets are available –
just be sure you have the correct version!
| REFERENCES |
Fearis, Peter J., The
Samurai’s Wings. Army. A Modellers
Guide to the Colour Schemes and Markings of Imperial Japanese Army Aircraft.
1939-45.
Koku-Fan, Famous
Airplanes of the World: Army Type 2 Fighter “Shoki”.
Thorpe, Donald W.,
Japanese Army Air Force Camouflage and Markings – World War II.
Sakaida, Henry, Japanese
Army Air Force Aces 1937-45.
Mikesh, Robert C.,
Japanese Aircraft Interiors 1940-1945.
Kit purchased courtesy of my wallet.
March 2011
If you would like your product reviewed fairly and quickly, please contact me or see other details in the Note to Contributors.