Special Hobby 1/32 Ki-27 ko
| KIT #: | 32033 |
| PRICE: | $62.95 MSRP16.98 |
| DECALS: | Three options |
| REVIEWER: | Bill Koppos |
| NOTES: | Another Special Hobby 'first' |
| HISTORY |
If you are reading this you undoubtedly have some interest in military aviation history. Quick, what was the main fighter of the Japanese Army Air Force at the start of WW2? If you said the Ki-43 Hayabusa, you were wrong. This "later" machine only equipped 2 Sentais (roughly equal to a U.S. group), the rest having as mounts the elegant Ki-27, the first monoplane fielded by the JAAF. They played a major role in the conquest of Malaya, Singapore, the Dutch East Indies, and Burma, where aided by a usual superiority in numbers, their superb powers of maneuver wielded by highly trained pilots gave them success.
Inspired by the performance of the Navy's A5M prototype, the JAAF put out
specifications for it's own monoplane. Maneuverability was the all-important
quality to the JAAF, speed, protection and firepower being subservient to the
ability to get on the enemy's tail quickly. Nakajima's response was a
low-winged, radial engined, all metal machine with fixed landing gear and a
weird forward positioned windscreen. Not being maneuverable enough for the Army
testers, several increases in wing area finally satisfied them, and the Nakajima
design was picked for production over it's Mitsubishi and Kawasaki competition.
The final 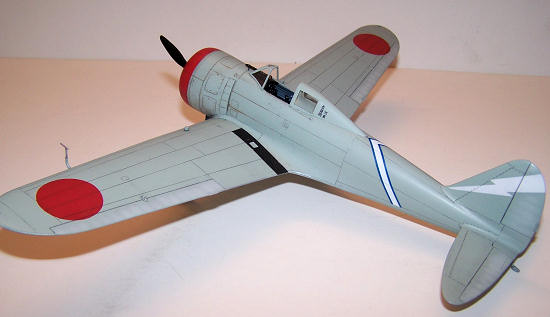 version
had a more normal windscreen and a sliding hood canopy arrangement. In this
configuration it was adopted for production as the Army type 97 fighter.
Replacement of the type 95 biplane began as soon as possible though production
was initially slow. Ki-27 units fought in China with success, and when a border
dispute between Mongolia and Japanese occupied Manchuria started, the Russians
in support of Mongolia sent in aerial units. In reply the Japanese Army Air
Force sent the Ki-27 Sentais. Air fighting escalated quickly, the Japanese
pilots enjoying initial superiority against the Russian I-15 and I-16 using
their superb maneuverability. However the Russian pilots learned to avoid
dogfighting and use climb-and dive tactics, their better firepower and
protection swinging the advantage to them.
version
had a more normal windscreen and a sliding hood canopy arrangement. In this
configuration it was adopted for production as the Army type 97 fighter.
Replacement of the type 95 biplane began as soon as possible though production
was initially slow. Ki-27 units fought in China with success, and when a border
dispute between Mongolia and Japanese occupied Manchuria started, the Russians
in support of Mongolia sent in aerial units. In reply the Japanese Army Air
Force sent the Ki-27 Sentais. Air fighting escalated quickly, the Japanese
pilots enjoying initial superiority against the Russian I-15 and I-16 using
their superb maneuverability. However the Russian pilots learned to avoid
dogfighting and use climb-and dive tactics, their better firepower and
protection swinging the advantage to them.
Massive claims were made by both sides during the summer of 1939 fighting, but honors were probably about even. When the fighting ended the Japanese pilots were exhausted and their machines worn out. The JAAF failed to learn their lessons here. The chosen successor to the Ki-27 was the Ki-43 Hayabusa, a fighter still emphasizing maneuverability above all other qualities.
As said above the Ki-27 was still in the thick of it when the Pacific war started, and until allied pilots learned their lessons, many quotes such as "He was on my tail in an instant" or "dogfighting the Japs made you a dead man" were made. The Ki-27 remained in service until late 1942, when those remaining were turned over to training schools and home defense units. A trainer version with lower powered engine and one machine gun was made in single and two seat versions by Mansyu, and used for Kamikaze missions at war's end.
| THE KIT |
 In
a large box comes 5 sprues of the usual soft Special Hobby plastic, one clear, a
baglet of resin parts, and a photo-etched fret. The surface detail on large
parts is quite delicate, with some rivet detail but not overdone. The resin seat
is very well done, as are the rudder pedals and propeller boss. The etched fret
has seat belts and cockpit details. The clear parts include the rear canopy
parts to do either the early "Ko" or later "Otsu", for which the underwing fuel
tanks are also included. So obviously later boxings will be of the "Otsu"
version.
In
a large box comes 5 sprues of the usual soft Special Hobby plastic, one clear, a
baglet of resin parts, and a photo-etched fret. The surface detail on large
parts is quite delicate, with some rivet detail but not overdone. The resin seat
is very well done, as are the rudder pedals and propeller boss. The etched fret
has seat belts and cockpit details. The clear parts include the rear canopy
parts to do either the early "Ko" or later "Otsu", for which the underwing fuel
tanks are also included. So obviously later boxings will be of the "Otsu"
version.
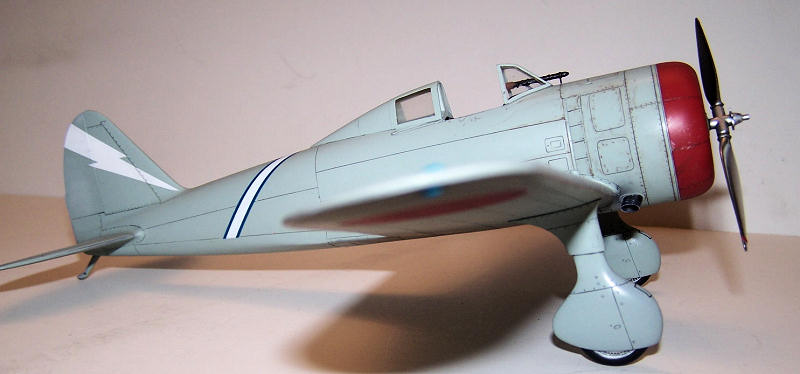
Decals are provided for 3 "Ko" aircraft from the Nomonhan fighting, all are colorful things with lightning bolts and stripes. So let's get to it.
| CONSTRUCTION |
This is a kit where the cockpit interior assembly and engine must be completely
done and cemented to one side before the fuselage can be closed up. Sidewall
detail, the stringers formers and such, is molded in nicely. Cockpit
paraphernalia are a
 combo of
plastic, resin, and etched parts, which turn out looking plenty busy, though
viewing will be limited by the small cockpit opening. With parts C2, the machine
gun mounts, keep them as far from the walls as possible. I had to trim chunks
off them to fit later. Also make sure the guns won't interfere with the
sidewalls when assembly is attempted. The plans tell you to put the cocking
handles on the outside where they won't fit or be seen. I did mine on the
inside. I added 2 control cables to the rudder pedals, and ran them back under
the seat. Only two little blips are given to support the floor, I added some
styrene tabs for better location and easier test fitting. I also made a mount
for the instrument panel to better support this. Part A 11 I left out as I saw
no useful purpose for it.
combo of
plastic, resin, and etched parts, which turn out looking plenty busy, though
viewing will be limited by the small cockpit opening. With parts C2, the machine
gun mounts, keep them as far from the walls as possible. I had to trim chunks
off them to fit later. Also make sure the guns won't interfere with the
sidewalls when assembly is attempted. The plans tell you to put the cocking
handles on the outside where they won't fit or be seen. I did mine on the
inside. I added 2 control cables to the rudder pedals, and ran them back under
the seat. Only two little blips are given to support the floor, I added some
styrene tabs for better location and easier test fitting. I also made a mount
for the instrument panel to better support this. Part A 11 I left out as I saw
no useful purpose for it.
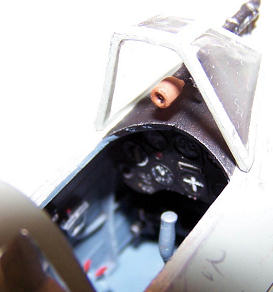
After seeking some opinions and information, the interior was given a coat of Intermediate Blue overall, guns and boxes black and handles etc. in various "controlly-looking" colors. The seat back was weathered leather, seat belts Buff. A black water color wash gave shadows, and drybrushing with light blue popped out the highs. The Instrument panel has well-defined details and paints up nicely.
OK
now the engine. The fuselage halves are molded complete with the cowling, so
this has to be fully assembled painted and placed properly before the fuselage
can be closed up. Not so easy as the kit mounting system sucks lemons to be
polite. Two little bumps are on each side of the fuselage, to which the builder
is expected to attach a star-like mounting plate with two small points, and
somehow get glue on the other half when closing the fuselage. I don't see how
anyone could have
 done this
with success (there was a test-builder, right?) So, out comes the sheet styrene
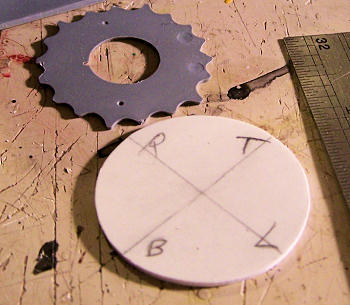
(I believe it's 0.20) and a bulkhead was made to fit the forward cowling area as
an engine mount. For those who want to do this, the dimensions are 1 1/2 inches
(38mm) vertically and 1 7/16 inches (37mm) sideways, to get in the ballpark. A
little more trimming might be needed, but it's close. After finding the center
and drilling a center hole for alignment. This was cemented behind the fuselage
bumps, and reinforced from behind with some triangular braces, 90 degrees to the
fuselage wall. Now dry fitting the assembled engine showed the engine/oil cooler
assembly would still not be far enough out (It should be about flush with the
cowling front). So another styrene sheet was layed on top of the original, that
about does it. Wow, almost like scratchbuilding. I realize this is a limited run
kit but a better way to install the engine should be provided.
done this
with success (there was a test-builder, right?) So, out comes the sheet styrene
(I believe it's 0.20) and a bulkhead was made to fit the forward cowling area as
an engine mount. For those who want to do this, the dimensions are 1 1/2 inches
(38mm) vertically and 1 7/16 inches (37mm) sideways, to get in the ballpark. A
little more trimming might be needed, but it's close. After finding the center
and drilling a center hole for alignment. This was cemented behind the fuselage
bumps, and reinforced from behind with some triangular braces, 90 degrees to the
fuselage wall. Now dry fitting the assembled engine showed the engine/oil cooler
assembly would still not be far enough out (It should be about flush with the
cowling front). So another styrene sheet was layed on top of the original, that
about does it. Wow, almost like scratchbuilding. I realize this is a limited run
kit but a better way to install the engine should be provided.
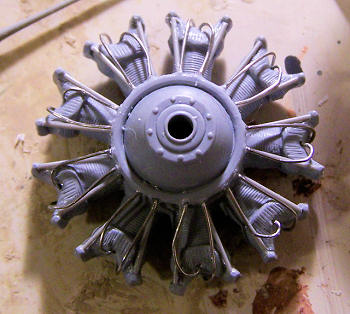 The
engine itself is simplified, needing pushrods and wiring, but I'm used to that.
The circular oil cooler is in resin in two parts and once again a vague mount.
Four etched braces kind of hold it on to the crankcase. These were painted
copper and blackwashed. The engine assembly mounts to the "star" plate, and two
resin air intakes are glued to their marked locations. Now it is placed on our
custom motor mount, and centered using a toothpick through the crankcase into
our centering hole on the bulkhead. Test fitting showed the cowl opening would
be too small, hiding the intakes and barely clearing the oil cooler. So this was
opened up with a sharp new #11 blade till it looked right according to photos.
Now finally the interior can be cemented to it's mounts and the fuselage closed
up while things can still be moved around a bit, making sure all is centered and
looks right. After the seams set up, it was time to repair to the cabinet de
liquor for some hard stuff, a stiff Bailey's on the rocks.
The
engine itself is simplified, needing pushrods and wiring, but I'm used to that.
The circular oil cooler is in resin in two parts and once again a vague mount.
Four etched braces kind of hold it on to the crankcase. These were painted
copper and blackwashed. The engine assembly mounts to the "star" plate, and two
resin air intakes are glued to their marked locations. Now it is placed on our
custom motor mount, and centered using a toothpick through the crankcase into
our centering hole on the bulkhead. Test fitting showed the cowl opening would
be too small, hiding the intakes and barely clearing the oil cooler. So this was
opened up with a sharp new #11 blade till it looked right according to photos.
Now finally the interior can be cemented to it's mounts and the fuselage closed
up while things can still be moved around a bit, making sure all is centered and
looks right. After the seams set up, it was time to repair to the cabinet de
liquor for some hard stuff, a stiff Bailey's on the rocks.
Well from here, everything has GOT to get easier, and it does. The wing, as in the A5M Claude, is a simple thing, no wheel wells, flaps etc. The fit to the fuselage is not bad at all, minor trimming is all that is needed, the only problem is the front seam runs right through a busy panel line/rivet area, all of which needs rescribing. As in the Claude against my own advice I glued the wheel pants together before installing the wheels for easier painting, and again got a split pant upon squeezing the wheels in. Fool me twice---.
 At
this point a decision must be made on our version we're doing, because to look
right the rear canopy glazing must be installed and faired in before painting.
The early "Ko" version was the one used in the Nomonhan fighting, for which 3
decal choices are given. However, if one wanted, the world war 2 "Otsu" model
could be done as the rear glazings are given for both. Originally I was leaning
toward a 77th Sentai Otsu, as fought the "Flying Tigers", but this time actually
tried the canopy fit at the right time. NO WAY was the sliding canopy portion
going to go over the rear glazing, not even close to sitting down far enough. It
was closed or nothing, and I did not want to hide all my interior work. So much
for choice, and as it happened the Nomonhan pilots removed the sliding canopies
for better vision so that the decision was made. Out of the 3 kit schemes I went
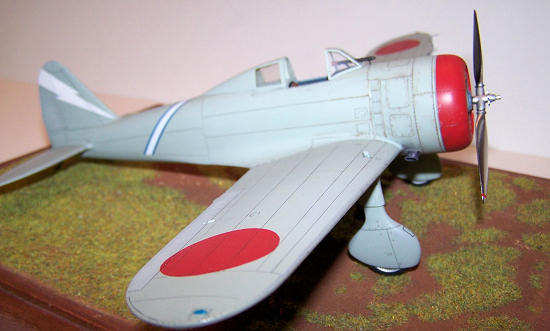
with the 11 Sentai one, with it's snazzy lightning bolt on the tail. So the
appropriate less glazed canopy rear was used, a base coat of Japanese Army light
green sprayed on the area beneath first, paint scraped from the attachment area,
and the glazing glued on using Tamiya Ultra Thin. No mention is made in the kit
of the crash pylon under the glazing so I made this from scrap resin. When dry,
the part was faired in carefully using thin CA glue until a smooth transition
was achieved. All fuselage and wing seams smoothed and checked, and the model
rubbed down with Alcohol (not the Bailey's), it was ready to paint.
At
this point a decision must be made on our version we're doing, because to look
right the rear canopy glazing must be installed and faired in before painting.
The early "Ko" version was the one used in the Nomonhan fighting, for which 3
decal choices are given. However, if one wanted, the world war 2 "Otsu" model
could be done as the rear glazings are given for both. Originally I was leaning
toward a 77th Sentai Otsu, as fought the "Flying Tigers", but this time actually
tried the canopy fit at the right time. NO WAY was the sliding canopy portion
going to go over the rear glazing, not even close to sitting down far enough. It
was closed or nothing, and I did not want to hide all my interior work. So much
for choice, and as it happened the Nomonhan pilots removed the sliding canopies
for better vision so that the decision was made. Out of the 3 kit schemes I went
with the 11 Sentai one, with it's snazzy lightning bolt on the tail. So the
appropriate less glazed canopy rear was used, a base coat of Japanese Army light
green sprayed on the area beneath first, paint scraped from the attachment area,
and the glazing glued on using Tamiya Ultra Thin. No mention is made in the kit
of the crash pylon under the glazing so I made this from scrap resin. When dry,
the part was faired in carefully using thin CA glue until a smooth transition
was achieved. All fuselage and wing seams smoothed and checked, and the model
rubbed down with Alcohol (not the Bailey's), it was ready to paint.
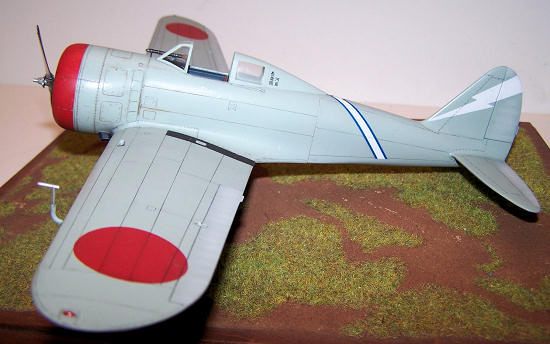
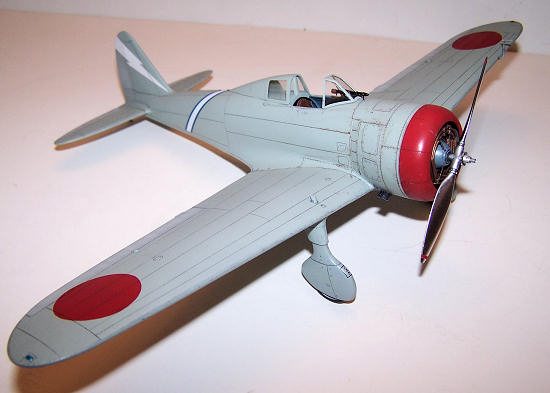
| COLORS & MARKINGS |
 Basic coat was Model Master 2115 JA Light Grey, this particular jar laying down
beautifully smooth. Hinomarus were cut out of Tamiya Tape using a circle
template and sprayed on using Testor's glass jar flat red with a touch of black
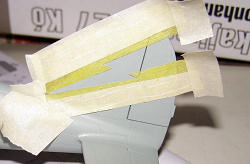
in it. The cowling front was done with straight red. The tail lightning bolt
not being too hard to mask was cut using a decal as pattern and sprayed flat
white. The model was glosscoated using decanted Tamiya TS-13 lacquer clear as a
base for decals and sludging. I find the Tamiya clear goes on smoother than my
old favorite Testor's Metallizer Sealer, and dries just as fast. The fuselage
stripe, spat decal, and pilot's name (?) were the only decals used. Panel lines
and cowling dirt were put on using my water based "sludge". Nomonhan Ki-27's
were maintained in the open and often flown on 5 patrols a day, in the years
before radar, ridden hard and put away wet, so I dirtied and chipped it up a
bit. Finally a lightened grey mix was added to the fabric-covered control
surfaces for fading, then the whole thing shot with one layer of Testor's
Dullcoat, leaving some sheen behind.
Basic coat was Model Master 2115 JA Light Grey, this particular jar laying down
beautifully smooth. Hinomarus were cut out of Tamiya Tape using a circle
template and sprayed on using Testor's glass jar flat red with a touch of black
in it. The cowling front was done with straight red. The tail lightning bolt
not being too hard to mask was cut using a decal as pattern and sprayed flat
white. The model was glosscoated using decanted Tamiya TS-13 lacquer clear as a
base for decals and sludging. I find the Tamiya clear goes on smoother than my
old favorite Testor's Metallizer Sealer, and dries just as fast. The fuselage
stripe, spat decal, and pilot's name (?) were the only decals used. Panel lines
and cowling dirt were put on using my water based "sludge". Nomonhan Ki-27's
were maintained in the open and often flown on 5 patrols a day, in the years
before radar, ridden hard and put away wet, so I dirtied and chipped it up a
bit. Finally a lightened grey mix was added to the fabric-covered control
surfaces for fading, then the whole thing shot with one layer of Testor's
Dullcoat, leaving some sheen behind.
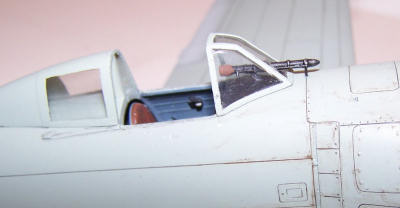 In the home stretch, the windscreen was masked and sprayed, and the area in
front of the cockpit painted flat black. The kit gives you some resin parts for
the tubular gunsight, but for the life of me I couldn't find pictures of
anything like them. I made a conical cap for the front and a sprue rod for it on
the side. The hole in the windscreen must be opened up to slip over the sight .
Following the pictures, mounts were made and the tube glued to the rear mount,
when dry it was painted flat black with a leather eyepiece, and drybrushed
aluminum. The windscreen with white glue applied was slipped over the tube, and
glued down, smoothing out the white glue with a damp finger.
In the home stretch, the windscreen was masked and sprayed, and the area in
front of the cockpit painted flat black. The kit gives you some resin parts for
the tubular gunsight, but for the life of me I couldn't find pictures of
anything like them. I made a conical cap for the front and a sprue rod for it on
the side. The hole in the windscreen must be opened up to slip over the sight .
Following the pictures, mounts were made and the tube glued to the rear mount,
when dry it was painted flat black with a leather eyepiece, and drybrushed
aluminum. The windscreen with white glue applied was slipped over the tube, and
glued down, smoothing out the white glue with a damp finger.
The propeller was cleaned up, and the nice resin starter dog put on. Gloss black was applied, the rear blades flat black, and Alclad Polished Aluminum sprayed on the fronts, and finally the tip stripes brushed on. Again I lucked out, as these Nomonhan planes had the radios removed, hence no pesky antennas or masts thereto. Only part remaining was the unique pitot tube, paint this and the landing lights and another one is done!
| CONCLUSIONS |
Well it looks like a Ki-27, from all angles it matches all the photos I've seen of these machines. Admittedly not very scientific but the Mark I eyeball is a good tool. This is definitely no beginner's kit, major modelling skills being required. But for them that's has them a very nice Ki-27 can be built from this, the first in 1/32 scale.
Kit courtesy of my paycheck (didn't feed the kid that week).
| REFERENCES |
 Japanese Army Fighters Part 2 William Green WW2 aircraft fact files 1978
Ki-27 Nate Wieliczko and Szeremeta Kagero No. 11 2004
Japanese Army Air Force Fighter Units and Their Aces Hata, Izawa
and Shores Grub Street 2002
December 2010
Copyright ModelingMadness.com. All rights reserved. No reproduction in part or in whole without express permission.
If you would like your product reviewed fairly and fairly quickly, pleasecontact the editor or see other details in the Note to Contributors.
Back to the Review Index Page 2023