Hasegawa 1/48 A6M5 Zero-Sen
|
KIT # |
? |
|
PRICE: |
$26.00 MSRP |
|
DECALS: |
? |
|
REVIEWER: |
Mark Gran |
|
NOTES: |
Cutting Edge Cockpit used |
|
HISTORY |
Enough has been written about the various
A6M's out there to choke a horse, so I'll give you the background on how
this one came to be. You ever have one of those paint schemes in your
head that you know someday, no matter what, you are going to do? Well if
you said "Yes," then we have something in common. When I was a kid, my
parents always bought me a book
 that dealt with aviation for Christmas,
mostly WW2 (I have GREAT parents). One of the books I got was entitled
"The Encyclopedia of Air Warfare" that covered military aviation from
start to modern day (modern as in the mid/late 70's). The remainder of
Christmas Day would be spent pouring over all of the new pictures and
soaking in every bit of information I could. There was the WW1 info and
the between the wars stuff (cool) and then came WW2.
that dealt with aviation for Christmas,
mostly WW2 (I have GREAT parents). One of the books I got was entitled
"The Encyclopedia of Air Warfare" that covered military aviation from
start to modern day (modern as in the mid/late 70's). The remainder of
Christmas Day would be spent pouring over all of the new pictures and
soaking in every bit of information I could. There was the WW1 info and
the between the wars stuff (cool) and then came WW2.
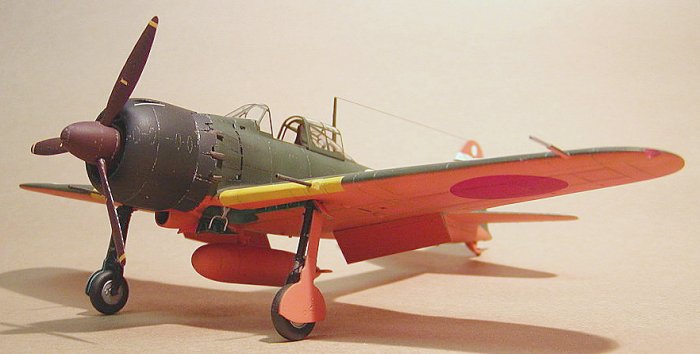
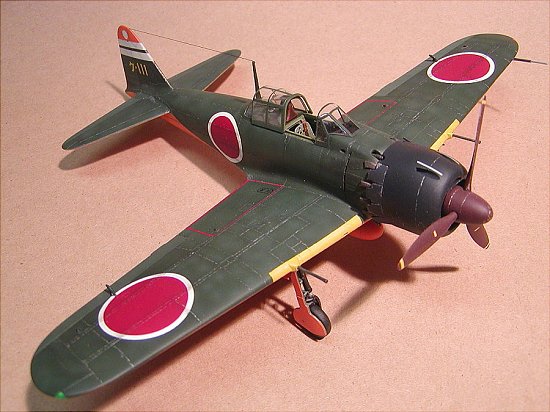
Oh there were pictures and profiles of Bf-109's, Mustangs, etc., but then came the section called "The Rising Sun." Pages full of things called Nicks, Georges, Tony's, and Zero's, and OH MY one Zero in particular. In my P-47 build I did here a couple of months ago, I expressed how I prefer to build the oddball aircraft rather than that of the aces. Well on this page, there was the oddball. Growing up without missing an episode of "Baa Baa Blacksheep," I thought all Zero's were gray (I was a kid, give me a break OK). Here it was, a Zero with an all orange bottom, green top and "meatballs" surrounded in white! The caption under this profile said "A6M5 (Zeke) Genzan Air Corp, Wonsan, Korea 1944" At this time in my life I didn't care about the accuracy of the markings, this was cool!
Skip forward 28 years.
|
THE KIT |
 Since first seeing that profile in the
mid/late-70's, I had always wanted to build that aircraft. Now I know you
can't always trust profiles but since I have seen at least 3 pictures of
A6M2's and 3's believed to have orange bottoms (Thank God for the Aero
Detail #7 on the A6M's), why not an A6M5? Having no direct reference for
this aircraft other than a profile and some supporting information that
indicates that there were orange bottomed A6M's, I waited patiently for
the right time to come to build her. When I decided to get back into
modeling a year ago or so, the Hasegawa 32nd Bf-109G-6 had
just come out and I HAD to build one (turned out pretty darn well if I do
say so myself-and yes it's different). Once it was completed, I had the
dilema of “What to do next?” while staring at my 500+ kits strewn about
the room. Somewhere in the back of my mind I heard “Zero...Zero...” so I
looked and Wa-lah, there was my Hasegawa 48th A6M5 staring me
in the face. Time to build that orange bottomed Zero!
Since first seeing that profile in the
mid/late-70's, I had always wanted to build that aircraft. Now I know you
can't always trust profiles but since I have seen at least 3 pictures of
A6M2's and 3's believed to have orange bottoms (Thank God for the Aero
Detail #7 on the A6M's), why not an A6M5? Having no direct reference for
this aircraft other than a profile and some supporting information that
indicates that there were orange bottomed A6M's, I waited patiently for
the right time to come to build her. When I decided to get back into
modeling a year ago or so, the Hasegawa 32nd Bf-109G-6 had
just come out and I HAD to build one (turned out pretty darn well if I do
say so myself-and yes it's different). Once it was completed, I had the
dilema of “What to do next?” while staring at my 500+ kits strewn about
the room. Somewhere in the back of my mind I heard “Zero...Zero...” so I
looked and Wa-lah, there was my Hasegawa 48th A6M5 staring me
in the face. Time to build that orange bottomed Zero!
|
CONSTRUCTION |
I can't remember which Hasegawa kit I
used, all I can tell you is it came with recessed panel lines, dropped
flaps and a one piece lower wing (unlike some of the earlier Hasegawa
Zero's that have the wheel well insert). This kit goes together with
nothing really fancy to mention. I did add the Cutting Edge A6M2/A6M3 set
to the kit. WAIT! The horror! I added an A6M2/A6M3 cockpit to an A6M5!
Why yes I did. Unless you know EXACTLY what the changes were to the
cockpit (and I'm 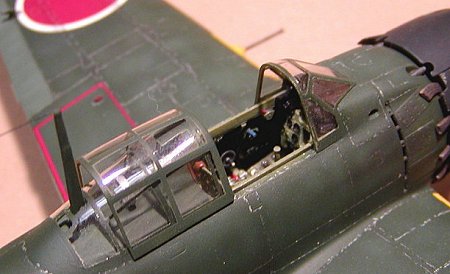 sure there's folks out there that do), I don’t think you
have to sweat it. Some folks will, I won't. I painted the cockpit with my own custom mix to simulate Nakajima Interior Green based on the color
chip in the Monogram book on Japanese aircraft interiors. I then
detailed, weathered and added the whole sha-bang into the fuselage.
sure there's folks out there that do), I don’t think you
have to sweat it. Some folks will, I won't. I painted the cockpit with my own custom mix to simulate Nakajima Interior Green based on the color
chip in the Monogram book on Japanese aircraft interiors. I then
detailed, weathered and added the whole sha-bang into the fuselage.
What is nice about this CE set is it gives you the detail behind the seat (gun charging bottles, etc) which can be seen. I also thinned out and opened up the vents on the fuselage side just behind the engine compartment and placed a piece of styrene card stock painted Flat Black behind these openings. This prevents you seeing through the but gives depth to the openings. After this was done, the fuselage was buttoned up with nothing major to report. I detailed out the engine by adding the ignition harness/plug wires to the engine with my favorite .010 lead fly tying wire. The gear doors were detailed by drilling holes through the mounting arms located on the gear doors (just like the real bird) and passing .010 lead wire through them to simulate brake lines. Other than that, the kit fit together wonderfully, nothing really to report beyond that. Minimal Mr. Surfacer 500 was used on only a few of the seams.
The one part I was VERY happy with was the wing tip lights. I had never been that good at blending lights in and to be honest, was chicken to do so. On this kit I gave it a shot since I had just purchased a Micro Mesh polishing set. Drilled out the back of the plastic pieces with a #80 drill to simulate the bulb, painted them silver and glued them on with thick CA. Once done, out came the jewelers file, then 600 grit wet/dry sandpaper, then 1000 grit, 1200, you get the picture. Once I was down to the 12000 grit cloth the lenses were shining brightly and blended in nicely with the wing tips. This wasn't as bad as I thought it was going to be! Painted the respective covers Tamiya Clear Red (port) and the other a mix of Clear Green and Clear Blue (starboard). Rescribed the minor detail that was lost, masked them over as well as the canopy parts and I was ready to paint.
|
COLORS AND MARKINGS |
 From what I’ve read, a close match to
Japanese Aircraft Trainer Orange is Floquil Reefer Orange. This paint can
be found at model railroad shops and Oh how I miss their old line of
military enamel paints. I pre-shaded the model with Flat Black but in
hindsight, would go with a medium gray in the future, at least for the
orange. Floquil goes on very thin and it took FOREVER to get the orange
to look correct, not like someone had taken a magic marker to the bottom
of the aircraft. No less than 8 coats later and plenty of drying time
(about a week), it was time to continue. I also laid down in the
appropriate areas, Floquil Reefer Yellow (with a hint of red added) on
the leading edge of the wings and face of the vertical stabilizer.
Floquil Reefer White was sprayed on the vertical stab as well. See, I was
planning on painting most of the markings on the aircraft, hence all of
the lovely colors. These were masked off in the appropriate
shapes/characters and painting continued. For the areas that I was going
to paint Aotake, I wanted to try a technique I had read about quite a
while ago. It involves laying down Flat Black first, then dry brushing
aluminum. Once this is done, you spray over this with your own custom mix
of Tamiya Clear Blue and Tamiya Clear Green. Some say it should be blue,
some say green, some say a hue in between. Since it was a clear
protective varnish that was dyed to know where it had been applied, I say
shoot the moon. Since there is no set standard for what depth of color
Aotake is supposed to be that I know of, it’s all up to you on how you
want it to look. I was very pleased with the results of this technique (I
went with the mix of clear blue and green) and a sincere "Thanks" to the
gent who came up with this technique. The upper portion of the kit was
sprayed Floquil IJN Green and set aside to dry over night.
From what I’ve read, a close match to
Japanese Aircraft Trainer Orange is Floquil Reefer Orange. This paint can
be found at model railroad shops and Oh how I miss their old line of
military enamel paints. I pre-shaded the model with Flat Black but in
hindsight, would go with a medium gray in the future, at least for the
orange. Floquil goes on very thin and it took FOREVER to get the orange
to look correct, not like someone had taken a magic marker to the bottom
of the aircraft. No less than 8 coats later and plenty of drying time
(about a week), it was time to continue. I also laid down in the
appropriate areas, Floquil Reefer Yellow (with a hint of red added) on
the leading edge of the wings and face of the vertical stabilizer.
Floquil Reefer White was sprayed on the vertical stab as well. See, I was
planning on painting most of the markings on the aircraft, hence all of
the lovely colors. These were masked off in the appropriate
shapes/characters and painting continued. For the areas that I was going
to paint Aotake, I wanted to try a technique I had read about quite a
while ago. It involves laying down Flat Black first, then dry brushing
aluminum. Once this is done, you spray over this with your own custom mix
of Tamiya Clear Blue and Tamiya Clear Green. Some say it should be blue,
some say green, some say a hue in between. Since it was a clear
protective varnish that was dyed to know where it had been applied, I say
shoot the moon. Since there is no set standard for what depth of color
Aotake is supposed to be that I know of, it’s all up to you on how you
want it to look. I was very pleased with the results of this technique (I
went with the mix of clear blue and green) and a sincere "Thanks" to the
gent who came up with this technique. The upper portion of the kit was
sprayed Floquil IJN Green and set aside to dry over night.
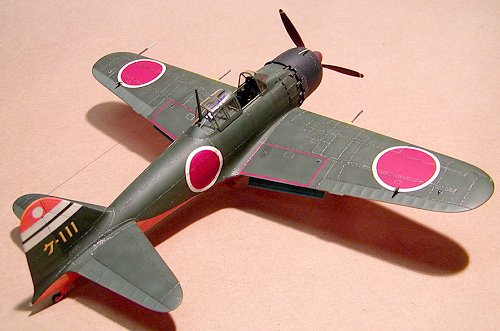
 Next day was lightening up the IJN Green
with some white and gave her a blotchy look simulating various panels
starting to succumb to the elements. I did paint the control surfaces in
an even lighter shade of IJN Green with the left aileron painted even
lighter than the rest. At the time I was thinking, “Hey, it’s a trainer.
Some student had to have dinged her at some point with the aileron being
replaced off of an OLD A6M5” so that’s why it’s a tad lighter. Call it
artistic license since that pretty much what this project was. At this
point I was feeling pretty feisty and decided to paint the Hinomarus on
as well. Made the masks with my Olfa-P circle cutter and some frisket
paper and proceeded to paint. Once everything was done, I laid down a
coat of Testors gloss coat to level out the color and prepare her for the
minimum of decals that were going on. Decals were added (wing warning
areas and the stripes on the cowl, that's it) and when appropriate one
more gloss coat followed by a final Dullcote. Paint chipping was done
with a silver artists pencil, I’m still trying to decide if I over did it
a bit. Exhaust staining was done with Tamiya Clear Smoke and dark brown
and black pastels.
Next day was lightening up the IJN Green
with some white and gave her a blotchy look simulating various panels
starting to succumb to the elements. I did paint the control surfaces in
an even lighter shade of IJN Green with the left aileron painted even
lighter than the rest. At the time I was thinking, “Hey, it’s a trainer.
Some student had to have dinged her at some point with the aileron being
replaced off of an OLD A6M5” so that’s why it’s a tad lighter. Call it
artistic license since that pretty much what this project was. At this
point I was feeling pretty feisty and decided to paint the Hinomarus on
as well. Made the masks with my Olfa-P circle cutter and some frisket
paper and proceeded to paint. Once everything was done, I laid down a
coat of Testors gloss coat to level out the color and prepare her for the
minimum of decals that were going on. Decals were added (wing warning
areas and the stripes on the cowl, that's it) and when appropriate one
more gloss coat followed by a final Dullcote. Paint chipping was done
with a silver artists pencil, I’m still trying to decide if I over did it
a bit. Exhaust staining was done with Tamiya Clear Smoke and dark brown
and black pastels.
|
FINAL CONSTRUCTION |
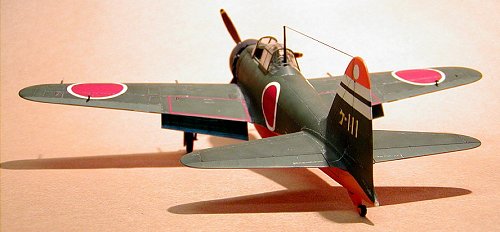
After all of the masking was removed, this was a plane of many colors. My friend Steve Mesener referred to her as “The Flying Lifesaver,” and looking at her, he isn’t to far off. All of the small bits were glued on at this point (gear/gear doors, pitot tube, flaps, tail wheel, etc.) with antenna wire added from 7x fly fishing tippet material. Gun barrels were hollowed out as were the exhausts. Before I knew it, she was done. When I was done taking these pictures of her, I noticed the gunsight was missing! Oh but the carpet Gods were kind and gave it back, I'll glue it back in later.
|
CONCLUSIONS |
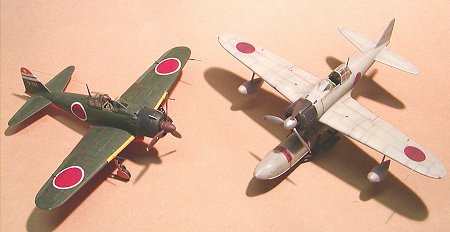 Well here she is, a nice colorful A6M5.
All in all I'm pretty happy with the way she turned out and she looks
good sitting next to the Rufe and Ki-44 on the shelf. Since this time,
I've found some other pretty wild looking A6M's that are a MUST on the
build list. Now here's the wacky part, I really don't build Japanese
aircraft, prefer US and Lufwaffe, but if I keep on seeing some Zero's
marked other than your standard Amerio or Green/Gray, I see a lot more
A6M's on the shelf. Thanks for letting me stop by again, be good to each
other. Time to get back to fishing!
Well here she is, a nice colorful A6M5.
All in all I'm pretty happy with the way she turned out and she looks
good sitting next to the Rufe and Ki-44 on the shelf. Since this time,
I've found some other pretty wild looking A6M's that are a MUST on the
build list. Now here's the wacky part, I really don't build Japanese
aircraft, prefer US and Lufwaffe, but if I keep on seeing some Zero's
marked other than your standard Amerio or Green/Gray, I see a lot more
A6M's on the shelf. Thanks for letting me stop by again, be good to each
other. Time to get back to fishing!
|
REFERENCES |
The Encyclopedia of Air Warfare: Salamander Books (1975)
Aero Detail #7: A6M Zeros
Japanese Aircraft Interiors by Mike Mikesh
April 2004
If you would like your product reviewed fairly and fairly quickly, please contact the editor or see other details in the Note to Contributors.