R&S Resins 1/72 Re.2007
|
KIT # |
|
|
PRICE: |
|
|
DECALS: |
|
|
REVIEW |
Allan Wanta |
|
NOTES: |
Resin kit |
|
HISTORY |
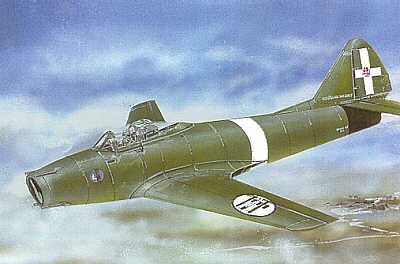
 The
finest achievement of the Reggiane Mechanical Works was undoubtedly the
Re.2007. In every way, this design of late 1943, was much like modern jet
aircraft that were to follow in the late 1940's/early 50's. It had fully swept
wings and tail. It had a fully fuselage enclosed Jumo 004 turbojet while other
designs had the engine attached to the airframe or wings. It was heavily armed
with four 20mm cannon.
The
finest achievement of the Reggiane Mechanical Works was undoubtedly the
Re.2007. In every way, this design of late 1943, was much like modern jet
aircraft that were to follow in the late 1940's/early 50's. It had fully swept
wings and tail. It had a fully fuselage enclosed Jumo 004 turbojet while other
designs had the engine attached to the airframe or wings. It was heavily armed
with four 20mm cannon.
As it the case with many late war projects, the end of hostilities pretty well finished the project. A prototype was about 70% compete at war's end and may have been finished earlier, however a number of moves were made during development. This was mostly due to the Allied advance up the Italian peninsula. Much of the work was followed with great interest by a committee of German officers and technician. So promising was the design, that two Jumo 004B turbojets were shipped to Italy for use in the prototypes. One of these engines is currently on display at the Historic Museum of Military Aeronautics at Caserta.
A very similar Re.2008 was proposed post war, but for various reasons was never accepted by the A.M.I.
(Update, 23 Feb, 2001. Thanks to information from reader Max C.A. Cappone, it appears that the Re.2007 was never more than a paper project. The engine mentioned in the above history was from an Ar-234. This only goes to show that often older references are not totally accurate and that later research can greatly change what was at one time thought to be fact.
If you can read Italian, I encourage you to visit Max's website for more information on the Reggiane 2007 and other projects.)
|
THE KIT |
As with all RS resin kits, a simple top over bottom cardboard box holds a small yet well done collection of tan colored parts. Main fuselage parts as well as the two solid wings are cast independently with a wafer containing the smaller bits. The landing gear legs are of particular interest, being extremely fragile looking, best start looking for some suitable replacements in the spares bin. Although very nicely done, I fear the weight of this kit will be their undoing.
|
CONSTRUCTION |
 First off, flat sand the two fuselage halves and remove the
small pour blocks from the main wings. The wings butt join to the fuselage, best
drill and insert wire rods here to ensure the wings not coming undone down the
road. Also the wings have a pronounced anhedral. The interior is best described
as sand and fit time, a few big blobs of resin occupy the cabin walls and must
be dealt with in order to make the cockpit tub and rear bulkhead fit. Once I got
the tub and wall to fit, the front wheel well can be placed and glued. Another
tricky spot is an air intake splitter vane; trial fitting and sanding is the
norm here. I wonder if anyone at RS actually assembled one of these before
letting it on the market? Well, I don't mind the challenge and being a modeler
is what this hobby is all about.
First off, flat sand the two fuselage halves and remove the
small pour blocks from the main wings. The wings butt join to the fuselage, best
drill and insert wire rods here to ensure the wings not coming undone down the
road. Also the wings have a pronounced anhedral. The interior is best described
as sand and fit time, a few big blobs of resin occupy the cabin walls and must
be dealt with in order to make the cockpit tub and rear bulkhead fit. Once I got
the tub and wall to fit, the front wheel well can be placed and glued. Another
tricky spot is an air intake splitter vane; trial fitting and sanding is the
norm here. I wonder if anyone at RS actually assembled one of these before
letting it on the market? Well, I don't mind the challenge and being a modeler
is what this hobby is all about.
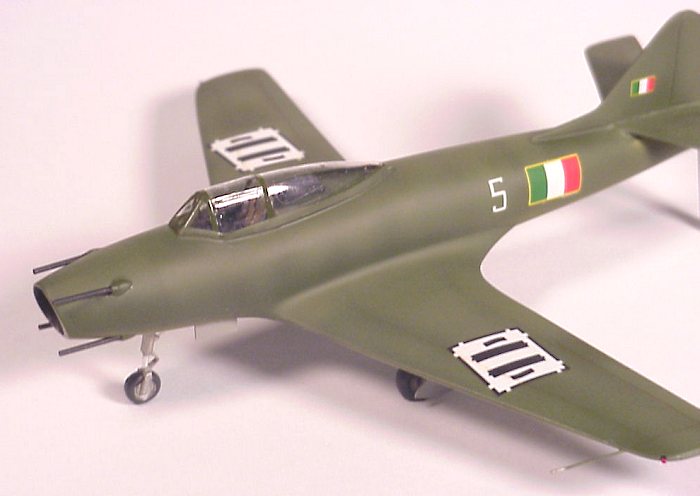
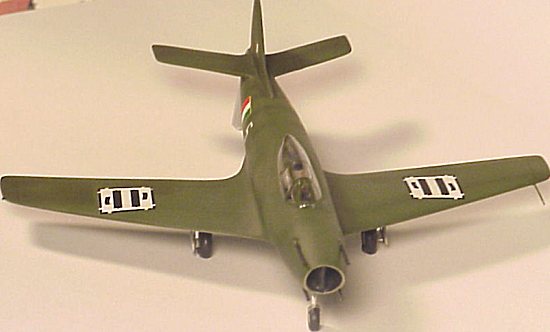
With most of the hard part behind me, the fuselage, along with a couple lead shots in the nose, were glued together. This is a really well molded and detailed kit, from the scribed panel lines to the ultra thin gear doors complete with beveled sides. The gear legs however have the case of shifted molds, an incurable affliction, and were cleaned up as best as possible in hopes no one looks closely. I ended up using a pair of True Detail Macchi Mc-202/205 wheels that were a perfect match. The wheel wells are good enough in this scale, as is the nose well.
Some day all resin companies will mold seatbelts onto their seats, saving the hassle of gluing on stiff brass and stainless replicas. I found that taking thick aluminum foil painted to match works very well. It's easy to bend and stays where its' glued. The rear tail fins are extremely thin but fit like a charm with little bother.
|
PAINT & DECALS |
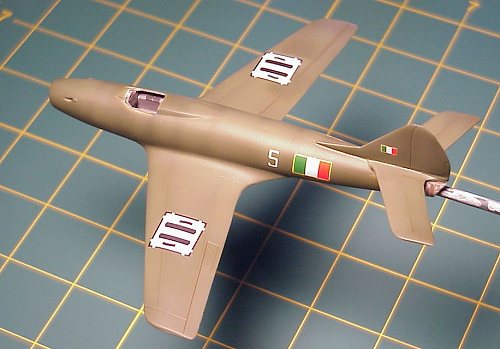
The next step is to primer the entire plane, checking for the inevitable pinholes and blips. With those things taken care of, the undersurface is sprayed an Italian blue-gray, the upper surface given a dark green as found in later war aircraft. Lot's of Future floor wax is applied to give the decals something to bite into and level the paint surfaces. I suspect that if this plane were ever to have been built, it would have seen service with the Luftwaffe aligned ANR, thus some Skymodel decals from various sheets have been applied.
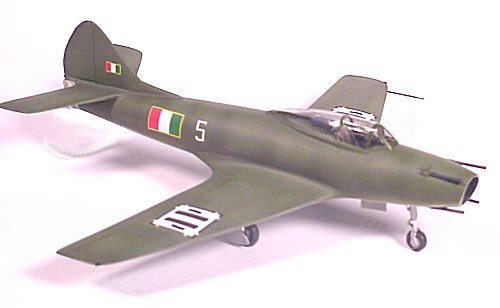 Gosh, this thing looks a lot like an early Dassault jet
aircraft! But I bet the real thing would have had the courtesy to sit on all
three gears. I fear that there was not enough room for ballast in the nose to
keep this beast from being a tail sitter. So there it sits, in an action pose
ready to fly from my test airstrip. The aircraft was equipped with four
(4) yes, count 'em 4 cannon in the nose, mine are replicated using 4 fine lengths
of tubing. They almost look like pitot tubes. Under the canopy and behind the
seat one might imagine a radio or something like that, so I imagined a thing
that represents a radio and put in. The canopy as supplied is clear all the way
to the back and not painted as part of the overall green topsides. So I tried to
get the cockpit as busy looking as I could to satisfy the Mag-light group.
Gosh, this thing looks a lot like an early Dassault jet
aircraft! But I bet the real thing would have had the courtesy to sit on all
three gears. I fear that there was not enough room for ballast in the nose to
keep this beast from being a tail sitter. So there it sits, in an action pose
ready to fly from my test airstrip. The aircraft was equipped with four
(4) yes, count 'em 4 cannon in the nose, mine are replicated using 4 fine lengths
of tubing. They almost look like pitot tubes. Under the canopy and behind the
seat one might imagine a radio or something like that, so I imagined a thing
that represents a radio and put in. The canopy as supplied is clear all the way
to the back and not painted as part of the overall green topsides. So I tried to
get the cockpit as busy looking as I could to satisfy the Mag-light group.
With another coat or two of Future, the entire craft was given a spray of Testors Dullcoat after which the last item to be glued was the canopy.
|
CONCLUSIONS |
Well, there we have a Regia'46, possibly the only airplane kit to be so labeled. And it certainly looks like it could have caused some serious damage had it been made a bit sooner in the war. Kudos to R S Resins for this kit, a well done little piece of what could have been! On the difficulty scale of 1 to 10, this one's a 5; it's also an 8 on the cool scale. Ciao dudes!
|
REFERENCES |
The Caproni Reggiane Fighters 1938-1945 by Piero Prato, 1971
Copyright ModelingMadness.com. All rights reserved. No reproduction in any form without express permission from the editor.
If you would like your product reviewed fairly and quickly, please contact me or see other details in the Note to Contributors.
Back to Reviews Page 2025