|
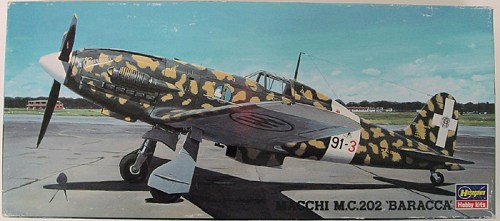
KIT # |
51618 (SP 118) |
|
PRICE: |
$around $12.98 MSRP when new |
|
DECALS: |
Two options |
|
REVIEWER: |
Jon Hudak |
|
NOTES: |
|
HISTORY |
No doubt about it the Macchi C.202 Folgore has got to be one of the finest looking Italian fighters of WW2. The Folgore or "Lightning" was the result of a desperate need for a more modern, competent fighter for the Italian Air Force to replace already outdated designs like the Fiat G.50 and Macchi C.200.While the C.200 was a fine aircraft with excellent flying characteristics it was underpowered by it's 800 hp radial engine. Having acquired rights to build the proven German Daimler Benz DB 601 inline engine under license, the plan was to build an entirely new airframe around it while using as many parts from the C.200 as possible. Things like the wings, stabilizers, vertical tail and landing gear were incorporated from the C.200 onto an all new fuselage to ease and simplify production.
 The resulting aircraft was a
success and was said to be superior to the Hawker Hurricane and on par
with other Allied fighters of the time like the P-40. It was noted for
it's handling skills and was a formidable fighter even though it was
somewhat inadequately armed with only a pair of 12.7 mm machine guns in
the cowling. Later examples would be fitted with a pair of 7.7 mm machine
guns in the wings, one gun per wing. These were rarely used even when
fitted due to the ineffectiveness of the rifle caliber round against
American heavy bombers and the well protected fighters now being
encountered later in the war. The C.202 would see extended service in
North Africa, Malta, and Tunisia against the Allies and some were even
sent to Russia.
The resulting aircraft was a
success and was said to be superior to the Hawker Hurricane and on par
with other Allied fighters of the time like the P-40. It was noted for
it's handling skills and was a formidable fighter even though it was
somewhat inadequately armed with only a pair of 12.7 mm machine guns in
the cowling. Later examples would be fitted with a pair of 7.7 mm machine
guns in the wings, one gun per wing. These were rarely used even when
fitted due to the ineffectiveness of the rifle caliber round against
American heavy bombers and the well protected fighters now being
encountered later in the war. The C.202 would see extended service in
North Africa, Malta, and Tunisia against the Allies and some were even
sent to Russia.
Eventually faced with superior competition the need arose to make the C.202 faster and give it a bigger punch. This is where the C.205 would come in. Although a worthy successor, the Veltro or "Greyhound" wasn't produced in large enough numbers to make a difference and by then it was already too late. Altogether some 1150 C.202s had been produced and the number of C.205s were even fractionally less. When faced with the number of aircraft that were being cranked out by the Allies, this was never a large enough number to turn the tide of the war for the Italians. Both still held the distinction of being some of the finest fighting aircraft of the Italians in WW2.
|
THE KIT |
The instructions of this particular kit and the
side of the box date from 1993.I got this particular kit secondhand at a
model show for $5 off of a vendor. It was originally labeled as a "parts
model" but a check of my own revealed that everything was indeed there.
Truly a good deal for $5. Inside are three sprues molded in light gray
plastic and a fourth one for the clear parts. The kit itself is what
we've come to expect from Hasegawa. The parts are all nicely and cleanly
molded with fine 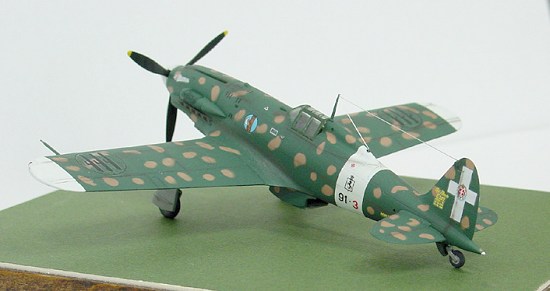 recessed panel lines and zero flash. A nice touch is
that the windscreen and canopy are molded separately. While they are both
thin and clear, the framing at the bottom of the windscreen is a little
light making it harder to pick out and mask off. It looks like it will
build into a very nice model.
recessed panel lines and zero flash. A nice touch is
that the windscreen and canopy are molded separately. While they are both
thin and clear, the framing at the bottom of the windscreen is a little
light making it harder to pick out and mask off. It looks like it will
build into a very nice model.
Markings:
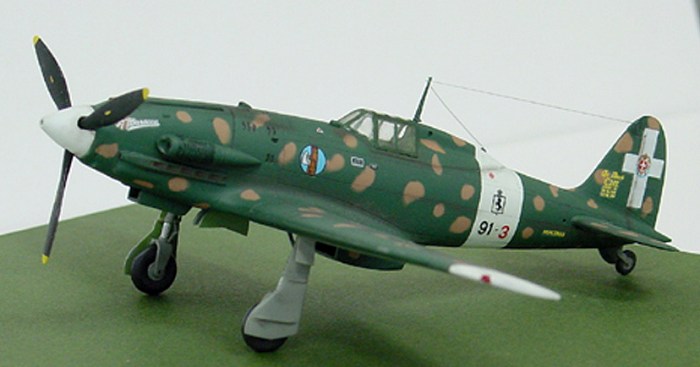
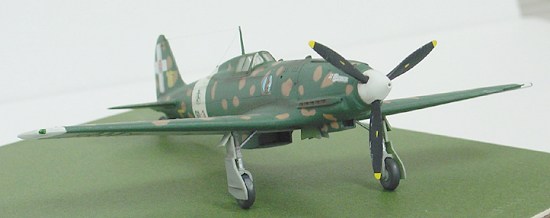
Markings are provided for two aircraft. The first one is the lovely
overall Dark Green one with Light Hazelnut Brown splotches over Light
Blue-Gray undersides as depicted on the box art. Further research
indicated that this machine,"4º Baracca" (named after famous Italian WW1
ace Francesco Baracca) of 91 Squadriglia,10º Gruppo,4º Stormo was flown
by Capitano Carlo Maurizio Ruspoli di Poggio Suasa. Boy, say that name 10
times fast! The second aircraft is labeled as 386 Squadriglia,21º Gruppo
Antonomo C.T and is overall Light Sandy Brown/Light Hazelnut Brown with
Olive Green "mottling" over Light Blue-Gray undersides. Both are Italian
Air Force. Decals are standard Hasegawa and look nice and are in perfect
register.
|
CONSTRUCTION |
I always start off by washing all the parts in the sink with an old soft toothbrush and a little liquid dishwashing soap and then the parts are all thoroughly rinsed and allowed to dry.
I started with the cockpit and following the kit recommendations I
airbrushed everything needed for it as well as the insides of the
fuselage halves, wheel wells and inner sides of the gear doors with
Gunze's H312 Light Green. When everything was dry I assembled the cockpit
which consists of a floor, seat and control stick. The instrument panel
comes in later. There is no sidewall detail for the insides of the
fuselage or wheel wells. The handgrip and instrument panel were painted
black and later I applied the decal for the instrument panel. I also made
some seatbelts from Tamiya tape and these were painted in a light
beige/tan color with a little silver at the ends to simulate buckles. The
instrument panel was then glued to the inside of one of the fuselage
halves, and while the glue was setting, I then glued the two halves
together. After this had dried I glued in the completed cockpit tub up
from underneath.
 The instructions show to mount the one piece lower wing to the fuselage
and then attach the upper wing halves rather than doing it all as a
subassembly and then attaching it. If my memory serves me correctly I did
it as per the instructions. The stabilizers were next and glued on. So
far no problems other than some gapping at the wing roots and where the
edge of the lower wing meets the bottom of the fuselage towards the tail.
A little extra care was taken to blend everything in here as well as the
trailing edge of the fillet into the lower wing area. Otherwise,
everything fit pretty well. Next was the upper cowl piece and I think I
goofed and glued it slightly off center making for a flush fit on one
side and a "step" on the other. D'oh! I alleviated this problem by some
vigorous but careful sanding reducing the side of the fuselage to match
up with the cowl. I do think that the cowl piece is a bit undersized so
be careful when attaching it. I also had some gapping at the attaching
points of this piece. Like with the wing roots you have to be careful
because there are natural panel lines here. The instructions would show
you to assemble the prop and spinner and backing plate as one assembly
and then trap it between the upper cowl and lower front of the forward
fuselage. That would make for some serious masking I'd think, so not
being too concerned about having a spinning prop I glued the spinner ring
to the front and pushed the prop on later.
The instructions show to mount the one piece lower wing to the fuselage
and then attach the upper wing halves rather than doing it all as a
subassembly and then attaching it. If my memory serves me correctly I did
it as per the instructions. The stabilizers were next and glued on. So
far no problems other than some gapping at the wing roots and where the
edge of the lower wing meets the bottom of the fuselage towards the tail.
A little extra care was taken to blend everything in here as well as the
trailing edge of the fillet into the lower wing area. Otherwise,
everything fit pretty well. Next was the upper cowl piece and I think I
goofed and glued it slightly off center making for a flush fit on one
side and a "step" on the other. D'oh! I alleviated this problem by some
vigorous but careful sanding reducing the side of the fuselage to match
up with the cowl. I do think that the cowl piece is a bit undersized so
be careful when attaching it. I also had some gapping at the attaching
points of this piece. Like with the wing roots you have to be careful
because there are natural panel lines here. The instructions would show
you to assemble the prop and spinner and backing plate as one assembly
and then trap it between the upper cowl and lower front of the forward
fuselage. That would make for some serious masking I'd think, so not
being too concerned about having a spinning prop I glued the spinner ring
to the front and pushed the prop on later.
The airframe for the most part was now complete and I went to work on the
seams. Other than the previously listed "fit areas" the rest of the fit
was pretty good and I didn't have to use much filler at all. I used Gunze
Mr.Liquid Putty here and there in a few places, while some areas needed
no putty at all. It dries quickly and sands easily enough. Some care was
taken to fill in the gaps at the wing roots but still leaving the natural
panel line. In the end it all worked out. Next I added the "scoops"
underneath and a little blending was needed with both of them along the
edges where they attach. Confident now that all the seams were looking
good, the model if I may say was...... Now ready for paint!
I had previously applied Future to the clear parts and masked them with
Tamiya tape doing it all at once masking each pane off with pieces of
tape sort of forming a "frame" and then painting the centers with Ambroid
liquid mask. I usually prefer to attach the canopies/windscreens before
painting but due to the way the 202's canopy is sort of "open" at the
back I chose to attach them after painting.
|
COLORS & MARKINGS |
Painting:
The cockpit and wheel wells were masked off with Tamiya
tape and the first areas to be painted were the wingtips and area for the
tail band on the fuselage. While there is a decal provided for this, I
chose to paint mine on. As R. Lee Ermey would say "hoo-rah!" Despite the
fact that my last several models were done with acrylics, enamel paints
would be mainly used for the
 rest of the airplane from here on out. I
also had decided to do the green aircraft with the light brown splotches.
Some Humbrol Flat White #34 was used here and also for the spinner and
this was my first time using Humbrol paints. It airbrushed nicely. I did
add a drop of blue to it just in case to avoid the "yellowing factor"
that comes with old age. I was now in a race to complete the model in
less than a weeks' time for a club meeting contest so the pressure was
on! The White had dried for two days and I then masked off these areas
using Tamiya masking tape. Let me say this friends, when trying to mask
off a tailband with one piece of tape on something like a C.202 with that
complex fuselage shape and spine, keep the ends of the tape at the top of
the spine and have them wrap around and meet there at the end. I tried a
couple of different ways and the tape would always pull away if you tried
to wrap the whole piece around the "hump."
rest of the airplane from here on out. I
also had decided to do the green aircraft with the light brown splotches.
Some Humbrol Flat White #34 was used here and also for the spinner and
this was my first time using Humbrol paints. It airbrushed nicely. I did
add a drop of blue to it just in case to avoid the "yellowing factor"
that comes with old age. I was now in a race to complete the model in
less than a weeks' time for a club meeting contest so the pressure was
on! The White had dried for two days and I then masked off these areas
using Tamiya masking tape. Let me say this friends, when trying to mask
off a tailband with one piece of tape on something like a C.202 with that
complex fuselage shape and spine, keep the ends of the tape at the top of
the spine and have them wrap around and meet there at the end. I tried a
couple of different ways and the tape would always pull away if you tried
to wrap the whole piece around the "hump."
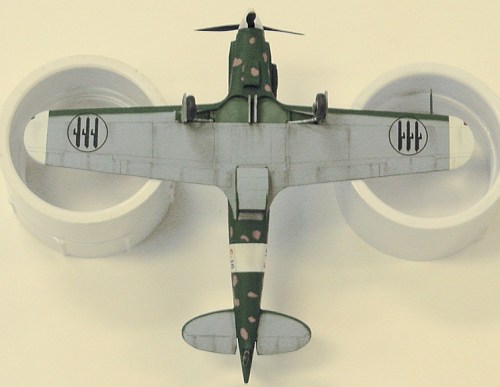
With the white areas masked off I sprayed the underside areas which were
only the bottoms of the stabilizers and the wing area. The colors of the
fuselage on this particular aircraft wrapped around completely
underneath. That's part of the beauty of Italian WW2 camouflage schemes,
more work, but worth the effort. They also look cool and are very unique.
This would be my first Italian paint scheme by the way. I also at this
time sprayed the outsides of the gear doors. Model Master Italian Blue
Gray was used throughout. I had an idea I'd learned from another modeler
at a show on how to do the camouflage for this particular scheme. We'll
get to that.
The next day I masked off the underside areas that had been painted gray
with some low tack Scotch drafting masking tape. Now on most WW2 Italian
fighters the upper color of the wings wrapped around underneath and onto
the underside of the wing. Using another technique for the first time
that I'd learned, I positioned the tape away from the leading edge by
eyeballing it and put a piece of dental floss about a 1/16" away from the
forward edge of the tape to give a nice "feathered" edge, not too sharp
but not too fuzzy either. It worked perfectly. For the stabs which have
the same pattern, I used ones from another kit and traced them onto a
piece of the masking tape and cut out the shape on the tape and had a
nice symmetrical template that would serve as my mask. They were
positioned the same way.
 I then sprayed the upper
surfaces in Italian Sand again using Model Master enamel paints. So far
so good and the model was left to dry overnight. Now this is where the
masking trick comes in. Using only a single action airbrush and trying to
freehand all those tan splotches and yet on a 1:72 scale model would be
pretty tough I'd think. So using some Handi-Tack poster mounting material
stuff from a craft store, I set about tearing off tiny little pieces of
it to stick to the model. These I'd hope would act as a template when
spraying the green over the tan, giving me my splotches. After about 2.5
hours of getting the things to stick to the model and not my hand or
Xacto knife I was ready to paint. I had followed the instructions for
this as best as I could to have a comparison. When this was done I then
sprayed Model Master FS34092 Euro Dark Green on all the areas that were
to be painted this color. I was getting close to the deadline and a
couple of hours later I couldn't take it and started lifting off all the
little pieces of the stuff and was relieved to see that they had held up
rather well. I also took off the masking tape from everywhere else on the
model and was delighted to see that the white areas had held up to the
masking job. Whew!
I then sprayed the upper
surfaces in Italian Sand again using Model Master enamel paints. So far
so good and the model was left to dry overnight. Now this is where the
masking trick comes in. Using only a single action airbrush and trying to
freehand all those tan splotches and yet on a 1:72 scale model would be
pretty tough I'd think. So using some Handi-Tack poster mounting material
stuff from a craft store, I set about tearing off tiny little pieces of
it to stick to the model. These I'd hope would act as a template when
spraying the green over the tan, giving me my splotches. After about 2.5
hours of getting the things to stick to the model and not my hand or
Xacto knife I was ready to paint. I had followed the instructions for
this as best as I could to have a comparison. When this was done I then
sprayed Model Master FS34092 Euro Dark Green on all the areas that were
to be painted this color. I was getting close to the deadline and a
couple of hours later I couldn't take it and started lifting off all the
little pieces of the stuff and was relieved to see that they had held up
rather well. I also took off the masking tape from everywhere else on the
model and was delighted to see that the white areas had held up to the
masking job. Whew!
Decals:
The next day the model was sprayed with Pollyscale's clear gloss and a
couple of hours later I was applying the decals. I used the Micro Set and
Sol system and there were no harsh reactions or troubles. The unit badges
with the blue backgrounds didn't want to stick for anything and I was
afraid they'd lost all their magical powers of adhesion. In the end some
good old fashioned spit (a tip learned from this very website!) was used
and a couple more hits of MicroSol. In the end it all worked out.
Everything seemed to be going rather well but unfortunately I saw some
silvering on the national insignias on the wings. Even after a wipe down
with a damp cloth a few hours after the decals had dried and another coat
of Pollyscale gloss followed by a coat of their flat, (which I like) the
silvering was still there. In the end I used some lightly thinned Euro
Dark Green and dry-brushed it on inside the insignia with a fine brush
and sprayed on some more Pollyscale clear flat. This was another trick
learned by a friend. I got most of it but there's still a couple of light
traces here and there. I think the culprit behind the silvering was an
uneven gloss coat. It was a little "patchy" looking back on it. Normally
I use Testor's glosscote and recently have had success with Future. This
was the first time I'd tried the Pollyscale glosscote and I should have
tried polishing it out with some micromesh cloths and perhaps resprayed
it again before applying the decals. Haste makes waste they say.
|
FINAL CONSTRUCTION |
With everything else basically done and running
out of time I did everything else I could think of. The prop tips were
sprayed with Tamiya Flat Yellow and the blades with their Flat Black. The
exhaust stacks were painted with Floquil's Roof Brown. The landing gear
and wheel rims had been painted with the same gray that I used on the
bottom of the airplane and Model Master Chrome Silver was used for the
sliding portions of the gear and for the links that attach to the main
gear. These would prove 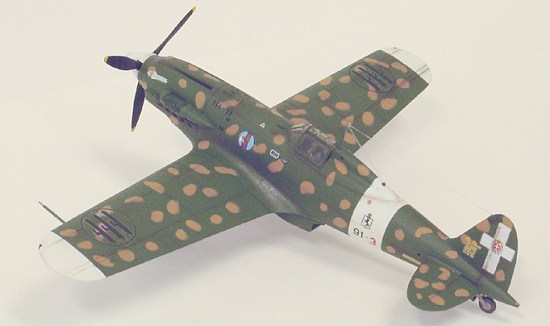 to be a small exercise in frustration while
adding them later. I used Floquil Grimy Black RR enamel as it's a nice
color for tires and also brushes nicely. I then added the antenna, pitot,
tail wheel and landing gear, allowing the model to dry overnight on it's
"back" until the morning.
to be a small exercise in frustration while
adding them later. I used Floquil Grimy Black RR enamel as it's a nice
color for tires and also brushes nicely. I then added the antenna, pitot,
tail wheel and landing gear, allowing the model to dry overnight on it's
"back" until the morning.
The small outer gear doors will attach better if you hack out a little
from their tab where they mount into the bottom of the wing as the tab is
a little oversized for the slot. It was worth the added extra little
effort and is a more solid mount. After the second gloss coat had dried
(the one sprayed over the decals to seal them in) I used a regular pencil
and went over the panel lines before the final flat coat as this will
eliminate any of the "shininess" you'd get if you did the penciling last.
With the model now almost entirely complete (the wingtip lights hadn't
been painted yet, not enough time)! and looking very much a Macchi it was
done for the contest that morning.
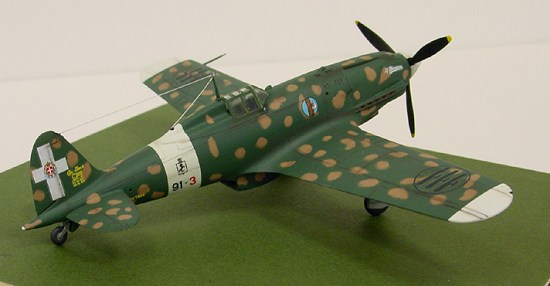
Although the model was looking good and was finished, I took it over to a
friend's house and asked him his opinion. He liked it but felt it was
"too clean" and so with his help we took it away and "dirtied it up".
This is where I felt the model really transformed. Pastels were used for
some added effect all over, not too much, but just enough. A little on
the tires as well and some dry brushing with silver near the wing root on
the left-hand side as well as the leading edges of the wings, and other
flying surfaces and the edges of the prop blades. A micropen was used to
highlight all the various vents and slits that abound on a C.202. The
wingtip lights were also painted at this time. Lastly an antenna made
from stretched clear sprue was the final bit and it was now "entirely"
complete.
|
CONCLUSIONS |
I really enjoyed building this little kit and
would recommend it to anyone with the slightest interest. It definitely
stands out from the normal Allied and Luftwaffe fare and the colorful
Italian camouflage schemes are attractive. I'm not one to compare sizes
and dimensions but it definitely looks like a Macchi C.202 to me. I'm
also amazed at it's size, it's rather tiny and is smaller than my 1:72
scale Zeros that it's sitting next to in the display cabinet. It goes
together pretty easily and it's too bad you don't see more of them at
shows. While I'd previously started the construction a couple of weeks
before the deadline, all of the painting and everything else which
amounted to four different colors was done in just a week. The colorful
paint scheme gave me several new techniques to try, a couple of them
being just in masking alone. This was my sixth model and also my first
Italian aircraft and I like how it turned out. It's definitely different
and has a pleasing shape and I am proud of it. Sharp eyed readers may
have noticed the right landing gear being a little crooked, but I'll get
that fixed soon.
For C.202 1:72 scale fans there is the ancient Frog kit, and one from Supermodel (I have this and the Frog kit)
and one from Italeri as well as the Hasegawa kit. The Frog kit is a child
of it's time and is eclipsed by the newer offerings, even Supermodel. The
Supermodel kit isn't bad despite it's raised panel lines and age and it
has dry transfer decals which I've heard a lot of good things about. Plus
it looks like there's markings for 4 aircraft! It also has nifty rubber
tires too and allows you to build what looks like the prototype "D"
version. Plus you can usually find it at shows cheap. How can you beat
that? It also looks pretty good built up. I also have the Italeri kit and
while it's about half the price of the Hasegawa kit when new, it does
feature some nice wheel well detail as well as some framing and floor
detail inside. The fuselage halves also feature some nice ribbing detail
which the Hasegawa kit does not offer. It's antenna is also mounted to
the fuselage which I like as it's a sturdier piece and is less prone to
break. There is also some recessed rivet detail on the wings which looks
nice. Like the Hasegawa kit you'll have to open up the machine gun holes
in the wings if you want. Since mine was going to be an out of the box
build, I didn't add the machine gun barrels or venturi tube like I could
have. Research will be worth it here as to find out whether or not your
particular aircraft had them.
Lastly the Hasegawa kit lacks the little venturi(?) tube that mounts
under the fuselage which the Italeri and Supermodel kits both have.
However these are minor things and can be easily remedied by the modeler
and if the canopy is mounted in the closed position on either kit, you
won't notice the inner detail that's there or not there. The one thing
the Hasegawa kit has over it's competitors is the superb quality of the
moldings, they're hard to beat and are nice and crisp. I'd say they're a
little thinner compared to the Italeri moldings as well. There's just
something about Italeri's plastic that you can't mistake for anyone
else's moldings. Perhaps it's the thickness and texture of the plastic.
Please note, these comparisons aren't meant to trash one or the others
kits, so take no offense. They're just noted to give the reader knowledge
and make him or her aware. I'd like to see the Italeri kit built up and
put next to the Hasegawa kit for a comparison myself. I should mention
that both Italeri and Supermodel produce a C.205 while Hasegawa does not,
at least not in 1:72 scale. The aftermarket company Misterkit makes a
conversion set that allows you to convert the Hasegawa kit into a C.205
as well as a 202 "correction" kit. I was fortunate to have won one of
these (the latter) at a raffle. It includes a "corrected"? fuselage in
gray plastic as well as some p.e brass for the wheel wells and landing
gear doors and a beautiful resin set that includes a full cockpit,
"plumbing" and "weighted" tires. I recently picked up a Sky decals sheet
for the C.205 which includes markings for no less than twenty different
aircraft! It is lovely and a real gem of a sheet. The nice thing about
the closeness of the two aircraft is that you could use some of the
insignias and unit badges from this for the 202 as well.
So there you have it, there's a lot out there that can be done with the C.202 and C.205 in 1:72 scale and the Hasegawa kit is a great place to start.
|
REFERENCES |
Macchi C.202 in Action
Squadron Publications
Macchi MC 202 Folgore pt.1a IBN Editore
Aer. Macchi C.202 1941-1942 La Bancarella Aeronautica
May 2004
Copyright ModelingMadness.com. All rights reserved. No reproduction in part or in whole without express permission from the editor.
If you would like your product reviewed fairly and fairly quickly, please contact the editor or see other details in the Note to Contributors.