| KIT #: | 9133 |
| PRICE: | $35.00 when new |
| DECALS: | Two options |
| REVIEWER: | Andrew Garcia |
| NOTES: | Ultracast resin seat & Mike Grant 48043 Smoke Ring decal |
| HISTORY |
The Macchi
MC.205 Veltro was an Alfa-Romeo engined DB 605 clone, 1475 h.p. inline engine
replacement for the MC.202 Folgore. It was part of the lineage starting with the
MC.200 radial engined fighter. It was built by
 Aeronautica
Macchi, and subcontractors SAI-Ambrosini and Breda in Italy. The MC.205 initial
prototype flew in April of 1942.
Its armament was improved over the MC.200 Saetta and MC.202 Folgore that it
replaced. Initially it had the same armament configuration as the MC.202 but it
was quickly improved starting with the MC.205 serie III to 20mm cannons in the
wings and 12.7mm guns in the nose.
Aeronautica
Macchi, and subcontractors SAI-Ambrosini and Breda in Italy. The MC.205 initial
prototype flew in April of 1942.
Its armament was improved over the MC.200 Saetta and MC.202 Folgore that it
replaced. Initially it had the same armament configuration as the MC.202 but it
was quickly improved starting with the MC.205 serie III to 20mm cannons in the
wings and 12.7mm guns in the nose.
Although
heavier it was a marked improvement over the C.202. The first production
aircraft rolled off the assembly line in September 1942. Due to war time
pressures requiring parallel production of the MC.200 and MC.202 the Veltro had
a slow start with just a trickle coming off the production lines for many
months.
| THE KIT |
Hasegawa
released the C.205V "Veltro" in July 1995, following the release of the Macchi
C.202 "Folgore” in April 1994. Both of these kits were among the first 1/48th
scale kits to provide an accurately detailed Macchi 202/205 with a nice OOB
cockpit. After building a few using combinations of resin cockpits and the kit
plastic with some Eduard etched I found if you replace the seat or have a set of
color seatbelts to use for the kit cockpit you will be quite pleased with the
results OOB. Add a complete resin cockpit and it’s a beauty!
Hasegawa
made one of the best kits of its time as far as fit and finish with their MC.202
& MC.205 line of aircraft. It captures all the complex shapes accurately and the
fit and finish are excellent. The cockpit is complete and unless you want to
detail that area it is sufficient for most modelers. The gunsight needs
improvement and the wheel well area could have more details since this is a
distinctive area for the Macchi MC.2XX series of aircraft. The wing lights
should have been moulded on the clear parts tree with a cut out on the wing
tips. This would have improved this kit since changing it for a more realistic
appearance requires cutting the wing tip and a lot of extra effort. I gave it
some thought since it is an improvement but passed on it for this build since
cutting the wing plastic was not a happy thought. Hasegawa in its current 1/48th
scale kit releases has changed its approach for wing tip lights in new releases
to now use clear plastic for the wing tip lights.
It is a fast build due to its low parts count and good fit. The fit is
very good, but not perfect, so some putty or gap filling is required but it is a
minor issue.
The MC.205
Veltro's retractable tail wheel made a new fuselage mould necessary since the
MC.202 had a fixed tail wheel and no doors. I read a review where this
modification was a concern for the reviewer. I did not see this as a big problem
and am not sure what the reviewer was complaining about. His concern was
Hasegawa used a copy of the MC.202 Folgore fuselage mould, then grafted a Veltro
tail onto it – and ended up with what he saw as an unpleasant ridge that the
modeler has to carefully sand off.
I think the
same review expressed a concern that one of the weakest points of the kit was
the “Spartan” cockpit interior. I would agree if it was the Tauro kit with its
minimal OOB cockpit and I respect his opinion
 but I like
it OOB and overwhelmingly others have expressed their satisfaction with this
kit’s cockpit in an OOB configuration. I use resin cockpits frequently for the
improved details or to replace a deficient kit plastic cockpit. This kit, and
the Hasegawa MC.202/205 series, does not motivate me to do so because it has
sufficient OOB detail.
but I like
it OOB and overwhelmingly others have expressed their satisfaction with this
kit’s cockpit in an OOB configuration. I use resin cockpits frequently for the
improved details or to replace a deficient kit plastic cockpit. This kit, and
the Hasegawa MC.202/205 series, does not motivate me to do so because it has
sufficient OOB detail.
Others have also expressed
dissatisfaction with the undersized and unusable exhaust stacks. Yes, they are a
weak part of the kit appearing undersized and somewhat flat. There are two resin
replacements, one from Quickboost #48282 and one from Ultracast 48177. The
Quickboost exhaust offers a hollowed out version of the kit exhausts and look
too thin and flat for my use. The Ultracast exhaust, # 48-177, provides a much
better detailed and quite robust exhaust. I will use the Ultracast exhaust in a
future build since it is a clear improvement on a very visible area.
Since the
Veltro uses the same DB 605 engine as the Bf-109F-K family you could also try
using resin exhausts indicated for those kits. You might even have an old Moskit
metal set in the stash that will work!
The undercarriage legs and landing gear are riddled with deep ejector pin
marks requiring a bit of clean-up. The undercarriage legs have to be filled and
sanded or replaced by a white metal replacement.
This kit is
nearly perfect in shape and dimensions and shows off some of the finest surface
detail you can get. There are some small errors or omissions since the original
MC.202 is not a one for one replacement. I have admired Hasegawa’s 202/205
series every time I worked on this kit – the details are just that good! From
all the cowl fasteners to the tail wheel – it’s all good.
The
instructions are excellent, very typical of Hasegawa’s time proven instructions.
There’s nothing new here since it is composed of well detailed explanations and
clear illustrations. The parts count is low and will surprise you because the
build goes very fast as a result of the minimal parts count.
The kit
cockpit is nicely laid out and includes decals for the instrument clusters. The
cockpit and sidewalls have adequate detail. I only say adequate because the
Macchi 200 to 205 series used a unique restraint system composed of chains,
belts and a seat pad that are missing from the OOB contents. You can fix this
with the Eduard Color Zoom set or as I did with a resin replacement seat with
cast belts.
There are
lots of other very nice details Hasegawa provides like the part # B17 magnetic
compass, a nice trim wheel, etc. with its OOB parts. Many resin cockpit sets
actually have you use some of the Hasegawa cockpit parts because they are that
well moulded. I would express some caution about using the kits control stick if
you are a detail freak. There are a different types of control sticks you will
see explained in the Squadron C.205 Veltro Walk Around text on pages 60, 63 and
67, so be aware if this is a concern for you. The stick details vary due to the
variations in armament resulting in more or less firing buttons and other stick
related changes.
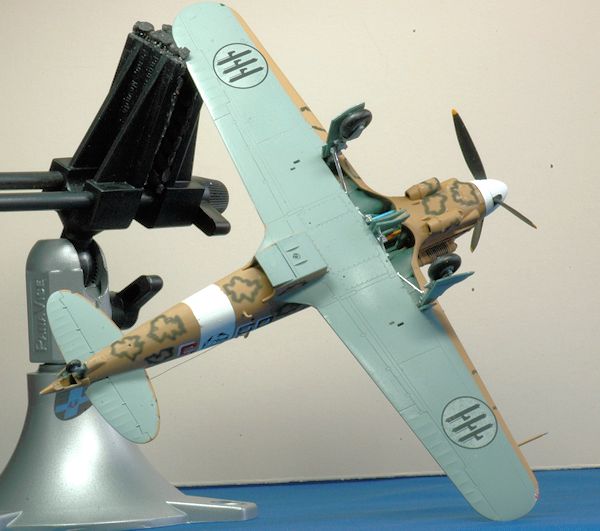
The wing
subassembly that you build in step 3 has an adequate main wheel well that
captures a small amount of the complex look of a C.202/205’s accessory and main
wheel well bay details. But, compared to the photos of the actual area it does
look “boxed-in” and flatly detailed. If you look at close ups from actual
aircraft or had the opportunity to put your head underneath this area you will
quickly recognize the compromise made in 2D injection plastic parts compared to
the actual very busy 3D look of the MC.205 main landing gear bay. There are some
significant electrical wires and color coded pneumatic hoses for its ignition
system for example that are missing.
Again, I
would hope this would be the area some resin caster with superior abilities like
Vector, Pavla or Aires/Quickboost could give us a big hand by supplying a simple
resin bay enhancement piece. Since the kit has been out for a few years I am
surprised none have been released. Now that Roy is back in business maybe
 Barracuda
can help us out – if he does it will be awesome!
Barracuda
can help us out – if he does it will be awesome!
I did have
some trouble working with the part C16 assembly which represents some of the
engine and nose bearing support struts. Although there’s not much Hasegawa
detail in this area there was enough to give me some assembly fit mishaps
especially with the main landing gear struts and the part C16 tubular supports.
If you try to add some wire or bass guitar strings to this area to detail the
“snake pit” use caution because it gets cramped like the real aircraft and can
affect some of the kit plastic assembly. A color painting guide for the
pneumatic and electrical hoses is available on the “Stormo” website.
The landing
gear is well detailed and the main gear door mounting frames are acceptable
making a tradeoff between cost and accuracy. Perhaps I am still thinking about
how Italeri approached this area and comparing it to Hasegawa’s effort? I was
impressed with Italeri’s work (on their similar airframe Macchi MC.200 kit) in
this area using photo-etch to mount the main landing gear wheel covers to the
landing gear. Italeri provided a solid mount of the doors to their respective
struts using etched metal while maintaining in-scale thickness and improved
detailing. The Italeri combination of superbly moulded plastic and etched metal
supports or attachment points gives an excellent representation of the landing
gear and doors. It even included a tail wheel as a two part component permitting
ease of painting and enhanced detail which is usually lost when a tail wheel is
moulded as a one piece component as found in many other kits.
There are
some areas where I hoped to see more detail such as the clear light at the rear
tip of the fuselage, the butterfly doors on the air intake and oil cooler exit
area but the kit does not represent them. It would be nice to have the two sets
of tail wheel configurations in the MC.205 kit as well. Again these are just
observations and in no way an expression of disappointment since this is a
beautiful kit!
The kit has
two options which were well printed. It is not the old thick early Hasegawa
generation but an improved decal. There is no indication of who printed them but
it looks like Cartograph. They were thin, perfect in color density and register
and went on without any problems. They went on the kit flawlessly and when dry
conformed to all the underlying plastic detail. The printing is crisp, small
details such as stencils are clearly printed and even the white bands if you
choose to use them are opaque and easy to work with.
The kit
provides marking options for two aircraft, a MC.205, Regia Aeronautica airframe
from 88th Squadriglia, 6th Gruppo, 1st Stormo and one from
88 Squadriglia, 155th Gruppo, 51st Stormo
both in Nocciola Chiaro 4
(Light Hazel Tan 4 – FS30219) upper surfaces over Grigio Azzurro Chiaro 1 (Light
Blue Gray 1 – FS36314) undersurfaces with the smoke ring olive green rings
camouflage. I think the
instructions are in error regarding which unit information goes with which decal
marking. They are reversed in the instructions. The pouncing cat Marking # 1 is
the 51st Stormo and the Marking # 2,
Sagittarius Archer pulling
on its bow is for the 1st Stormo.
I was very
pleased with Hasegawa on this kit. It is a very beautiful aircraft and they
captured its lines and look perfectly. They have done a really nice job on this
kit. It isn't over-engineered, nor are there any serious shortcuts taken either.
The kit gave me a lot of building pleasure and added a nice kit to my
Italian Regia Aeronautica collection.
Unfortunately it has been some time since Hasegawa has released any Macchi 205
kits. It looks like Hasegawa is reissuing its 1/48th scale products that were
released in the 1990’s so one can only hope the 205 series kits in their
original markings will be re-issued. The original kit # 9132 MC.202 was issued
in 2012 with little fanfare and can be found selling for $30.00 or so at
internet discounters so perhaps the “205” will be coming out in the near future.
It is frequently found for sale on eBay
but the prices including the new higher shipping rates makes it undesirable for
me.
 There are
unfortunately very few available aftermarket decals for the MC.205. Given it was
released almost 19 years ago not much seems to have materialized for the MC.205
in aftermarket decals. There are some terrific and colorful schemes that I would
like to see in MC.205 decals. You have many choices in colors and markings from
the R.A. initial utilization markings, followed by both ANR and Co-Belligerent
use as well as Luftwaffe use of the MC.205 with RLM 74/75/76 camouflage. There
have been decals released by Skymodels in their 48020 Macchi MC.205 decal with
38 different C.205 options, Superscale 48-861 which has the same airframe “Black
88 – Red 5” as the kit decal, plus three other very different color schemes.
Other MC.205 decals have been issued by AeroMaster
# 48-190, and Third Group Decals 48-013, so there are some choices.
There are
unfortunately very few available aftermarket decals for the MC.205. Given it was
released almost 19 years ago not much seems to have materialized for the MC.205
in aftermarket decals. There are some terrific and colorful schemes that I would
like to see in MC.205 decals. You have many choices in colors and markings from
the R.A. initial utilization markings, followed by both ANR and Co-Belligerent
use as well as Luftwaffe use of the MC.205 with RLM 74/75/76 camouflage. There
have been decals released by Skymodels in their 48020 Macchi MC.205 decal with
38 different C.205 options, Superscale 48-861 which has the same airframe “Black
88 – Red 5” as the kit decal, plus three other very different color schemes.
Other MC.205 decals have been issued by AeroMaster
# 48-190, and Third Group Decals 48-013, so there are some choices.
Some MC.205’s were conversions form MC.202 airframes. Because of this I encourage Hasegawa to include the part tree “F” from their MC.202 kit in their future MC.205 releases because some MC.205’s used the MC.202 antenna mast and rear wheel arrangement with its speed fairings. These parts appear on the MC.202 Kits on parts tree # “F”.
| CONSTRUCTION |
I kept this
build close to OOB. When it comes to cockpit enhancements I just replaced the
kit seat with an Ultracast resin seat using the “with belts” version. It was a
perfect replacement and added a lot especially providing the unique look of the
MC.205 restraining chains, seat belts and seat cushion that is missing from the
OOB Hasegawa kit.
The Hasegawa
fuselage halves closed with no concerns coming from the aftermarket resin seat.
When the cockpit was painted and dry brushed, then a black wash applied, I added
the instrument panel decal with some setting solution and that was it. What you
can see from the outside looks fine to me except for the gunsight which is in
need of replacement.
When you
glue the two fuselage halves together don’t forget the propeller shaft, part A6.
After building a few of these I almost forgot to do this step on this build.
When it comes to attaching props I prefer the vinyl washer approach Hasegawa
takes in most of its other kits because it permits you to remove the propeller
and spinner and usually is a tight fit. The problem with this kits engineering
of the attachment is you can easily glue the shaft to the fuselage and it is not
a tight fit resulting in a wobbly prop that can look slightly askew.
Steps 3 and
4 have you construct the main wing, landing gear bay and attach it to the
fuselage. This is where the “snake pit” detailing decision takes place. You can
go OOB or try to replicate some or all of the details appearing the long OOP
Jaguar MC202 resin detail set to
improve the accuracy and intense detail of the landing gear bay with its myriad
pneumatic pipes and electrical wiring connections. I am going the OOB route this
time and looking forward to a build with my Jaguar resin set to see how it
looks. I tried to use wire and guitar wire on some MC.200 builds recently and
the caveat is you need to understand where everything goes and avoid getting in
the way of kit components when you start to add wiring to detail this area
before the kit parts are glued in place.
I have read
other kit build reviews of the landing gear assembly, with negative comments on
the landing gear due to ejection pin marks. The mould punch out pin marks are
unfortunately a by-product of Hasegawa’s approach so some clean up is required.
You can add some wire for the brake lines and even try some replacement scratch
building of the attachment points for the leg to gear covers for finer detail.
There are replacement gear covers in etched metal and possibly in resin as well.
I chose not do so on this build because the kit parts pass the 2 foot viewing
test. The landing gear oleo linkages have weight reduction holes so you could
think about some cosmetic drilling to improve this area as well if you are
adding the brake lines.
The Macchi
205 has several metal covers over the aileron hinges that you could use some
evergreen sheet to detail (see page 55 in the Squadron Walk Around text for
details). The upper wings are missing the oval access panels to the armament
box. They should be re-scribed into ovals. The spent shell casing ejector
opening underneath the wing is there but there should be two holes, one for the
shells and one for the links. This area is also missing the small raised
teardrop shaped “speed bumps” that protected the wing from spent shell and
casing ejection damage. The opening for the belt links is missing so you will
need to open up a second rectangular opening for this and add its raised tear
drop “speed bump”. The teardrop shaped bumps were designed to prevent bounce
back damage when the wind blows the shell back against the wing. I used an
etched metal template from Eduard to add the second hole. See page 58 in the
Squadron Walk Around for two good color pictures of the two per-wing spent
casing ejection holes and tear drop bumps for a better look at this feature.
Part A1, the
fuel dump exit or dynamic socket tube on the port side fuselage is very small
and the hole it goes into very large so you may want to use metal wire to
replace it because it can get overwhelmed if you use liquid glue. I have also
seen this part called the “dynamic socket” on page 49 of the Squadron
walk-around text which stated its purpose was to “provide pressure to all
grouped air tubes”.
Steps six
and eight of the instructions have the bottom fuselage parts assembly steps. The
kit has one rod, part B10 added in step eight to hold the part B10 radiator door
open. It is actually two rods, one on each side and one more going horizontally
across the middle. See the Squadron Walk Around # 5558 book page 45 for the
details on both the front and back areas to see Hasegawa used some artistic
license in their model which is not accurate in this area. Maybe they thought
since it was underneath modeler’s would not look?
One reviewer
noted you should be careful with the main spar (C17) indicating it must be glued
absolutely perpendicular to the wing or it would cause problems later. I'm glad
he warned me, as the part naturally wants to lean forward slightly. He also
noted in the real Macchi’s a lot of the engine plumbing/wiring was visible in
the forward part of the wheel wells but little to nothing is supplied in
Hasegawa's kit.
Now, with
the benefit of having completed the kits construction, I would strongly advise
you to do as much gap and seam filling and sanding on sub-assemblies before
final assembly. Keep an eye out for sub-assemblies that require some filler or
seam filing to correct them before attachment. For example, parts A3 that goes
on the air filter (part A4), the two oil coolers G7/G10 and G6/G8, and the
fuselage seam where the
 rear center
part of the wings meet the fuselage all have noticeable seams or tiny gaps that
are much, much easier to fill and sand before they are committed to their
attachment points on the fuselage or partially obscured by other assemblies. For
example, the lower wing to fuselage join I thought would be covered up by the
ventral radiator housing but it is not. It is exposed enough to be visible.
Trying to fix this one after the radiator and its door with a support strut are
attached is no fun – but it could have been so easy with a Flex-I-File clean up
done at the right time.
rear center
part of the wings meet the fuselage all have noticeable seams or tiny gaps that
are much, much easier to fill and sand before they are committed to their
attachment points on the fuselage or partially obscured by other assemblies. For
example, the lower wing to fuselage join I thought would be covered up by the
ventral radiator housing but it is not. It is exposed enough to be visible.
Trying to fix this one after the radiator and its door with a support strut are
attached is no fun – but it could have been so easy with a Flex-I-File clean up
done at the right time.
This version
of the MC.205 did not have the 20mm wing guns but retained the 7.7mm MC.202
armament (diagrams for this armament are found on page 66 of the Squadron Walk
Around) . I replaced the plastic gun
barrels with some stainless steel tubing.
| COLORS & MARKINGS |
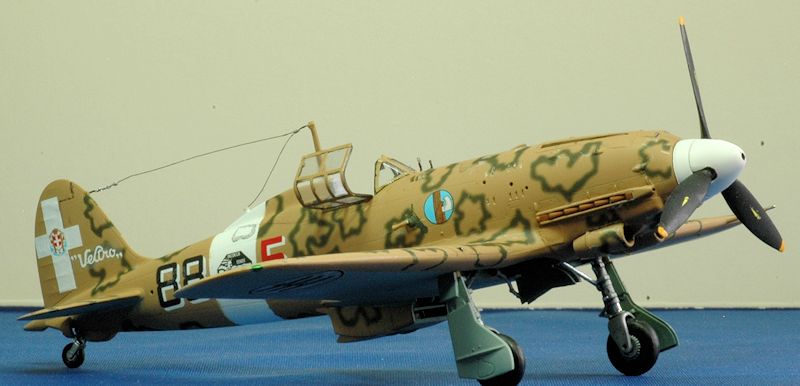
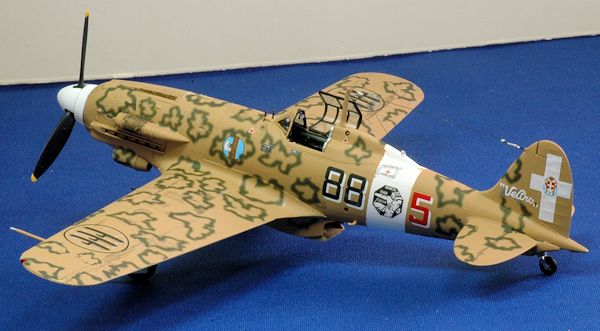
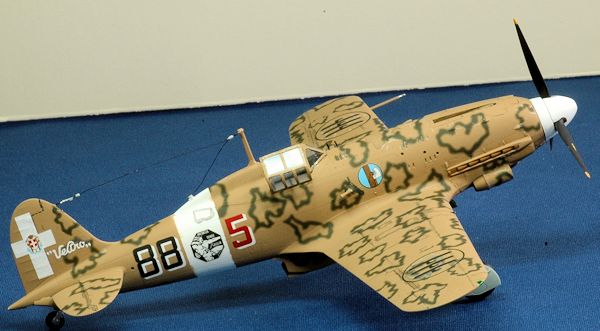
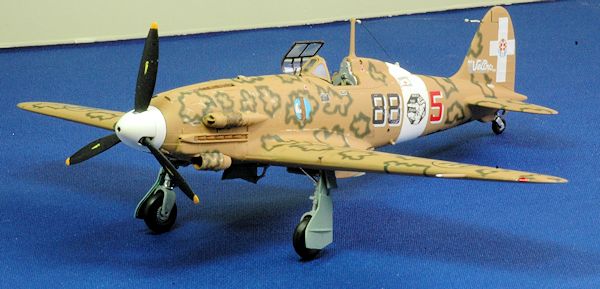
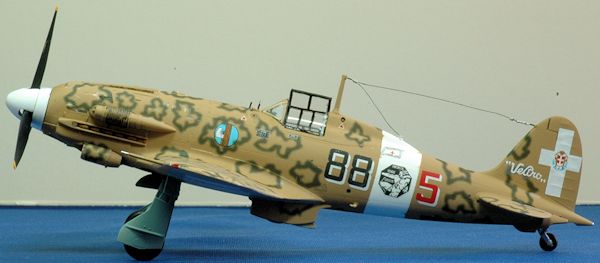
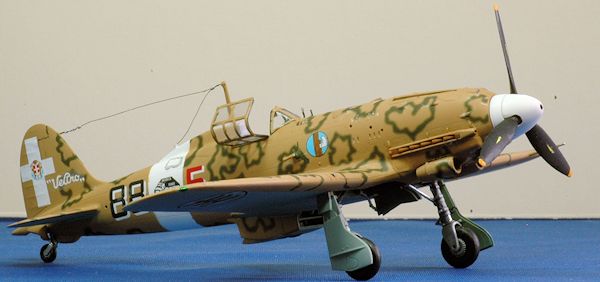
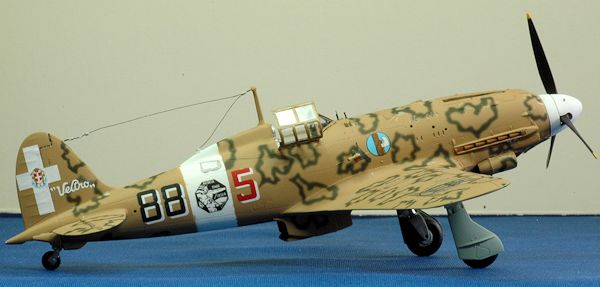
I chose the
markings for the second aircraft, “Black 88 – Red 5” from the kit decal for a
MC.205, R.A. 88th Squadriglia, 6th Gruppo, 1st Stormo in
the original delivery color scheme of Nocciola Chiaro 4 (Light Hazel Tan 4 –
FS30219) upper surfaces over Grigio Azzurro Chiaro 1 (Light Blue Gray 1 –
FS36314) undersurfaces with the smoke ring camouflage.
There is a color profile on page 72 of the Squadron 5558 Walk Around that
is for a similar airframe but it has the early MC.202 thin wooden antenna.
The cockpit
and wheel wells of the MC.205 were painted in light green The instructions
indicate to use pale green Model Master 1534. I chose to use the same color as
the aircraft from the two museums I reviewed prior to building. However, some of
those photos also show a light grey was used in portions of the lower cockpit
areas such as the floor, rudder pedals and lower cockpit walls. The Tamiya
instructions for the MC.200 indicate XF-21 Sky and XF-5 Green in a 50% each
mixture for the cockpit. This mixture provides a similar color to the U.K. WWII
color of interior green or cockpit green. The Squadron Walk Around text gives
some very interesting advice on painting the interior of the MC.205, all of the
components of which I will use on the next build.
For the
overall fuselage finish I used Tamiya acrylics because they were close enough in
color and I had the paint in hand. A web search indicated Model Master II
Enamels - No. 2037 Flint Gray FS36314 is the exact match for undersurfaces. The
top surfaces are matched by Model Master # 1742 Enamel Dark Tan FS30219
 or Gunze
Mr. Color # 310 Brown. The exact colors I used were Tamiya XF-59 Desert Yellow
with a small amount of XF-52 Flat Earth. The undersides are painted Tamiya XF-25
Light Sea Grey (it is spelled “grey” not “gray” on the label) which is a very
good blue gray tone similar to FS36314.
or Gunze
Mr. Color # 310 Brown. The exact colors I used were Tamiya XF-59 Desert Yellow
with a small amount of XF-52 Flat Earth. The undersides are painted Tamiya XF-25
Light Sea Grey (it is spelled “grey” not “gray” on the label) which is a very
good blue gray tone similar to FS36314.
Weathering
and Final Coat – some pastel chalk and black/brown pin wash was used. I sprayed
on a Future coat used during the initial decal application and after decaling
was completed I used Future using a brush to seal all of the decals. Testors
Dull Cote was used during the final step to seal all of the decals and give the
correct flat finish.
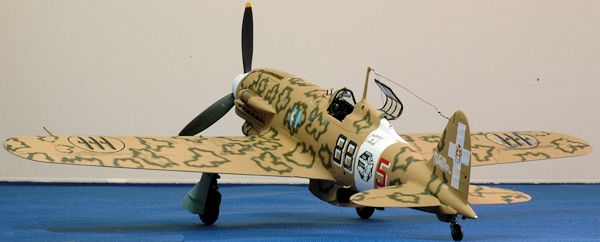
Anyone who has used the Mike Grant Smoke Rings decals for this camouflage knows how well they perform and how nice they look. Most of the hand painted smoke rings I have seen can’t compare with the finish this approach provides. I am very pleased to have used Mike’s smoke rings on this build. The props have the correct decal “ Aeronautica Macchi Varese” stencil which is found on the kit decal sheet. Unlike most other aircraft manufacturers it seems Macchi (as well as Breda) used the props to also place their company name in its logo even though the P.1001 propellers were designed and made by Piaggio.
| FINAL CONSTRUCTION |
I used the
Mr. Surfacer 500 treatment on areas that had gaps or seams before final assembly
this I could add them at this stage and not worry about any finishing issues.
The issues were small and instead of using Tamiya or Squadron putty I opted for
the “500” treatment. Even though I have built a few of these now where part A7
joins the fuselage was an easy assembly gluing effort but the moulding did not
click into place. There was a noticeable step no matter how I tried to align it
while gluing the part to the two fuselage halves. It fit well with no gap but
there was a big step on one side.
This is one
of the better Hasegawa kits that does not suffer from the non-fit of the lower
wing to the fuselage. The wing to fuselage had no gap (it did have a seam). I
just had to hold it together with a berna-clamp and apply some liquid glue.
After the glue set I used a flex-I-file to smooth it out. The final step was to
give it some Mr. Surfacer 500 and I sanded it smooth.
Hasegawa
supplied a clear gunsight (Part M1) which I reluctantly used. It is not a
prominent part but it does bother me that it is a weak representation of the
actual gunsight. Gun sights are a tricky
subject with the Macchi 205. Several types were used depending on who built the
aircraft and what serie version it was. Most decals do not identify this detail.
The initial models used the San Giorgio Type B gunsight which is similar to that
used on the MC.200 and MC.202. Some used the German Revi C/12 gunsight and
others used the San Giorgio Type C gunsight which was the standard fit used on
serie III through VI aircraft. So before this last step think about what you
want to do and then button up the cockpit. Quickboost have some nice Revi
replacement gun sights.
I punched
out three styrene disks from an Evergreen sheet to provide the intake doors for
the air filter and two oil coolers. Note, the round door on the air intake is on
the front and was smaller than the two doors on the oil coolers which go on the
rear (see photo) of the oil coolers.
 The exhaust
was finished by brushing on flat black into the exhaust outlets followed by
thinned Pactra IP96 Rust enamel. I was a
bit disappointed with the kit exhausts which are too flat and will use some
aftermarket (Ultracast) next time.
The exhaust
was finished by brushing on flat black into the exhaust outlets followed by
thinned Pactra IP96 Rust enamel. I was a
bit disappointed with the kit exhausts which are too flat and will use some
aftermarket (Ultracast) next time.
There are
several antenna masts you can use for this aircraft. One is a tall antenna radio
antenna post consisting of a long thin wooden mast and the more commonly used
thicker metal mast version which was hollow inside and used on most MC.205’s.
There is usually an antenna wire connected to the tail configuration and
entering the fuselage through an insulator found on the spine. This was used for
most of the MC.205 aircraft and is well represented. I wish Hasegawa supplied
both antenna types the other one which is part F3 in the MC.202 kit would be a
welcomed addition.
I wound some
thin copper wire around a thicker piece of wire to create a spring for the
antenna connection to the tail. I also used two pieces of empty wire insulation
as the insulators. I attached this before the final painting of the upper
surfaces and canopy parts.
The main
landing gear covers were painted off the model and added at this point. The
small tabs (part C14) at the top did have a good fit since there was a small
indentation just for them. The speed fairing in front of the tail wheel provided
by the kit was the correct shape.
The clear
parts were added using Testors 8876C white glue. I use this because of its long,
tapered black plastic applicator that allows small amounts to be carefully
placed. I also used a Squadron “Fast Frames” vinyl canopy accessory # 41016 – on
the inside and outside of the canopy. Since it is an open canopy this is a very
visible part and I needed a very clean delineation of the inside canopy frame
which it provided. The now long OOP “Fast Frames” worked fine for the main
canopy frames but not so well for the front windscreen! But before you use them
see if they fit. They did make for an easy way to add the black framing of the
cockpit interior. I then added an
etched metal gun sight bead and post in front of the canopy.
There is a
thin wire used to restrain the canopy when it is opened. This is clearly visible
in a photo on page 33 of the Squadron Color Walk Around text. I used some smoke
colored Sulky brand invisible sewing thread which is what I also used for the
antenna wire because it is already darkened (not transparent like other
invisible sewing threads) for the restraining wire. It needs to be glued behind
the two mounting bolts on the armor plate behind the pilot. This was completed
before I could insert and glue in the resin seat. If you keep the canopy closed
you won’t need this step.
The wing tip lights were painted Testors chrome silver. When it was dry I used Tamiya clear red and green over the lights and the model was finished.
| CONCLUSIONS |
I really
enjoyed this build and have no hesitation in highly recommending this kit.
. Assembly of the main parts is quick and everything is there for a nice
build. The MC.205 is a beautiful aircraft and the model builds into an accurate
replica.
The colorful
camouflages and paint variations of the MC.205 include some German Bf-109 types
of gray on blue-gray mottle for ANR aircraft as well as the Italian desert
yellow with green smoke rings desert schemes or even overall green. The cockpit
is fine OOB but you do have many enjoyable interior alternatives. There is
plenty of aftermarket to upgrade the cockpit area using color zoom from Eduard,
or complete resin cockpit sets from Squadron True Details, or SBS Model resin.
In this build I wanted to see how just swapping out the seat for an Ultracast
seat with belts and using the Hasegawa instrument panel decals would compare to
my other builds. It fared well and is a nice looking model due to the pleasant
plastic OOB plastic parts.
There are
some excellent reference books listed below. The Squadron C.205 Veltro Walk
Around # 5558 is entirely in color (except for B&W WWII period photos) and
answered every modeling detail question that I had. Throughout the build I was
constantly referring to this book finding the correct detail for comparison to
kit parts or identifying missing features. It too is highly recommended and its
price is very reasonable given its quality and significant contribution to a fun
build. The MMP book although focused on the MC.202 was also very useful in the
same regard.
| REFERENCES |
Warpaint
Series No. 78 Aer Macchi C.202-205 Folgore-Veltro
SKYmodels
decal 'Macchi MC 205', # 48-020
Macchi MC
205 “Veltro”; Maurizio Di Terlizzi; Avialibri #1; 1997
Squadron #
5558 Macchi MC 205 “Veltro” Walk Around Color Series; Maurizio Di Terlizzi,
2008
Aero Detail
# 15 Macchi C.200/202/205 published 1995
Stormo! web site at http://www.stormomagazine.com
May 2013
If you would like your product reviewed fairly and fairly quickly, please contact the editor or see other details in the Note to Contributors.