Hasegawa 1/48 Macchi C.202 'Folgore'
| KIT #: | 09132 |
| PRICE: | $35.00 |
| DECALS: | Two options |
| REVIEWER: | Andy Garcia |
| NOTES: |
True Details Resin Cockpit & MSAP # 4853 MC.202 decal |
| HISTORY |
The Macchi
MC.202 Folgore was an Alfa-Romeo engined DB 601-A1, license built from Daimler
Benz, 1,175 h.p. inline engine replacement for the MC.200 Saetta. It continued
the form, function and lineage of the MC.200 radial engined fighter built by
Aeronautica Macchi, and subcontractors Ambrosini and Breda in Italy. The MC.202
initial prototype flew in April of 1942.
Its initial armament consisted of two fuselage mounted Breda-SAFAT .50
caliber (12.7mm) guns – a bit light compared to its contemporaries.
The
prototype C.202 (serial # M.M. 445(2) flew in the summer of 1940. The first
production aircraft rolled off the assembly line in May 1941. It was well liked
by its pilots and served in the Mediterranean, Russian and North African fronts.
| THE KIT |
 Hasegawa
released Macchi C.202 "Folgore” in April 1994. It was quite well received and a
big seller in 1/48th scale kits for many
years since it provides an accurately detailed Macchi 202 with a nice OOB
cockpit. After building a few Hasegawa MC.202/205 airframes using combinations
of resin cockpits and the kit plastic with some Eduard etched I found no matter
what you do with the cockpit, whether you replace the seat or just add a set of
color seatbelts you will be quite pleased with the results OOB. There are some
complete resin cockpits available as well from SBS Models and Squadron that are
very nice.
Hasegawa
released Macchi C.202 "Folgore” in April 1994. It was quite well received and a
big seller in 1/48th scale kits for many
years since it provides an accurately detailed Macchi 202 with a nice OOB
cockpit. After building a few Hasegawa MC.202/205 airframes using combinations
of resin cockpits and the kit plastic with some Eduard etched I found no matter
what you do with the cockpit, whether you replace the seat or just add a set of
color seatbelts you will be quite pleased with the results OOB. There are some
complete resin cockpits available as well from SBS Models and Squadron that are
very nice.
The MC.202
Folgore’s tail wheel comes in a few varieties and Hasegawa provides alternate
parts for this. The kit’s cockpit in an OOB configuration looks very nice. I use
resin cockpits frequently for the improved details or to replace a deficient kit
plastic cockpit. This kit, and the Hasegawa MC.202/205 series, does not motivate
me to do so since it is quite nice OOB.
The exhausts are undersized and for some
“unusable”. There is a resin replacement from Ultracast # 48119 (which I used in
this build), that provides a much better detailed and quite robust exhaust. It
is a clear improvement on a very visible area.
The Quickboost alternative gives hollowed out exhaust tips but looks a
bit flat in dimensions compared to the Ultracast unit.
The
undercarriage legs and landing gear are riddled with deep ejector pin marks
requiring a bit of clean-up. The undercarriage legs holes have to be filled and
sanded or replaced by a white metal replacement.
This kit is
nearly perfect in shape and dimensions and shows off some of the finest surface
detail you can get. There are some small errors or omissions, Fixes for all of
these are detailed in Mauricio Di Terlizzi’s book, Macchi MC 202 Folgore,
Aviolibre Special #3.
The
instructions are excellent, very typical of Hasegawa’s time proven instructions.
There’s nothing new here since it is composed of well detailed explanations and
clear illustrations. The parts count is low and will surprise you because the
build goes very fast as a result of the minimal parts count.
 The kit
cockpit is nicely laid out and includes decals for the instrument clusters. The
cockpit and sidewalls have adequate detail. I only say adequate because the
Macchi 200 to 205 series seat used a unique restraint system composed of chains,
belts and a seat pad that is missing from the OOB contents. You can fix this
with the Eduard Color Zoom set or with a resin replacement seat from Ultracast
with cast seat belts.
The kit
cockpit is nicely laid out and includes decals for the instrument clusters. The
cockpit and sidewalls have adequate detail. I only say adequate because the
Macchi 200 to 205 series seat used a unique restraint system composed of chains,
belts and a seat pad that is missing from the OOB contents. You can fix this
with the Eduard Color Zoom set or with a resin replacement seat from Ultracast
with cast seat belts.
There are
lots of other very nice details Hasegawa provides like the part # B17 magnetic
compass, a nice trim wheel, etc. with its OOB parts. Many resin cockpit sets
actually have you use some of the Hasegawa plastic cockpit parts because they
are that well moulded.
The wing
subassembly that you build in step 3 has an adequate main wheel well that
captures a small amount of the complex look of a C.202/205’s accessory and main
wheel well bay details. But, compared to the photos of the actual area it does
look “boxed-in” and flatly detailed. If you look at close ups from actual
aircraft or had the opportunity to put your head underneath this area you will
quickly recognize the compromise made in 2D injection plastic parts compared to
the actual very busy 3D look of the MC.202 main landing gear bay. There are some
significant electrical wires and color coded pneumatic hoses for its ignition
system for example that are missing.
Again, I
would hope this would be the area some resin caster with superior abilities like
Vector, Pavla or Aires/Quickboost could give us a big hand with by supplying a
simple resin bay enhancement piece. Since the kit has been out for a few years I
am surprised none have been released. Now that Roy is back in business maybe
Barracuda can help us out – if he does it will be awesome!
I did have
some trouble working with the part C16 assembly which represents some of the
engine and nose bearing support struts. Although there’s not much Hasegawa
detail in this area there was enough to give me some assembly fit mishaps
especially with the main landing gear struts and the part C16 tubular supports.
If you try to add some wire or bass guitar strings to this area to detail the
“snake pit” use caution because it gets cramped like the real aircraft and can
affect some of the kit plastic assembly. A color painting guide for the
pneumatic and electrical hoses is available on the “Stormo” website.
The landing
gear is well detailed and the main gear door mounting frames are acceptable
making a tradeoff between cost and accuracy. Perhaps I am still thinking about
how Italeri approached this area and comparing it to Hasegawa’s effort? I was
impressed with Italeri’s work (on their similar airframe Macchi MC.200 kit) in
this area using photo-etch to mount the main landing gear wheel covers to the
landing gear. Italeri provided a solid mount of the doors to their respective
struts using etched metal while maintaining in-scale thickness and improved
detailing. The Italeri combination of superbly moulded plastic and etched metal
supports or attachment points gives an excellent representation of the landing
gear and doors. It even included a tail wheel as a two part component permitting
ease of painting and enhanced detail which is usually lost when a tail wheel is
moulded as a one piece component as found in many other kits.
There are
some areas where I hoped to see more detail such as the clear light at the rear
tip of the fuselage, the butterfly doors on the air intake area but the kit does
not represent them.
 The kit
provides marking options for two aircraft, a MC.202, Regia Aeronautica airframe
from 363rd
Squadriglia, 150th
Gruppo, 53rd
Stormo and
one from the, 153rd Gruppo,
both in
Nocciola Chiaro 4
(Light Hazel Tan 4 – FS30219) upper surfaces over Grigio Azzurro Chiaro 1 (Light
Blue Gray 1 – FS36314) undersurfaces.
The kit
provides marking options for two aircraft, a MC.202, Regia Aeronautica airframe
from 363rd
Squadriglia, 150th
Gruppo, 53rd
Stormo and
one from the, 153rd Gruppo,
both in
Nocciola Chiaro 4
(Light Hazel Tan 4 – FS30219) upper surfaces over Grigio Azzurro Chiaro 1 (Light
Blue Gray 1 – FS36314) undersurfaces.
There are unfortunately very few available aftermarket decals for the MC.202. Given it was released almost 19 years ago not much seems to have materialized for the MC.202 in aftermarket decals. There are some terrific and colorful schemes that I would like to build. There have been decals released by Tauro, Skymodels 48015 Macchi MC.202 decal with 36 different C.202 options, Superscale 48-659, 48-660 and 48-862, AeroMaster 48-189, (MSAP) Ministry of Small Aircraft Production 4853 are some choices.
| CONSTRUCTION |
The Hasegawa
fuselage halves closed with no concerns coming from the aftermarket resin
cockpit. When the cockpit was painted and dry brushed, then a black wash applied
it went in with no fuss. What you can see from the outside looks fine to me and
also the resin gunsight is a big improvement over the lame kit part.
With the
benefit of having completed the kits construction, I would strongly advise you
to do as much gap and seam filling and sanding on sub-assemblies before final
assembly. Keep an eye out for sub-assemblies that require some filler or seam
filing to correct them before attachment. For example, parts A3 that goes on the
air filter (part A4), and the fuselage seam where the rear center part of the
wings meet the fuselage all have noticeable seams or tiny gaps that are much,
much easier to fill and sand before they are committed to their attachment
points on the fuselage or partially obscured by other assemblies. For example,
the lower wing to fuselage join I thought would be covered up by the ventral
radiator housing but it is not. It is exposed enough to be visible. I fixed this
one before the radiator and its door with a support strut were attached with a
Flex-I-File to clean up the seam.
This version of the MC.202 did not have wing guns but other versions did have the 7.7mm armament (diagrams for this armament are found on page 66 of the Squadron Walk Around) which comes standard with this kit. If they are pertinent for your build I recommend replacing the plastic wing gun barrels with some stainless steel tubing because plastic moulding constraints or the approach Hasegawa took make the barrels look a bit odd.
| COLORS & MARKINGS |
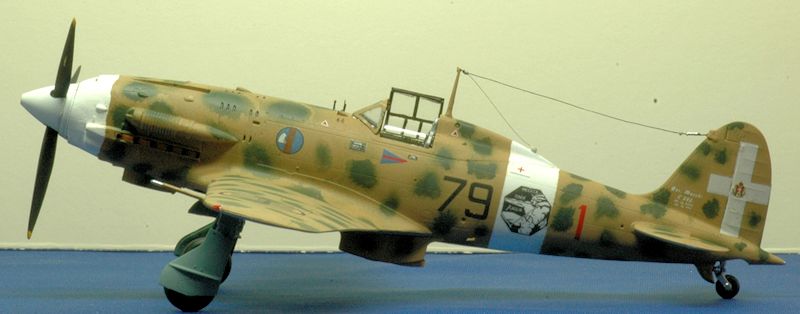
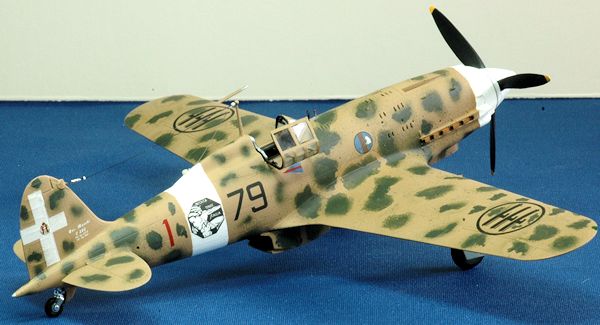
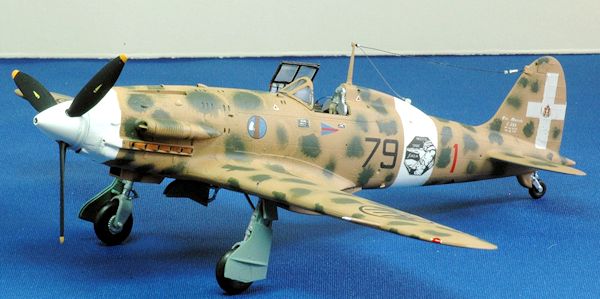
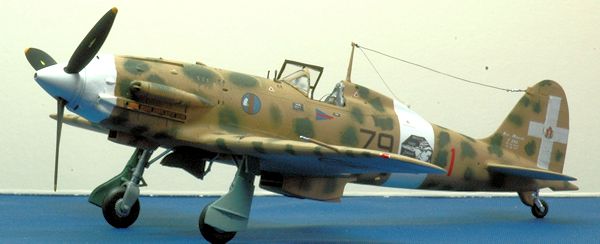
The decals
come on a small but well printed sheet with two options. I opted to use (MSAP)
Ministry of Small Aircraft Production decal # 4853 for “Black 79-Red 1”because
it had among its five choices an airframe for 1st
Stormo. Besides
looking very nice I wanted to match it to the MC.200 and MC.205 I have with 1st
Stormo markings. I found a picture of the subject aircraft on page 9 and a
similar aircraft in Libya during 1941 on page 12 of Warpaint Series No. 78 Aer
Macchi C.202-205 Folgore-Veltro. This book
also had color profiles for 1st
Stormo airframes “79-6” on
page 3, and “88-9” on page 11 .
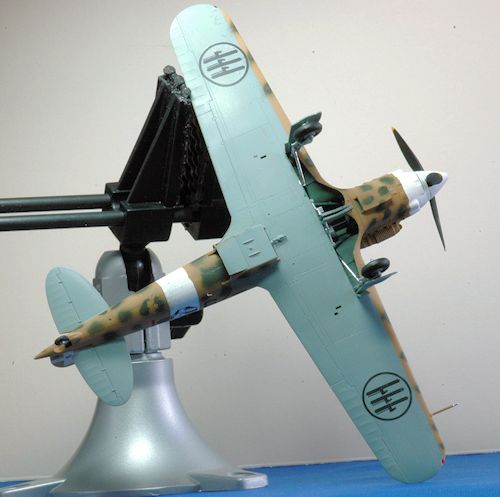
For the
overall fuselage finish I used Tamiya acrylics because they were close enough in
color and I had the paint in hand. A web search indicated Model Master II
Enamels - No. 2037 Flint Gray FS36314 is the exact match for undersurfaces. The
top surfaces are matched by Model Master # 1742 Enamel Dark Tan FS30219 or Gunze
Mr. Color # 310 Brown. The exact colors I used were Tamiya XF-59 Desert Yellow
with a small amount of XF-52 Flat Earth. The green was XF-13 JA Green. The
undersides are painted Tamiya XF-25 Light Sea Grey (it is spelled “grey” not
“gray” on the label) which is a very good blue gray tone similar to FS36314.
Weathering
and Final Coat – some pastel chalk and black/brown pin wash was used. I sprayed
on a Future coat used during the initial decal application and after decaling
was completed I used Future using a brush to seal all of the decals. Testors
Dull Cote was used during the final step to seal all of the decals and give the
correct flat finish.
| FINAL CONSTRUCTION |
This was the
first Hasegawa kit that I have built which did not suffer from the non-fit of
the lower wing to the fuselage. It was perfect. The wing to fuselage had no gap
(it did have a seam). I just had to hold it together with a berna-clamp and
apply some liquid glue. After the glue set and I removed the clamps and thought
NO filler was required which is, or to me, a big shock since I always have had
this concern with 1/48th scale Hasegawa kits not fitting in the lower wing to
fuselage join beneath the cockpit. But, a few days later, I was concerned with
the thought that maybe what looks like a panel line (the glue join) should be
smooth and have no seam. Is it a seam or a panel line? Some Mr. Surfacer 500 was
applied and sanded smooth.
 Hasegawa
supplied a clear gunsight (Part M1) which I did not use due to the True Details
resin cockpit. The TD sight was OK but could have been more pronounced since it
just looked like another blob rather than standing separately from the
instrument panel as in the actual aircraft. I added the glass reflector part
using some clear styrene sheet from Squadron.
Hasegawa
supplied a clear gunsight (Part M1) which I did not use due to the True Details
resin cockpit. The TD sight was OK but could have been more pronounced since it
just looked like another blob rather than standing separately from the
instrument panel as in the actual aircraft. I added the glass reflector part
using some clear styrene sheet from Squadron.
The very
last step was attaching the canopy and its connector wire that goes behind the
armor plate (see page 33 photo in the Squadron Walk Around book). I used a
“third hand” tool positioned below the canopy to hold it in position under the
Gorilla glue which hardened hours later.
I punched
out one styrene disk from an Evergreen plastics sheet to provide the intake door
for the air filter intake. It is a noticeable flap on the actual aircraft.
The exhaust was finished by brushing on
thinned Pactra IP96 Rust enamel.
When the Pactra was dry I used some Metalizer Dark Iron non-buffing as a wash. I
was a disappointed with the kit exhausts and used some Ultracast replacements
which went right in and look great.
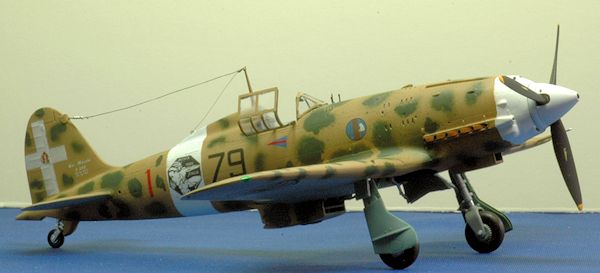
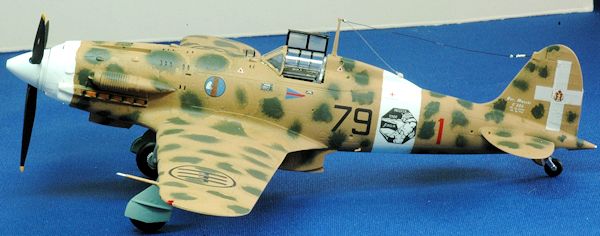
The long
thin wooden mast was used and some antenna wire connected to the tail and to the
mid-fuselage glass insulator connector. This configuration was used for most of
the MC.202 aircraft except for very early versions. I used some scrap etched
copper fret to cut a connection tab for the antenna wire connection to the
vertical tail’s front edge. I wound some thin copper wire around a thicker piece
of wire to create a spring for this part. I also used two pieces of empty wire
insulation as the insulators (see photo). I attached this before the final
painting of the upper surfaces and canopy parts.
The main
landing gear covers were painted off the model and added at this point. The
small tabs (part C14) at the top did have a good fit since there was a small
indentation just for them. I found other Macchi kits lacked fit in this area.
There are two versions of speed fairing in front of the tail wheel, with one
having a part behind so be mindful of which is appropriate for your build.
 metal gun sight and post in front of the canopy.
The gun sight has no crosshair so you essentially need to find a loop on a post
which I found on another etched fret.
metal gun sight and post in front of the canopy.
The gun sight has no crosshair so you essentially need to find a loop on a post
which I found on another etched fret.
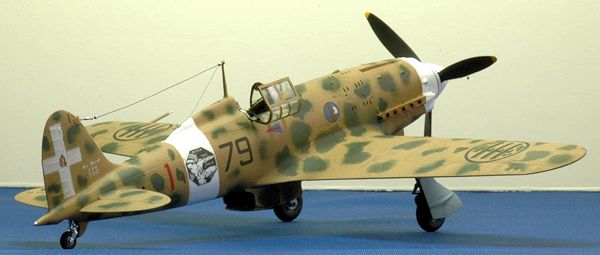
| CONCLUSIONS |
I have no
hesitation in highly recommending this kit. I really enjoyed this build.
Assembly of the main parts was so quick that I thought I did something wrong but
everything was there. The MC.202 is a beautiful aircraft and the model builds
into an accurate replica.
| REFERENCES |
Warpaint
Series No. 78 Aer Macchi C.202-205 Folgore-Veltro
Squadron
Publications # 1041 Macchi C.202 In Action 1980
SKYmodels
decal 'Macchi MC 202', # 48-015
Macchi MC
202 Folgore, Aviolibre Special #3 Maurizio Di Terlizzi; Avialibri Special # 3;
2000
Squadron #
5558 Macchi MC 205 “Veltro” Walk Around Color Series; Maurizio Di Terlizzi,
2008
Aero Detail
# 15 Macchi C.200/202/205 published 1995
Stormo! web
site at
http://www.stormomagazine.com
Andy Garcia
June 2013
Thanks to for the review kit. You can find this one at your favorite hobby shop or on-line retailer.
If you would like your product reviewed fairly and fairly quickly, please contact the editor or see other details in the Note to Contributors.