Italerie 1/48 Macchi C.200 serie 2a 'Saetta'
| KIT #: | 2711 |
| PRICE: | $55.00 |
| DECALS: | Four options |
| REVIEWER: | Andrew Garcia |
| NOTES: | Includes p.e. fret |
| HISTORY |
The Macchi C.200 Saetta was a radial engined fighter (also identified as the
MC.200) built by Aeronautica Macchi in Italy, and used in various forms
throughout the Regia Aeronautica (Italian Air Force). The MC.200 had excellent
maneuverability and general flying characteristics. Its stability in a
high-speed dive was exceptional. When larger engines came along in the form of
the Mercedes Benz MB601 in-lines from Germany it ended the usefulness of this
radial engined beauty. Its armament was minimal as well with only two .50 cal
(12.7mm) Breda-SAFAT fuselage mounted guns.
Italy entered the war on 10 June 1940 and was an adversary through the armistice
signed September 8, 1943 with the Allies. The C. 200 flew more operational
sorties than any other Italian aircraft. The Saetta flew over many countries
such as Greece, North Africa, Yugoslavia, all across the Mediterranean and even
Russia. Just imagine flying an open cockpit aircraft in the Russian winter. Some
accounts say it even obtained a kill to loss ratio of 88 wins to 15 losses. It
featured a very strong all-metal construction and air-cooled engine. This made
the aircraft ideal for ground attack and several units flew it as a
fighter-bomber. Over 1,000 were built by the time the war ended.
The Saetta underwent very few modifications during its service life. It was
unique in that it started life with an enclosed canopy (I serie) and later
production versions went to an open canopy configuration. Aside from the switch
to an open canopy, later aircraft were fitted with an upgraded radio and an
armored seat. Some late-production Saetta's were built with the MC.202 Serie VII
wing, thus adding two 7.7 mm (.303 in) Breda-SAFAT machine guns to the armament.
 There were four main versions (with many subtypes) of the MC.200:
M.C. 200 (prototypes) - Two prototypes fitted with the 623 kW (840 hp) Fiat A.74
RC 38 radial piston engine.
M.C. 200 - Single-seat interceptor fighter, fighter-bomber aircraft. This was
the initial production version. Initial production was called the “I serie” with
a enclosed canopy, straight rudder and prop spinner with later “serie” versions
featuring the open canopy for better visibility, a rudder offset balance and no
prop spinner. M.C.200AS – was an adaptation for North African use with engine
air filters. M.C.200CB - Fighter-bomber version with 320 kg (710 lb) of bombs or
two external fuel tanks.
M.C.200bis was a Breda-proposed modification with a Piaggio P.XIX R.C.45 engine
producing 1,180 hp at 14,800 ft. It flew on April 11, 1942 near its production
center of Milan, Italy. The aircraft had a larger propeller and a revised engine
cowling. Top speed was 332 mph. It did not enter production as the C.200 had
been replaced by more advanced designs such as the MC.202 Folgore.
M.C.201 – this model had a revised fuselage, a new engine, the Isotta-Fraschini
Astro A.140RC.40 which was a license variant of the French Gnome-et-Rhone
GR.14Krs Mistral Major. After some development experience the decision was made
to use the newer Fiat A.76 R.C.40 engine with 1,000 hp. Two prototypes were
ordered. It first flew on the August 10, 1940, still with the less powerful
engine (i.e. using the A.74). Macchi estimated a top speed of 340 mph but the
prototype was cancelled after Fiat abandoned the troublesome A.76 engine. The
arrival of the Daimler-Benz DB 601-powered MC.202 Folgore ended further
development of the radial powered Saetta.
The most serious handicap for wider utilization before the MC.202 took over was the low production rate. One source claimed it took over 22,000 hours of production time due to antiquated manufacturing technology. A total of 1,153 Saettas were eventually produced, manufactured by Macchi, Breda and SAI-Ambrosini but almost all were gone from front line use by the time of the armistice between Italy and Allied armed forces in September 1943.
| THE KIT |
 Italeri released their MC.200 in June of 2010 and this version, the “2a serie”,
in 2011. The 2a serie represents the initial MC.200 configuration with an
enclosed cockpit. The kit is essentially the same as their kit # 2676 MC.200
with new fuselage halves and canopy parts. As much as I like the aircraft the
price point for this model, around $55.00 to $60.00, was beyond what I want to
pay given I had several Classic Airframes and Special Hobby releases of the
MC.200 airframe in my un-built kit collection. The Special Hobby release is
close enough to be an alternative to this kit. There is a Pavla resin conversion
set to modify the first Italeri release of their MC.200 in 1/48th scale to the
serie 1 and 2a versions but it still has some useful parts because the Italeri #
2711 kit does not have the correct rudder demarcation, prop spinner, etc. for
the earliest versions of the Saetta.
Italeri released their MC.200 in June of 2010 and this version, the “2a serie”,
in 2011. The 2a serie represents the initial MC.200 configuration with an
enclosed cockpit. The kit is essentially the same as their kit # 2676 MC.200
with new fuselage halves and canopy parts. As much as I like the aircraft the
price point for this model, around $55.00 to $60.00, was beyond what I want to
pay given I had several Classic Airframes and Special Hobby releases of the
MC.200 airframe in my un-built kit collection. The Special Hobby release is
close enough to be an alternative to this kit. There is a Pavla resin conversion
set to modify the first Italeri release of their MC.200 in 1/48th scale to the
serie 1 and 2a versions but it still has some useful parts because the Italeri #
2711 kit does not have the correct rudder demarcation, prop spinner, etc. for
the earliest versions of the Saetta.
It is the first current era all styrene kit of this subject in this scale if you
don’t count the ancient SMER release and has very nice detailing throughout. The
kit was an all new-tooling of the C.200 and since it was release in 2010 I
expected quite a bit from it since the state of art is quite high for plastic
models. The kit has a simple package of plastic parts on two parts trees moulded
in gray styrene, plus one small tree with three clear parts, one small fret of
photo-etch, and a small sheet of decals. There were moments when I was building
the kit that I thought the panel lines and other details were a bit too deep or
large compared to the finely recessed lines found in very recent U.S., British,
Czech and Japanese plastic kits. Missing from this kits box art is a banner
stating “Super Decals Sheet” found on the earlier kit # 2676 MC.200 Saetta
release.
The instructions are excellent composed of photographs and well detailed
explanations. The parts count is low and should be low for such a simple
aircraft.
The cockpit is nicely laid out and includes a photo-etched instrument panel as
well as the pilot's shoulder harness/restraints. The sidewalls have adequate
detail but compared to the resin in the older Classic airframes release it is
not an improvement. In a sense it is just adequate with a nice trim wheel but
limited because the rest of the cockpit moulding is a little flat.
More separate parts in the cockpit area could have provided a state of the art
kit. The Pavla resin replacement will provide an improvement in this area. The
view through that narrow cockpit opening is limited. I think Italeri put
together the right blend of detail for your ability to see inside, paying
attention to the seat and harness which are the most visible area. Even with a
flashlight the area would satisfy most modelers and is there for super detailing
with a Pavla resin or some scratch work if you like.
 The engine is very well done. The shape and separate components provide a highly
detailed engine including exhausts and push rod tubes. After building the CA and
Special Hobby C.200 kits this engine is a beauty and the best MC.200 injection
plastic engine I have seen to date. There is a Vector resin replacement and it
is superb if you want to use the best engine but it will require some
modifications to incorporate it into your build. The Italeri kit engine benefits
from the keyed location assembly providing an accurate and trouble free
installation.
The prominent push
rods are provided as separate items. Some have commented in other reviews that
it only lacks some photo-etched ignition wiring to complete the look but I found
in my review of museum aircraft close up photographs the MC.200 wiring goes to
the rear and not to the front into a wiring harness. Thus it is not as prominent
as in U.S. radial engine aircraft where the spark plug wires are very prominent
and go into a collection ring or harness. Because of this I do not think an
etched part for the ignition wiring is required.
The engine is very well done. The shape and separate components provide a highly
detailed engine including exhausts and push rod tubes. After building the CA and
Special Hobby C.200 kits this engine is a beauty and the best MC.200 injection
plastic engine I have seen to date. There is a Vector resin replacement and it
is superb if you want to use the best engine but it will require some
modifications to incorporate it into your build. The Italeri kit engine benefits
from the keyed location assembly providing an accurate and trouble free
installation.
The prominent push
rods are provided as separate items. Some have commented in other reviews that
it only lacks some photo-etched ignition wiring to complete the look but I found
in my review of museum aircraft close up photographs the MC.200 wiring goes to
the rear and not to the front into a wiring harness. Thus it is not as prominent
as in U.S. radial engine aircraft where the spark plug wires are very prominent
and go into a collection ring or harness. Because of this I do not think an
etched part for the ignition wiring is required.
The kit does provide the option of a separately molded cowling access panel to
be left off to reveal the Fiat engine. Years ago I loved having this feature and
we saw them on many Monogram and Revell kits. I no longer like this option. If
or when I do an exposed engine it is because a resin aftermarket replacement has
such fantastic details that I am compelled to open up an engine. As much as I
love the Italeri injection plastic engine, opening up side panels is not what I
would recommend or desire with this kit. I found the side panels created seams
and required some extra gluing for a lesser result. Trying to get a smooth seam
between the NACA bumps and the square opening for part 7A is not a desirable
activity for me. I feel it detracts from an otherwise nice moulding.
There was one big plus for the Italeri cowl, Part number 15b, which is a small
tab on the top of the cowl between the machine guns is there and correctly
moulded. On the Classic Airframes and Special Hobby kits the part is either
missing or not correctly represented so this was a pleasant surprise to find it
separately moulded and correctly shaped.
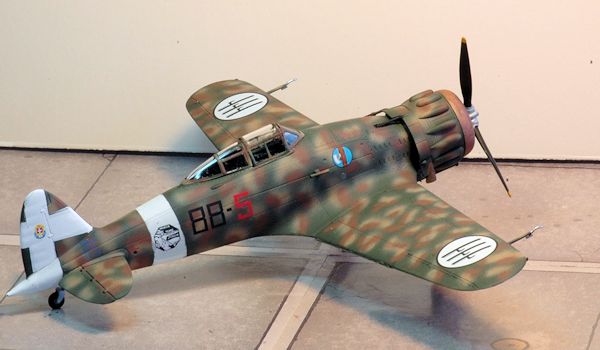
The wing subassembly has an adequate main wheel well that captures some of
the complex look of a C.200’s rear engine accessory/main wheel well
compared to the
'boxed-in' and
flatly detailed wheel wells provided in most kits. If you look at close ups from
actual aircraft or had the opportunity to put your head underneath this area you
will quickly recognize the compromise made in 2D injection plastic parts
compared to the actual very busy 3D look of the MC.200 main landing gear bay.
There are some significant electrical wires and color coded pneumatic hoses for
its ignition for example that are missing. Again, I would hope this would be the
area some resin caster with superior abilities like Vector, Pavla or Aires/Quickboost
could give us a big hand. This area much more than the cockpit is viewable due
to the large opening. Italeri did an adequate job by providing some essential
details in a boxed in environment. A color painting guide for the pneumatic and
electrical hoses is available on the “Stormo” website.
The ailerons and elevators are all separately molded to permit posing them in
any position. Also, the flaps are separately molded so they can be positioned up
or down. Keep in mind the ailerons would also be deflected down with the flaps,
so you would be better off modeling the aircraft with its flaps up unless you
want to surgically remove the ailerons to keep this kit copacetic.
 The main landing gear is quite nice. Compared to the resin and mixed media
MC.200 alternative kits it is a huge improvement. The landing gear are well
detailed and the main gear door mounting frames are rendered in photo-etch which
will provide a solid mount of the doors to their respective struts while
maintaining in-scale thickness and improved detailing. The combination of
superbly moulded plastic and etched metal supports or attachment points gives an
excellent representation of the landing gear and doors. The tail wheel is a two
part component and this permits ease of painting and enhanced detail lost when a
tail wheel is moulded as a one piece component as found in many other kits.
The main landing gear is quite nice. Compared to the resin and mixed media
MC.200 alternative kits it is a huge improvement. The landing gear are well
detailed and the main gear door mounting frames are rendered in photo-etch which
will provide a solid mount of the doors to their respective struts while
maintaining in-scale thickness and improved detailing. The combination of
superbly moulded plastic and etched metal supports or attachment points gives an
excellent representation of the landing gear and doors. The tail wheel is a two
part component and this permits ease of painting and enhanced detail lost when a
tail wheel is moulded as a one piece component as found in many other kits.
The cockpit tub is a simple assembly. Once painted and the etched bits attached
it goes easily and securely into the fuselage halves. Although there are pins
the fuselage halves, parts 14A & 15A were a challenge to line up and hold
together. This might be caused by the large gap in the main wing attachment and
landing gear area but after building the limited run alternatives I was looking
for this to be a solid and trouble free join. It is not a problem or big concern
– I was just surprised that the connections were not as secure as I expected.
The engine mounts to the nose with a secure keyed connection which is a huge
improvement over the limited run kits. The wing and tail surfaces all go
together without any gaps and provide for flaps down alternatives. Assembly is a
simple build for the average modeler. This is a huge improvement over the time
it takes to work the limited run kits. The etched parts are in just the right
spots to provide the level of thin detail only etched can do so there was some
superior kit design on this aspect of the Italeri MC.200.
There are some areas where I was extremely pleased to see Italeri catch the
details such as in the clear light at the rear tip of the fuselage, the FIAT
A.74 RC 38 engine details, the two wing pitot tubes shape, and the nose oil
cooler detail. The oil cooler cowl area even has detail on the inside which are
prominent features of the actual aircraft – kudos to Italeri for this inside
detail moulding effort because it is visible and a sign of good quality.
The propeller hub and backing plate (part 17A) are excellent and the kit
includes the Aeronautica Macchi Varese logo prop stencils. Thank you Italeri for
releasing such a nice kit!
The use
of etched parts was superb – adding the right details to the right places –
especially giving the two cockpit instrument panel choices – either multiple
layered etched metal with decal instrument dials or a simple flat decal of the
instruments for ease of assembly. There is no armored headrest since there was
none on this “serie” of MC.200 but the roll-over assembly for early serie
airframes which is provided is delicately represented by Italeri.
The only shortcoming in this area I noted were the exhausts could have been
moulded differently. They are difficult to join and the seams somewhat hard to
fix. They are comprised of two parts for each exhaust. Due to their small size
and shape this causes a difficult to join and align process and the seams are
hard to fix. This feeling was a reaction to the fiddly nature of the assembly
process for the exhaust. Once they were dry and sanded with a flex-I-file they
looked quite nice with thin walls and a realistic appearance that was far better
than a thicker solid cast alternatives. When I did the final painting Italeri
won me over from an initial poor observation to a final complement to them on
this part – well done
The engine cowl I would have preferred to be simpler using just a two part
moulding. The cowl has a beautifully moulded front oil-cooler but getting the
attachment points cleaned without damaging the small crevices on this part made
me wonder if there is a better way to provide this part in plastic with
attachments somewhere else to avoid the impossible to fix and very visible
contact points that mar the welded seams on the oil cooler ring edges. The
multiple parts and NACA blisters were an unnecessary enhancement and detracted
from my finished kit. I am referring to parts 8A, 9A, 10A, and 11A. There must
be a reason Italeri chose to make these separate items, perhaps due to the part
7A cowl side access hatch. This added feature results in some unneeded
distractions and hard to fix seams on the finished kit in terms of large seams
or gaps that are difficult to fix.
 I read a review of this kit where the reviewer disliked the kit plastic gun
tubes and replaced them with metal tubes. Since there is a noticeable perforated
air cooled tube structure and a tapered blat tube tip I chose to drill out the
opening (you can also buy the Quickboost resin replacement with a better
opening) and see how it looked. There is an amazingly detailed brass replacement
from Master Models in Poland that is available. I used it on another MC.200 and
it looks awesome but it has no blast tube extension. I wanted to see the OOB
results on this build and with some drilling out of the tip and silver dry
brushing on the cooling jacket the only additions it looks fine.
I think the drilled out gun tube looks much better than a pair of hollow
metal tubing replacements.
I read a review of this kit where the reviewer disliked the kit plastic gun
tubes and replaced them with metal tubes. Since there is a noticeable perforated
air cooled tube structure and a tapered blat tube tip I chose to drill out the
opening (you can also buy the Quickboost resin replacement with a better
opening) and see how it looked. There is an amazingly detailed brass replacement
from Master Models in Poland that is available. I used it on another MC.200 and
it looks awesome but it has no blast tube extension. I wanted to see the OOB
results on this build and with some drilling out of the tip and silver dry
brushing on the cooling jacket the only additions it looks fine.
I think the drilled out gun tube looks much better than a pair of hollow
metal tubing replacements.
For the detail oriented, the actual aircraft has a cover separate from the
fuselage for the wings and horizontal tail on the hinges. You can fix this with
small thin pieces of styrene sheet. At the wing roots, the reinforcing plates
actually cover the intersection of panel lines, so you might want to remove the
molded detail and replace it with thin plastic stock. I chose not to on this
build.
Markings
Italeri did not note 'Super Decals Sheet' for this kit as they did on the
previous MC.200 release. The decals come on a well printed sheet with four
options. The decals were well printed by Cartograph and look perfect. They went
on the kit flawlessly and when dry conformed to all the underlying plastic
detail without any solvent. The printing is crisp, small details such as
stencils are clearly printed and even the white bands if you choose to use them
are opaque and easy to work with. The instructions have them correctly depicted
– the decals were placed incorrectly by me during the build. That means there is
a different port and starboard side decal required in order to be correct.
The blade of the facis should be facing
forward on both sides. Not to confuse you the decals are numbered as # 7 & # 8
on the assembly instructions but as # 5 and # 6 on the decal sheet. The faces (facis),
decal # 5 & 6, should both have the blade pointing forward.
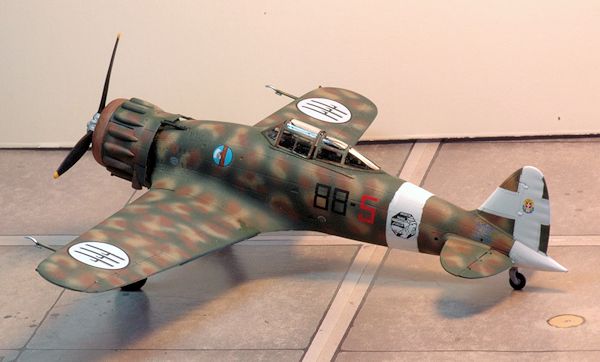
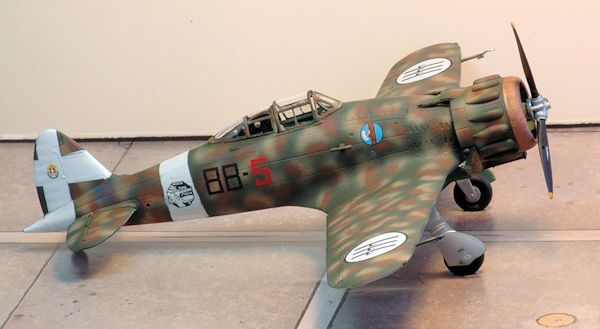
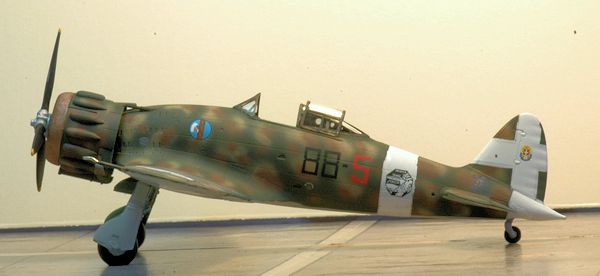
The kit provides marking options for four aircraft, a MC.200, 88 Squadriglia/6
Gruppo 1, Stormo CT, Catania, 1940; MC.200, 372a Squadriglia, 153 Grupo
Autonomo CT, Brindisi, Italy, 1940; MC.200, 386a Squadriglia, 157 Gruppo
Autonomo CT, Torino Caselle, Italy 1940; MC.200, 370 Squadriglia Autonoma
CT, Foggia, Italy, 1941. This covers several variations in camouflage and is a
good selection.
I was very pleased with Italeri on this kit. It is a huge improvement over
existing 1/48th scale MC.200 kits in terms of ease of assembly and improved
details. They have done a really nice job on this kit. It isn't over-engineered,
nor are there any serious shortcuts taken either. Aside from expecting more from
an Italeri kit at this price, I found the kit gave me a lot of building pleasure
and filled in a huge gap for Italian Regia Aeronautica modelers.
The choice of a serie 2a airframe fills a big gap in MC.200 kits and is a wise
choice. It gives you the basis for creating earlier MC.200 versions with some
small modifications like re-scribing the rudder line on the tail, adding a prop
spinner, reshaping the prop, and adding doors to the tail wheel area. Some
components of the Pavla conversion set # 48-38 have the required parts if you
are interested in an earlier serie airframe to accomplish what I just described.
 There are unfortunately very few available aftermarket decals for the MC.200.
Given it was released almost two years ago nothing seems to have materialized
for the MC.200 in aftermarket decals. There are some terrific and colorful
schemes that I would like to see.
I
have the Sky Models 48-021 decal with 37 different C.200 options. Scott used it
on his Astro Kit MC.200 build. There are several early serie MC.200’s on this
decal sheet. There is also an old AeroMaster sheet, 48-154, with seven MC.200
options that are sure to delight but none of the options on that sheet are for
this version, the 2a serie. One look at a decal released with color printed
profiles and you will buy it!
There are unfortunately very few available aftermarket decals for the MC.200.
Given it was released almost two years ago nothing seems to have materialized
for the MC.200 in aftermarket decals. There are some terrific and colorful
schemes that I would like to see.
I
have the Sky Models 48-021 decal with 37 different C.200 options. Scott used it
on his Astro Kit MC.200 build. There are several early serie MC.200’s on this
decal sheet. There is also an old AeroMaster sheet, 48-154, with seven MC.200
options that are sure to delight but none of the options on that sheet are for
this version, the 2a serie. One look at a decal released with color printed
profiles and you will buy it!
Tauro Models has three decal sheets which could enhance painting of the
multi-layer camouflages for this aircraft, Tauro 48454 Italian Camouflage Macchi
Smoke Rings decals representing Regia Aeronautica and post-armistice irregular
camouflage markings, for the 2 Breda factory patterns, in ‘spinach’ Verde Oliva
Mimetico to be applied over a base painted surface of ‘sand’ Nocciola Chiaro.
Tauro 48455 Amoebas and Worms Breda Style and 48457 Italian Camouflage Breda Style 2 could be helpful for some of the complex camouflage used by the MC.200. Although not MC.200 specific it looks like they could work on some Italian aircraft schemes where finer air brush work would not be enjoyable or attainable for most modelers since there were MC.200’s that used some of these schemes.
| CONSTRUCTION |
This is a very simple kit to build. Compared to the alternatives there isn’t
much effort required to build this kit. I actually built two of them, kits #
2676 and # 2711, while waiting for the glue to set or paint to dry on my Classic
Airframes and Special Hobby MC.200 builds. I did not have to use any of the
metal pins or extensive dry fitting and sanding that alternative kits required.
After building the limited run kits I was looking for a boring exercise in
assembly. This build wasn’t boring and it was easy and most enjoyable. Just
follow the instructions and you will get a nice build.
 I started the kit per the instructions which are easy to follow and very well
done. It consists of fourteen steps starting with the easy to assemble cockpit.
Step five has you inserting the completed cockpit tub and you are looking at a
half finished kit at this point. The locator pins for the fuselage halves gave
me some trouble. The joining of the fuselage parts did not impress me with the
typical firm connection found in most kits but it worked and was a huge
improvement over limited run kits.
I started the kit per the instructions which are easy to follow and very well
done. It consists of fourteen steps starting with the easy to assemble cockpit.
Step five has you inserting the completed cockpit tub and you are looking at a
half finished kit at this point. The locator pins for the fuselage halves gave
me some trouble. The joining of the fuselage parts did not impress me with the
typical firm connection found in most kits but it worked and was a huge
improvement over limited run kits.
I did not have a burning desire to add any aftermarket colored etched bits since
the kit etched metal parts gave me what I most needed. Due to the small cockpit
you don’t see much in the rest of the cockpit especially with the closed canopy
option.
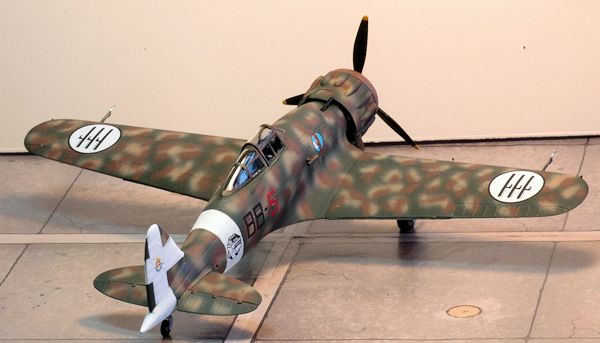
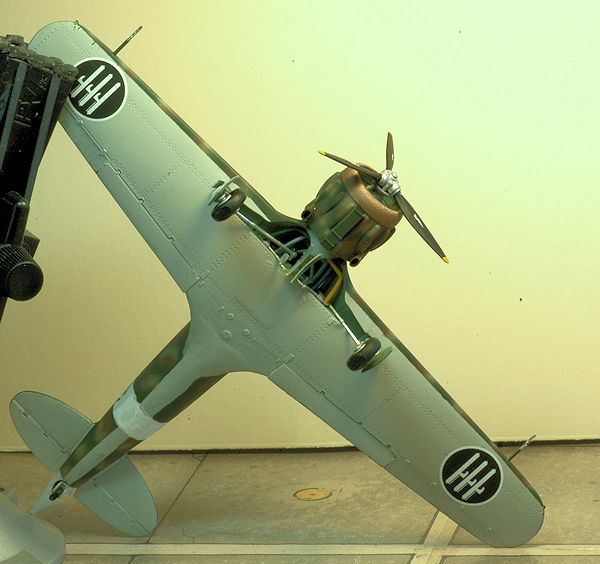
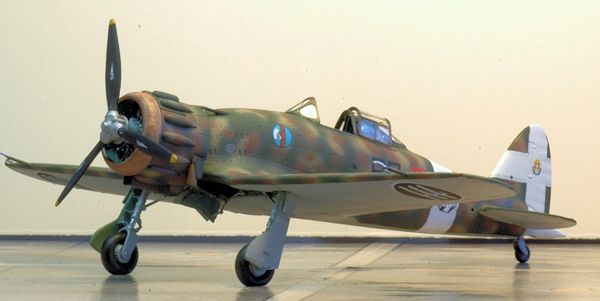
The wings connected to the fuselage without hesitation in a tight fit. There are some very nice locater tabs to help with this step. The actual aircraft has a prominent wing tip light with the inner orb (the side facing the pilot) painted so that it creates a half-shell light which helps others in formation without affecting the pilots night vision. The wing lights are well represented as two small in scale extended lights. Not much to add here since it is a smooth and trouble free assembly following the kit instructions.
| COLORS & MARKINGS |
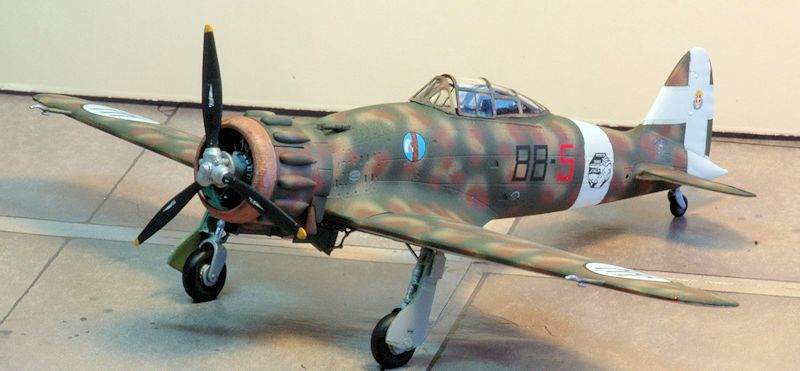
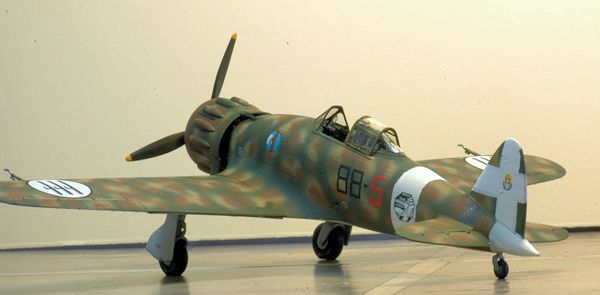
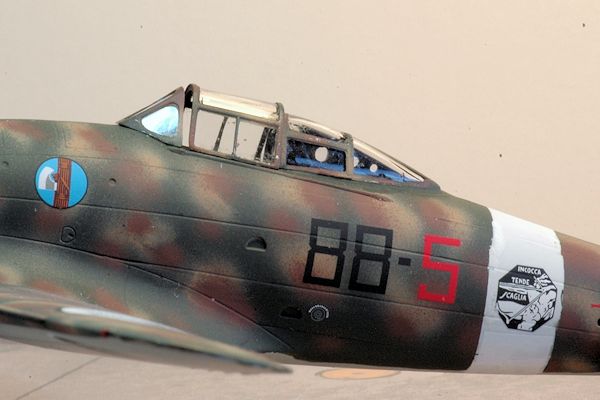
I used the kit supplied decal for an aircraft from the 86a Squadriglia, Gruppo
1, Stormo CT, based in Catania, in 1940. Photos and color profiles of this and
similar airframes were found on pages 24, 28, 29 and 110 in the Macchi C.200
Saetta MMP Books Orange Series No. 8113,
It was the first decal option in the assembly instructions.
I selected it because I found some photos of this aircraft in my
references. It features an unusually painted white tipped tailcone designed to
facilitate recognition in combat with Hurricanes (per Aeroplano Macchi C.200;
Ali D’Italia # 8 pages 12-13).
I did have an unusual problem with the decals. The instructions did not appear
to correctly call out some of the stencils. The marking numbers did not match
the instructions for the smaller detail stencils. The larger decals were
correctly numbered. It was such a strange error that I am still wondering if
there is something I did incorrectly or if the instructions actually have a
significant error compared to the numeration for the stencils. The faces (facis),
are numbered # 5 & # 6 on the decal sheet, but on the instruction sheet as # 7 &
# 8.
They should both have the
blade pointing forward. That means there is a different port and starboard
 side
decal required.
side
decal required.
The kit decal artwork has both of these facing the same direction which when
applied is wrong once placed on the model (see photos). The instructions artwork
is correct – just the decal for the starboard side was placed incorrectly when I
applied it. It will be an easy fix but I noticed it too late. The blade on decal
# 6, found in the lower portion of the decal sheet faces to the right and thus
would correctly face forward when placed on the starboard side of the aircraft.
The instruction sheet is still incorrect however calling out the facis symbol as
items # 7 & # 8 for all four of the airframes depicted – they are actually
numbered # 5 & # 6 on the decal sheet.
The C.200 had three types of camouflage color schemes. I recommend you get the
Mushroom Publications No. 8113 book for a complete description of these on page
10. They are very interesting camouflages and a wonderful challenge to paint.
The alternatives make for very attractive finishing options. Mushroom
Publications book made this part a reality – no more wrong guesses!
I painted the white fuselage band using Tamiya XF-2 Flat White, masked it off
and used the kit decal as well to avoid camouflage color bleed through. I did
under paint it in white but thought about trying to apply the kit white band
decal just to see how well it worked.
I used Tamiya acrylic colors for the rest of the colors as they are
called out including mixes in the instructions for a Tamiya released version of
the Italeri C.200 kit (a more expensive re-boxing of the Italeri kit which
includes a pilot figure and same Italeri decal). I looked up the instructions
online and felt more confident using the Tamiya acrylics for this project. The
Italeri kit instructions give the Italian name of the color and an FS number for
the exterior fuselage which is adequate with some web color paints research.
The cockpit and wheel wells of the MC.200 were painted in a color which comes
from my declining stocks of AeroMaster paints (# 1120 U.K. Interior Green
Acrylic). The instructions indicate to use pale green Model Master 1534. I chose
to use the same color as the aircraft from the two museums I reviewed prior to
building. However, some of those photos also show a light grey was used in
portions of the lower cockpit areas such as the floor, rudder pedals and lower
cockpit walls. The Tamiya instructions indicate XF-21 Sky and XF-5 Green in a
50% each mixture for the cockpit. This mixture provides a similar color to the
U.K. WWII color of interior green or cockpit green.
For the overall fuselage finish I used Tamiya acrylics. The exact colors used
were XF-59 Desert Yellow, XF-52 Flat Earth, and XF-13 J.A. Green. The undersides
are a mix XF-2 Flat White (66%) and XF-66 Light Grey (34%) for a very light grey
underside. It was easy to use and the results good with a fast drying time and
no masking tape pull-up losses.
The stencils came from the kit decals as well. There are several stencils and
they are very clearly printed. I had to refer to another kits instruction sheet,
the Italeri kit # 2676 instructions, to match the stencil numbering to the
stencil and correct placement location. This, the decal numbering problem, is
such a strange error I am still not sure if it is a user misunderstanding on my
part, or a big miscommunication between the organization which numbered the
stencils on the instructions with the decal manufacturer, or a numbering
oversight by the instruction writer?
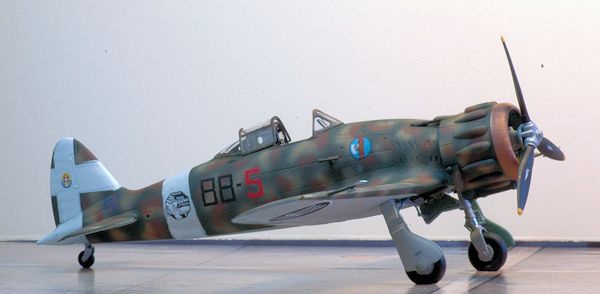 Weathering and Final Coat – some pastel chalk and black/brown pin wash was used.
I sprayed on a Future coat used during the initial decal application and after
decaling was completed I used Future to seal all of the decals. Testors Dull
Cote was used during the final step to seal all of the decals and give the
correct flat finish. From photos it appears the MC.200 used gloss paints but in
the harsh operating environments where it was operated it looks like they became
non-reflective
Weathering and Final Coat – some pastel chalk and black/brown pin wash was used.
I sprayed on a Future coat used during the initial decal application and after
decaling was completed I used Future to seal all of the decals. Testors Dull
Cote was used during the final step to seal all of the decals and give the
correct flat finish. From photos it appears the MC.200 used gloss paints but in
the harsh operating environments where it was operated it looks like they became
non-reflective
The props have the correct decal stencil. Take a look at the prop stencils from
the Hasegawa Macchi Mc 202 kit and from the Skymodels decal sheets and Italeri
kits for a correct example. The Skymodels sheet for the MC.205 properly shows
the two different propeller types (labeled Macchi & Breda) similar to that used
by the MC.200. I even noticed a “Piaggio & Co – Genoa” prop stencil which might
be the one appearing in the Classic Airframes kit since it is oval shaped with a
gold background similar to the Hamilton-Standard logo. Note – the stencil I saw
was on a blade used by a MC.202 Folgore. Most photographs of the MC.200 show the
Macchi logo prop stencil.
One last comment on the props – should they have yellow tips or not? It appeared many did not have yellow prop tips in the photos I studied. Perhaps in actual usage the yellow wore off. Many wartime photos have the props showing actual wear of the flat black to the extent the natural metal was showing through. I chose to include the yellow because they were on most of the photographs I saw for the MC.200 in operational use.
| FINAL CONSTRUCTION |
The last part, Step “13 & 14” (Final Assembly) consisted of adding the roll-over
support, three piece enclosed canopy, propeller and backing plate, twin cranked
pitot tubes (parts # 37/37A). I also added the venturi tube (part # 34B) to the
starboard side which is in step 12 of the instructions.
The exhaust was finished by brushing on thinned Pactra IP96 Rust enamel.
When it was dry I used some Metalizer Dark Iron non-buffing as a wash.
Many photo references show the C.200 Saetta exhaust were painted the same color
as the fuselage camouflage colors so you have a choice to make. After some use a
hot exhaust usually burns off its paint leaving the exposed exhaust metal to
oxidize. I could not confirm this from the color photos of MC.200’s taken during
WWII since they all appeared to be finished in the camouflage paint of the
fuselage and is hard to tell from the black & white period photos. The museum
aircraft have been cleaned up and appear to be finished an overall semi-gloss
black with generalized rust spots.
There was no antenna wire used for most of the serie I and 2a aircraft. Some did
have early versions of radios with wing mounted attachment points but they are
rare in numbers. There were three types of communications used by MC.200 pilots
resulting in three choices for the modeler. Most early serie aircraft
 had no
radio using the time honored hand signal methods from WW I and the Spanish Civil
War. Some MC.200’s had radios. The radio’s in later serie models used a small
antenna behind the pilot headrest and some of the antennae’s were connected via
a wire to the leading edge of the vertical stabilizer. There were two types of
masts used, a small one with a wire between the mast and a larger mast with no
visible wire in the final MC.200’s but it was “never” used on the early serie I
and 2a found on this kit. Most RA knowledgeable persons could dispute the use of
“never” with this aircraft because there were many retro-fitted changes to their
aircraft. I have also seen pictures and a even a color profile found on page 13
of MACCHI C.200 SAETTA Orange Series # 8113 Mushroom Publications using a three
point antenna wire configuration attached to the wings in an arrangement similar
to a P-40.
had no
radio using the time honored hand signal methods from WW I and the Spanish Civil
War. Some MC.200’s had radios. The radio’s in later serie models used a small
antenna behind the pilot headrest and some of the antennae’s were connected via
a wire to the leading edge of the vertical stabilizer. There were two types of
masts used, a small one with a wire between the mast and a larger mast with no
visible wire in the final MC.200’s but it was “never” used on the early serie I
and 2a found on this kit. Most RA knowledgeable persons could dispute the use of
“never” with this aircraft because there were many retro-fitted changes to their
aircraft. I have also seen pictures and a even a color profile found on page 13
of MACCHI C.200 SAETTA Orange Series # 8113 Mushroom Publications using a three
point antenna wire configuration attached to the wings in an arrangement similar
to a P-40.
The C.200 has an unusual double pitot arrangement featuring a pitot rod on each
wingtip. The reason for this is one pitot is heated and the other is not. It
also has an unusual tip with a cranked step along with a second small tube under
the main tubular component. Italeri faithfully reproduced this but it is just a
bit too thick – not overly so but in want of replacement if you take the model
to a competitive event. I used the kit plastic but thought of trying some metal
rods and bending them to get a better scale effect as I did with my Special
Hobby MC.200 build. I will replace them on the next MC.200 build just for the
sake of a comparison.
You can use some guitar wire and scratch this part to improve survivability. The
aftermarket part from Quickboost is not the cranked shape but a thin long tube
common to other aircraft. The Quickboost part is used in later MC.200 serie
aircraft and not on the early serie represented by this kit. Some MC.200’s also
appear to have two piece straight tubular pitot’s as well which I rarely saw in
period photos. This type of pitot is available with the QB48341 Quickboost
MC.200 Saetta Pitot Tubes & Antennas resin if you need one.
The landing gear covers had the slight bend in order to conform to the tire hump
and wing airfoil shape and looked nice once painted. The small tabs at the top
did not have an adequate fit so this part may be my mistake in assembly.
Hasegawa did a better job in this area, the small tab attachment location, with
their MC.202 kit for example.
The clear parts were added using Testors 8876C white glue. I use this because of
its long, tapered black plastic applicator that allows small amounts to be
carefully placed.
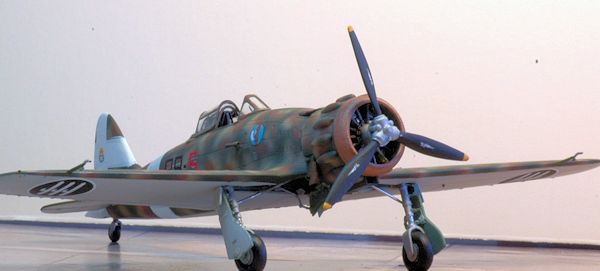
The copper radial oil cooler was painted using Tamiya dark copper, #XF-28. If
you like a shinier surface you can try titanium gold or even gold with some flat
black dry brushing. I liked the Tamiya dark copper shade since it approaches the
tone of a slightly weathered copper visible on the many WWII era color photos of
the MC.200. I also added a wash of some flat black XF-1 thinned with water and
Tamiya thinner to pop out the details.
The Italeri cowling was a pleasure to detail with painting. The copper cowl ring is well represented with fine lines representing the brazed copper panels of the oil cooler ring.
| CONCLUSIONS |
I really enjoyed building the Italeri kit especially after building the Classic
Airframes and Special Hobby C.200 Saetta. The Italeri kit is as close to a shake
and bake two day build as you can get. The challenge is in painting the complex
camouflages correctly. I didn’t have any more of these in my stash but during
the final stages enjoyed it so much I ordered some more to make some other
versions of the Saetta that I found on the Skymodels and AeroMaster C.200 decal
sheet.
The colorful camouflages and paint variations make for a superb canvass. The
cockpit is fine OOB since it is a small opening so don’t fret too much about the
inside appearance – just get the seatbelts and seat looking good and you should
be happy. It is a small sized aircraft so it won’t take up too much shelf space.
It does stand out in a crowded shelf since the variety of camouflages are an
attention getter. I encourage
 you to build one of these nice kits if you are
looking for an interesting subject without too much building complexity!
you to build one of these nice kits if you are
looking for an interesting subject without too much building complexity!
What do we really need from the aftermarket resin casters to improve the MC.200?
There are a few things that would really benefit us and be well worthwhile
coming from the fine resin casters we so love. Let’s ask them for an MC.200
detail set with the gunsight, a prop spinner, tail wheel doors, the two
different sets of wingtip pitot tubes, the bell shaped magnetic compass and
external tropical oil cooler. All of these in one small release or four or five
separate item releases would permit some additional MC.200 variations. For the
larger resin cockpit set providers a replacement wheel bay with all the plumbing
in the correct spaces would be sought after additions.
Finally, some new decal releases for the
MC.200 are needed. If one of them would have the simple manufacturers logo and
stencils seen in the MMP book on page 8 for the early airframes on one of these
releases that would be modeling nirvana! Although Skymodels provided a super
sheet, having an instruction sheet with color profiles would be well received.
I believe the Mike Grant smoke rings camouflage decal sheet was well
received. I have two of them and they will be used on the Hasegawa MC.202/205 kits that I will build next.
There is room for a few more similar decal sheets covering the complex Italian
camo schemes that might be better reproduced by a professional artist on a decal
than a free hand air brush hobbyist. One of the big challenges I had building
this kit was the camouflage. Despite looking at many photos and reading a lot of
books on this subject once the air brush was in hand the chance to do a great
job or an incorrect one was just a matter of chance. Is the camo I produced
accurate? Does it adequately represent the actual aircraft I am trying to model?
In any event I highly recommend this kit since you will enjoy building it and
appreciate admiring your work once completed.
| REFERENCES |
Macchi C.200 Saetta MMP Books Orange Series No. 8113
Aeroplano Macchi C.200; Ali D’Italia # 8; 2000
C.200 Saetta Scale Aviation Modeler International Vol. 2 # 8 August 1996
AeroMaster decal # 48-154
SKYmodels decal # 48-021
Macchi MC 200 Saetta Part 2; Maurizio Di Terlizzi; IBN Editore; 2004
The Macchi MC.200, Profile Publications, # 64
Stormo! web site at
http://www.stormomagazine.com
March 2013
If you would like your product reviewed fairly and fairly quickly, please contact the editor or see other details in the Note to Contributors.