 |
 |
|
KIT: |
Trumpeter / Classic Airframes 1/48 SM.79 |
|
KIT # |
?/? |
|
PRICE: |
$44.95 / $54.95 |
|
DECALS: |
One aircraft / Two aircraft |
|
REVIEWER: |
Tom Cleaver |
|
NOTES: |
|
|
|
HISTORY |
 However, looks
can be deceiving. Before the war, the S.79 set several international
speed, distance and load-carrying records. At the outbreak of war in the
Mediterranean, the S.79 seemed to live up to its reputation, since it was
faster than the defending fighters. The fact that the defending British
fighters that opposed the S.79 was the obsolete Gladiator was brushed
over by Italian air force leaders. However, following the introduction
of the modern Hurricane, the S.79 was shown to be one of many Axis
bombers that had drawn the wrong conclusion from their baptism in combat
over Spain. It was vulnerable to heavy firepower, and losses rose
dangerously.
However, looks
can be deceiving. Before the war, the S.79 set several international
speed, distance and load-carrying records. At the outbreak of war in the
Mediterranean, the S.79 seemed to live up to its reputation, since it was
faster than the defending fighters. The fact that the defending British
fighters that opposed the S.79 was the obsolete Gladiator was brushed
over by Italian air force leaders. However, following the introduction
of the modern Hurricane, the S.79 was shown to be one of many Axis
bombers that had drawn the wrong conclusion from their baptism in combat
over Spain. It was vulnerable to heavy firepower, and losses rose
dangerously.
The S.79 became the most successful land-based torpedo bomber of the war when the Aerosilurante were formed in 1941. In fact, the airplane became the nemesis of the British Mediterranean Fleet, with S.79s sinking the aircraft carrier HMS "Eagle," as well as several valuable destroyers and cruisers, and sending others to the yards for major repairs that took them out of combat at crucial moments. For the Italian people, the S.79 and its crews became as evocative of the national will as did the Spitfire for the British and the Zero for the Japanese.
|
THE KITS |
Thus, any serious collector of World War II aircraft will want at least one S.79 in their collection. For years, the only kits available was a 1/50 S.79 first released by Artiplast in the early 1960s, and a 1/72 Sparviero released shortly thereafter by Airfix. Both were seriously deficient in terms both of accuracy and production design. A model can be made. I have seen at least three of the 1/50 kits - now released for the past 15 years by SMER - built up by good modelers with great effort. A 1/48 full resin kit was released a few years back, but the expense of the kit kept it from the workbenches of most modelers.
 A year ago,
Jules Bringuer of Classic Airframes released a 1/48 S.79 Sparviero
Serie I, and serious modelers were happy indeed, even with a MSRP of
more than US$50.00. The kit was accurate, and while it was a limited-run
kit with all that implies, it was one of the best of the newer releases
from Classic Airframes; with a bit of "modeling ability required," and
applied, one could finally have a Sparviero in their collection.
A year ago,
Jules Bringuer of Classic Airframes released a 1/48 S.79 Sparviero
Serie I, and serious modelers were happy indeed, even with a MSRP of
more than US$50.00. The kit was accurate, and while it was a limited-run
kit with all that implies, it was one of the best of the newer releases
from Classic Airframes; with a bit of "modeling ability required," and
applied, one could finally have a Sparviero in their collection.
Earlier this year, Trumpeter, a "mainstream" injection plastic model company from China, announced release of a S.79 in 1/48, as a "mainstream" injection-molded model. Many modelers who might have been contemplating purchase of the Classic Airframes kit paused, waiting for the "mainstream" kit, since everyone "knows" such kits are always superior to limited-run kits in accuracy and ease of construction due to superior kit design.
At about the same time the Trumpeter kit was released, Classic Airframes released the late-production S.79/S.79bis torpedo bomber. I ended up with a kit of each of these Sparvieros and decided to build them head-to-head, to see which kit is the one modelers should pick up.
For a detailed description of "what's in the box" I refer you to the "first look reviews" of each company's release, here at M2.
 As is usual with
Trumpeter kits, the model looks great on the sprues and in the box. The
molds are crisp, there is no flash, and in every way the model looks
"state of the art." The kit invites the modeler to start cutting the
parts off and get to work on construction.
As is usual with
Trumpeter kits, the model looks great on the sprues and in the box. The
molds are crisp, there is no flash, and in every way the model looks
"state of the art." The kit invites the modeler to start cutting the
parts off and get to work on construction.
On the contrary, the Classic Airframes kit on first look appears to be a "standard limited-run kit" with thick parts, thicker sprues, bags of resin for detail parts, etc. The kit looks intimidating to anyone who doesn't consider themselves an "advanced modeler." It looks like it's going to be more work to get to the same place one can get easily and reliably with the mainstream kit.
Those familiar with Trumpeter kits will know that first appearances can be deceiving, which means that if they have managed (for once) to get a kit released that seems to have outline accuracy, the real test will be in the building.
|
CONSTRUCTION |
Both kits are "Out of the Box" builds, in that nothing was used in building it that wasn't in the box, other than to use lead-foil seatbelts on the CA kit, since the instructions do mention attaching seat belts to the pilot's seats.
 While one can
cut the Trumpeter parts from the sprue with a #11 Xacto blade, one needs
to use a razor saw to cut the CA parts off their sprues. Additionally,
the mating surfaces of the various parts of the CA kit need to be sanded
to insure they are flat and will join correctly. There are numerous
locating pins in the Trumpeter kit, and none in the CA kit. For me as a
modeler, locating pins are virtually useless, since they are not always
in the right position, and one doesn't realize this until they are
fighting a huge seam ridge; I long ago started cutting the pins off my
kits, so the lack of them in the Classic Airframes kit made no difference
to me.
While one can
cut the Trumpeter parts from the sprue with a #11 Xacto blade, one needs
to use a razor saw to cut the CA parts off their sprues. Additionally,
the mating surfaces of the various parts of the CA kit need to be sanded
to insure they are flat and will join correctly. There are numerous
locating pins in the Trumpeter kit, and none in the CA kit. For me as a
modeler, locating pins are virtually useless, since they are not always
in the right position, and one doesn't realize this until they are
fighting a huge seam ridge; I long ago started cutting the pins off my
kits, so the lack of them in the Classic Airframes kit made no difference
to me.
Sub-Assemblies:
I began both kits with the fuselage. This means starting with the cockpit.
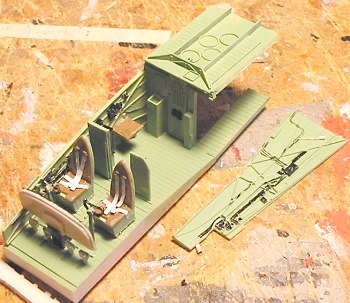 The Classic
Airframes kit provides a detailed cockpit in resin, which has to be
painted and detailed before installation, and I proceeded with that,
painting the parts in interior green, then painting the "black boxes",
instrument panels, etc., which were then highlighted using SnJ polishing
powder very lightly applied to bring out detail. I tried using some of
the photo-etch levers, but the first three popped out of the tweezers,
never again to be seen in the carpet below; the cockpit was completed
without any of these. I also made seatbelts from lead foil taken from a
wine bottle, and fitted these to the pilot's seats. The interior will
look good since you have the option of assembling the upper gun position
open.
The Classic
Airframes kit provides a detailed cockpit in resin, which has to be
painted and detailed before installation, and I proceeded with that,
painting the parts in interior green, then painting the "black boxes",
instrument panels, etc., which were then highlighted using SnJ polishing
powder very lightly applied to bring out detail. I tried using some of
the photo-etch levers, but the first three popped out of the tweezers,
never again to be seen in the carpet below; the cockpit was completed
without any of these. I also made seatbelts from lead foil taken from a
wine bottle, and fitted these to the pilot's seats. The interior will
look good since you have the option of assembling the upper gun position
open.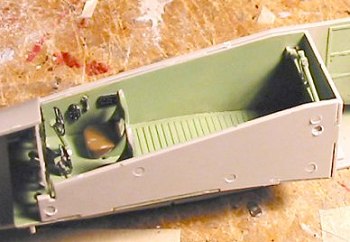
The Trumpeter kit provides virtually no interior, other than a "box" for the forward cockpit, which has two seats, two control yokes, and an instrument panel. The upper gun position cannot be opened, so once the model is assembled there is nothing to be seen in there anyway. The fuselage has molded-in frame detail, which can't be really seen through the waist windows. The entry door is separate, but unless one wants to scratch-build a lot of detail that isn't provided inside, it's best to glue it closed to begin with. The bombardier's gondola has no interior detail, and in fact cannot be seen on the inside, since the fuselage floor is solid. I came to the conclusion this was going to be a Sparviero with everything closed up, so I also closed the waist window hatches.
The Classic Airframes fuselage is two halves, and they went together easily. With a bit of test-fitting, the centerline seam was virtually non-existant, easily sanded down and covered over with Mr. Surfacer. The cockpit glass was very clear, and fit easily; it was injection-molded, and as clear as if it had been vacuformed.
 The Trumpeter
Fuselage is different. There are two halves, then the clear canopy and
cockpit roof, and another piece for the upper fuselage immediately aft of
the cockpit area, and a nose cone that the engine will attach to. None of
these fit all that well. In fact, the cockpit roof and the other upper
fuselage part seem a bit narrower than the fuselage once it is assembled
with the cockpit box inside. I ended up applying Bondo putty to all the
joint lines and having to live with the fact there would be a "shelf"
around the cockpit windows due to the parts design. I might also mention
that had there been any interior detail, it would not be visible, since
the clear windows aren't that clear, even with two coats of Future. The
"glass" is jut wavy enough in texture to be optically distorting.
The Trumpeter
Fuselage is different. There are two halves, then the clear canopy and
cockpit roof, and another piece for the upper fuselage immediately aft of
the cockpit area, and a nose cone that the engine will attach to. None of
these fit all that well. In fact, the cockpit roof and the other upper
fuselage part seem a bit narrower than the fuselage once it is assembled
with the cockpit box inside. I ended up applying Bondo putty to all the
joint lines and having to live with the fact there would be a "shelf"
around the cockpit windows due to the parts design. I might also mention
that had there been any interior detail, it would not be visible, since
the clear windows aren't that clear, even with two coats of Future. The
"glass" is jut wavy enough in texture to be optically distorting.
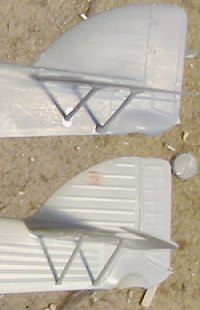 With the
elevators separate from the horizontal stabilizer on the Trumpeter kit,
one can mount the elevators to "droop," which I did. I attached the
horizontal stabilizers and discovered that Trumpeter had made the mistake
of providing the bracing struts of the prototype S.79, i.e., two struts
below and one above. The two lower struts did not look like the struts
seen in photos. I filled in the holes in the horizontal stabilizer and
vertical fin for the incorrect upper struts.
With the
elevators separate from the horizontal stabilizer on the Trumpeter kit,
one can mount the elevators to "droop," which I did. I attached the
horizontal stabilizers and discovered that Trumpeter had made the mistake
of providing the bracing struts of the prototype S.79, i.e., two struts
below and one above. The two lower struts did not look like the struts
seen in photos. I filled in the holes in the horizontal stabilizer and
vertical fin for the incorrect upper struts.
The Classic Airframes horizontal
stabilizer and elevators and molded in one part, and were not
 separated. The lower
struts for this assembly are accurate in shape and position.
separated. The lower
struts for this assembly are accurate in shape and position.
When I compared the tail parts of the two kits, I realized that the Trumpeter vertical fin and rudder, and horizontal stabilizers and elevators, are too small overall by about 20 percent in comparison to the Classic Airframes kit. This is not something you can fix.
The Wings:
Trumpeter provides all the
control surfaces separate, including the leading edge slats. There are no
photos I could find of S.79s sitting on the ground with these slats
deployed, so after I assembled the wings, I glued the slats in position.
There were big gaps, which had to be filled with Bondo putty and sanded
smooth. The ailerons and flaps are supposed to be fabric-covered, but
there was no "fabric effect" on them. Considering the too-large,
out-of-scale "fabric effect" on the rear fuselage and tail feathers, I
didn't think this was a bad thing. However, the various parts dealing
with the hinges, and the
 aileron mass balance,
are too small when compared with photographs. The wings are separate,
left and right, and glue to the fuselage in a conventional manner. Being
separate like this, it is easy to notice that the airfoil is wrong, being
equally curved on the lower surfaces as on the upper surface, which
provides a strange "look" to the forward wing-fuselage joint after they
are attached. Also, the wing-fuselage joints and gaps that had to be
filled with putty.
aileron mass balance,
are too small when compared with photographs. The wings are separate,
left and right, and glue to the fuselage in a conventional manner. Being
separate like this, it is easy to notice that the airfoil is wrong, being
equally curved on the lower surfaces as on the upper surface, which
provides a strange "look" to the forward wing-fuselage joint after they
are attached. Also, the wing-fuselage joints and gaps that had to be
filled with putty.
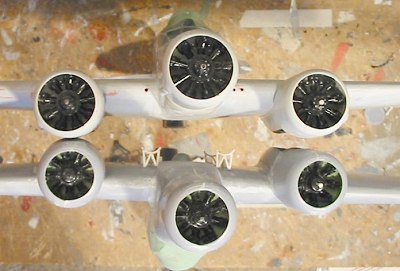
Additionally, the engine
nacelles have a strange shape to them, not being as pointed at the rear
as photographs reveal they are. Worse, the engine cowlings are too big
in diameter, and the front opening is too big. While this makes it nice
to see the very well-detailed engines, it gives a totally incorrect look
to the model.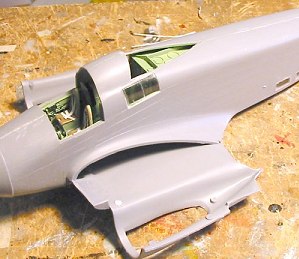
The Classic Airframes kit wing is not as easy to assemble to the fuselage as is the Trumpeter kit. There are three parts to the lower surface and two for the upper. Fit is "iffy" here. The modeler should test fit the upper wings to the wing fairing, and sand the face of that joint to fit to the fuselage. This is not difficult and takes no skill the average modeler does not possess. The wing should be assembled in parts, and attached to the fuselage in a specific sequence, rather than building a sub-assembly and then attaching it; if you do this, it will fit together easily. First, attach the lower center part to the fuselage. (Be sure to glue in the wheel wells at this time, it will be almost impossible if you forget and will require "advanced modeling skills" to solve the problem.) Second, attach the upper surfaces to the fuselage and lower center section. Third, attach the lower outer surfaces. You will need to sand the wingtips to get rid if a slight "overhang" of the upper wing surface, but there will be no joints in the assembly needing more than Mr. Surfacer 500.
Both models were sanded smooth on their joints, with Mr. Surfacer applied to the Trumpeter kit after the putty was sanded down.
|
COMPARISONS |
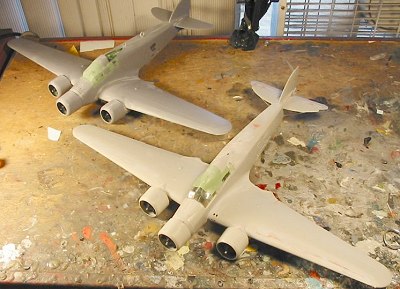 Comparing the two
models together, one is immediately struck by two physical items of the
Trumpeter version: the horizontal stabilizer is considerably smaller than
that of the Classic Airframes model, while the engine cowlings are of
greater diameter and have a wider opening.
Comparing the two
models together, one is immediately struck by two physical items of the
Trumpeter version: the horizontal stabilizer is considerably smaller than
that of the Classic Airframes model, while the engine cowlings are of
greater diameter and have a wider opening.
Compared both with drawings and photographs, the Classic Airframes kit is correct on both points. The horizontal stabilizer of the Trumpeter model is approximately 3 scale feet shorter in span and about 18 scale inches narrower in chord than the Classic Airframes kit, with a smaller vertical fin and rudder also. This is visually significant.
Both models are the same length,
and this is "close enough" to the published dimensions of the original
that the difference might by my own deficient math skills. The Trumpeter
engine cowlings, in addition to being of greater diameter than those of
the Classic Airframes kit, are also narrower in chord, which visually
emphasizes their additional girth. Comparing the two models to
photographs, the Classic Airframes model looks right. Some modelers have
pointed out that the outboard cowlings should have a convex curve to
their rear opening from the point of greatest diameter;
 neither kit has this,
but since the Classic Airframes kit has thicker plastic for the parts, a
modeler determined to get this right could do so armed with a sanding
stick and 10 minutes of patience. Additionally, the bombardier's gondola
on the Classic Airframes kit is too long by about a scale foot, that of
the Trumpeter was close to right; had I realized this problem before
assembly, I could have cut off a quarter-inch from the front end of the
CA gondola, attached the forward glass part, and solved the problem with
no difficulty.
neither kit has this,
but since the Classic Airframes kit has thicker plastic for the parts, a
modeler determined to get this right could do so armed with a sanding
stick and 10 minutes of patience. Additionally, the bombardier's gondola
on the Classic Airframes kit is too long by about a scale foot, that of
the Trumpeter was close to right; had I realized this problem before
assembly, I could have cut off a quarter-inch from the front end of the
CA gondola, attached the forward glass part, and solved the problem with
no difficulty.
Both models are roughly the same wingspan, and the difference between them could be due to the Classic Airframes wingtip being "evened off" due to the different method of assembly. The chord of both wings is close to the same at the root, while the Trumpeter kit has a narrower chord at the tip, with the difference made up in the different angle of the trailing edge. The Classic Airframes wing appears more accurate in planform compared to photos, and the angle of the trailing edge of the Trumpeter kit gives the whole wing a "pushed forward" look. Additionally, the area where the engine nacelles extend aft of the trailing edge are different in shape and outline, with the Classic Airframes model again displaying more accuracy.
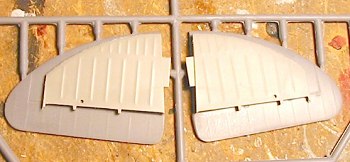
 With regard to
surface detail, let us remember that the S.79 was a wooden airframe with
fabric-covered rear fuselage, tail surfaces, ailerons and flaps. The
Classic Airframes kit has all of these areas represented by a muted
"fabric effect" that looks realistic to me as someone who has been around
a fair number of fabric-covered "real" airplanes. The Trumpeter kit has
no detail on the ailerons or flaps, and a very heavy and
unrealistic-looking fabric effect on the rear fuselage and tail surfaces
that brings a new meaning to the term "hills and valleys."
With regard to
surface detail, let us remember that the S.79 was a wooden airframe with
fabric-covered rear fuselage, tail surfaces, ailerons and flaps. The
Classic Airframes kit has all of these areas represented by a muted
"fabric effect" that looks realistic to me as someone who has been around
a fair number of fabric-covered "real" airplanes. The Trumpeter kit has
no detail on the ailerons or flaps, and a very heavy and
unrealistic-looking fabric effect on the rear fuselage and tail surfaces
that brings a new meaning to the term "hills and valleys."
As regards the engines, the Trumpeter kit provides three well-detailed, multi-part engines that look quite effective when assembled. The (incorrect) larger cowling opening does allow these to be seen more easily. The Classic Airframes engines are well-molded one-piece resin parts, and look effective inside the tighter cowlings. Trumpeter's props score high for being one-piece rather than the hub and individual blades of the Classic Airframes kit, but the Classic Airframes kit provides the different hubs for the early production and late production S.79-I and the S.79-II/bis.
While Trumpeter only provides the early I Serie exhausts (and says to have them all on the left side of the cowling), the Classic Airframes kit provides the correct exhausts for the late-production I Serie Aerosilurante, as well as the "Wellington exhausts" used by the re-engined I Serie and the S.79bis.
|
CAMOUFLAGE & MARKINGS |
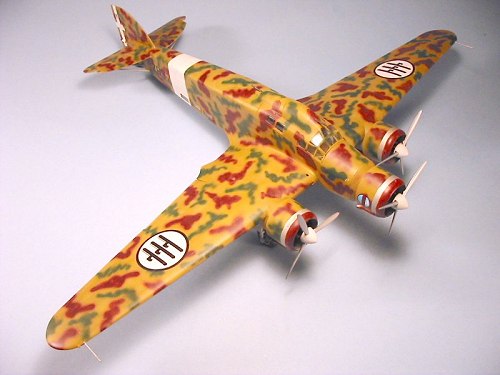
Painting:
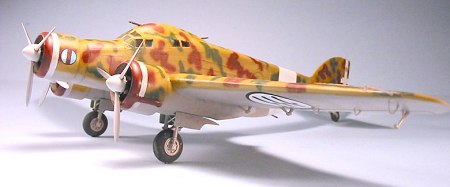
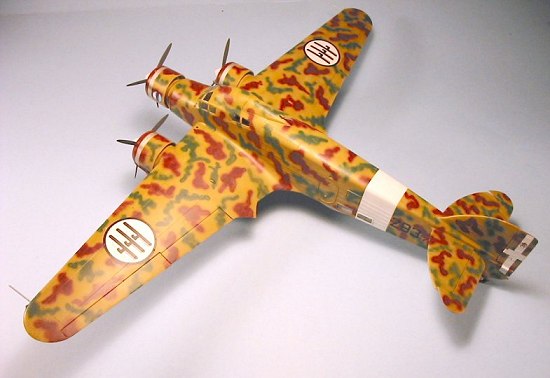
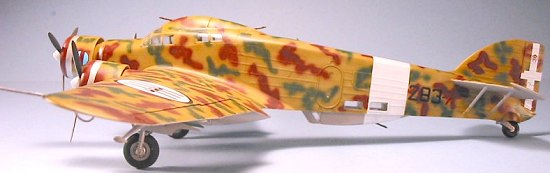
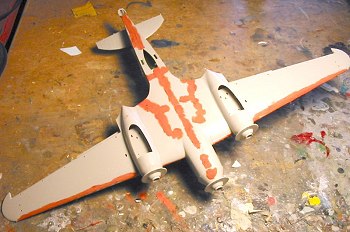
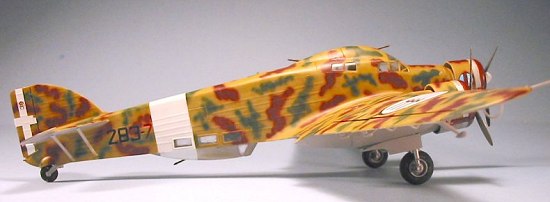
Since the Trumpeter S.79 is
clearly a S.79-I, and not a later-production airplane as was used for the
torpedo bombers, I opted to paint it as a standard level bomber, as seen
at the outset of the war, with the Italian Yellow, under Maroon and Green
blotches. 
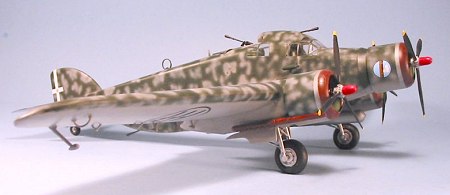
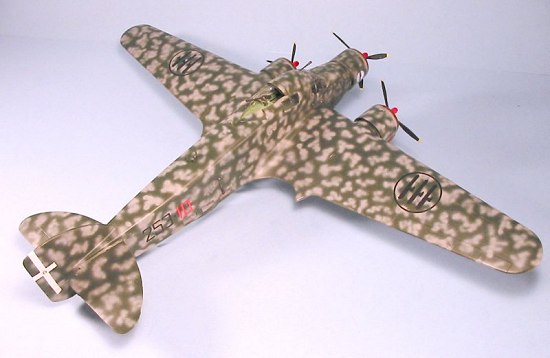
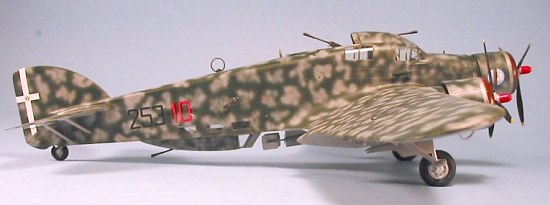
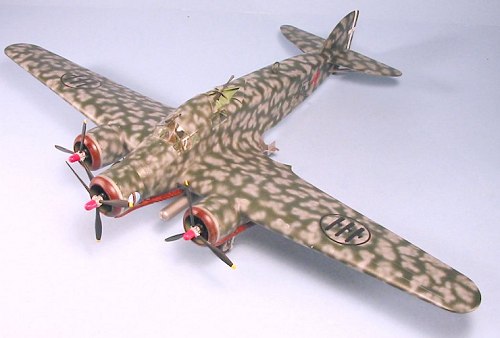
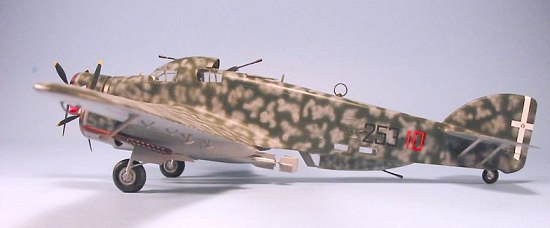
The Classic Airframes S.79 was done as a re-engined late-production I Serie Aerosilurante with a field-applied night camouflage consisting of grey blotches over the dark green factory-applied camouflage.
Decals:
The difference in decals between the two kits is no contest. The Trumpeter kit provides markings for one airplane, an S.79-I/sil (despite the fact the model most closely resembles an early-production S.79 not used by the Aerosilurante). The Classic Airframes kit provides markings for an early-production S.79-I(sil) and a late-production S.79-I(sil) of the Regia Aeronautica, and two S.79bis torpedo bombers of the Aviazione della R.S.I. These are printed by Microscale and present no difficulty in application.
|
CONCLUSIONS |
When the Trumpeter kit was first released, Squadron Mail Order had a "fire sale" of the first-release kit of the Classic Airframes S.79, and many modelers talked on discussion boards of getting the Classic Airframes kit as an "aftermarket set" for the Trumpeter kit, on the theory that any "mainstream" injection-molded kit must be superior to any limited-run kit.
 In fact, even if
one could put the Classic Airframes cockpit inside the Trumpeter model
without major surgery (which one can't), the reverse is true.
Admittedly, a $45 kit is an expensive "aftermarket set" and I do not
recommend that; however, for those who bought the two kits in
anticipation of robbing the Classic Airframes kit, I would recommend you
use the engines and the props (depending on which version S.79 you are
building), and perhaps the torpedoes and their mounts, along with the
gear doors, from the Trumpeter kit as aftermarket parts for the Classic
Airframes kit.
In fact, even if
one could put the Classic Airframes cockpit inside the Trumpeter model
without major surgery (which one can't), the reverse is true.
Admittedly, a $45 kit is an expensive "aftermarket set" and I do not
recommend that; however, for those who bought the two kits in
anticipation of robbing the Classic Airframes kit, I would recommend you
use the engines and the props (depending on which version S.79 you are
building), and perhaps the torpedoes and their mounts, along with the
gear doors, from the Trumpeter kit as aftermarket parts for the Classic
Airframes kit.
The final result of the two models built-up is - to me - no contest, with the Classic Airframes kit far superior in terms of overall look because of its better shape accuracy, as well as better detail throughout.
 Those of you
who have the Classic Airframes kit and have been worrying that it is "too
hard" are most likely underestimating your own abilities. This kit is
well-engineered, and if you take your time to test-fit parts and trim
where necessary, you will have little difficulty assembling the model and
will not be using lots of putty - which you will use with the Trumpeter
kit, which has its own assembly problems.
Those of you
who have the Classic Airframes kit and have been worrying that it is "too
hard" are most likely underestimating your own abilities. This kit is
well-engineered, and if you take your time to test-fit parts and trim
where necessary, you will have little difficulty assembling the model and
will not be using lots of putty - which you will use with the Trumpeter
kit, which has its own assembly problems.
Any outline shapes of the Classic Airframes kit a modeler feels are incorrect can be fixed with "some modeling skills required." Unfortunately, the same cannot be said about the Trumpeter kit, whose failings are simply wrong, and unfixably so.
Sad to say, I fear Trumpeter as a kit-producer is another Hobbycraft, and one that has yet to produce its P-26.
Thanks to HobbyLink Japan for the Trumpeter review kit. Thanks to Classic Airframes for the Classic Airframes review kit.
If you would like your product reviewed fairly and quickly by a site that has over 200,000 visitors a month, please contact me or see other details in the Note to Contributors.