Warrior Models 1/48 Breda Ba65 A80
|
KIT # |
48001 |
|
PRICE: |
$54.95 |
|
DECALS: |
Two Aircraft |
|
REVIEWER: |
|
|
NOTES: |
Limited run resin |
|
HISTORY |
Breda was originally a train manufacturer... whether this was a factor in the troubled history of this aircraft, one can only guess! As one of the earlier monoplane designs, the high wing loading of the Isotta-Fraschini K14 (under) powered two seat Breda Ba65 made it a real handful for the inexperienced pilots, who had insufficient training or knowledge of such characteristics and this contributed to a spate of accidents during its introduction into the Regia Aeronautica.
 Take-off or landing was a fraught time and the engine had to remain on full
power just to keep the aircraft in the air! Aerobatics were practically
impossible and only expert pilots could get the best out of the plane. Its
relatively high-speed led the Air Ministry to believe it could be used as an
interceptor as well as ground attack. Ultimately, it was to be a single seat
ground attack only, when weight saving measures demanded the removal of the
rear-gunner from all aircraft. This applied to the Breda Ba65A80 as well,
despite being fitted with the more powerful Fiat A80 engine.
Take-off or landing was a fraught time and the engine had to remain on full
power just to keep the aircraft in the air! Aerobatics were practically
impossible and only expert pilots could get the best out of the plane. Its
relatively high-speed led the Air Ministry to believe it could be used as an
interceptor as well as ground attack. Ultimately, it was to be a single seat
ground attack only, when weight saving measures demanded the removal of the
rear-gunner from all aircraft. This applied to the Breda Ba65A80 as well,
despite being fitted with the more powerful Fiat A80 engine.
As soon as the Spanish campaign was over they were all consigned to the scrap yard, but due a shortage of replacements, they were recommissioned! They went on to have somewhat belated success in the North African campaign, but the tough desert conditions took a heavy toll and any aircraft not lost in action were quickly rendered unserviceable. A total of 201 Ba65's were made, including export models destined for Chile, Iraq and Portugal.
|
THE KIT |
I bought this "very limited" run resin kit from Pacific Coast Models. Having missed out on the excellent RCR resin kit, which is long OOP, this is the only quarter scale model of this strange, aggressive looking aircraft. I really like it, especially the single seater "monoposto" version. Before I started, I bought the Ba65 Ali d'Italia book, which turned out to be an extremely useful source for checking detail and accuracy. After checking the kit contents against the plans in the book, it was clear that the fuselage shape was going to need a lot of work, more of which later. Most of the finer detail is made of white metal parts and includes some (but not all) of the interior tubular framework. They are all neatly packaged in small, labeled plastic bags. The biposto version is built straight out of the box, whereas the monoposto version will require a bit of surgery on the fuselage. Some of the panel lines are rather heavily engraved, so they will need to be reduced with filler or superglue.
|
CONSTRUCTION |
 After the unavoidable pre-preparatory stage to get through, i.e. the
cleaning up & test fitting of all parts and before starting any cockpit detail
work, I chose to tackle the fuselage. After joining the two halves and replacing
the rear gunner section with the blank, which wasn't a perfect fit by any means,
the cross section of the fuselage was examined. The kit has an oval section, but
the plans and photos in the book show that it should have what could be called
an "athletic race-track" shape. This shape is maintained from the rear of the
cockpit to the start of the tailfin, so there was a lot of Milliput to apply,
which is messy stuff at the best of times. Although Milliput can be smoothed
out before it cures, there was still a fair amount of sanding to do after. I
used card templates to help me fine tune the shape. Any panel lines lost were
re-engraved. Next task was to open up both the bomb bay and glazing areas in the
ventral fuselage area, using the plans as a guide.
After the unavoidable pre-preparatory stage to get through, i.e. the
cleaning up & test fitting of all parts and before starting any cockpit detail
work, I chose to tackle the fuselage. After joining the two halves and replacing
the rear gunner section with the blank, which wasn't a perfect fit by any means,
the cross section of the fuselage was examined. The kit has an oval section, but
the plans and photos in the book show that it should have what could be called
an "athletic race-track" shape. This shape is maintained from the rear of the
cockpit to the start of the tailfin, so there was a lot of Milliput to apply,
which is messy stuff at the best of times. Although Milliput can be smoothed
out before it cures, there was still a fair amount of sanding to do after. I
used card templates to help me fine tune the shape. Any panel lines lost were
re-engraved. Next task was to open up both the bomb bay and glazing areas in the
ventral fuselage area, using the plans as a guide.
New bomb bay doors were made from shaped plasticard and the glazing made from
clear sheet (the vac form item was much too small). These opened up areas made
access to the cockpit quite easy, so I set about installing all the detail,
leaving out the resin floor. It never had a floor as such, just two footplates,
which meant adding some missing tubular structure. As there were no bombs
supplied for the internal bomb bay, which was situated right behind the pilot
seat, I decided to fabricate an additional petrol tank that was often installed
in their place. This filled the vacant area quite nicely and also stopped any
"show-through" from the large "drop" holes in the bomb bay doors. Any tubular
structure that might still be visible through those doors and ventral glazing
were added using sections of plastic rod. I chose to depict all internal areas
in light grey, instead of the "anti-corrosivo" green often quoted in build
articles, as no one seems to know for sure what colours were actually used. I
picked out various items in black and silver.
 Compared to that, which was easily the most difficult fuselage construction I've
ever dealt with, the rest of the kit construction is pretty straightforward. A
few tweaks were still necessary though. The shape of the elevators and outline
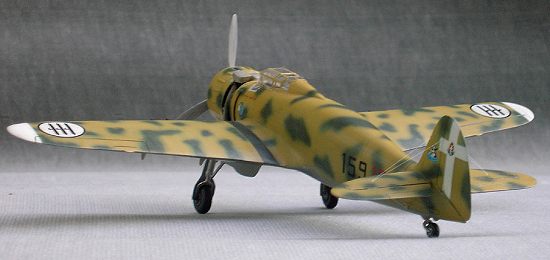
of each wing were matched to the plans, including an extension to the port
wingtip (to counter engine torque). Some filler was needed to achieve a smooth
join between the wings and fuselage and minor tweaks made to the shape of the
trailing edge of the wing fillets, which were too sharp. New undercarriage doors
were made from plasticard to replace the very thick kit items (the propeller
blades needed to be thinned down quite a lot too). Minor adjustments were made
to the shape of the cannon's wing fairings and the "shields" either side of the
cockpit were removed and replaced with more accurate plasticard versions. The
small intakes on the top of the cowlings were also modified as they lacked
sufficient depth.
Compared to that, which was easily the most difficult fuselage construction I've
ever dealt with, the rest of the kit construction is pretty straightforward. A
few tweaks were still necessary though. The shape of the elevators and outline
of each wing were matched to the plans, including an extension to the port
wingtip (to counter engine torque). Some filler was needed to achieve a smooth
join between the wings and fuselage and minor tweaks made to the shape of the
trailing edge of the wing fillets, which were too sharp. New undercarriage doors
were made from plasticard to replace the very thick kit items (the propeller
blades needed to be thinned down quite a lot too). Minor adjustments were made
to the shape of the cannon's wing fairings and the "shields" either side of the
cockpit were removed and replaced with more accurate plasticard versions. The
small intakes on the top of the cowlings were also modified as they lacked
sufficient depth.
The vac form canopy needed careful handling (as there's only one supplied) and
despite my misgivings about the heavy handed framework, it looked perfect once
installed, masked and painted... phew!
|
COLORS & MARKINGS |
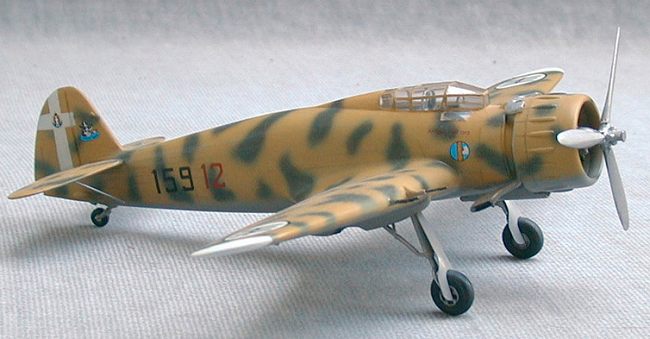
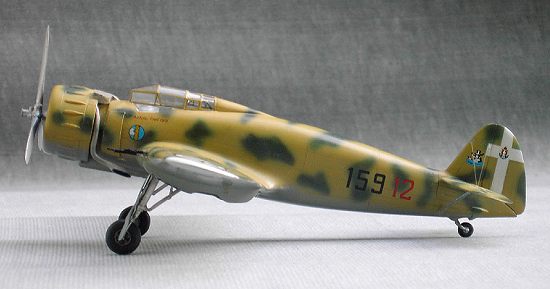
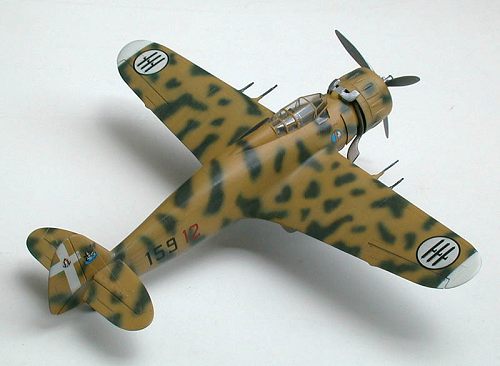
Another problem that was not apparent until I applied a coat of grey primer was the presence of hundreds of tiny holes on the surface of both wings and tail surfaces that could not be seen with the naked eye. They were magnified a thousandfold after the first coat! Repeated sanding and application of more primer eventually obscured most of them. I used Humbrol 81 for the main upper camouflage colour and Humbrol 140 for the lower surfaces. The mottles were sprayed using Humbrol 149. The kit decals worked surprisingly well on Future, but there is an error in the spelling of the pilots name on the fuselage, which should read as "Antonio dell'Oro", not "Antoio dell'ara". I used aftermarket wing roundels, as I wasn't happy with the shape of the fasces.
|
CONCLUSIONS |
 The fuselage problems made this an extremely difficult and time consuming kit to
build, but it did make it all the more satisfying when it was finally finished.
There are two limited run injection 1/72 Breda Ba65 kits by Azur and RCR (Sign),
but they're not much better... oh well.
The fuselage problems made this an extremely difficult and time consuming kit to
build, but it did make it all the more satisfying when it was finally finished.
There are two limited run injection 1/72 Breda Ba65 kits by Azur and RCR (Sign),
but they're not much better... oh well.
As a footnote, Classic Airframe have just cancelled their 1/48 planned release,
due to an as yet unnamed manufacturer deciding to release one as well. Whoever
it is, it will most welcome!
Copyright ModelingMadness.com
If you would like your product reviewed fairly and fairly quickly, please contact the editor or see other details in the Note to Contributors.
Back to Reviews Page 2020