Pavla 1/72 Fiat CR.42 'Falco'
| KIT #: | 72048 |
| PRICE: | £15.17 |
| DECALS: | Four Options |
| REVIEWER: | Carmel J. Attard |
| NOTES: | Resin detail parts |
| HISTORY |
 Construction of the CR 42 prototype began in 1937 at the Aeritalia works, with
the maiden flight in May 1938 and the first 200 production aircraft were
manufactured in the autumn of 1939. The CR 42 was an elegant bi-plane, which had
a fully metal frame and a fixed landing gear, an open cockpit and was armed with
two synchronsed SEFAT 0.50 machine guns mounted on the forward fuselage. Two
bomb racks were added under the lower wings at the start of the war and there
were already five Sturmos equipped with the type totaling 330 CR 42s. It was a
popular fighter aircraft and was also sought after by foreign air forces.
Construction of the CR 42 prototype began in 1937 at the Aeritalia works, with
the maiden flight in May 1938 and the first 200 production aircraft were
manufactured in the autumn of 1939. The CR 42 was an elegant bi-plane, which had
a fully metal frame and a fixed landing gear, an open cockpit and was armed with
two synchronsed SEFAT 0.50 machine guns mounted on the forward fuselage. Two
bomb racks were added under the lower wings at the start of the war and there
were already five Sturmos equipped with the type totaling 330 CR 42s. It was a
popular fighter aircraft and was also sought after by foreign air forces.
| THE KIT |
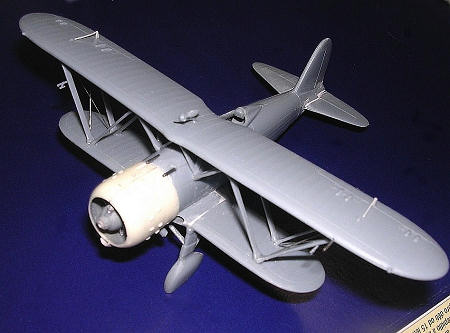
 The kit
of the CR 42 comes in a standard Pavla box containing kit parts on a well-moulded
sprue of grey styrene that is contained in a sealed bag; another bag has detail
parts in cream-colored resin and there is a vacform windshield and another spare
one. A generous decal sheet caters for no less than four aircraft, three being
Regia Aernautica and one is a Hungarian aircraft. Instructions come in a typical
16-page, A5 size instructions booklet, with line drawings of kit parts and
assembly process. All views depict spatted undercarriage but there is in the kit
box also parts for an unspotted undercarriage possibly a clue for some version
in future re-release. Kit parts show a good representation of fabric surfaces to
main planes and fuselage. The Pavla style of paint details of sprue and resin
parts thoughtfully indicating paint details in numbered form. A colour paint
reference chart is displayed in Czech, Italian, FS and Humbrol equivalents.
The kit
of the CR 42 comes in a standard Pavla box containing kit parts on a well-moulded
sprue of grey styrene that is contained in a sealed bag; another bag has detail
parts in cream-colored resin and there is a vacform windshield and another spare
one. A generous decal sheet caters for no less than four aircraft, three being
Regia Aernautica and one is a Hungarian aircraft. Instructions come in a typical
16-page, A5 size instructions booklet, with line drawings of kit parts and
assembly process. All views depict spatted undercarriage but there is in the kit
box also parts for an unspotted undercarriage possibly a clue for some version
in future re-release. Kit parts show a good representation of fabric surfaces to
main planes and fuselage. The Pavla style of paint details of sprue and resin
parts thoughtfully indicating paint details in numbered form. A colour paint
reference chart is displayed in Czech, Italian, FS and Humbrol equivalents.| CONSTRUCTION |
 The first
6 stages deal with assembly of the cockpit office and also the radial engine.
There is an offer to choose between an instrument panel having raised details or
one with printed instruments decal to fit on instrument panel.. At this scale
the offer is appreciable. Cockpit interior parts are colour indicated so that
this is completed and individual parts painted while the assembly process
proceeded. There are pronounced ejector knobs on the inner surface of the
fuselage halves and it is imperative to file these down since these can
interfere with the cockpit sub assembly when it comes to fit inside. I also
found out to file off 1/16” from the cockpit floor width in order to allow the
fuselage to close.
The first
6 stages deal with assembly of the cockpit office and also the radial engine.
There is an offer to choose between an instrument panel having raised details or
one with printed instruments decal to fit on instrument panel.. At this scale
the offer is appreciable. Cockpit interior parts are colour indicated so that
this is completed and individual parts painted while the assembly process
proceeded. There are pronounced ejector knobs on the inner surface of the
fuselage halves and it is imperative to file these down since these can
interfere with the cockpit sub assembly when it comes to fit inside. I also
found out to file off 1/16” from the cockpit floor width in order to allow the
fuselage to close.
 Coming to
the wing assembly stage, fixing the struts could develop into a temporary
setback and these are fixed in a sequence whereby the central fuselage struts
are attached to the upper wing first since their position is assured at the wing
spot area. At this point the mid fuselage area and the under of upper wing were
painted in the respective colors indicated later in text. The assembly is then
brought to the fuselage and once aligned and it is permanently fixed. The mid
wing struts are then fixed in place followed by the inner ones. This may give an
indication that the lower wing may require a very slight upward tilt in order
that the outer struts reach both wings. These were then glued together and the
inner struts added. With the upper wing in place, the horizontal tail planes,
oil cooler outlets, air intake fairings were attached, and the spatted wheels
fixed in place. A long exhaust pipe is also issued that to my knowledge is
associated with the night intruder version, as indicated in the side view shown
on P8 of the instructions for a version CR42CN, and this may indicate that
another version or decal option may come out someday. Cross rigging to the outer
wing struts were made from measured cut metal thin wire strips.
Coming to
the wing assembly stage, fixing the struts could develop into a temporary
setback and these are fixed in a sequence whereby the central fuselage struts
are attached to the upper wing first since their position is assured at the wing
spot area. At this point the mid fuselage area and the under of upper wing were
painted in the respective colors indicated later in text. The assembly is then
brought to the fuselage and once aligned and it is permanently fixed. The mid
wing struts are then fixed in place followed by the inner ones. This may give an
indication that the lower wing may require a very slight upward tilt in order
that the outer struts reach both wings. These were then glued together and the
inner struts added. With the upper wing in place, the horizontal tail planes,
oil cooler outlets, air intake fairings were attached, and the spatted wheels
fixed in place. A long exhaust pipe is also issued that to my knowledge is
associated with the night intruder version, as indicated in the side view shown
on P8 of the instructions for a version CR42CN, and this may indicate that
another version or decal option may come out someday. Cross rigging to the outer
wing struts were made from measured cut metal thin wire strips.| COLORS & MARKINGS |
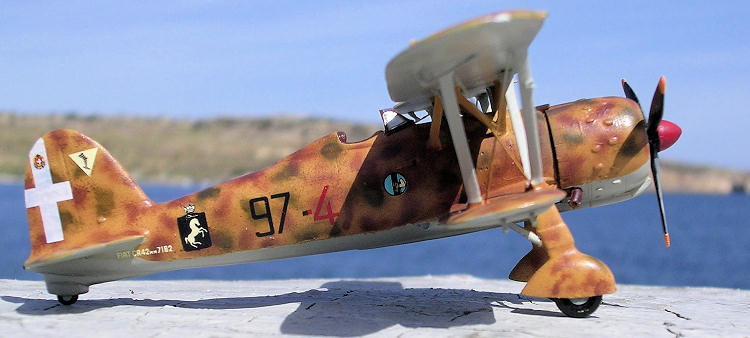
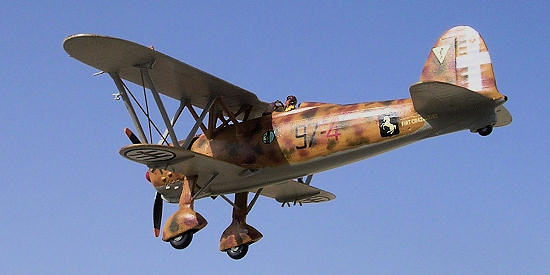
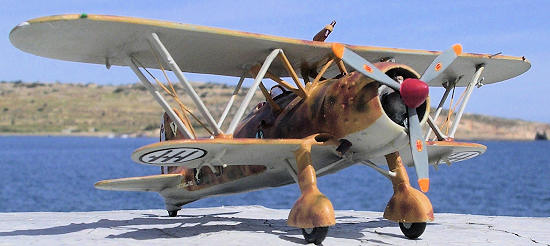
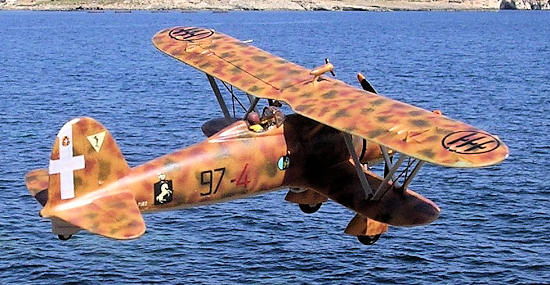
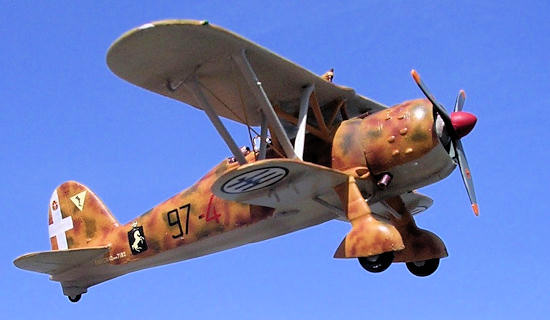
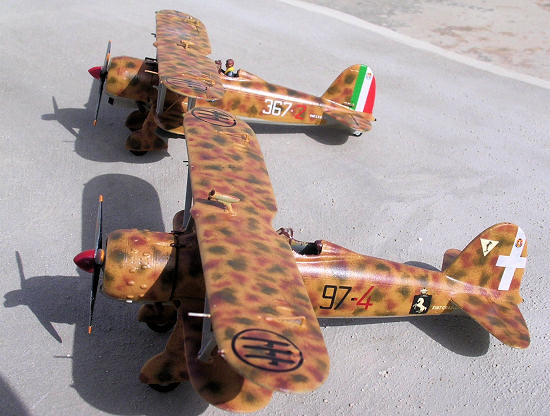 The CR 42
carried very interesting camouflage, which varied from one unit to another. Also
there was variation within the same unit. Basically the camouflage consisted of
sand background with blotches of green and red brown while the lower surfaces
were light grey. I used Humbrol paint and first airbrushed the light grey
undersides. The first coat revealed some imperfections during constructions that
were attended to and the lower surfaces were airbrushed once more in light grey.
After drying these were masked and the upper areas airbrushed in sand to match
the upper fuselage pre painted area, which was painted during the setting of the
upper wing. After drying, while the cockpit was still masked the airbrushed was
primed with green and using the XF nozzle applied small blotches at irregular
areas. This I used light pressure with 40% thinner mix. The same method was used
this time using red brown for more irregular blotches. With masking removed, I
applied an overall coat of Klear. Time to apply decals for which I have used a
selection of Pavla kit decals and
The CR 42
carried very interesting camouflage, which varied from one unit to another. Also
there was variation within the same unit. Basically the camouflage consisted of
sand background with blotches of green and red brown while the lower surfaces
were light grey. I used Humbrol paint and first airbrushed the light grey
undersides. The first coat revealed some imperfections during constructions that
were attended to and the lower surfaces were airbrushed once more in light grey.
After drying these were masked and the upper areas airbrushed in sand to match
the upper fuselage pre painted area, which was painted during the setting of the
upper wing. After drying, while the cockpit was still masked the airbrushed was
primed with green and using the XF nozzle applied small blotches at irregular
areas. This I used light pressure with 40% thinner mix. The same method was used
this time using red brown for more irregular blotches. With masking removed, I
applied an overall coat of Klear. Time to apply decals for which I have used a
selection of Pavla kit decals and | CONCLUSIONS |
| REFERENCES |
 Pavla Kit instructions.
If you would like your product reviewed fairly and quickly, please contact me or see other details in the Note to Contributors.