Hasegawa/UMI 1/32 Bf-109G-12 Conversion
| KIT #: | ? |
| PRICE: | $36.95 for the ProModeler kit, $50 for the resin conversion |
| DECALS: | see review |
| REVIEWER: | Tom Cleaver |
| NOTES: |
| HISTORY |
When one considers that close to two-thirds of all Bf-109s that were lost were written off to non-operational accidents, and that the majority of these involved takeoff and landing accidents due to the poor design of the airplane - with its weak, narrow-track gear, non-trimmable rudder, etc. - the fact that it took the Luftwaffe until the summer of 1944 to finally decide to have a 2-seat conversion trainer produced is truly amazing. Both major post-war users of the Bf-109 - Czechoslovakia and Spain - produced 2-seat trainer versions in fairly substantial numbers because of the airplane’s notorious problems. And it wasn’t just the under-trained tyros who had problems with the airplane - no less a 109 experte than Gunther Rall told me in 1984 that he lost twice as many 109s to accidents as he did to operations.
 Nevertheless, it was the stress of sending under-trained young pilots known as
nachwuchs (“new growth”) with less than 100 hours total training on to
operational Jagdgeschwadern that finally led to the creation of what was
known as the Bf-109G-12. Of a planned 960 trainers, only 96 were actually
produced, created from war-weary Bf-109G-4, G-6 and G-14 airframes, including
the G-6/AS and G-14/AS. The 20mm cannon was removed. The Bf-109G-12s rebuilt
from G-4 airframes - which appear to be the majority of the sub-type - did
retain the nose-mounted 7.62mm machine guns. It is unclear whether those
converted from G-6 or G-14 airframes retained the 13mm machine guns or had those
replaced with 7.62mm weapons to save weight. That part of the fuselage main
tank that was situated immediately behind the standard cockpit was removed to
provide space for the second cockpit, with the gas tank reduced to less than
half its capacity when the part beneath the cockpit floor was retained. As a
result, the Bf-109G-12 always flew with the 66-gallon drop tank.
Nevertheless, it was the stress of sending under-trained young pilots known as
nachwuchs (“new growth”) with less than 100 hours total training on to
operational Jagdgeschwadern that finally led to the creation of what was
known as the Bf-109G-12. Of a planned 960 trainers, only 96 were actually
produced, created from war-weary Bf-109G-4, G-6 and G-14 airframes, including
the G-6/AS and G-14/AS. The 20mm cannon was removed. The Bf-109G-12s rebuilt
from G-4 airframes - which appear to be the majority of the sub-type - did
retain the nose-mounted 7.62mm machine guns. It is unclear whether those
converted from G-6 or G-14 airframes retained the 13mm machine guns or had those
replaced with 7.62mm weapons to save weight. That part of the fuselage main
tank that was situated immediately behind the standard cockpit was removed to
provide space for the second cockpit, with the gas tank reduced to less than
half its capacity when the part beneath the cockpit floor was retained. As a
result, the Bf-109G-12 always flew with the 66-gallon drop tank.
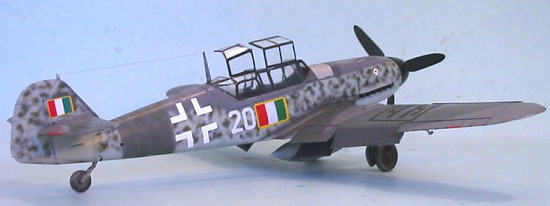
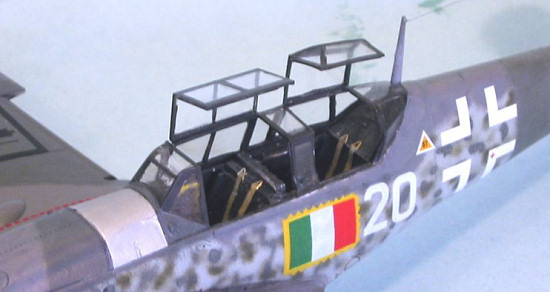
The canopies only opened to the left, rather than tilting over all the way as with the standard canopy.
A few Bf-109G-12s were provided to the Italian ANR for use in converting pilots of the Macchi C.205 and Fiat G.55 when that service standardized on the Bf-109G at the end of 1944.
| THE KIT |
Kits of the Bf-109G-12 have been as scarce as the original airplane. In the
late 1980s, Falcon released a 1/48 vacuform conversion kit that had a fuselage
and canopy, for use with the Otaki Bf-109G-6 kit. Falcon later released their
own 1/48 limited-run injection-molded kit in the early 1990s which you can see
reviewed here. Recently, Kiwi Resins released a conversion set for use with
the 1/48 Hasegawa Bf-109G-6 kit, which provides a full resin fuselage and cock pits,
with the Falcon vacuform canopy, and can be considered the best Bf-10G-12
conversion available in 1/48. At one time, Hobbycraft was set to release a 1/48
injection-molded Bf-109G-12, which I am not certain ever saw the light of day.
Additionally, MPM has released a limited-run Bf-109G-12 in 1/72.
pits,
with the Falcon vacuform canopy, and can be considered the best Bf-10G-12
conversion available in 1/48. At one time, Hobbycraft was set to release a 1/48
injection-molded Bf-109G-12, which I am not certain ever saw the light of day.
Additionally, MPM has released a limited-run Bf-109G-12 in 1/72.
Once again, I have been involved in the creation of this conversion set as “cheerleader” to Dave Thompson of UMI Resin, and worked with him to get the best information on the conversion. This review, like that of the Fw-190S, is a review of the test kit.
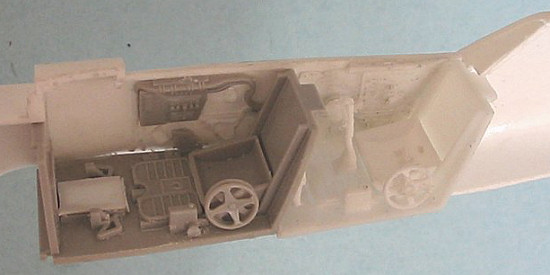
This conversion set from UMI Resin is the first Bf-109G-12 in 1/32, and is designed to be used with the Hasegawa Bf-109G-4, G-6 or G-14 kits, or the Pro-Modeler Bf-109G-4 release of this kit. As with their earlier Fw-190S conversion for the Hasegawa Fw-190A-5 or A-8 kits, this is a “drop-fit” conversion in which the entire forward fuselage is replaced by high-quality resin fuselage halves, so that modelers do not have to trouble themselves with hacking and sanding down with the possibility of getting it wrong and wasting an expensive kit and an expensive conversion set. The set also provides a resin rear cockpit and a vacuform canopy with the “faceted” rear canopy, which is used with the kit windscreen. The conversion set does not include decals.
| CONSTRUCTION |
I elected to use the Pro-Modeler Bf-109G-4 kit, since at least from the limited photographic evidence it appears the majority of Bf-109G-12s were converted from this sub-type, which was obsolescent by 1944 and available in good quantity.
Essentially, construction is little different from the standard kit, other than a bit of extra effort to build and install the rear cockpit. The only big problem with the rear cockpit is the necessity to sand down the sidewalls so they are thin enough to fit inside the fuselage halves.
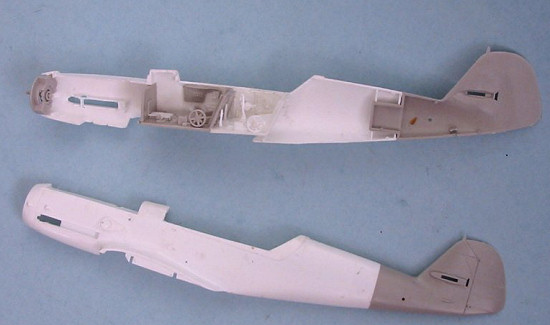 After cleaning up the minimal flash on the fuselage halves, I installed the kit
forward cockpit and the conversion rear cockpit. I had to cut off the cannon
housing in the kit forward cockpit and cover the hole in the floor with
Evergreen sheet. After getting these parts installed, I painted the cockpits
with Xtracrylix RLM 66 Schwarzgrau. I highlighted the detail in the cockpits
using the new Tamiya weathering system, in this case putting the silver to use.
I also used the kit decals and decals from a second Pro-Modeler kit for the
instrument panels, and made seat belts from lead foil taken from a wine bottle.
After cleaning up the minimal flash on the fuselage halves, I installed the kit
forward cockpit and the conversion rear cockpit. I had to cut off the cannon
housing in the kit forward cockpit and cover the hole in the floor with
Evergreen sheet. After getting these parts installed, I painted the cockpits
with Xtracrylix RLM 66 Schwarzgrau. I highlighted the detail in the cockpits
using the new Tamiya weathering system, in this case putting the silver to use.
I also used the kit decals and decals from a second Pro-Modeler kit for the
instrument panels, and made seat belts from lead foil taken from a wine bottle.
 I
attached the rear fuselage parts to each fuselage half before assembling the
fuselage, as this is the best way to get good fit of these parts. I then
assembled the fuselage. I needed to use Mr. Surfacer 500 on the centerline
seams.
I
attached the rear fuselage parts to each fuselage half before assembling the
fuselage, as this is the best way to get good fit of these parts. I then
assembled the fuselage. I needed to use Mr. Surfacer 500 on the centerline
seams.
While this was setting up, I assembled the wings according to the kit instructions.
Following the clean-up of the fuselage, I rescribed the panel lines where
necessary and then attached the upper cowling part from the kit and the lower
fuselage
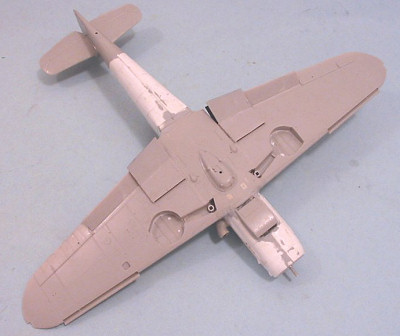 center
section with the spars for the wings. Both of these fit perfectly to the
conversion fuselage. I then attached the wings and horizontal stabilizers.
center
section with the spars for the wings. Both of these fit perfectly to the
conversion fuselage. I then attached the wings and horizontal stabilizers.
At this point, I proceeded to cut and attach the canopy. I decided to use Evergreen strip inside the canopy to make it thicker like a real 109 canopy, as well as provide some additional stiffening. The strips were painted RLM 66 and then glued inside the canopy after it was Futured. While difficult, the end result looks more realistic than merely having the vacuformed canopy parts in the open position, where they would look too thin. Alternatively, a modeler wouldn’t have to worry about this if they kept the rear canopy closed, and could use the kit-supplied forward canopy cut to open correctly for the G-12.
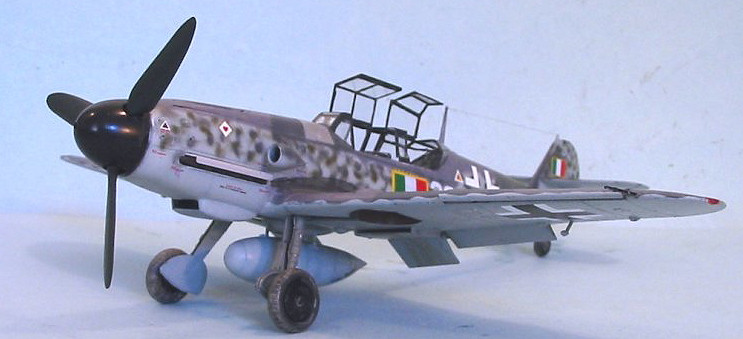
| COLORS & MARKINGS |
Painting:
My
decision to do the ANR “White 20" Bf-109G-12, due to my having managed to find
the proper-size markings in the deepest
 sub-basement of the decal dungeon. With
that decision made by “force majeure,” I proceeded to paint the model to
represent that airplane.
sub-basement of the decal dungeon. With
that decision made by “force majeure,” I proceeded to paint the model to
represent that airplane.
I painted the forward gun cover with SNJ Aluminum, then masked that off. I then pre-shaded the rest of the model with flat black airbrushed over panel lines. The camouflage was done in a standard Messerschmitt pattern for the 1943 period, using Xtracrylix RLM 74/75/76, with RLM 02/71/74 fuselage mottling. “sun-faded” the upper surface colors by adding in white and red to the RLM 75, and some RLM 70 to the RLM 74. I overpainted the Reich defense band for JG 77 with RLM 02. The prop blades were painted RLM 70, with the spinner in Semi-gloss black, which I also used for the wheel hubs. I gave the wheel wells, gear legs and gear doors a wash of Tamiya “Smoke.”
Decals:
I used decals from the decal dungeon for the markings. The German national insignia came from an Aeromaster 1/32 Bf-109 sheet, while the ANR “postage stamps” and the square fasces markings for the upper wing came from the Classic Airframes decal sheet for the 1/48 S.M.79. I found the JG 77 unit insignia for the cowling on a 1/48 sheet, which was the proper size for this small marking in 1/32. I used the stencil decals from the pro-Modeler sheet for the rest.
| FINAL CONSTRUCTION |
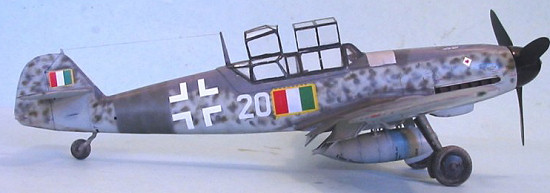 I
gave the model two overall coats of Xtracrylix Flat Varnish, then unmasked the
canopy. I attached the landing gear, engine exhausts, prop and raised cockpit
canopies. The photos of this airplane have it looking pretty clean, so I
limited weathering to exhaust stains applied using the Tamiya weathering “Soot”
and the “Mud” for the wheels and lower surfaces near the wheels.
I
gave the model two overall coats of Xtracrylix Flat Varnish, then unmasked the
canopy. I attached the landing gear, engine exhausts, prop and raised cockpit
canopies. The photos of this airplane have it looking pretty clean, so I
limited weathering to exhaust stains applied using the Tamiya weathering “Soot”
and the “Mud” for the wheels and lower surfaces near the wheels.
| CONCLUSIONS |
The UMI Resin conversion is the essence of simplicity to use, so modelers afraid of hacking up an expensive kit will not have to do anything other than replace parts. In fact, the forward fuselage parts of this conversion fit to the tail parts better than the original kit parts do. The UMI Resin conversion is in fact more accurate than any of the other conversion sets out there as regards external shapes.
 For those 109Nutz who want every version of their favorite airplane, this
conversion fills an important gap. This 2-seater looks great sitting next to my
other 1/32 109s.
For those 109Nutz who want every version of their favorite airplane, this
conversion fills an important gap. This 2-seater looks great sitting next to my
other 1/32 109s.
Please note that UMI is no longer in business.
Copyright ModelingMadness.com
Thanks to UMI Resin for the kit and conversion set.
If you would like your product reviewed fairly and fairly quickly, please contact the editor me or see other details in the Note to Contributors.