Pacific Coast Models 1/32 Ta-152H-1
| KIT #: | 32008 |
| PRICE: | $69.95 MSRP |
| DECALS: | Four options |
| REVIEWER: | Tom Cleaver |
| NOTES: | New mold kit |
| HISTORY |
The Ta‑152H, with a longer fuselage and greater wingspan
 The first Ta‑152H‑0s - which lacked the wing fuel tanks
and MW50 and GM1 systems of the operational Ta‑152H‑1 -, were in service with
Erprobungskommando Ta152 in November
and December 1944, under the command of Hauptmann Bruno Stolle.
The first Ta‑152H‑0s - which lacked the wing fuel tanks
and MW50 and GM1 systems of the operational Ta‑152H‑1 -, were in service with
Erprobungskommando Ta152 in November
and December 1944, under the command of Hauptmann Bruno Stolle.
Most of the Ta‑152H‑1s delivered for operational service in
February and March 1945 were equipped with the R11 Rustsatze,
which included all‑weather instrumentation.
Approximately 150 Ta‑152H's were produced by the
Focke‑Wulf factory at
One pilot who flew the Ta‑152H recalled that, "The flying
characteristics of the Ta‑152H put all previous German fighters in the shade.
Although I never flew the Me‑262, I would venture to say that the Ta‑152 was by
far the superior when it came to dogfighting with the Allied fighters then in
service. In my opinion, there was no better fighter in operational service at
the time."
Oberfeldwebel Willi Reischke of the
Stabschwarm, JG301 ‑ the only unit to
take the Ta‑152H into battle ‑ had the opportunity on 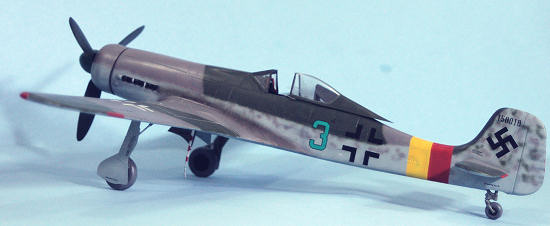 ot
could afford to make a mistake, and it was now that I began to fully appreciate
what this airplane could do."
ot
could afford to make a mistake, and it was now that I began to fully appreciate
what this airplane could do."
He pulled tighter and tighter turns, never approaching
the limits of the Ta‑152's capability.
When the Tempest pilot ‑ unable to shake his pursuer ‑
tried to flick turn in the opposite direction, Reischke gave him a full burst,
and then his guns froze.
He stayed in position where his opponent would be able
to see him, and literally flew
Reischke scored a total of 3 kills in the Ta‑152H in the closing
weeks of April 1945.
His comrade, Feldwebel
Joseph Keil, scored five kills during this time to become the only Ta‑152H ace
Reischke's airplane, "Green 6," was surrendered to the RAF at the
end of the war. It was disassembled and flown to
| THE KIT |
The Ta-152H-1 has been released in 1/32 scale once
before, when Jerry Rutman first brought out his 1/32 all-resin Ta-152H-1 a few
years back.
This kit by Pacific Coast Models is the first release of a kit of
this airplane in this scale in injection molded plastic.
As such, it is a much easier kit to build that the
Rutman resin kit.
The limited-run plastic parts and resin are by Sword,
with a fret of photoetch detail and seatbelts by Eduard, with decals by
Cartograf.
A modeler should use the corrected number
 sheet for
markings, since that sheet has the correct shade of Grun 25.
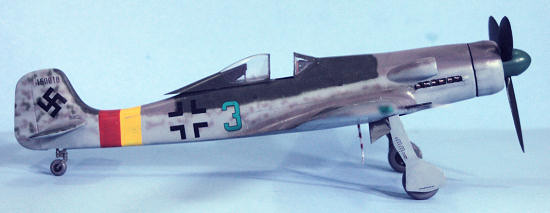
The very good Cartograf decals provide markings for the
four Ta-152H-1s flown by the JG 301 Stabschwarm, and a very good color profile
for each of these aircraft (which were each painted differently) is done by
aviation artist Richard Caruana.
sheet for
markings, since that sheet has the correct shade of Grun 25.
The very good Cartograf decals provide markings for the
four Ta-152H-1s flown by the JG 301 Stabschwarm, and a very good color profile
for each of these aircraft (which were each painted differently) is done by
aviation artist Richard Caruana.
When this kit was first released, there was a flurry of criticism that it was incorrect - that it provided a radiator similar to the Fw-190D-9 that the Ta-152H-1 didn't use, that the landing gear had problems, that the engine plug was incorrect for the Jumo 213, and that there was no washout in the wings. From my review of the kit and my experience building it, none of this criticism is accurate, other than the very minor criticism that the retraction gear is incorrect, which is a problem with a very easy solution. In fact, having read the early comments, I was initially under the impression that the kit had been corrected, but I have been assured by Ken Lawrence that there has never been a correction to the kit. I can assure anyone who buys any of these kits that it is right in all the major points.
| CONSTRUCTION |
Construction begins with cleaning up the plastic parts,
since there is some slight flash, and in taking the resin parts off the molding
blocks.
In the case of the main gear wheel wells, this is a very involved
process, since the block covers the top of the gear well, which is supposed to
be a curved surface when finished.
Thank goodness for a plug-in Dremel tool, since I would
have run the batteries out at least once accomplishing this bit of cleanup.
I then divided the model into two major sub-assemblies:
wing and fuselage.
The lower wing comes in three parts.
I glued the wheel wells into position on the lower
center section, then attached up upper wing halves.
Then I glued the lower outer wing parts in position.
I needed both cyanoacrylate glue and Mr. Surface to fill
the seams, plus several sessions with different grit sanding sticks to get
smooth surfaces and leading edges.
I then painted the engine plug and glued it in position.
I also found that with careful assembly, it is possible to put in the proper
degree of “washout” in the wing.
If you are clumsy in this, you will end up with no
washout in the wing.
This is subtle enough (there was only a 2 degree
washout) that you really only notice it when looking at the trailing edge in
edge-on profile.
The fuselage was easy.
I glued the resin exhaust stacks in position, then glued
the upper rear cockpit decking.
I painted the resin cockpit and the interior area of the
cockpit with Tamiya “German Grey,” then detail painted the instrument panel and
the side consoles.
This was glued in position and I glued the fuselage
halves together, finishing off by attaching the resin plug for the radiator
interior.
I also needed cyanoacrylate glue and Mr. Surfacer on the
centerline seam here.
 After test-fitting the wing and sanding where necessary
to get a good join, I glued the wing to the fuselage, and used some large rubber
bands to pull the wing up and get a good solid join on the upper wing-fuselage
joint.
I attached the radiator cowling at this time.
I needed cyanoacrylate glue and Mr. Surfacer on all
these seams.
After test-fitting the wing and sanding where necessary
to get a good join, I glued the wing to the fuselage, and used some large rubber
bands to pull the wing up and get a good solid join on the upper wing-fuselage
joint.
I attached the radiator cowling at this time.
I needed cyanoacrylate glue and Mr. Surfacer on all
these seams.
Overall, none of the filling and sanding was anything
one would not expect with a limited-run kit, and once done with the panel lines
rescribed where necessary, all that was needed to finish the airframe was to
attach the horizontal stabilizers.
I found when I assembled the landing gear that I needed
to sand the mounting peg at the end of the gear strut to fit its mounting hole,
which was smaller in diameter.
I also had to cut off about 1/4 inch of the top end of
the gear door for it to fit properly in the extended position.
| COLORS & MARKINGS |
Painting:
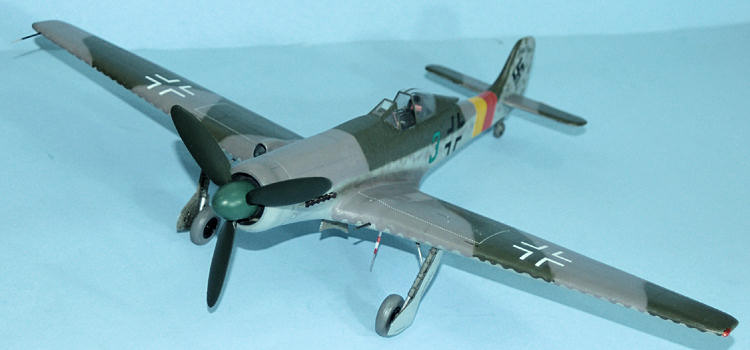
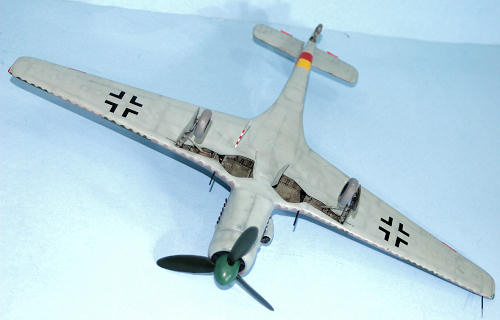
I decided to do Josef Keil's “Green 3,” which was in RLM
75/82 uppers and RLM76 for the lower surface.
I used Gunze-Sangyo paints for this and freehanded the
camouflage following the very complete painting diagram provided. I then gave
the model a coat of Xtracrylix Gloss Varnish.
The biggest problem was mixing the
Grun 25 for the spinner to match the color of the decal
number.
 Decals:
The kit decals when on without problem.
I used some additional decals from the dungeon for the
wing walk outline.
| FINAL CONSTRUCTION |
I gave the model a coat of Xtracrylix Flat Varnish,
followed by some light exhaust staining with Tamiya Smoke.
I figured since these airplanes only saw operational
life for a few weeks that they were likely not to have been weathered or dinged.
I then attached the landing gear, for which I used the
too-small 20mm cannons as the gear retraction struts, having replaced those with
20mm cannon barrels from a Hasegawa Bf-109G kit.
The prop was attache, and I then unmasked the canopy and
placed it in the open position.
| CONCLUSIONS |
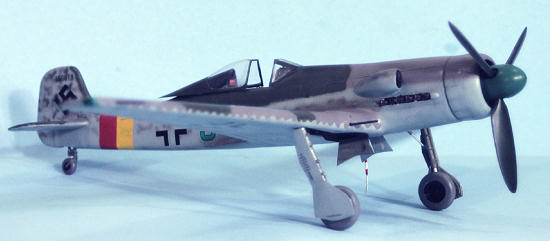
This is an easy model for anyone with some experience
with limited-run kits, and makes up into an impressive model with a 21-inch
wingspan.
The model looks very good next to my Hasegawa Fw-190s and rounds
out the collection of Wurgers.
The kit is highly recommended.
Review kit courtesy of my wallet.
Tom Cleaver
January 2010 If you would like your product reviewed fairly and quickly, please
contact
me or see other details in the
Note to
Contributors.