Eduard 1/48 Bf-110G-2
|
KIT #: |
8205 |
|
PRICE: |
$60.00 SRP |
|
DECALS: |
Five options |
|
REVIEWER: |
Tom Cleaver |
|
NOTES: |
|
The Luftwaffe had determined that the Bf-110 heavy fighter would be
phased out of production by the end of 1941, with the completion of the
Friedrich series, to be replaced by the new Messerschmitt Me-210.
Unfortunately, the Me-210 proved an unmitigated disaster.
While Messerschmitt worked overtime to correct all the mistakes - which
would result in the Me-410 - it was decided that an “improved” Bf-110 would be
put back into production.
Messerschmitt had begun work on such an upgraded airframe in the summer
of 1941.
The Bf-110G-0 differed
form the Bf-110F primarily in the replacement of the DB601F engine with the
DB605B-1 engine, which provided 1.475 h.p. for takeoff and emergency, and 1,355
h.p. at 6,000 meters.
The
forward-firing drum-fed 20mm MG FF cannon were replaced with the belt-fed MG
151, while the single 7.72mm MG 15 was replaced by he MG 81Z twin mount with 800
rounds.
The Bf-110G-2 began to
leave the
 assembly lines in May 1942. As with the earlier variants since the Bf
110D, the Bf-110G-2 could be used as either a long range heavy day fighter or as
a fighter bomber with two 250 Kg bombs on the under-fuselage
ETC
carriers, with two 100 Kg bombs under each outer wing.
assembly lines in May 1942. As with the earlier variants since the Bf
110D, the Bf-110G-2 could be used as either a long range heavy day fighter or as
a fighter bomber with two 250 Kg bombs on the under-fuselage
ETC
carriers, with two 100 Kg bombs under each outer wing.
With additional Rustsatze sets, the Bf-110G-2 was able to increase its
effectiveness as a bomber destroyer.
R1 was a BK 37 cannon mounted in place of the
ETC
carriers under the fuselage, with the deletion of the two MG 151 cannon; one hit
by the BK 37 shell was sufficient to destroy a B-17.
R3 involved the replacement of the four upper MG 15 machine guns with two
30mm MK 108 cannon.
R4was a twin
20mm MG151 pack in place of the
ETC
carriers.
Additionally, the bomber
destroyer could carry two Wgfr 21 rocket mortars under each outer wing in
replacement of the drop tanks.
So long as the American daylight formations were unescorted by fighters,
the Bf-110G-2 was a potent anti-bomber weapon.
Being as heavy as it was, whenever American escort fighters encountered
Bf-110Gs, the combat was one-sided and the heavy German twin was thought of by
the Americans as “meat on the table.”
By the late Spring of 1944, the Bf-110G was no longer used in the day
fighter role.
The Bf-110G-2 was also used as a long-range fighter bomber on the Eastern
Front.
At least two Staffeln
of ZG1 were hurriedly transferred from the Eastern Front to southern Italy
following the invasion of Sicily, where they met the same fate as those bomber
destroyers over Germany that ran into Allied single-seat fighters.
 Eduard has been releasing all variants of the Bf-110 series, starting in
2007 with the Bf-110E, followed in 2008 by the Bf-110C and Bf-110D, and in early
2009 with this Bf-110G-2.
The
Bf-110G-4 night fighter was released this fall.
Eduard has been releasing all variants of the Bf-110 series, starting in
2007 with the Bf-110E, followed in 2008 by the Bf-110C and Bf-110D, and in early
2009 with this Bf-110G-2.
The
Bf-110G-4 night fighter was released this fall.
This kit differs from the earlier versions by the inclusion of sprues
that carry the different-shaped engine cowling and propeller spinners and blades
as well as different landing gear.
All the plastic parts other than the canopy are in Eduard’s now-standard tan
plastic, and have little if any flash.
Decals are provided for five different aircraft, carrying a variety of
additional armament.
The word on the Eduard Bf-110 series is that they are very “fiddly” kits.
That is absolutely true, and the Bf-110 is actually more “fiddly” than
the Fw-190 series.
That said, a
modeler willing to put in the necessary effort will be rewarded by what has to
be the best and most accurate Bf-110 models in 1/48 scale so far released.
 Perhaps the biggest problem for most modelers is that - like most kits
made with features that can be displayed open or dropped, or in any position
outside of closed up for flight, those parts fit better in that position than
they do if one attempts to close them up.
This is nowhere more noticeable than with the nose.
The upper gun cover is just a bit short in length, and if one has already
assembled the lower nose portion to the fuselage, there will be a considerable
bit of shimming, puttying, sanding and re-scribing necessary to get a nice
smooth nose.
Perhaps the biggest problem for most modelers is that - like most kits
made with features that can be displayed open or dropped, or in any position
outside of closed up for flight, those parts fit better in that position than
they do if one attempts to close them up.
This is nowhere more noticeable than with the nose.
The upper gun cover is just a bit short in length, and if one has already
assembled the lower nose portion to the fuselage, there will be a considerable
bit of shimming, puttying, sanding and re-scribing necessary to get a nice
smooth nose.
There is however, an easier way to deal with this.
I did not use any of the interior nose parts, and did not attach the
forward fuselage bulkhead.
Instead,
I glued the upper and lower nose parts together, then glued a couple pieces of
Evergreen strip inside to give that joint strength.
When this was set up, I then sanded the rear of the nose cap so it was
straight all around, and then did the same to the forwards fuselage, test
fitting as I did so.
When fit was
perfect, I then ran an Evergreen strip around the interior of the forward
fuselage to provide a gluing surface, and then attached the nose.
There was no need for putty or rescribing.
The only
“difficult” part of this
would involved cutting off the gun barrels and sliding them into the proper
holes once everything else was completed.
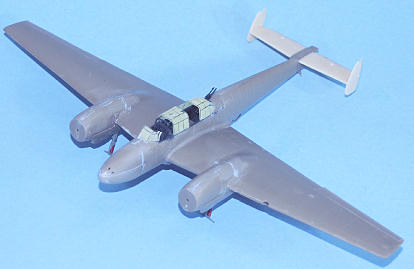
Before I did all that to the nose, however, I painted and assembled the
cockpit.
There are a lot of small
parts, and the photoetch parts are again “fiddly,” but patience and the use of a
magnifier lamp paid off with a cockpit that looked better than that in the 1/32
Dragon kit.
When that was done I
assembled the fuselage and attached the nose cap.
 I also used the Aerocast resin tail parts, which provide separate
horizontal stabilizers and elevators, and separate vertical fins and rudders, so
these can be posed dynamically.
These very nice parts are available from Aerocast at
and are highly recommended.
I also used the Aerocast resin tail parts, which provide separate
horizontal stabilizers and elevators, and separate vertical fins and rudders, so
these can be posed dynamically.
These very nice parts are available from Aerocast at
and are highly recommended.
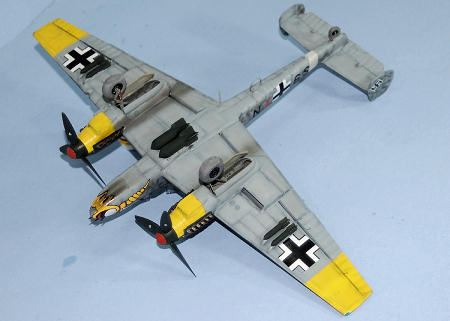
The wings and engines are not difficult, though there are a lot of small
parts to assemble in the wheel well; these result in the best-looking wheel
wells of any other 1/48 Bf-110 kit, and are done in very petite detail.
Once again, taking one’s time and using both patience and the magnifier
lamp will have a good result.
I finished off by attaching the MG 81Z mount, and then the fixed canopy
and windshield.
I definitely
appreciated Eduard’s provision of pre-cut masks for the multiple-panel canopy,
which made everything very easy.
I
also attached the landing gear at this point so the model would be able to sit
without lying on a surface while paint was drying.
Painting:
I first gave the model an overall primer coat of Tamiya “Sky Grey” to be
sure that all offending seams were filled.
I then “pre-shaded” the model with flat black airbrushed over the panel
lines.
I then painted the area of
the white fuselage stripe and the areas that would be painted yellow with Tamiya
“Flat White.”
I then painted the
yellow areas, and then all the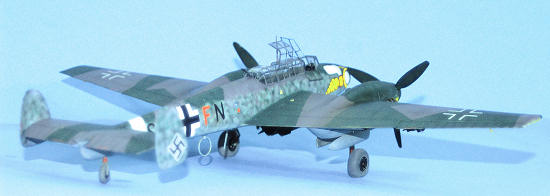 se were masked off.
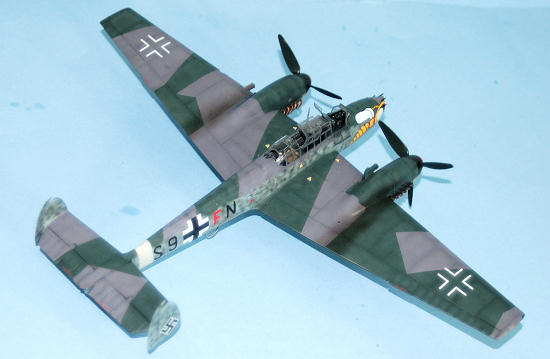
The model was then painted in the standard day fighter scheme of
Xtracrylix RLM 76 Hellgrau lower surfaces, and RLM 74
Graugrun and
RLM 75 Grauviolett, which I masked off with Tamiya tape that I raised
just a bot along the painting lines to get rid of any paint buildup.
When that was all dry, I unmasked the yellow and white areas, and gave
the model a coat of Xtracrylix Gloss Varnish.
Decals:
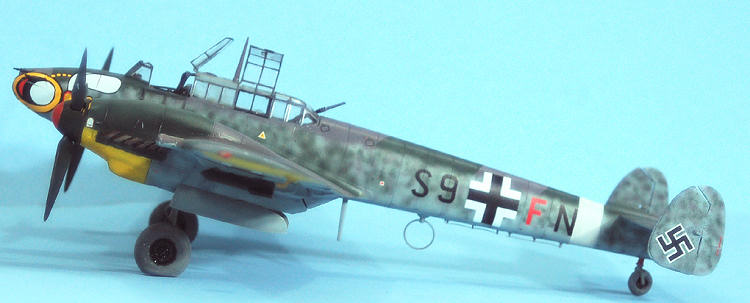
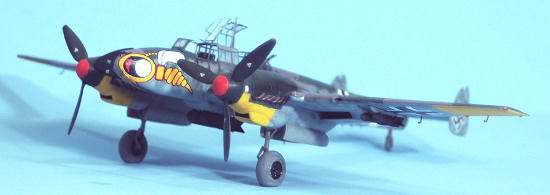
I used the kit decals to do the 5./ZG 1 Bf-110G-2 with the dramatic “Wespen”
nose art from the unit’s days as SKG-210, the original Bf-110 fighter bomber
unit.
The decals went on without
any problems under a coat of Micro-Sol.
I applied exhaust stains using Tamiya “Smoke,” then unmasked the canopy.
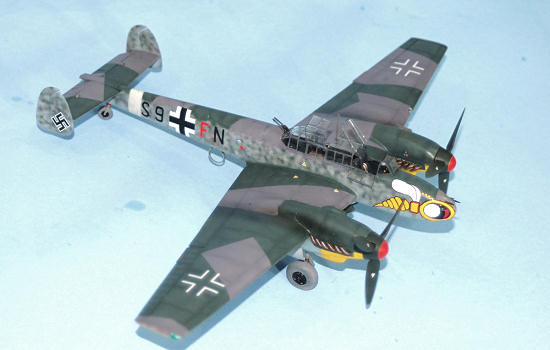
I attached the props, the very nice Aerocast resin wheels, and gear
doors.
I finished off with the bomb
ordnance.
 Yes, the kit is fiddly, and yes, it could have been designed to be more
“modeler-friendly.”
That said, the
average modeler, applying care and patience and following the instructions, as
well as my little secret about the nose, can create a very nice model with this
kit.
This is the most accurate
series of Bf-110s released by anyone, and the kits are well worth their price
for value.
The resin tail is a
nice-to-have, as well as the resin wheels, but the model also looks great using
nothing but what’s there in the box.
Recommended for any Luftwaffe fan.
Yes, the kit is fiddly, and yes, it could have been designed to be more
“modeler-friendly.”
That said, the
average modeler, applying care and patience and following the instructions, as
well as my little secret about the nose, can create a very nice model with this
kit.
This is the most accurate
series of Bf-110s released by anyone, and the kits are well worth their price
for value.
The resin tail is a
nice-to-have, as well as the resin wheels, but the model also looks great using
nothing but what’s there in the box.
Recommended for any Luftwaffe fan.
Thanks to Eduard
for the review kit.
Tom Cleaver
December 2009
Copyright ModelingMadness.com
If you would like your product reviewed fairly and quickly, please
contact
the editor or see other details in the
Note to
Contributors.
Back to the Main Page
Back to the Review
Index Page 2020