| KIT #: | 48041 |
| PRICE: | $12.98 when new |
| DECALS: | Yes, the kit came with decals |
| REVIEWER: | Jonathan Prestidge |
| NOTES: | Aeromaster decals. Squadron vac canopy. An enjoyable conversion of the Yak-7DI kit. |
| HISTORY |
The Yak-9 ranked among the best Soviet fighter aircraft used during WWII. It was also one of the most prolific aircraft ever produced with over 30,000 of the Yak-1/3/7/9 fighters manufactured throughout the war. The Yak-9 was developed from the Yak-7 line of fighters on the basis of aerodynamic and mechanical refinements.
The main visual differences between
the Yak-7DI and early Yak-9 were the much deeper oil cooler and squared-off
wingtips of the Yak-9. The Yak-9 lacked the Yak-7’s port wing leading-edge
landing light. Internally, the Yak-9’s wing had metal spars allowing for
increased fuel capacity and longer range. The
 plywood skin of the wings was
covered in doped fabric on the Yak-9. Larger control tabs, revised exhaust, a
fully enclosed retractable tail wheel and myriad detail changes were also
incorporated into the new machine.
plywood skin of the wings was
covered in doped fabric on the Yak-9. Larger control tabs, revised exhaust, a
fully enclosed retractable tail wheel and myriad detail changes were also
incorporated into the new machine.
Armament on the Yak-9 remained light throughout its production, usually consisting of one ShVAK 20mm cannon firing through the prop hub and one UBS machine gun in the upper fuselage decking. Available underwing stores included either two FAB-100 bombs or six RS-82 rockets. The powerplant of the early Yak-9 was the 1,260hp Klimov VF-105 liquid cooled V-12 which was based on the Hispano-Suiza 12Y.
The Yak-9 was the first of the Yak series to take on the F and G model Bf 109s on more or less equal footing. While the quality of Soviet pilots and their equipment was getting better at this point in the war, it was the simplicity and ease of manufacture of the Yak and Lavochkin fighters that allowed the VVS (Soviet air force) to field more aircraft and replace losses faster than the Germans could hope to match. Yak-9s were flown by many Soviet and Free French aces. They were continually modified and improved throughout the war culminating in the formidable all metal Yak-9U with the more powerful VK-107 engine.
| THE KIT |
 Given its historical importance, the
Yak-9 has been woefully neglected by model manufacturers. To date in 1/48th
scale there is no accurate mainstream kit of the Yak-9 in any of its many
iterations. Previously, ICM kitted some later model Yak-9s in 1/48th
scale but those kits bear little resemblance to the prototype. For an early
Yak-9 the closest starting place is ICM’s Yak-7DI (also far from a perfect kit).
I attempted this project hoping that a mainstream kit producer would then
release an accurate Yak-9 just to spite me!
Given its historical importance, the
Yak-9 has been woefully neglected by model manufacturers. To date in 1/48th
scale there is no accurate mainstream kit of the Yak-9 in any of its many
iterations. Previously, ICM kitted some later model Yak-9s in 1/48th
scale but those kits bear little resemblance to the prototype. For an early
Yak-9 the closest starting place is ICM’s Yak-7DI (also far from a perfect kit).
I attempted this project hoping that a mainstream kit producer would then
release an accurate Yak-9 just to spite me!
The ICM Yak-7DI originated in the 1990s. It was a bit of a pooch if built OOB with the canopy and prop marring what was already a second rate kit. If that wasn’t bad enough, sink holes, grainy surface texture and ample mold-release agent (grease) meant more work for those of us “committed” enough to build it. For this conversion the only aftermarket items used were a Squadron Vac canopy and national insignia decals from an Aeromaster sheet (Fighting Polikarpov Pt. III: I-153). I did source a prop and wheels from the parts bin as well.
| CONSTRUCTION |
Construction began with removing the
major parts from the sprues and cleaning them up. Next, parts that could be
assembled prior to paint were glued together resulting in a series of
subassemblies. I then shot the interior with Poly Scale British Interior Green
thinned with Future. The semi-gloss finish allowed washes to flow freely and
also made it easier to remove excess wash from the high spots. Detailing
 ontinued in the cockpit with a radio and other items added from the parts bin.
For the seat, I thinned the seatback by about 70%. Next, I added a seatbelt made
from .010 x .030” Evergreen strip. A thin black soapy water wash was applied.
Once the wash had dried, I drybrushed the interior with a slightly lighter shade
of interior green. With the cockpit complete, I closed up the fuselage. The rest
of the airframe was then assembled. The fit was iffy, requiring lots of
dry-fitting, putty and sanding. On to the external mods!
ontinued in the cockpit with a radio and other items added from the parts bin.
For the seat, I thinned the seatback by about 70%. Next, I added a seatbelt made
from .010 x .030” Evergreen strip. A thin black soapy water wash was applied.
Once the wash had dried, I drybrushed the interior with a slightly lighter shade
of interior green. With the cockpit complete, I closed up the fuselage. The rest
of the airframe was then assembled. The fit was iffy, requiring lots of
dry-fitting, putty and sanding. On to the external mods!
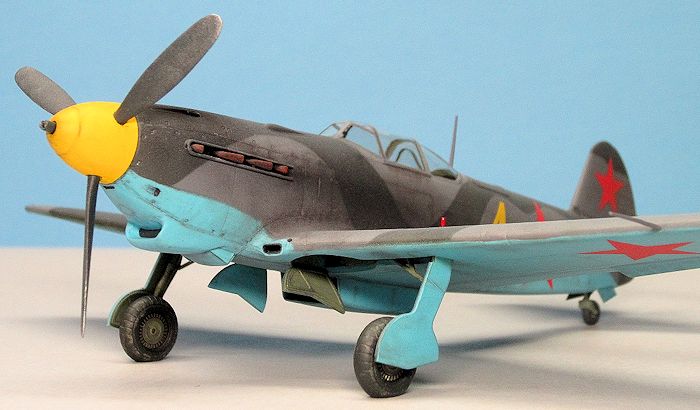
The first thing I needed to address was the distinctive Yak-9 oil cooler. I installed the kit piece and then built it up using a piece of sprue and plastic card. Once dry I smoothed things out with putty and then sanded and shaped until I was happy with the look. I made the oil cooler outlet door from plastic card and was happy with my second attempt.
Next came reshaping the wing. I printed out a plan view of the Yak-9’s wings and started cutting plastic. I hacked, filed and sanded until the wingtips lined up with the printout. The leading edges of the wings were then filed straight to match the plan view. Finally, I cut out spaces for the wingtip identification lights and drilled holes for the clear gas gauge covers on the wings.
Studying photos I noticed quite a few
vents in the forward fuselage that didn’t appear on the kit parts. I opened
these up and while I was at it I drilled out the wing root air-intakes and the
exhausts. The prop spinner was reshaped and I closed off the space beh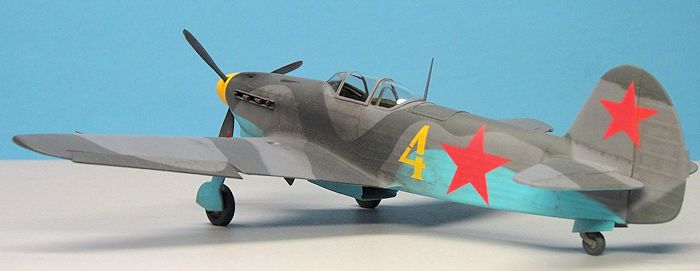 ind each
prop blade. The molded on canon muzzle was drilled out and I used a piece of
plastic rod inserted through the spinner to represent the muzzle with the Hucks
starter notches. I used evergreen strip to outline the radio compartment just
aft of the cockpit.
ind each
prop blade. The molded on canon muzzle was drilled out and I used a piece of
plastic rod inserted through the spinner to represent the muzzle with the Hucks
starter notches. I used evergreen strip to outline the radio compartment just
aft of the cockpit.
I added the canopy next. The Squadron Vac canopy that I used had the correct windscreen and sliding section but the aft section was not for the cut-down fuselage of the Yak-9. I cut the aft section from the kit canopy and used it instead. I had to modify the kit fuselage forward of the windscreen to accommodate the later style canopy. I also re-scribed the forward engine cover updating it to Yak-9 standard. The clear parts were dipped in Future prior to assembly. White glue was used to attach the canopy sections. Once dry, I masked the canopy using Tamiya tape and a new #11 blade. I commenced with a final puttying, sanding and polishing session prior to paint.
| COLORS & MARKINGS |
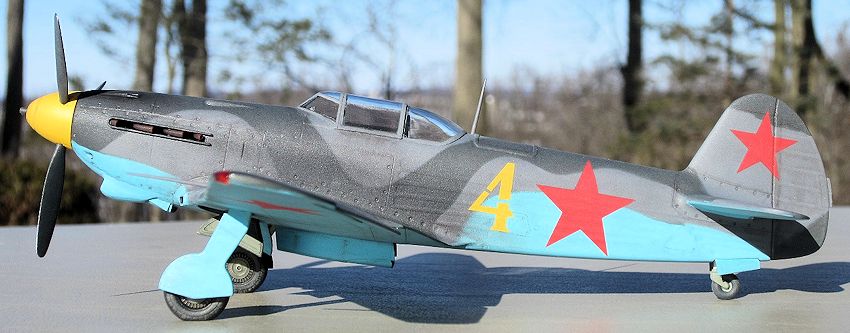
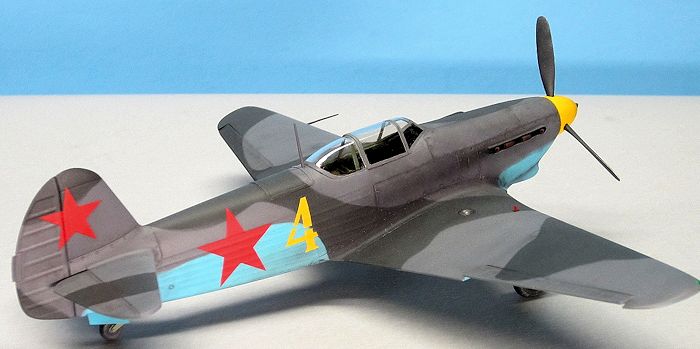
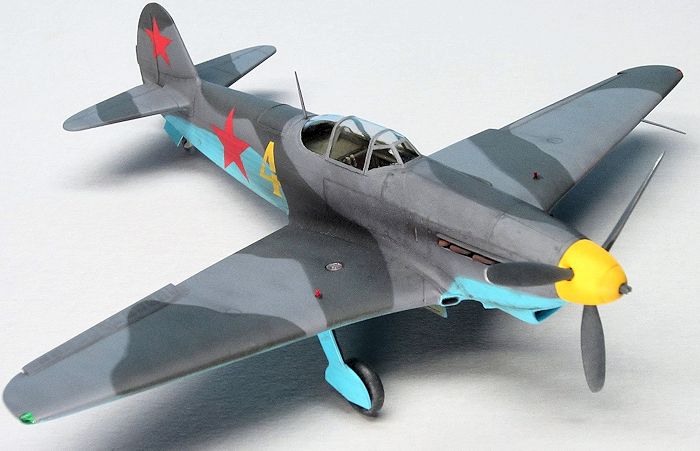
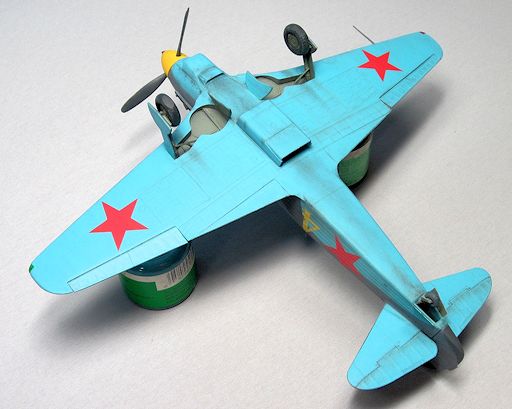
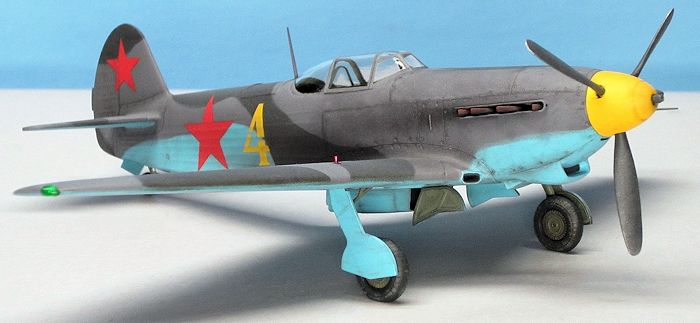 Searching the internet for a color
scheme that piqued my interest, I came across a series of photos of an early
Yak-9 in non-standard disruptive camouflage. The photos showed light gray (AMT
11) and dark gray (AMT 12) uppers and Soviet Underside Blue for the lower
airframe. For a bit of interest, I added a yellow prop spinner and yellow “4” as
these types of markings were often added once aircraft reached the front line
units.
Searching the internet for a color
scheme that piqued my interest, I came across a series of photos of an early
Yak-9 in non-standard disruptive camouflage. The photos showed light gray (AMT
11) and dark gray (AMT 12) uppers and Soviet Underside Blue for the lower
airframe. For a bit of interest, I added a yellow prop spinner and yellow “4” as
these types of markings were often added once aircraft reached the front line
units.
I used Polly Scale acrylics U.S.S.R. Dark Topside Gray, U.S.S.R. Light Topside Gray, and U.S.S.R. Underside Blue for the airframe. The camo pattern was hard edged on the real aircraft so I used silly putty to mask between colors. The yellow nose was sprayed at this time.
 At this point I used pastels to
emphasize the panel lines and dirty the airframe up a bit. Since the wings were
covered in plywood, there is minimal detail on them. I tried to keep things
subtle, adding just enough shade variation to enhance detail. I then sealed
everything with a coat of Future in preparation for decals.
At this point I used pastels to
emphasize the panel lines and dirty the airframe up a bit. Since the wings were
covered in plywood, there is minimal detail on them. I tried to keep things
subtle, adding just enough shade variation to enhance detail. I then sealed
everything with a coat of Future in preparation for decals.
The solid red stars were from an Aeromaster sheet and the yellow “4” came from a Yak-3 sheet in my decal dungeon. All decals went down fine with no trouble. Once in position, the decals responded well to an application of Micro Sol. After weathering the decals, I gave the plane a final flat clear coat. Once dry I added some chipping around maintenance panels with a silver Prismacolor colored pencil.
The landing gear and other fiddly bits were added at this time. I shaped some clear sprue for the wingtip marker lights, installed them with white glue, and painted them with Tamiya’s clear red and clear green. I made the tail wheel doors from plastic card and installed them to finish off the conversion. Final detailing was then completed.
| CONCLUSIONS |
What a fun project! With very little out of pocket expense I put an early Yak-9 on the shelf. I thoroughly enjoyed the planning and research that went into this build. Starting with a simple, inexpensive kit made it easy to begin cutting plastic since I wasn’t afraid to screw it up. A simple conversion like this should be well within the abilities of modelers with a few kits under their belts. Now won’t somebody please give us an up to date series of Yak-9’s? Eduard? Airfix? ICM? Anybody?
| REFERENCES |
My main reference for this build was:
“What would it take a Yak to make?”
article and model by Alexei Matvi Enko hosted on www.sovietwarplanes.com
The Encyclopedia of Aircraft of WWII, General Editor: Paul Eden, Amber Books Ltd.
October 2015
If you would like your product reviewed fairly and fairly quickly, please contact the editor or see other details in the Note to Contributors.