|
KIT: |
Hobbycraft 1/48 Polikarpov I-16 type 10 |
|
KIT # |
1575 |
|
PRICE: |
$15.75 |
|
DECALS: |
One aircraft |
|
REVIEW: |
Peter L’Heureux |
|
NOTES: |
|
|
HISTORY |
The I-16 was a design submitted by Nikolai Polikarpov, a Russian designer who found himself either in favor or out of favor with high Communist party officials, depending on their whims. I read on the ‘Net that he was thrown into jail by Joe Stalin until he could come up with a fighter design that could surpass anything then existent in the world during the early 1930s. I don’t know how accurate this is, and I don’t want to conjecture here. So these are the facts: When the I-16 came into front line use in the Soviet Union in 1936 for the VVS, it was the first Russian aircraft to feature an all-metal cantilevered single wing combining retractable landing gear. It also had all-monocoque construction, and from 1936 to 1939, it was indeed the equal or surpassed any other fighter aircraft in the world. The plane first saw combat service in the 1935-39 Spanish Civil War, where it was said to be comparable in performance to the early Bf109. The I-16 also saw service in the Sino-Japanese war of 1937 and the ‘Mongolian Incident’ where, as part of the Chinese Air Force, they were successful against the Japanese Nakajima Ki-27.
When Germany invaded the Soviet Union in 1941, nearly two-thirds of the Soviet fighter arm consisted of I-16s, and although outclassed by the Bf109E and F, achieved remarkable results against the Nazi onslaught. By 1943, they were obsolete, and were relegated to training units. The aircraft had a massive 9 cylinder, air-cooled 1000hp Ash-62 engine in the cowl, producing a maximum speed of 304 mph, and burned fuel at a rate of 150 litres per hour. Wing span was 29 ft. 6 in., and the aircraft had an empty weight of 33501 lbs.
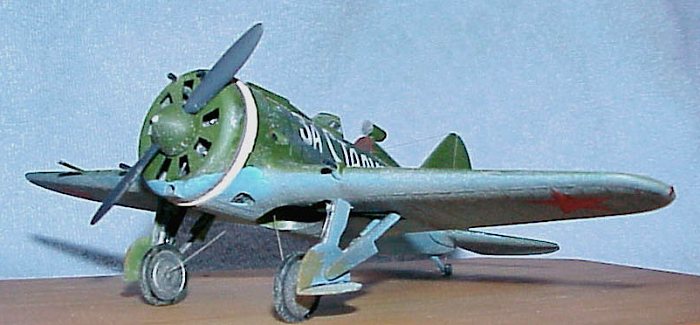
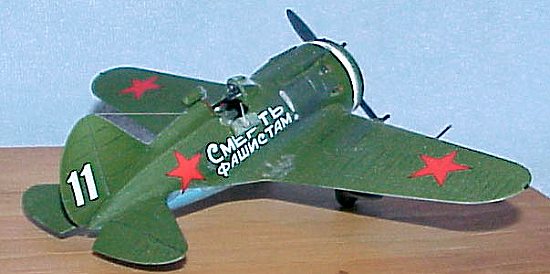
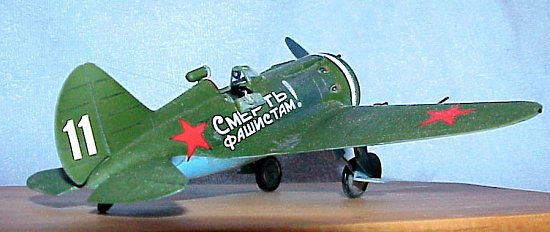
The I-16 was called by many names by the pilots who flew her: Yastrebok, or ‘Young Eagle’ in the USSR, Mosca, or ‘Fly’ by the Spanish Republicans, Rata, or ‘Rat’ by the Nationalists, and Abu, or ‘Gadfly’ by the Japanese. This particular model is the Type 18 of Capt. Boris Safanov of the 72 AP, 1941. The sayings in Cyrillic along the sides are, as close as I can gather, "Death to Fascism!", and "All behind Joseph Stalin!"
|
THE KIT |
 The box has a nice
painting on top depicting a Spanish Republican Type 10 fighter, with Popeye in a
fighting stance on the tail. However, when I bought the kit at a swap and sell
during January of 1999, I thought that maybe it would look better in Russian
markings. I looked around on the ‘Net, and came across the Aeromaster decals
for Fighting Polikarpov 1-16s Part I, saw the decals for Capt. Safanov’s
plane, and said to myself "I gotta have those!" So I purchased those,
and relegated the kit decals to my spares box. There are two sprues of light
grey injection molded plastic, unbagged, with a little clear sprue containing a
choice of two cockpits for either a completely enclosed or the earlier open one.
I chose the open cockpit. Instructions were a bit vague, with nothing written,
only illustrations of subassemblies. The vagueness lies in the attachment of the
landing gear strut covers. Fortunately, I had photos of other completed I-16
models to go by, so I didn’t make an error in this department.
The box has a nice
painting on top depicting a Spanish Republican Type 10 fighter, with Popeye in a
fighting stance on the tail. However, when I bought the kit at a swap and sell
during January of 1999, I thought that maybe it would look better in Russian
markings. I looked around on the ‘Net, and came across the Aeromaster decals
for Fighting Polikarpov 1-16s Part I, saw the decals for Capt. Safanov’s
plane, and said to myself "I gotta have those!" So I purchased those,
and relegated the kit decals to my spares box. There are two sprues of light
grey injection molded plastic, unbagged, with a little clear sprue containing a
choice of two cockpits for either a completely enclosed or the earlier open one.
I chose the open cockpit. Instructions were a bit vague, with nothing written,
only illustrations of subassemblies. The vagueness lies in the attachment of the
landing gear strut covers. Fortunately, I had photos of other completed I-16
models to go by, so I didn’t make an error in this department.
|
CONSTRUCTION |
I started in the cockpit area, which I painted with a light grey-green combination. The cockpit compartment itself is bare bones, with no detail whatsoever, so I scatchbuilt a throttle quadrant and a seat frame from my Squadron styrene stock sheets. I cut the starboard side cockpit door, which I reattached later to be in the open position (was Safanov a southpaw?). I discovered later after I did this, that the cockpit had two door hatches which I could have cut and positioned open. Oh, well. After drybrushing with steel and a black wash to dirty it up, I closed up the two fuselage halves, and sanded and filled the seams. I didn’t have to do very much filling, as the fit was very good here, with alignment pins to eliminate guesswork. As this was going to be a Type 18, I went by the drawings on the Aeromaster sheet and formed a gun camera out of a piece of sprue. I attached it to the fuselage by drilling a small hole with my pin vise, and glued a thin round part of a tractor grill from an old B-24 kit I had in my spares box into the fuselage. I then in turn glued this to the original piece of sprue to depict the gun camera on Capt. Boris Safanov’s plane.
 I next turned my
attention to cutting off the rudder as I was going to both reattach and
reposition both that and the elevator flaps. Since the two elevators were in one
piece respectively, it was relatively easy with a scriber, microsaw, and an x-acto
knife. The landing gear bays required attention, as they were bare of detail
just like the cockpit. I cut pieces from styrene stock and fashioned stringers
for both sides of the landing gear bay, primed the area, then glued the upper
wing halves and sanded the leading edges and trailing edges smooth. Again, fit
was good. I stuffed wet cotton balls into the cockpit area, primed the plane,
and allowed it to dry for a day. Following this, it was airbrush art time.
I next turned my
attention to cutting off the rudder as I was going to both reattach and
reposition both that and the elevator flaps. Since the two elevators were in one
piece respectively, it was relatively easy with a scriber, microsaw, and an x-acto
knife. The landing gear bays required attention, as they were bare of detail
just like the cockpit. I cut pieces from styrene stock and fashioned stringers
for both sides of the landing gear bay, primed the area, then glued the upper
wing halves and sanded the leading edges and trailing edges smooth. Again, fit
was good. I stuffed wet cotton balls into the cockpit area, primed the plane,
and allowed it to dry for a day. Following this, it was airbrush art time.
|
PAINT & DECALS |
Since I have much to learn about intricate camouflage patterns found on so
many World War II aircraft, I was lucky in only having to do a two-tone paint
job. The ventral section of the plane was painted first with Testor’s sky blue
in two coats, care being taken to mask off the landing gear bay first. I also
sprayed the gear doors on the sprue on one side with this color. After allowing
this to dry for a day, I masked off these areas and sprayed the dorsal half of
the plane in Russian dark green.
 This took two coats as well. Paint was Model Master enamels. After
allowing to dry for another day, I painted the landing gear struts in Model
Master steel, followed by the oleos in gloss silver. I glued them into their
respective holes. Prior to this, however, I drilled small holes into the wheels
and into the landing gear bays to add thin guitar wire to add the bracing wire
detail. Again, I was going by photos I had found of model on the ‘Net. I
attached the landing gear doors, using photos as references because the
instructions were vague on exact location. Next, I fashioned a tail wheel out of
a sawed cross-section of thin sprue, painted the middle silver, and glued it to
the tail drag strut to depict the tail wheel. Using the pin vise again, I
drilled out the exhausts and used thin wire insulation to go over the nubs
depicting the cannon and machine guns. I shot the plane with two coats of Testor’s
Gloss Coat prior to decaling.
This took two coats as well. Paint was Model Master enamels. After
allowing to dry for another day, I painted the landing gear struts in Model
Master steel, followed by the oleos in gloss silver. I glued them into their
respective holes. Prior to this, however, I drilled small holes into the wheels
and into the landing gear bays to add thin guitar wire to add the bracing wire
detail. Again, I was going by photos I had found of model on the ‘Net. I
attached the landing gear doors, using photos as references because the
instructions were vague on exact location. Next, I fashioned a tail wheel out of
a sawed cross-section of thin sprue, painted the middle silver, and glued it to
the tail drag strut to depict the tail wheel. Using the pin vise again, I
drilled out the exhausts and used thin wire insulation to go over the nubs
depicting the cannon and machine guns. I shot the plane with two coats of Testor’s
Gloss Coat prior to decaling.
What is there about Aeromaster decals that hasn’t been said? They went on like a dream, settled without any setting solution, had perfect registration and color, and had no silvering whatsoever. I love ‘em. ‘Nuff said. I weathered the plane to depict gun smoke and exhaust stains with a thinned solution of dark grey, flat black, and rust
|
CONCLUSIONS |
I think this is great little kit. I had a lot of fun building it, it’s great for scratchbuilding extras, or you can elect to buy aftermarket goodies for it as well. Although the panel lines are raised, they do well, and are easy to highlight with a sharpened pencil as I did. A fun kit for any level of experience.
History Credit: I wish to thank Mr. T. Garth Connelly of Ellington, CT for kindly providing the history behind the I-16. If there are any errors, the blame is entirely mine. (Not getting paranoid, are we Pete?) :o)
Review kit courtesy of me and my wallet!
If you would like your product reviewed fairly and quickly by a site that has over 2,000 visits a day, please contact me or see other details in the Note to Contributors.