| KIT #: | 22006 |
| PRICE: | $7-15.00 |
| DECALS: | Two options |
| REVIEWER: | Ryan Grosswiler |
| NOTES: | Currently available under the Eastern Express labe |
| HISTORY |
Shturmovik! In English, this mouthful translates simply as 'attacker.'
Military aviation theorists in the late 1930s
were busy bickering over how best to employ the relatively new 'airplane'
thingie in future wars. In sharp contrast to the developments going on in the US
and UK, where the likes of Billy Mitchell and Hugh Trenchard were advocating the
concept of strategic bombing using large, long-range aircraft to push the war
deep into the enemy's industrial heartland, Soviet doctrine simply viewed the
Air Force as subordinate to the Army and primarily useful for causing mayhem in
the enemy's rear echelon and a means of providing speedy overhead firepower
to help out advancing
 infantry...the
latter fact reflected by the aircraft here eventually being known to grateful
Soviet troops below as, among other things, "The Flying Tank".
infantry...the
latter fact reflected by the aircraft here eventually being known to grateful
Soviet troops below as, among other things, "The Flying Tank".
This mission, now known as CAS--Close Air Support--has actually been around as long as there have been airplanes in war but merely tolerated as grudging necessity by air force brass around the world. Unlike the sleek fighter plane earning press points doing glamorous aerial sword-play up in the wild blue, the attack airplane pressed down low and slow among the treetops to support troops-in-contact, strafing and maiming in an environment everyone and his stepmother are shooting back at you with rifle, grenade-launcher, side arm, and flare gun is an ugly mission requiring an ugly aircraft.
The Soviets recognized this, and after a painful gestation period
involving some wrangling between Ilyushin, the VVS, and the Politburo over some
points including whether or not a rear gunner was needed, the Il-2 had come into
production as a single-seater, reaching the squadrons mere months before the
June 1941 German invasion. With 300,000,000 Nazi troops and 300,000 tanks (I
might be using hyperbole here) pushed right up to the gates of Moscow, the
USSR's Shturmovik was considered so important to the repelling effort that
Stalin's famous telegraphed beatdown to an apparently inept factory manager
symbolized just how highly it was regarded all the way up to the top. For those
unfamiliar with this quote, it ran something like "The Red Army needs the Il-2
like it the air it breathes and the bread it eats...I demand that you try not my
patience...you will manufacture more ILs. This is my final warning." Around
36,600 were therefore built in the 1941-45 production run, making it the most
numerous aircraft type ever built excepting the ubiquitous Cessna 172. This
production figure, parked wingtip-to-wingtip, would line the highway from the
end of the Santa Monica pier all the way deep into the Nevada desert past Las
Vegas. That's five hours straight at interstate speeds driving past airplanes
(longer on  Fridays).
Thumbing through JWR Taylor's 1969 Combat Aircraft of the Worldreveals just how little we in the West knew about this most illustrious airplane until recently. We now know there were three main production variants: first a straight-winged single-seater, then same with a rear gunner dropped in, and finally the third version where the wings were swept back slightly to deal with the dangerously aft CG that the rear gunner and his weapon had caused. At undistinguished points along the way this all-metal airplane had its outer wings and rear fuselage replaced with wood 'to save on strategic materials', these structures reverting back to aluminum near the end. To make things even more complicated there were little differences between the various factories producing the aircraft in such details as tailwheel fairing, canopy, antenna, control surface mass balances, etc. Here in the non-Slavic world we have used the terms "IL-2", "IL-2M", and "IL-2m3" to distinguish these three variations in our histories of the plane, but to Soviet bureaucrats, engineers, and servicemen from start to finish it was always simply the Il-2, with clumsy suffixes such as "IL-2 Production of 1943" and "Il-2 Wing with Arrow" when differentiation was absolutely necessary. For all this, unusually the airplane's physical appearance changed little and what did went full circle: the 1939 TsKB-55 prototype looks almost exactly like the last Il-2m3s that rolled off the lines in 1945.
Some other interesting metrics on this aircraft:
though manufactured in these stupefying numbers it had an astonishingly short
production and service span. Except for the 700 or so--less than .02% of
production-- given to Soviet allies and client states at the end of the war,
they served only on one front
 against one
enemy in one war by one military for four years. Also of note is this
stark testimony: in the thick of the absolutely most horrible fighting humanity
has ever seen, less than a quarter of that production total were still listed on
the books as operational at war's end.
against one
enemy in one war by one military for four years. Also of note is this
stark testimony: in the thick of the absolutely most horrible fighting humanity
has ever seen, less than a quarter of that production total were still listed on
the books as operational at war's end.
Always the Il-2 was an airplane merely adequate to the task, being rather hoggish and light on firepower for its weight. But the importance of its specialization and mission in stopping the enemy on the ground were never in doubt. Sergei Ilyushin and the VVS seemed to see this delta, developing the much cleaner and more efficient Il-10 from a cancelled armored fighter design as a replacement, this going into battle over Berlin in 1945 then on to serve into the 1960s.
Meanwhile, this all was pretty much invisible to the West; the USAAF's serendipitous success with the P-47 Thunderbolt (also the brainchild of some Russians) and similar types going in 'down and dirty' against Axis troops and tanks would later lead NATO to the erroneous conclusion that ordinary fighter planes would be effective in CAS. It would take some costly lessons in Korea and Vietnam plus staring down Warsaw Pact tanks numbering in the hundreds of thousands to teach the USAF that it needed its own Shturmovik: today's aging but inimitable A-10. Leadership attitudes to the poor, ugly, unloved ground-attack airplane have not changed, however: having gotten a Shturmovik of their own, what's the USAF leadership now trying to do? Get rid of it, and replace it with the exorbitantly expensive, underperforming, and totally inappropriate F-35.
| THE KIT |
The Il-2 in 1/72: for decades, the fact that few Westerners had ever
laid eyes on the real thing meant that even among aviation buffs this
illustrious machine was an "obscure aircraft", and consequently we had only the
awful (but still marketed until recently) old Airfix kit, in which the kit
researchers seem to have confused the Il-2 with the IL-10. The Polish Mikro 72
kit was better, when it could be gotten, but was still a simple 1960s era mold.
Then around the turn of the 21st century this changed when several manufacturers
on both sides of the Atlantic simultaneously recognized this need and totally
dog-piled each other getting new Sturmovik kits to the market: Toko, Smer,
Dako-Plast, and Eduard all went for it simultaneously. Accurate Miniatures also
announced and cut molds for one, too, to go along with their
 well-regarded
1/48 version, but for some reason never released it. The Ukrainian Dako kit
I review here, still available under the Eastern Express label, emerged as the
best of that initial lot with good accuracy and nice petite surface detailing.
It continues to possess a decisive advantage over all the others: it's still the
only way to get all major versions of the IL-2 from the same set of molds.
well-regarded
1/48 version, but for some reason never released it. The Ukrainian Dako kit
I review here, still available under the Eastern Express label, emerged as the
best of that initial lot with good accuracy and nice petite surface detailing.
It continues to possess a decisive advantage over all the others: it's still the
only way to get all major versions of the IL-2 from the same set of molds.
The hoodwinked Accurate Miniatures kit finally came out in 2006 under the Academy label as a single-seater, then years later as a -2M. Tamiya, of course, has since released its gorgeous -m3, but the market must now be flooded as Academy seems to have stopped with the straight wing and the Tamiya kit was being dumped by the online shops at 50% off within months of its release. Hobby Boss threw one in there recently, too, with its cheap, fast-assembly IL-2m3, albeit with some sub-type boo-boos.
Back to Dako's effort. Opening the flimsy box reveals three sprues in white plastic, one in clear. Parts breakdown is conventional, except the components for the deep radiator ducting buried in the nose and the separate wing center section which joins the fuselage at the top of the fillet (more on these later). The color of the white plastic obscures some very excellent and petite recessed panel and rivet detail, inasmuch as main-production Il-2s had little of it. Versions are determined in each release by a sprue covering the appropriate outer wing panels (swept or unswept) and canopy (single- or two-seater). Some boxings contain the underwing 37mm cannon pods. A set of passable RS-132 rockets and FAB-250 bombs are included. Besides a bit flash here and there, overall impression is pretty good: a detailed, accurate, and well-molded kit.
| CONSTRUCTION |
That being said, this is a first generation East-Bloc kit and needs to be treated as such, dodgy fit and all. Do not attempt this one if you're a beginner to the hobby! This is my second go at this kit, and guidance below applies to all variations.
The construction problems center around a) the
engineering of the fuselage radiator intake, and b) a crude joint where the wing
fillet meets the fuselage. Dako's awkward assembly instructions will only make
 matters
worse. Therefore, follow this sequence to isolate the issues:
matters
worse. Therefore, follow this sequence to isolate the issues:
1) Wing center section: assemble the top and bottom with interior wing ribs. Ignore the landing gear for now
2) Fuselage: cut the exhausts off the radiator mounting 'plate' and mount them individually to the fuselage halves. Assemble the halves, then fit and glue the rear fuselage decking and radiator nose intake parts. Ignore the cockpit for now.
3) Come up with some kind of removable mounting device for the propeller, as you will need unrestricted access to the nose for the next step. Per usual, I used sleeved brass tubing.
4) Assemble the radiator intake 'floor' to the fuselage, let it set a few minutes, and add the 'roof' and let it set a few more minutes, then adjust the resulting intake opening to correct size referencing photos of the real thing while the joints are still pliable. Allow the fuselage assembly to cure.
5) The main event: You can now take on that wing-to fuselage joint without putting any other work at risk. Dry fit the wing center section assembly to the fuselage. Trim and shim as necessary until you get it level and square while closing up that gap as much as possible, then glue it and leave until fully cured.
6) Fill the remaining gap. I used Squadron Green Putty cut with Testor's liquid cement to get a nice, low-viscosity filler which could be then laid precisely in the gap with an old 00 brush without affecting the surrounding detail. Three coats of this were left to dry and then were just as carefully sanded and that crude gap was history.
 7) You should now have a wing-fuselage subassembly. If you want the canopy slid
open, now is the time to get rid of that root seam's manifestation in the
cockpit before adding the bulkheads, fuel tank, and cockpit detail. If not,
don't bother with any of it much, as the kit-provided parts are more than
adequate: there's little visible under that armored canopy and the rear gunner's
hovel was pretty bare. I only added lead-foil seatbelts and the gunner's
sling/seat.
7) You should now have a wing-fuselage subassembly. If you want the canopy slid
open, now is the time to get rid of that root seam's manifestation in the
cockpit before adding the bulkheads, fuel tank, and cockpit detail. If not,
don't bother with any of it much, as the kit-provided parts are more than
adequate: there's little visible under that armored canopy and the rear gunner's
hovel was pretty bare. I only added lead-foil seatbelts and the gunner's
sling/seat.
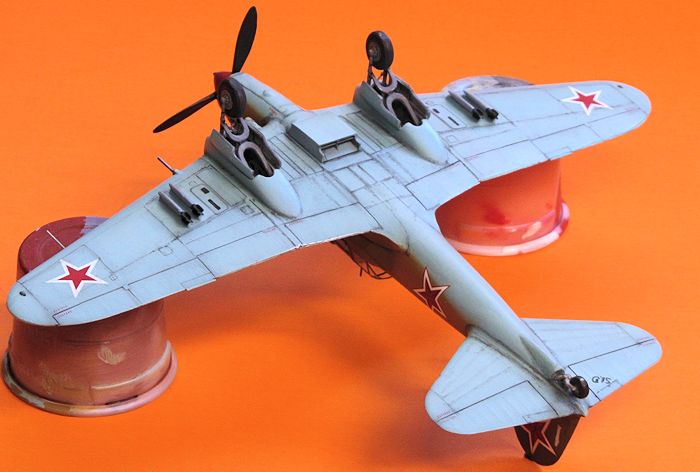
The rest of the model can now be assembled according to your established habits. I finished and masked the canopy, then added the outer wing panels (I early on selected a late-production aircraft for my markings, so scribed in panel lines to depict aluminum outer wings using the Wings and Wheels book drawings as my guide). Pay attention to wing dihedral here! There's no device to maintain it 'til cured on what is essentially a butt joint. The horizontal stabilizer was glued afterward. Outer wing panels and stab fit well, but I took a half hour to fill, sand, and rescribe their joins for a cleaner look.
This model was generally built stock, though as usual I replaced all protuberances--including the barrel and gas cylinder of the gunner's 7.62mm UBT weapon--with various diameters of Albion Alloys brass tube. Landing gear was added before painting: paint and weather the wheel wells, then glue in the the main gear units, align, and allow to dry. The retraction fork, cylinder, and main wheel can then be added after individual painting (don't forget to scrape said paint away at the glue joints, retouching after). The scale diameter main struts look fragile, but once the other components are glued in place they're actually plenty stout. Doors were added next and the gear itself was masked off with aluminum foil in prep for painting.
| COLORS & MARKINGS |
The exact nature of Soviet wartime colors have been the source of much
lively debate in the past decade. VVS aircraft were rarely photographed in
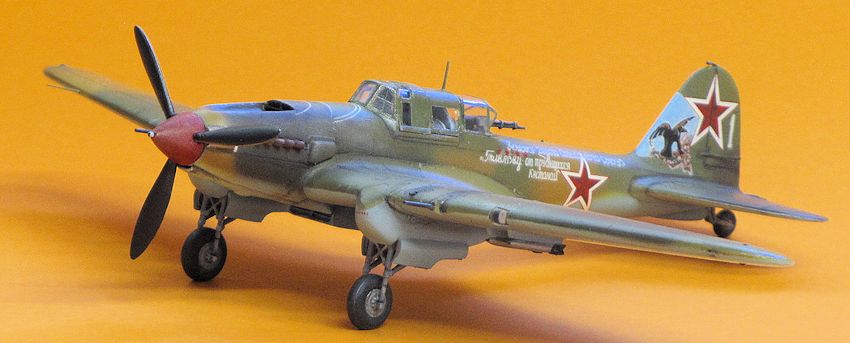
color, and few original samples survive. I selected Capt. Ivan
Pavlov's well-known "White 1 with Eagle", and several period photographs exist
of his aircraft--by Soviet standards, extensive documentation--but all are
taken on a level plane of the left side. These show very little contrast between
colors (it might have been two-tone, not three), soft edges, and a wing root f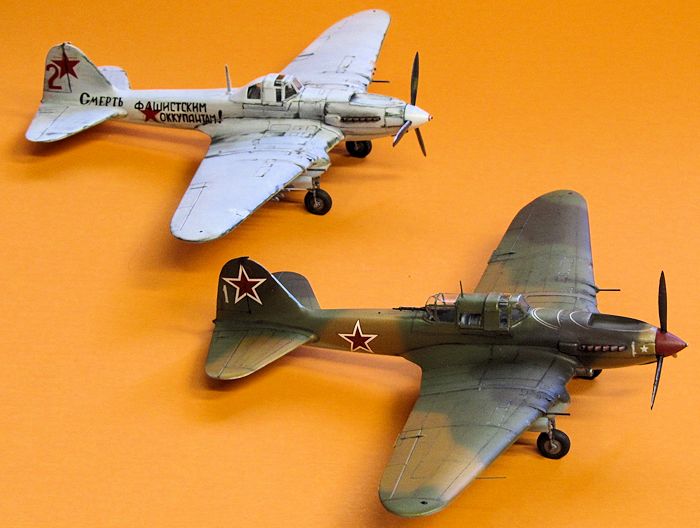 illet
panel noticeably lighter than its surroundings. After quite a bit of online
research and my own references, in the end I simply mixed up colors that seemed
right to me from Testor's square bottles and leftover Xtracolor enamels and shot
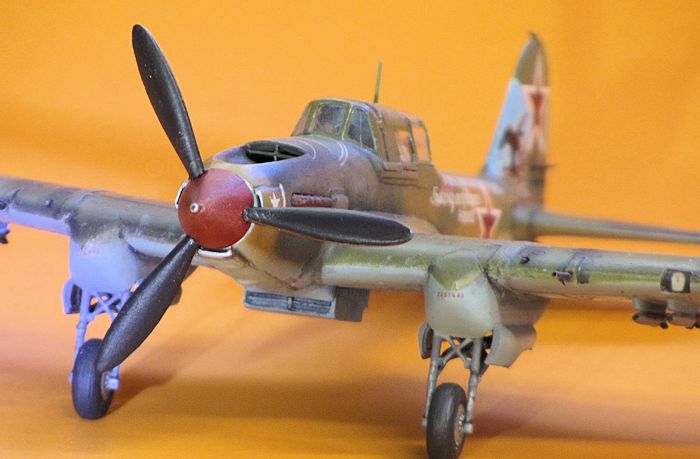
them using masks cut from the decal instructions, enlarged. Also, the propeller
spinner is much darker in the photos than the nose behind it--I reasoned it was
red.
illet
panel noticeably lighter than its surroundings. After quite a bit of online
research and my own references, in the end I simply mixed up colors that seemed
right to me from Testor's square bottles and leftover Xtracolor enamels and shot
them using masks cut from the decal instructions, enlarged. Also, the propeller
spinner is much darker in the photos than the nose behind it--I reasoned it was
red.
I used Authentic Decals targeted Il-2m3 set to get the markings. They were well printed, but boy, are they thin! In a tense 30-minute battle that made me wonder why I didn't just stay in school and become a neurosurgeon, I almost lost, then managed to save, the extensive Cyrillic script on the rear fuselage. The rest of the decals were treated with more caution--I'll spray a clear coat on the images the next time I employ this set. An Eagle Strike USSR stars-of-all-forms sheet got me the 'Kremlin-style' stars as they were printed much more vividly. The artwork on the tail was embellished with a bit of hand painting following application using period photos as reference. Finally, the Dako decals were used for stencils, serials, and prominent dive-angle reference arcs on the top of the nose and...surprise! The kit decals performed best of all.
A minor dark enamel wash and subtle exhaust streaking got me the required weathering. These aircraft seldom survived more than a few dozen combat missions and anything other than a winter finish shouldn't be dirtied up all that much.
| CONCLUSIONS |
Most modellers these days will probably go for
the modern AM/Academy and Tamiya versions, but this seemingly outmoded kit
remains a contender for the aforementioned fact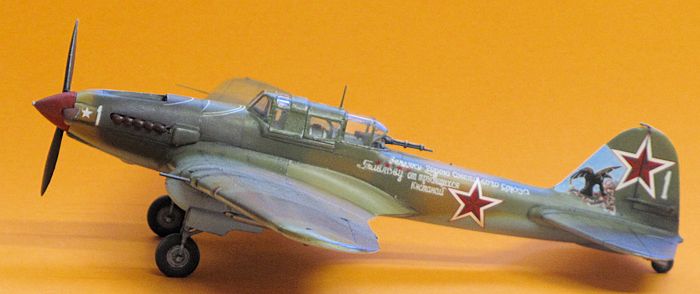 that it's currently the only means of getting all main versions of the Il-2 from
the same family of molds. It would also be an inexpensive practice field for the
new modeller who wants to venture away from shake-and-bake kits and try his
hand assembling something more challenging.
that it's currently the only means of getting all main versions of the Il-2 from
the same family of molds. It would also be an inexpensive practice field for the
new modeller who wants to venture away from shake-and-bake kits and try his
hand assembling something more challenging.
As for me, I think Dako's kit captures the original's distinctive lines and character perfectly. More are in my stash, and I see no need for an upgrade. My next one will be a straight-wing two-seater with open bomb bay doors.
Note: Some have said that these molds have suffered under Eastern-Express' stewardship. I haven't seen these boxings myself but I have multiple examples of E-E's formerly-Dako Yak-9 and they're all okay.
| REFERENCES |
Koran and Ovcacik: IL-2 Type 3 and IL-10 / Avia B-33 In Detail. Wings and Wheels publications, 1997.
Taylor, John W.R.: Combat Aircraft of the World. GP Putnam, 1969.
Gunston, William: The Osprey Encyclopedia of Russian Aircraft. Osprey Publishing, 1998.
The Internet
October 2015 If you would like your product reviewed fairly and fairly quickly, please
contact
the editor or see other details in the
Note to
Contributors.