Zvezda 1/72 Yak-6
| KIT #: | 7220 |
| PRICE: | $? |
| DECALS: | Two options |
| REVIEWER: | Alwin Broeckelmann |
| NOTES: |
| HISTORY |
Little is known about the Yak-6 so I am giving information that I found at avia.russian.ee/index2.html, if you know of more please don’t hesitate to let me know for my records.
In 1941 it became clear that
the Red Army urgently needed a new light transport/VIP aircraft to replace the
aging Polikarpov Po-2, which could no longer meet the VVS requirements.
Conceived as a light
utility transport, the twin-engine low-wing Yakovlev Yak-6
 was largely of wooden
construction and flown for the first time in June 1942; it had retractable tail
wheel landing gear and accommodated two crew and four passengers. An NBB (or
short-range night bomber) version had external racks for five 100kg bombs under
the fuselage and provision for a single 7.7mm ShKAS machine-gun, but the Yak-6
could also be equipped to carry stores or freight (including a 500kg external
load) or for use as an ambulance aircraft, glider tug or close-support aircraft
carrying 10 RS-82 rockets. Often flown with the main landing gear units locked
down, the Yak-6 was also used to supply partisans, and by 1944 most operational
units had one of these aircraft to ferry personnel between bases. Production
totalled about 380 to 1000, depending on the web site. A huge difference I know
but there you have it.
was largely of wooden
construction and flown for the first time in June 1942; it had retractable tail
wheel landing gear and accommodated two crew and four passengers. An NBB (or
short-range night bomber) version had external racks for five 100kg bombs under
the fuselage and provision for a single 7.7mm ShKAS machine-gun, but the Yak-6
could also be equipped to carry stores or freight (including a 500kg external
load) or for use as an ambulance aircraft, glider tug or close-support aircraft
carrying 10 RS-82 rockets. Often flown with the main landing gear units locked
down, the Yak-6 was also used to supply partisans, and by 1944 most operational
units had one of these aircraft to ferry personnel between bases. Production
totalled about 380 to 1000, depending on the web site. A huge difference I know
but there you have it.
The Yak-6M was an improved version, which finally led to the somewhat larger Yak-8, the prototype of which was first flown at the beginning of 1944. This was to have been a dedicated transport, essentially for military use, with accommodation for up to six passengers, but in the absence of anticipated higher-power engines its performance was disappointing and no series production ever took place.
Power plant: 2 M-1F 140 h.p. 5 cylinder aircooled radials with 2 blade wooden propeller.
Dimensions: Wing span 14 m Length: 10.35 m.
| THE KIT |
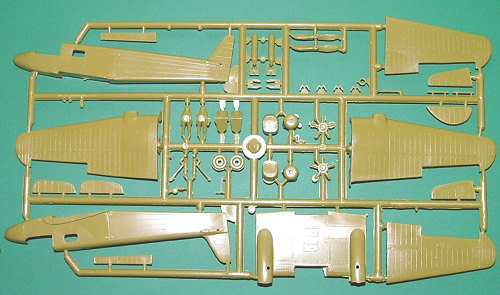 This is an older
kit dated 1996 on the box. It is nicely moulded with a small amount of flashing
on the engines and wheels. There are 3 sprues, 1st with the main
components for the aircraft, one with the transparencies, which are not bad,
then finally one with the ski’s so you can built a wheeled or ski version.
That’s about it nothing overly troubling at this point, although there are no
locating pins on the fuselage or any other part, apart from tail plane and
landing legs, which have 1 pin to the front.
This is an older
kit dated 1996 on the box. It is nicely moulded with a small amount of flashing
on the engines and wheels. There are 3 sprues, 1st with the main
components for the aircraft, one with the transparencies, which are not bad,
then finally one with the ski’s so you can built a wheeled or ski version.
That’s about it nothing overly troubling at this point, although there are no
locating pins on the fuselage or any other part, apart from tail plane and
landing legs, which have 1 pin to the front.
Instructions:
These are minimalist to the extreme, being over one A4 sheet in landscape. The instruction sheet is in English but there are no instructions, only pictures to follow in a 5 step format.
| CONSTRUCTION |
Assembly begins
oddly enough with step one this is to place the two side windows into their
respective places in the fuselage halves, then you then need to glue the pilots
onto their seats and onto the fuselage halves as there is no cockpit floor or
back wall in fact no interior detail at all no yokes, instrument panel nothing.
Once they have dried you can then glue the fuselage halves together, this takes
some delicate aligning and the use of extra hands. The trusted spring clothes
peg holds all in p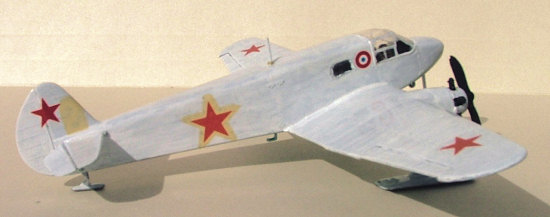 lace until
it’s dried, then onto the next step, which is light sanding of the joint around
the nose area as this was slightly proud, and a tidy up of the wing slot. This
was not moulded in line the port side lining up to the rear but being 3mm to
short on the front port side at the front.
lace until
it’s dried, then onto the next step, which is light sanding of the joint around
the nose area as this was slightly proud, and a tidy up of the wing slot. This
was not moulded in line the port side lining up to the rear but being 3mm to
short on the front port side at the front.
Then we place the wing centre section onto the fuselage this lines up nicely as it sits into the fuselage and then we place the top wing sections onto this followed by the lower wing sections which are shorter than the upper wing section, again no locating pins so it’s a little tricky and the 3rd hands come into play to hold things in place until the glue has set. Now it’s time to finish the engine assemblies, these I found to be very tricky to work with, as they are tiny. They are then fitted to the front of the engine housing and do not line up well cutting and sanding once the glue has set is required to get a stream line look. Then the tail assembly is done no major drama there, this is followed by the landing legs I chose to fit ski’s for my build.
Now we study the pictures carefully to place the forward antenna under the nose, drilling is required for this as no hole are pre-make to allow for these assemblies and then the radio direction finder just behind it. More studying and we drill and fit the rear belly antenna and the upper mid antenna. Then finally we place the prop’s into the front of the engines as the are direct fitted and not able to be made functional with out a great deal of work. So now we can move onto painting.
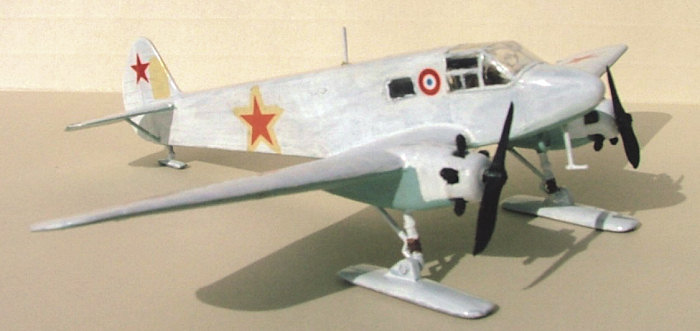
| COLORS & MARKINGS |
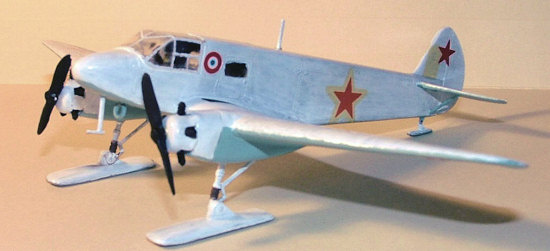 Decals are
provided for two aircraft in a sense, as the only difference between the two is
that one has a small roundel behind the cockpit window on both sides. You have a
choice of two colour schemes’, white for the ski version or 3 tone mid green,
black green and earth for the wheeled version, both appear to have pale blue
undersides. These colours will be open to interpretation by each builder as
there are no paint guides given only the pictures on the back of the box and my
green might be different to the green you see get the idea. Being a glutton for
punishment I chose the white version so undercoated first to save on having to
do a dozen coats of white paint. The decals were no trouble and worked well.
Decals are
provided for two aircraft in a sense, as the only difference between the two is
that one has a small roundel behind the cockpit window on both sides. You have a
choice of two colour schemes’, white for the ski version or 3 tone mid green,
black green and earth for the wheeled version, both appear to have pale blue
undersides. These colours will be open to interpretation by each builder as
there are no paint guides given only the pictures on the back of the box and my
green might be different to the green you see get the idea. Being a glutton for
punishment I chose the white version so undercoated first to save on having to
do a dozen coats of white paint. The decals were no trouble and worked well.
| CONCLUSIONS |
This is my first Zvezda kit and not withstanding its minimal detail; it has made a nice looking kit once I had put the effort into it has come up nicely. Over all a nice addition to my rare and unusual bird collection. This is not and I mean this not a kit for the beginner, it is a real challenge to get looking good. You need to have built a good few kits before you take it on.
August 2007
Copyright ModelingMadness.com
If you would like your product reviewed fairly and fairly quickly, please contact the editor or see other details in the Note to Contributors.