| KIT #: | AA-2045 |
| PRICE: | $54.00 SRP |
| DECALS: | one option |
| REVIEWER: | Brian Baker |
| NOTES: | Very unusual subject |
| HISTORY |
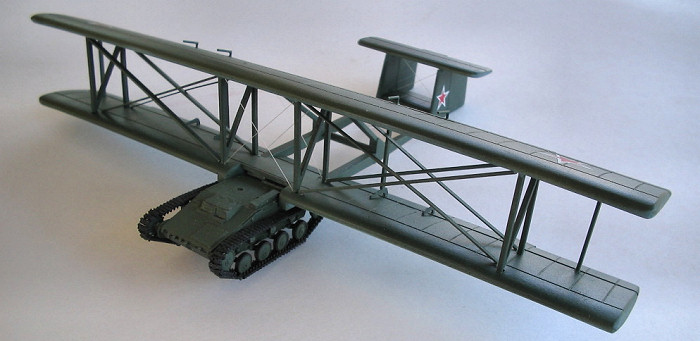
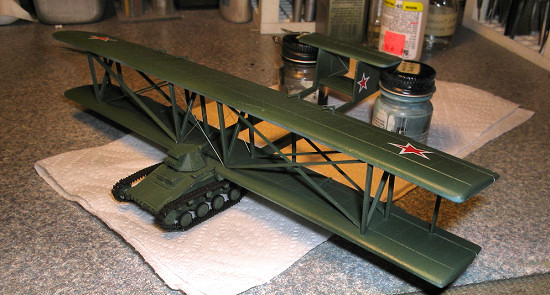
 This experimental glider was built
to test the concept of aerial delivery of tanks to the battlefield using a
glider airframe that attached directly to the tank, which served as the
fuselage. The wooden wings and tailplane could be detached immediately after
landing, allowing the tank to go immediately into action. The Soviet designers
were really interested in developing an air-deliverable T-34 tank, but the
“proof of concept” aircraft used the T-60 light tank instead.
This experimental glider was built
to test the concept of aerial delivery of tanks to the battlefield using a
glider airframe that attached directly to the tank, which served as the
fuselage. The wooden wings and tailplane could be detached immediately after
landing, allowing the tank to go immediately into action. The Soviet designers
were really interested in developing an air-deliverable T-34 tank, but the
“proof of concept” aircraft used the T-60 light tank instead.
 Developed by the Antonov design
team, the A-40, or KT, was begun in December, 1941, and was completed on 26
April 1942. Flight testing took place at the Flight Testing Institute located
at Ramenskoe Airfield, near Moscow between 7 August to 2 September 1942. In
order to decrease the weight of the aircraft, the turret was removed, only 100
liters of fuel was carried, and only the driver aka pilot was carried. The A-40
had a ground speed of 15 km/hr under its own power, and towed speeds of over 100
km/hr were attained during track testing. This was followed by the first and
only test flight behind an elderly TB-3 heavy bomber. Soon after takeoff, the
engines of the bomber began to overheat, so the pilot disengaged the towline,
landing at Bykovo, a civilian airfield near Moscow. The aircraft surprised
those on the airfield, who thought that the device was undoubtedly a German
secret weapon being used for a sneak attack.
Developed by the Antonov design
team, the A-40, or KT, was begun in December, 1941, and was completed on 26
April 1942. Flight testing took place at the Flight Testing Institute located
at Ramenskoe Airfield, near Moscow between 7 August to 2 September 1942. In
order to decrease the weight of the aircraft, the turret was removed, only 100
liters of fuel was carried, and only the driver aka pilot was carried. The A-40
had a ground speed of 15 km/hr under its own power, and towed speeds of over 100
km/hr were attained during track testing. This was followed by the first and
only test flight behind an elderly TB-3 heavy bomber. Soon after takeoff, the
engines of the bomber began to overheat, so the pilot disengaged the towline,
landing at Bykovo, a civilian airfield near Moscow. The aircraft surprised
those on the airfield, who thought that the device was undoubtedly a German
secret weapon being used for a sneak attack.
The test pilot reported that the aircraft would probably have been almost uncontrollable if the tank had been equipped with the turret, full fuel tanks, and a complete crew. As the PE-8 heavy bomber was the only aircraft capable of towing the A-40, and these aircraft were needed for long range bombing, the program was cancelled later in 1942. Production of the T-60 light tank also ended in that year.
| THE KIT |
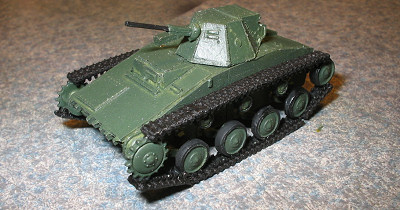
This is a unique kit: It is
especially designed for those modelers who can’t decide whether they want to
build a model of an airplane or a tank. In this kit, you get one of each. It
is the best of all possible worlds. The tank looks like photos I’ve seen of the
T-60 light tank, and could probably be issued on its own as a separate kit with
a few additions, such as fenders. There is a toolbox
 which is located on the
fender of the standard T-60, but this is superfluous, since there are no
fenders. In fact, the glider was flown WITHOUT the turret, but you cannot build
the model this way unless you open up the top of the hull to show detail that we
know nothing about, unless there is information about this tank on the web. It
was planned to mount the turret on production models, but the prototype left it
off to save weight.
which is located on the
fender of the standard T-60, but this is superfluous, since there are no
fenders. In fact, the glider was flown WITHOUT the turret, but you cannot build
the model this way unless you open up the top of the hull to show detail that we
know nothing about, unless there is information about this tank on the web. It
was planned to mount the turret on production models, but the prototype left it
off to save weight.
This is a resin kit, and all parts,
including the tracks are resin. The airframe consists of 17 parts, while the
tank is made up of 52 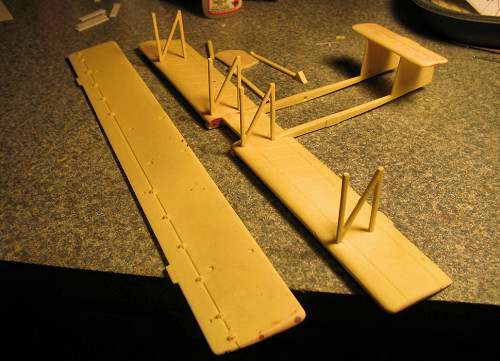 parts, including wheels and track sections. Casting
appears to be of reasonable quality, although a few of the parts were slightly
warped for whatever reason. There were a few cavities in the wingtips which
required filling, but this seems to be a typical problem with resin kits.
parts, including wheels and track sections. Casting
appears to be of reasonable quality, although a few of the parts were slightly
warped for whatever reason. There were a few cavities in the wingtips which
required filling, but this seems to be a typical problem with resin kits.
On the plus side, the major parts appear to be accurate in outline. Small indentations appear on the wing surfaces to locate the points for strut attachments. The few instances of flash are easily removed, and the resin is brittle, but not brittle enough to snap off when being removed from the spurs. The wings are relatively flat, but have a slight droop.
On the down side, there are some major problems with the kit which, fortunately can be corrected without major surgery. The tank used resin tracks, which are molded in sections. The longer sections attach to the bogie wheels with little problem, and a large number of single track links are intended to be inserted into the system to take care of the curved portions of the track. These units are VERY small, and can be lost easily, so there are many more than needed.
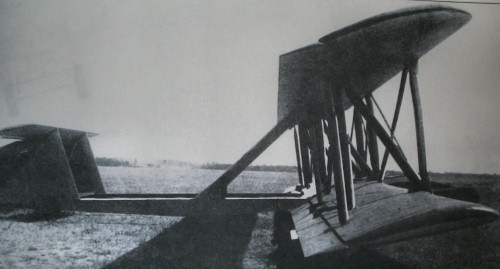
On the airframe there are major problems, mainly stemming from the fact that resource material is scarce, and some of that which is available is clearly wrong. When I first obtained this review sample from Scott VanAken, I contacted a friend in Russia who happened to have a book which deals with the A-40. He sent me a four view line drawing that looks pretty good, along with a color three view that he said was suspect. He sent me some information on the aircraft that was not included in the instructions.
He also sent me two actual photos of the beast, and these differ from both line drawings in a number of ways. Although the instructions include one of the photos, a direct front view, there is not much detail visible, but the print I received from Russia was much better. The best view, however, is the side view, and this reveals some of the problems.
 The three view drawings do not show
a bracing strut stabilizing the twin booms, located about halfway between the
trailing edge of the wing and the tailplane, but this is included in the kit.
The photo doesn’t show it, mainly because of the angle of the photos, but it is
shown in the kit instructions. Neither three view drawings from Russia show it.
It is logical to assume that it possibly was there, but I can’t prove it. I
included it. It made the flimsy structure a little stronger.
The three view drawings do not show
a bracing strut stabilizing the twin booms, located about halfway between the
trailing edge of the wing and the tailplane, but this is included in the kit.
The photo doesn’t show it, mainly because of the angle of the photos, but it is
shown in the kit instructions. Neither three view drawings from Russia show it.
It is logical to assume that it possibly was there, but I can’t prove it. I
included it. It made the flimsy structure a little stronger.
Another problem is the wing struts. These are pretty square in section, but probably were streamlined , although I can’t imagine why that would improve the aerodynamic qualities of this monstrosity. With streamlined struts, it might have glided about ten feet further before it reached the scene of the crash. The drawings show the strut ends attached with small tubular fittings, while the model has strut fairings next to the wing surfaces. The major problem, however, is the control system. The kit instructions show what appear to be four struts connecting the upper and lower ailerons, mounted directly on the ailerons about halfway between the leading and trailing edges, but these are definitely different from those shown in the photos. In fact, there are no aileron ends marked on the wings, so it is impossible to tell where they begin, but I don’t think they would have been full span. Another thing I can’t prove.
The major problem is that these struts show in the photos in two different locations. The outer struts seem to be mounted directly to the wing panels about a foot ahead of the upper hinge line on the low wing aileron. The inboard strut appears to be connected to the inner aileron hinge, which is about in line with the outboard strut, but attached entirely differently. It is confusing to say the least.
The aileron hinges are also shown in the drawings and photos, but they are different in each case. On the drawings, the hinges are shown on the side views, but not on the plan view or front view. You’re on your own on this one. Pick one and stick with it.
| CONSTRUCTION |
 The tank went together very easily.
I filled the body of the tank with lead shot so that the glider might rest in a
level position sitting on the ground. It didn’t, but now the tank is closer to
scale weight. I’ll have to prop it up somehow. The wheels attach easily,
although the front drive sprocket wheels have axels that are too long, requiring
trimming to get them to line up with all of the other wheels. I shortened them
and then drilled out both the wheels and the mounting stubs, and inserted a
piece of plastic rod to strengthen the wheel mounts and line them up properly.
This was not a serious problem, but it still took time to correct. The track
was a nightmare, but then, I’m primarily an aircraft modeler, and I’ve never
encountered this kind of track arrangement before. Maybe a rubber band track
would have been better, but I suspect the resin track was more convenient to
produce. Experienced armor modelers should have no trouble here.
The tank went together very easily.
I filled the body of the tank with lead shot so that the glider might rest in a
level position sitting on the ground. It didn’t, but now the tank is closer to
scale weight. I’ll have to prop it up somehow. The wheels attach easily,
although the front drive sprocket wheels have axels that are too long, requiring
trimming to get them to line up with all of the other wheels. I shortened them
and then drilled out both the wheels and the mounting stubs, and inserted a
piece of plastic rod to strengthen the wheel mounts and line them up properly.
This was not a serious problem, but it still took time to correct. The track
was a nightmare, but then, I’m primarily an aircraft modeler, and I’ve never
encountered this kind of track arrangement before. Maybe a rubber band track
would have been better, but I suspect the resin track was more convenient to
produce. Experienced armor modelers should have no trouble here.
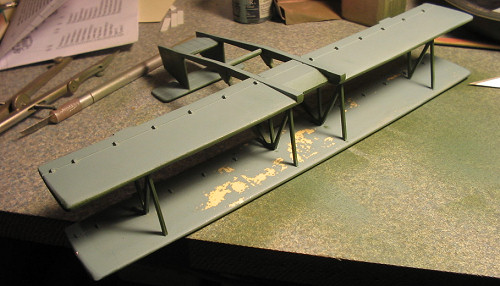
The airframe went together quite nicely, although the twin booms tended to get out of line very easily, mainly because of warping. I never did entirely eliminate the warp, so the tailplane is very slightly skewed to one side. The biplane tail unit didn’t help much, but it is not noticeable from any distance, so I’m not going to worry about it.
Mounting the upper wing is easy once you have the struts in place. There is no stagger, but the struts have to be exactly vertical to line up properly. Once they are, merely attach the top wing to the struts with superglue, and they are on.
| COLORS & MARKINGS |
 At this stage, I painted the airframe
and the tank. Although I had soaked the model parts in warm water laced with
detergent, and rinsed them off thoroughly, When I removed the masking tape from
the bottom section of the wings, quite a bit of paint came off as well. I
haven’t had this happen on a model in years, even other resin models. (Your
editor has had problems with this on Anigrand kits so I suspect it has something
to do with the resin used. Ed) I later resprayed the lower surfaces, and the paint stayed on. A coat of glosscoat
lacquer helped, and the paint seems to be staying on. The kit decals also are
OK, although that type of white outlined star doesn’t show in the only photo
available. MY suspicion is that the stars had either no outline at all or maybe
black outlines as were used on some aircraft.
At this stage, I painted the airframe
and the tank. Although I had soaked the model parts in warm water laced with
detergent, and rinsed them off thoroughly, When I removed the masking tape from
the bottom section of the wings, quite a bit of paint came off as well. I
haven’t had this happen on a model in years, even other resin models. (Your
editor has had problems with this on Anigrand kits so I suspect it has something
to do with the resin used. Ed) I later resprayed the lower surfaces, and the paint stayed on. A coat of glosscoat
lacquer helped, and the paint seems to be staying on. The kit decals also are
OK, although that type of white outlined star doesn’t show in the only photo
available. MY suspicion is that the stars had either no outline at all or maybe
black outlines as were used on some aircraft.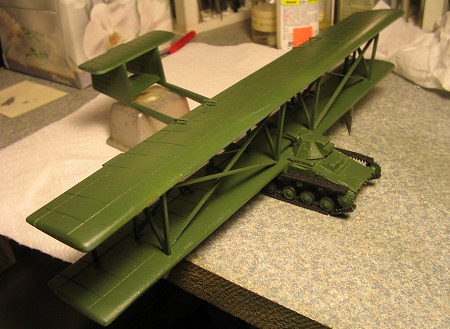
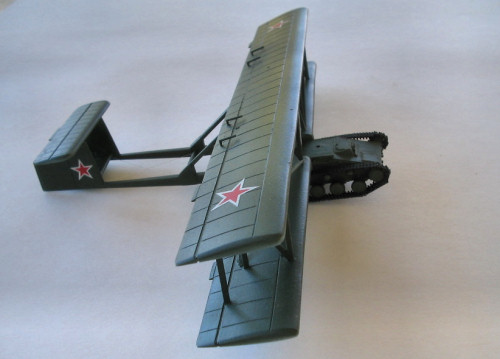
In addition, the star locations on the upper wing surfaces seem unusual, as many wartime Soviet aircraft dispensed with these.
After painting, I attached the rigging. This is another area that is confusing, and a careful examination of the photos shows that the flying wires were actually metal straps not quite as wide as the main struts, while the landing wires were considerably thinner. They certainly weren’t thin round cables as shown in some of the drawings. I used plastic strips, which seem to be approximately right. The tail bracing and wires between the fuselage sections and center section are standard rigging wire.
| CONCLUSIONS |
 This kit is unlike anything I have
ever put together. I’ve been known to build models of some really weird planes,
butt his one should win some kind of prize. I had heard of the aircraft, but
had never seen a picture of one until I received the kit. It certainly will
attract attention in any model display, but will require a long tedious
production process as problems are solved and issues are corrected. The
resulting effort is no doubt worth it, but this one isn’t for wimps.
Churchill’s “Blood, Toils, Tears, and sweat” certainly applies to this kit.
This kit is unlike anything I have
ever put together. I’ve been known to build models of some really weird planes,
butt his one should win some kind of prize. I had heard of the aircraft, but
had never seen a picture of one until I received the kit. It certainly will
attract attention in any model display, but will require a long tedious
production process as problems are solved and issues are corrected. The
resulting effort is no doubt worth it, but this one isn’t for wimps.
Churchill’s “Blood, Toils, Tears, and sweat” certainly applies to this kit.
At just over fifty bucks a shot, it isn’t cheap, but then, aren’t we worth it? Buy one. It’s certainly a model that will improve your researching and modeling skills
February 2006
Copyright ModelingMadness.com.
If you would like your product reviewed fairly and fairly quickly, please contact the editor or see other details in the Note to Contributors.